Malted Scáiltín Cupcakes

March 17, 2015

IMG_2667

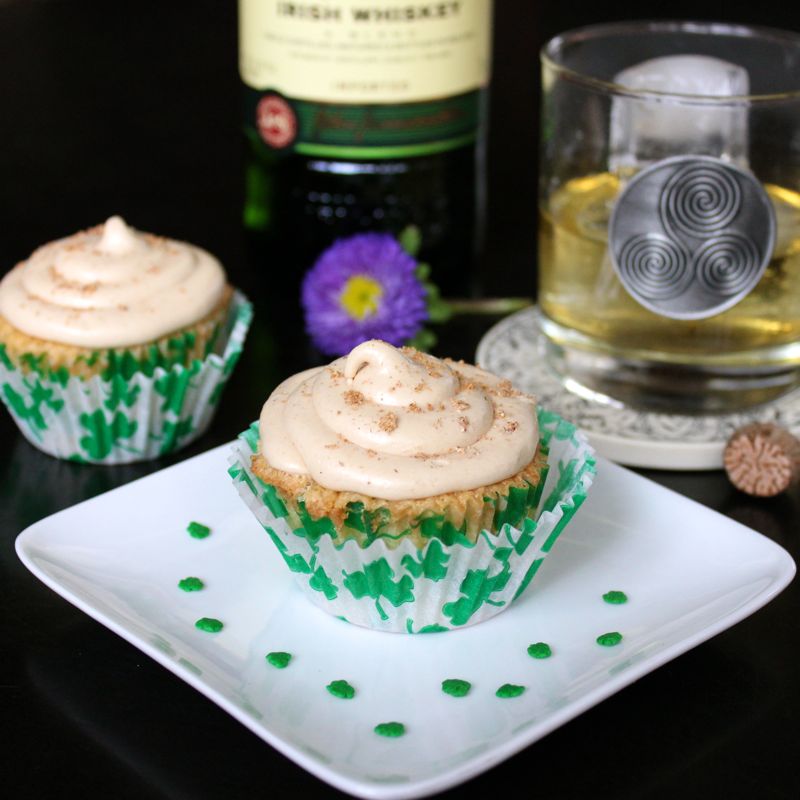
Woohoo! Today’s the day and I’ve got a great St. Patrick’s Day recipe all ready for you…Malted Scáiltín Cupcakes. For those of you who have been following along with me for any time now know that I simply adore cupcakes. So for St. Patrick’s Day I decided to make a cupcake version of Scáiltín (Irish Milk Punch), which is a drink made with hot milk, Irish whiskey and spices.

IMG_1796

It has been taking the chill off folks in Ireland since the middle ages. I told you all about it a couple of years ago and if there was ever a winter to inspire one to imbibe a few of these, it was the one we just had and are hopefully now seeing the back of!

IMG_2654

I adapted a Hot Milk Cake recipe for the cake bit of these cupcakes, seeings how hot milk plays such an important role in Scáiltín and added a bit of Irish Whiskey into the mix. The frosting is a delightful combination of marshmallow creme, butter, whiskey, Baileys and spices. And just as you do with the drink, I have garnished the cupcakes with a bit of freshly ground nutmeg.

IMG_2649

The result is one fantastic boozy cupcake! The cake is moist and tender, sweet but not too sweet. Oh and that frosting…creamy and addictive I tell you! Cupcake perfection for St. Patrick’s Day!

IMG_2613

So I guess that’s it. I have managed somehow to once again complete my St. Patrick’s Day blog-a-thon. I wasn’t sure there a couple of times, but there you go, that’s seventeen…count ’em…SEVENTEEN… tasty Irish-y recipes done and dusted! I may have to take a bit of a break from the old blog now for a few days to recover, but rest assured, I’ll be back. In the meantime, I hope you get out there and enjoy your St. Patrick’s Day festivities, after you make up a big batch of these Malted Scáiltín Cupcakes of course! Lá Fhéile Pádraig Sona Daiobh! (Happy St. Patrick’s Day!)

IMG_2684

  • Servings: 18 cupcakes
  • Difficulty: easy
  • Print

recipes adapted from: The Cupcakes from: King Arthur Flour Baker’s Companion, The Frosting from: F&B Department

Ingredients:

For the cupcakes:

  • 3 large eggs
  • 1 1/2 cups (10 1/2 ounces) sugar
  • 1 teaspoon vanilla extract
  • 3/4 cup (6 ounces) milk
  • 1 Tablespoon butter
  • 2 Tablespoons Irish Whiskey
  • 1 Tablespoon honey
  • 1 1/2 cups (6 1/4 ounces) all-purpose flour
  • 1 1/2 teaspoons baking powder
  • 1/2 teaspoon salt
  • 1/2 teaspoon cinnamon

For the Frosting:

  • 1 Cup plus 2 Tablespoons Marshmallow Creme
  • 3/4 cup butter
  • 3/4 cup confectioner’s sugar
  • 4 1/2 Tablespoons malted milk powder
  • pinch of salt
  • 3/4 teaspoon cinnamon
  • 3 Tablespoons Irish Whiskey
  • 3 teaspoons Baileys
  • freshly ground nutmeg to sprinkle on top

Directions:

Preheat the oven to 325°F. Grease or line two 12 cup muffin tins with cupcake papers.

In a large bowl, beat together the eggs and sugar until very thick; the batter should fall from the beaters in a thick ribbon. Beat in the vanilla.

While you’re beating the eggs and sugar, heat the milk, butter, Irish Whiskey and honey in a small saucepan to just simmering. Add the hot milk to the egg mixture in a slow, steady stream as  you continue beating.

In a separate bowl, whisk together the flour, baking powder and salt. Fold the dry ingredients into the wet ingredients, stirring until just combined. Don’t overmix!

Fill the cupcake wells using a 1/4 cup ice cream scoop. Bake for 30 minutes. Remove cupcakes from oven and cool completely on wire rack.

For the Frosting:

Cream together the marshmallow creme and butter until smooth and fluffy.

Sift the confectioner’s sugar, malted milk powder, salt and cinnamon together. Turn stand mixer on low and add the sugar/malt mixture to the marshmallow by the tablespoon, waiting until sugar is completely incorporated before adding the next tablespoon full. Add the Irish Whiskey and Baileys and mix until smooth.

Fill pastry bag with frosting and pipe onto cooled cupcakes. Just prior to serving, garnish with fresh ground nutmeg.

Enjoy!

Malted Scáiltín Cupcakes brought to you by: Runcible Eats (www.leaandjay.com)


Spicy Irish Beef Brisket Tacos

March 16, 2015

IMG_1775

It’s almost here! Tomorrow is St. Patrick’s Day! Are you getting all your plans sorted for the day’s celebrations? I’ve got a great recipe for you to add into the mix, Spicy Irish Beef Brisket Tacos! Now I bet you’re not surprized to hear me say that these Spicy Irish Beef Brisket Tacos are not a traditional Irish meal. No, Irish cuisine is not really known to be hot and spicy. But all of my Irish friends seem to love spicy dishes, as much as the husband and I do. So I decided to have a bit of fun and make up a batch of what I thought would be perfect “Irish Tacos”. First thing I had to figure out was the meat. I thought about using corned beef brisket, but decided to go with with beef brisket, cooked slow in Guinness with some spicy chipotle peppers and adobo sauce thrown into the mix. Again with an eye to Corned Beef & Cabbage dinners, I thought these Irish tacos would definitely need to be topped with cabbage. But rather than boiled cabbage, I went with a crispy spicy Cilantro Lime Slaw. And how could it be an Irish Taco if it didn’t have potatoes on it? My solution was to make a thin crispy potato pancake which would sit right on top of the flour tortilla and under the spicy beef and tangy slaw.

IMG_1737

Then there was nothing to do but pile on the toppings, fresh cilantro, tomatoes, avocado, shredded Dubliner Cheese and sour cream all drizzled with a bit of that spicy Guinness/Chipotle sauce in which the brisket was cooked. Wow! As it turns out Spicy Irish Beef Brisket Tacos are fantastic! Definitely not traditional Irish fare but perhaps it is time to start a new tradition. These devils will certainly give your St. Patrick’s Day celebrations a spicy twist!

IMG_1758

Spicy Irish Beef Brisket Tacos

  • Servings: 8 - 10
  • Difficulty: easy
  • Print

recipe adapted from: The Tasty Bite

Ingredients:

  • 3 lbs beef brisket
  • Salt and pepper
  • 2 Tablespoons vegetable oil
  • 4 cloves garlic, minced
  • 1 red onion, sliced
  • ¼ cup cider vinegar
  • 1 ½ cups Guinness extra stout 
  • 1 (14.5-ounce) can crushed tomatoes
  • ¼ cup molasses
  • 2 chipotle peppers in adobo
  • 1 Tablespoon adobo sauce
  • 1 Tablespoon chili powder
  • 2 tsps cumin
  • 2 bay leaves
  • 2 Tablespoons brown sugar
  • 8 -10 small corn or flour tortillas
  • Spicy Crispy Potato Pancakes (recipe noted below)
  • Cilantro Lime Slaw (recipe noted below)
  • Dubliner Cheese, shredded, for topping along with fresh diced tomatoes, fresh avocado fresh cilantro and sour cream

Directions:

Season the beef with salt and pepper. Heat a dutch oven or soup pot over medium-high heat. Add the oil and heat just until beginning to smoke. Add the meat and cook, turning once, until browned on both sides, about 10 minutes total. Transfer the meat to a plate and set aside.

Add garlic and onion to the pot, and cook until the onion is translucent, about 5 minutes. Add cider vinegar, stout, crushed tomatoes, molasses, chipotle peppers, adobo sauce, chili powder, cumin, bay leaves, and brown sugar, and bring it to a boil. Lower the heat to a simmer, add the meat, and cook covered on medium low until the meat is tender, about 2 hours.

Remove the meat and discard the bay leaves. Using two forks, shred the meat along the grain. Pour the liquid and vegetables into a blender and puree until smooth. Add the sauce and shredded meat back into the pot, and allow it to simmer on low until the sauce has thickened up, about 15 minutes. Season with salt and pepper to taste.

To serve, warm tortillas. Lay one spicy crispy potato pancake on top of a tortilla and then pile on the brisket, shredded cheese, lime cilantro slaw, tomatoes, fresh avocado, fresh cilantro and sour cream.

Spicy Crispy Potato Pancakes

Ingredients:

  • 2 Cups grated potatoes
  • 1/2 Tablespoon Chili powder
  • 1 tsp Smoked Spanish Paprika
  • 1 tsp. fresh Cilantro, chopped
  • flaky sea salt and pepper
  • 1 1/2 Tablespoons (+ more as needed) oil for frying

Directions:

Squeeze grated potatoes to extract as much water as possible. Place potatoes in bowl and par cook in microwave for 2 minutes.

Remove bowl from microwave and mix chili powder, smoked paprika and cilantro into grated potatoes.

Heat oil in frying pan over medium high. Add about 1/4 cup of potato mixture and flatten with  a spatula. You want about a 5″ diameter pancake. Reduce heat to medium low. Season with salt and pepper. Now here comes the hard part, don’t touch it! Let the pancake cook for about 3 -4 minutes or until the bottom is golden brown. Gently flip the potato pancake over. Increase the heat to medium high again and cook for about 2 minutes. Season with salt and pepper.  Then lower the heat to medium low to finish cooking.

Place finished pancakes on paper towel covered plate and keep warm until ready to serve.

Cilantro Lime Slaw

Ingredients:

  • 3 1/2 cups shredded Cabbage or slaw mix
  • 1 jalapeno, seeds removed, chopped finely
  • 1/4 cup olive oil
  • 1/4 cup fresh cilantro, chopped
  • 1 Tablespoon rice vinegar
  • The juice from 1 lime
  • 1/4 teaspoon garlic salt
  • 1/4 teaspoon onion powder
  • 1/4 teaspoon cumin

Directions:

Place shredded Cabbage is large bowl.

In small bowl, place diced jalapeno, olive oil, cilantro, rice vinegar, lime juice, garlic salt, onion powder and cumin. Whisk to combine.

Pour jalapeno/oil mixture over cabbage and toss to coat.

Refrigerate until ready to serve.

Enjoy!

Spicy Irish Beef Brisket Tacos brought to you by: Runcible Eats (www.leaandjay.com)


Baileys Chocolate Mud Cake

March 15, 2015

IMG_2423

Ummmm…did someone say Baileys and Chocolate? Sign me up! Oh how I love that combination…which you might have noticed back when I told you about those sinfully delicious Baileys & Coffee Pots de Crème.

IMG_1860


Well, here’s another great recipe in which Baileys and Chocolate have the starring roles, Baileys Chocolate Mud Cake.

IMG_2413

You might be wondering what a “mud cake” is. A mud cake is a cake that has a dense tight crumb. These cakes are usually made by melting the butter and chocolate together in a saucepan and then adding the eggs and dry ingredients to the wet ones in that same pan. A mud cake has a bit of a brownie vibe to it but still is quite definitely a cake.

IMG_2470

A moist, rich, decadent cake which in this case is covered with a silky smooth Baileys Chocolate ganache. Chocoholic’s bliss! Oh my….it is quite possibly a cake that could tempt St. Patrick himself!

IMG_2487

Baileys Chocolate Mud Cake

  • Servings: 10 - 12
  • Difficulty: easy
  • Print

recipe from: Citrus and Candy

Ingredients:

For the Cake:

  • 150 grams unsalted butter, chopped
  • 100 grams dark chocolate, chopped
  • 100 grams caster sugar (can substitute granulated sugar)
  • 100 grams brown sugar
  • 50 grams Dutch cocoa powder, sifted
  • 180ml Baileys Irish Cream Whiskey
  • 170 grams all-purpose flour
  • 1 1/2 tsps baking powder
  • 1/2 tsp baking soda
  • 1/2 tsp salt
  • 3 eggs, room temperature

For the Baileys Ganache

  • 200 grams good quality dark chocolate, finely chopped
  • 200ml Baileys Irish Cream (you can do 100ml cream and 100ml Baileys if you’d rather not have some much Baileys…but I gotta ask…”What are you like?!! Of course you want it to be all Baileys!)
  • pinch of sea salt
  • 1 Tablespoon (15 grams) unsalted butter, softened to room temperature

Directions:

For the Cake:

Preheat oven to 325° F (160°C). In a pan over low heat, add the butter, chocolate, sugars, cocoa powder and Baileys. When chocolate and butter has melted, whisk together to combine making sure to get rid of any lumps of sugar or cocoa powder. Remove from heat and leave to cool for 5 minutes.

Meanwhile, grease and line an 8″ (20-21cm) round cake tin.

Sift together the flour, baking powder, baking soda and salt and set aside. Add the eggs to the slightly cooled chocolate mixture and whisk to combine. Gently fold in the sifted flour mix until free of lumps.

Scrape into cake tin then bake for about 30 -35 minutes or until a skewer comes out clean (ideally you want to see some moist crumbs stuck to it. This is one cake you don’t want to over-bake so better to be a little under than over). The top of the cake will be a little cracked but no worries, this is normal for a mud cake and you will be covering it with a lovely and oh so concealing ganache.

Remove from oven and cool in tin for 10 minutes before unmoulding and cooling completely on wire rack. Trim the tops of the cake to level (if you wish – I did not).

For the Baileys Ganache:

Place the chopped chocolate in a heatproof bowl and set aside. Bring the cream, Baileys and the salt to a simmer in a pan. Pour over the chocolate and sit for a minute. Gently stir to combine then beat in the butter.

Set aside at room temperature and cool until it is thick enough to spread over your cooled cake. Gently stir the ganache occasionally as it cools to keep the temperature even and the ganache smooth. You can just add the ganache on the top of your cake or spread it over the sides as well. Your choice.

Enjoy!

Baileys Mud Cake Brought to you by: Runcible Eats (www.leaandjay.com)


Corned Beef & Irish Cheddar Potato Nests with Spicy Horseradish Cream & Guinness Mustard

March 14, 2015

IMG_2608

Alright, alright, alright….I told you all about that Corned Beef Hash leftover recipe yesterday, as well as burst your “Corned Beef is an oh so Irish dish” balloon. Today I’d like to let you in on another recipe you can turn to after your big Corned Beef and Cabbage St. Patrick’s Day Feast or as a bit of a teaser appetizer before hand. Are you ready? Corned Beef & Irish Cheddar Potato Nests with Spicy Horseradish and Guinness Mustard.

IMG_2590

These little devils are delicious. Kind of like that big St. Patrick’s Day feast all compacted into a tiny little appetizer. The “potato nests” used here are amazing. I mean, who doesn’t love hash browns? And that is basically what you’ve got here except they’re better. Yup…I’m just going to go ahead and declare it…These nests are better than hash browns. Why you might ask. Well, let me tell you, these nest have the crisp factor over regular hash browns. Hash browns are really difficult to do well. Often they turn out way too soggy and greasy. But these little potato nests cooked in muffin tins have a lot of crispy crunchiness going for them. Literally all the edges are sporting it, yet they are still tender on the inside of the cup, which makes for a wonderfully satisfying bite. And once you’ve got those potato nests ready to go, it’s pretty easy to stuff them with some leftover corned beef, shredded Irish Cheddar, chives and the choice of two wonderful sauces; Spicy Horseradish or Guinness Mustard. I must say, these condiments steal the show. You probably should have them on hand for your big Corned Beef Feast as well, because they really enhance the flavor of that meat.

IMG_2605

This dish comes together pretty quickly, especially if you use the Simply Potatoes Shredded Hash browns which can be found in the refrigerated section of your local grocery store. If you are going old school and grating your own potatoes, make sure you wring them out well to get rid of that extra moisture so that they will cook up nice and crispy. But if you can take the shortcut of pre-made hash browns, you should definitely go there. Don’t feel guilty, it is so worth it. Your time is valuable. And if you take advantage of this timesaver, you’ll be tucking in to these adorable tasty Corned Beef & Irish Cheddar Potato Cups before you know it. And I think that is a great thing!

IMG_2572

Corned Beef & Irish Cheddar Potato Nests with Spicy Horseradish Cream & Guinness Mustard

  • Servings: 12 Potato Nests
  • Difficulty: easy
  • Print

Ingredients:

For the potato nests:

  • 1 – 20 ounce bag of Simply Potatoes Shredded Hash Browns (if you can’t find these you can substitute in 3 1/2 cups shredded Russet potato which has been rinsed, and squeezed dry in a towel.)
  • 1 cup Irish cheddar, shredded
  • 2 Tablespoons Olive Oil
  • 1 teaspoon salt
  • 1/2 teaspoon pepper
  • 1/4 teaspoon cayenne pepper (if you like a little kick!)

For the filling:

  • 1 1/2 – 2 cups diced or sliced corn beef
  • 1 cup Irish Cheddar, shredded
  • chives, to sprinkle over the top

Serve with Horseradish Cream and Guinness Mustard (recipes listed below)

Directions:

Preheat oven to 350° F and thoroughly spray a 12 cup cupcake tin with baking spray or grease with butter or oil.

Place shredded Hash Browns and cheddar cheese in medium-sized mixing bowl. Add spices and mix. Drizzle with 2 tablespoons of oil and then toss until mixture is coated.

Using 1/4 cup ice cream scoop, fill each well of the cupcake tin with the hash brown mixture.

Using the back of a spoon and your fingers press the hash brown mixture into the sides and bottom of the pan. I actually used a 1/4 cup measuring cup with tapered sides to assist me in making the correct shape for these nests.

Bake potato nests in lower third of the oven for about 60 minutes, or until the bottoms are golden brown. The inside of the potato cup will not appear as dark as the bottom, so actually check the bottoms from time to time.

Remove nests from the oven and let cool for a minute or two. At this point you will probably need to reshape your “nest” a bit. Gently do so with the back of a spoon and then let them cool for 20 minutes on a wire rack.

Once cool, run a knife around the edges of the nests and very carefully remove them from the cupcake tin.

Reheat the leftover diced corned beef  in the microwave. Spoon it into the waiting potato nests. Sprinkle with a bit more shredded cheddar and top with chives.

Serve the Corned Beef & Cheddar Potato Nests with Horseradish Cream and Guinness Mustard on the side.

Horseradish Cream Sauce

Recipe from: Bon Appetit

Yield: 1 1/2 cups

Ingredients:

  • 1 cup sour cream
  • 6 tablespoons prepared white horseradish (about 4 ounces)
  • 1 tablespoon finely chopped dill pickle
  • 1 tablespoon chopped fresh chives or green onion tops

Directions:

Whisk all ingredients in small bowl to blend. Cover and refrigerate at least 2 hours. DO AHEAD: Can be made 2 days ahead. Keep refrigerated.

Guinness Mustard

Recipe from: Bon Appetit

Ingredients:

  • 1/2 cup coarse-grained Dijon mustard
  • 2 tablespoons regular Dijon mustard
  • 2 tablespoons Guinness stout or other stout or porter
  • 1 tablespoon minced shallot
  • 1 teaspoon golden brown sugar

Directions:

Whisk all ingredients in small bowl to blend. Cover and refrigerate at least 2 hours. DO AHEAD: Can be made 2 days ahead. Keep refrigerated.

Enjoy!

Corned Beef & Irish Cheddar Potato Nests with  Spicy Horseradish Cream Sauce & Guinness Mustard brought to you by: Runcible Eats (www.leaandjay.com)


Corned Beef Hash

March 13, 2015

IMG_2521

Corned Beef and cabbage! What would St. Patrick’s Day be without it? The quintessential Irish dish, or is it? Well, I’m sure all of my Irish friends (the ones that actually live in Ireland, not the Irish American ones to be specific) are saying…”What would it be without it? What would it be with it is a better question!” That’s right folks…Corned Beef and Cabbage is not considered “Irish” by the Irish themselves. They don’t really eat it there on St. Patrick’s Day or likely any other day of the year. “Hey….”I can just hear some of you saying…”I visited there last St. Patrick’s Day and I was served up a big old plate of the stuff”. I don’t doubt that you were. The Irish, being as accommodating as they are, made it up just because they knew hoards of Irish American tourists were going to turn up and be expecting it. It is not traditional for them whatsoever! But, that being said…it IS traditional St. Patrick’s Day fare for all the Irish Americans out there, who are the ones that really got that St. Patrick’s Day party going. And the recipe for today, Corned Beef Hash, doesn’t have so much to do with how to cook that big old hunk of corned beef and vegetables (hint….you boil the bejesus out of it….Just kidding 🙂 You simmer it all day, ever so gently… ), but what you do with the leftovers. I love recipes for leftovers. So much so that I’m giving you the one today and another one tomorrow. (bit of a spoiler, but it is for a corned beef appetizer, so stay tuned!). The husband swears that this Corned Beef Hash is fantastic. Indeed he preferred it to the original Corned Beef Feast we’d had the night before.

IMG_2513

But I’m sure some of you folks are still reeling from me letting the old “Corned Beef isn’t really Irish” cat out of the bag. So let me explain a little bit. Corned Beef, as I’m sure ya’ll know, has nothing to do with corn. The “corn” part of the title refers to the fact that large grain rock salt (salt kind of the same size as a grain of corn) was traditionally used to cure it. Back in the day, before reliable refrigeration, this “corning” was done to preserve meat. That vibrant pink color that corned beef is sporting is due to the pink salt that was used to cure it. Now this isn’t the fancy pants pink Himalayan salt that you may have read about, nope this is salt with good old sodium nitrate mixed in, which has been dyed a bright pink so that it is easily distinguishable from regular salt. It is the same reason why hot dogs have that rosy pink hue. Saltpetre, or potassium nitrate has also been used to preserve meat since the Middle Ages. Interestingly enough, it is also one of the main ingredients in gun powder. Saltpetre inhibits the germination of C. botulinum endospores as well as softens tough meat. Seventeenth century Ireland was the largest supplier of corned beef  in the world. That was because beef was very plentiful in the country and the salt tax in Ireland was 1/ 10 of what is was in England which meant the Anglo-Irish could import high quality salt at a lower price, cure that plentiful beef that they had in abundance and ready it for export. Which they did so much so that Irish Corned Beef was regarded as the best on the market from the 1600’s until about 1825.  However, although the Irish were exporting a lot of beef, they were not eating it. The Irish traditionally ate pork and beef was too expensive. After the potato famine in the mid 1800’s, many Irish immigrated to the United States. Once they arrived, many settling in New York, and living next to the many other immigrants of that time, they found that pork was very expensive, but that beef , which had previously been unaffordable, was plentiful. Their fellow immigrant Jewish butcher neighbors often sold an inexpensive cut of cured or corned beef brisket, which had started out quite tough but had been transformed by the curing process into a tender flavourful cut of beef. The Irish, being very adaptable, substituted this Jewish Corned Beef for the more expensive joint of bacon in their familiar boiled cabbage and potato recipe, thereby transforming and reinterpreting  the dish.

IMG_2547

So there you have it, not an Irish dish per se, but an exceedingly Irish American dish. I hope this recipe will inspire you to cast your eye not only to the big St. Patrick’s Day feast, but also to the days after. The leftovers days. St. Patrick’s Day is only four days away, so plan ahead! Buy that bigger cut of brisket and cook up a bit extra, so that you’ll have plenty of leftovers to work with. I promise you, you won’t regret it. This Corned Beef Hash is phenomenal. Just what the doctor called for to perk you up the day after the many St. Patrick’s Day parades, festivities and undoubtedly excessive green beer guzzling.

IMG_2493

Corned Beef Hash

  • Servings: 4
  • Difficulty: easy
  • Print

recipe slightly adapted from: BonAppetit

Ingredients:

  • 2 cups leftover shredded Corned Beef
  • 1 medium onion, left over from Corned Beef feast
  • 1 large russet potato, left over from Corned Beef feast
  • ¼ cup chopped fresh flat-leaf parsley, plus more for serving
  • 1 cup Irish Cheddar cheese, shredded
  • Kosher salt and freshly ground black pepper
  • 4 tablespoons unsalted butter
  • 1 teaspoon distilled white vinegar
  • 4 large eggs
  • Chopped fresh chives (for serving)

Directions:

This recipe assumes that you’ve already made your St. Patrick’s Day Corned Beef Feast and have managed to set aside a few leftovers, namely 2 cups of shredded corned beef, 1 medium onion and one large russet potato. I had used baby red potatoes when I made my corned beef dinner, so I just used a big handful of those.

Preheat oven to 200° F. Thinly slice cooked onion and potato into 1/2″ pieces; toss in a large bowl with corned beef, 1/4 cup parsley, and 1 cup Irish Cheddar. Moisten with some reserved cooking liquid if mixture seems dry. If you don’t have cooking liquid, just use a splash or two of Guinness; season with salt and pepper.

Heat 2 tablespoons butter in medium nonstick skillet over medium heat. Add 1/2 of the corned beef mixture and press down to form a pancake. Cook undisturbed until the underside is golden brown and crisp, about 6 – 8 minutes. Set a plate over the pan and carefully invert the pancake onto it; then slide it back into the pan, uncooked side down. Press it back into pancake shape again and then once again…do not touch it! Let it cook for 6 – 8 minutes again. Then carefully transfer it to a baking sheet, tent with foil and pace in the oven to keep warm until you are ready to serve. Repeat with the remaining butter and corned beef mixture.

Meanwhile, bring 2″ of water to boil in a large saucepan or frying pan. Reduce the heat to a gentle simmer and add vinegar.

Crack an egg into a small bowl and once the water has reached a temperature of 190°F, slide the egg into the water. Repeat with the remaining eggs, waiting until the egg whites are opaque before adding the next egg. Poach for about 4 minutes to 4 1/2 minutes. Using a slotted spoon, transfer eggs to a paper towel. Trim away any whispy egg whites if you desire. Eggs can be poached 2 hours ahead of time; place in a bowl of ice water and chill. If you are planning on doing eggs ahead and will need to reheat, you may want to reduce initial cooking time to 3 – 3 1/2 minutes so that they are not overdone after reheating. Reheat in simmering water for 1 minute prior to serving.

Serve eggs over hash, seasoned with salt and pepper and topped with chives, more cheddar and more parsley.

Enjoy!

Corned Beef Hash brought to you by: Runcible Eats (www.leaandjay.com)


Irish Cheddar and Bacon Soda Bread

March 12, 2015

IMG_1353

Here it is, only five days away from the big day…St. Patrick’s Day. So I figure that it’s time for some more Soda Bread folks! And today the Soda Bread I’m talking about is made even more fabulous…if that is possible, by the addition of some scallions, chunks of tangy Irish cheddar and wonderful, glorious Bacon! You can’t go wrong with bacon!

IMG_1319

Way back on the mere second day of this years St. Patrick’s Day blog-a-thon, I told you about Irish Soda Bread Muffins. Those slightly sweet, currant filled muffins are great for breakfast or perfect with a cup of tea in the afternoon. This savory soda bread is different. I don’t really see it as a tea time snack, but more of a tasty accompaniment to Irish Stews or Corned Beef and Cabbage. But it would make for a brilliant breakfast. Imagine a thick craggy slice of this bacon and cheese filled bread, slathered with butter and topped with a fried egg! Are you getting the picture! As with all soda bread, it is quick and easy to make. And yes, I admit, this Irish Cheddar and Bacon Soda Bread, like my Irish Soda Bread Muffins is not traditional. But I don’t think you’ll give one fig about that while you’re devouring slice after slice…

IMG_1364

Irish Cheddar and Bacon Soda Bread

  • Servings: 1 loaf of bread
  • Difficulty: easy
  • Print

recipe slightly adapted from: Jessica Gavin

Ingredients:

  • 1 cup all-purpose flour
  • 1 cup King Arthur Irish Wholemeal flour (can sub. in Wholemeal Flour)
  • ½ teaspoon baking soda
  • ½ teaspoon kosher salt
  • ¼ teaspoon freshly ground black pepper
  • ½ teaspoon granulated sugar
  • 2 ounces sharp Irish cheddar, cut into ¼ inch cubes
  • 4 slices cooked bacon, chopped
  • 2 green onions, washed and cut into thin slices green part only
  • ¾ cup buttermilk
  • melted butter to paint top of bread, Maldon smoked flaky sea salt for sprinkling

Directions:

Preheat oven to 400°F. Line a baking sheet with parchment paper, sprinkle a small amount of flour onto the sheet where you will be placing the bread.

Cook the bacon over medium heat in a sauté pan until crispy on both sides, about 2 minutes per side. Cool, chop and reserve the bacon.

In a large bowl, sift together the flour, baking soda, salt, black pepper and sugar, whisk together until combined. Add to the dry mixture the cheddar, bacon and green onions, combine together. Add the buttermilk to the flour mixture, mixing until combined. Knead for 1-2 minutes, until the dough is hydrated and holds together.

Form dough into a round loaf and transfer to the floured parchment paper lined baking sheet. Cut a cross into the top of the dough, about ½ inch deep. Brush the top of dough with melted butter and sprinkle with Maldon flaky sea salt. (use the smoked sea salt if you can find it.) Bake for 22-25 minutes, or until the soda bread is lightly browned and sounds hollow when tapped on the bottom of the loaf. Serve warm!

Enjoy!

Irish Cheddar and Bacon Soda Bread brought to you by: Runcible Eats (www.leaandjay.com)


Malted Guinness Chocolate Ice Cream with Malted Milk Balls

March 11, 2015

IMG_2159

Did someone say Ice Cream? I know it’s been extraordinarily cold this winter, but those frigid temps outside have not done a thing to put me off of that most wonderful frozen confection. And this ice cream definitely has my name written all over it…Malted Guinness Chocolate Ice Cream with Malted Milk Balls. What?!!! I love malted milk balls. Seriously. I can eat them by the bushel full I’d say whether they are Whoppers like we have here in Virginia or my favourite Maltesers that are found in Ireland. Some of my favourite desserts from the past were chock full of Malted Milk Balls Like this Malteser Chocolate Cookie Tart from a couple of St. Patrick’s Days ago.

IMG_1859

Oh and then more recently there were these Malted and Salted Buttered Popcorn Cookies.

IMG_8303

Yup, any dessert sporting a malted milk ball will instantly get my attention and most likely ever lasting devotion. And this Ice Cream is no exception. Another thing that I really love about this ice cream is the Guinness. Guinness really gives this chocolate ice cream the most amazing flavour. Guinness pretty much does that. I love desserts baked with Guinness, I love meats braised in Guinness, but….and now it’s time for a true confession moment…I don’t really like drinking a pint of Guinness. (shock! horror!) A sip is good, but if I drink a whole pint, I feel as though I’ve eaten a loaf of bread. I’m kind of done for the evening. But boy do I get excited when I see that it is being used as an ingredient in a recipe. Always a winner!

IMG_2152

And in this ice cream it works to accent the chocolate flavor. So what you end up with is an incredibly creamy, rich, decadent chocolatey ice cream with a nostalgic malted taste and the occasional thrillingly satisfying crunch of a malted milk ball. Be still my heart! Ice Cream perfection!

IMG_2148

Malted Guinness Chocolate Ice Cream with Malted Milk Balls

  • Servings: Makes 1 Quart Ice Cream
  • Difficulty: easy
  • Print

recipe from: Picky Cook

Ingredients:

  • 7 ounces milk chocolate, finely chopped
  • 1 cup whole milk
  • 1/2 cup sugar
  •  pinch of salt
  • 4 large egg yolks
  • 1 cup heavy cream
  • 3/4 cup Guinness Stout
  • 1 teaspoon vanilla extract
  • 1 1/2 teaspoon espresso powder
  • 1 Tablespoon + 1 teaspoon malt powder
  • 5 ounce of malted milk balls (like Whoppers or Maltesers), roughly chopped

Directions:

Place the milk chocolate in a large bowl and set a mesh strainer over the top.

Warm the milk, sugar and salt in a medium saucepan over low – medium low heat.

In a separate bowl, whisk together the egg yolks. Slowly pour a bit of the warm milk mixture into the egg yolks to temper and whisk constantly. Continue adding warm milk to the egg yolks, whisking constantly. Once egg yolks have tempered, add the yolk/milk mixture back into the saucepan.

Raise the heat to medium and stir with a heatproof spatula. Continue to stir until the mixture thickens and coats the spatula.

Pour the milk/yolk mixture through the strainer into the milk chocolate. Stir until the chocolate has melted. Once the mixture is smooth, whisk in the cream, followed by the Guinness, vanilla, espresso powder and malt powder.

Once mixture has cooled to room temperature, cover with plastic wrap, pressing it to the surface of the liquid. Place in refrigerator overnight.

On the following day, freeze in your ice cream maker according to the manufacturer’s instructions. In the final 5 minutes or so of churning, add in the chopped malted milk balls.

Put into container and place in freezer.

Enjoy!

Malted Guinness Chocolate Ice Cream with Malted Milk Balls brought to you by: Runcible Eats (www.leaandjay.com)


Guinness Braised Beef Short Rib Sandwiches on Waterford Blaa

March 10, 2015

IMG_1232

So my oh my…if I must say so myself, these Guinness Braised Beef Short Rib Sandwiches on Waterford Blaa are just phenomenal! Actually the husband was pretty quick to declare this himself when they made their first appearance on our dinner table. I was pretty sure they would be right up his alley though. I mean we are talking a sandwich piled high with shredded Guinness braised short ribs, sweet caramelized onions and melted ooey, gooey Dubliner Cheese.

IMG_1211

As far as I’m concerned you really can’t go wrong with short ribs. They are so flavourful, so melt-in-your-mouth tender all on their own, but when braised in Guinness they take on some of that deep, malty, nutty flavour. Comfort food extraordinaire! Oh and I don’t want to forget the bread part of the sandwich. It is not just some store-bought hamburger bun. No, this special shredded beef needed and equally special roll. So I decided to bake up a batch of Waterford Blaa. I originally told you about this unique bread from Waterford, Ireland (no surprizes there huh?) when I used it for Chip Buttys (also supreme comfort food).

IMG_1414

Pronounced blah (you know as in blah, blah, blah….), it is a white soft yeast bread which is sprinkled with flour before being baked. It kind of “snows” flour when you pick it up (hah! Like we need anymore snow around here…) Unique to Waterford, I couldn’t think of a better roll for this Irish Short Rib Sandwich. Serve these at your St. Patrick’s Day festivities and you’ll be the talk of the town!

IMG_1215

Guinness Braised Beef Short Rib Sandwiches on Waterford Blaa

  • Servings: 4
  • Difficulty: easy
  • Print

recipe slightly adapted from: Life Tastes Good 

Ingredients:

  • 2 pounds beef short ribs
  • 2 teaspoons kosher salt
  • 1 teaspoon ground black pepper
  • 1/4 cup all-purpose flour
  • 1 tablespoon olive oil
  • 1 tablespoon unsalted butter
  • 1 onion, sliced
  • 1 tablespoon freshly minced garlic
  • fresh thyme, 3 -4 sprigs, leaves only
  • 1 (14.9 ounce, approximately) can of Guinness
  • 1 Cup beef stock
  • 2 tablespoons butter
  • pinch of salt
  • 3 good sized yellow onions, sliced thinly
  • slices of Dubliner Cheese
  • 4 Waterford Blaa Sandwich Baps (recipe to follow, or click here to see my blog about this unique Irish Bread) – butter each half and lightly toast under broiler

Directions:

Season the short ribs with 2 teaspoons kosher salt and 1 teaspoon ground black pepper. Dredge the seasoned ribs in the flour until lightly coated, shaking off excess.

Heat a dutch oven over mid-high heat and add 1 tablespoon olive oil and 1 tablespoon butter. Allow the fat to heat up just a bit, but don’t burn it. Then add the ribs in a single layer and brown on all sides. You might not be able to fit all of them into the pan at once. That’s okay. Brown what you can on all sides and then remove the browned ribs and set aside until all ribs are nicely browned on all sides. This will take 4-5 minutes on each side to brown, but it is worth it. The browning definitely adds flavor.

When all the ribs are browned, remove them from the pan and set aside. Reduce the heat to medium, and add the sliced onion and 1 tablespoon freshly minced garlic to the pan. Cook, stirring, for about minute, add the thyme and cook for 30 seconds more and then pour in the can of Guinness. Stir, being sure to scrape all the browned bits from the bottom of the pan. Add 1 cup of beef stock into the pan and stir, bringing to a gentle boil.

Return the beef short ribs to the pan, cover and reduce heat. Allow the ribs to simmer until very tender – about 2 hours.

If you’ll be eating your short ribs sandwiches the same day, go ahead and start your caramelized onions. Heat a skillet over medium heat and melt 2 tablespoons butter. Add the sliced onions and a pinch of salt and stir, cooking, until they are tender. Reduce the heat to mid-low and continue to cook until the onions are a nice caramel color, stirring occasionally. This will take about 30-45 minutes. Once they are a deep golden color, give them a taste and add salt and pepper to your liking. Set aside.

When the short ribs are fall-off-the-bone tender, go ahead and remove the bones and discard. Shred the beef with two forks and set aside.

Pour the sauce in which the beef cooked into a gravy separator so that you can easily be rid of any excess grease. Or if you have mad skills you can attempt to skim grease from the top. Add shredded beef back into sauce if you are not ready to serve. Leaving it to sit in the sauce overnight will intensify the flavours. However, if it is showtime, just divide the beef among the four toasted buns and top with a spoonful of the sauce in which the ribs cooked. Then top with caramelized onions and a slices of Dubliner Cheese. Pop the sandwich back under the broiler to melt the cheese.

Enjoy!

Waterford Blaa

recipe originally from: I Married an Irish Farmer or see my blog about it here.

yield: 8 rolls

Ingredients:

  • 10 gram active dry yeast (about 1 tablespoons & 3/4 teaspoon)
  • 10 grams caster (superfine) sugar ( about 2 1/8 teaspoon)
  • 500 grams Bread Flour, plus more for dusting (A little shy of 4 cups)
  • 10 grams sea salt ( about 1 3/4 teaspoons)
  • 10 grams Unsalted butter ( about 3/4 tablespoon)

Directions:

Dissolve the yeast and sugar in 275ml lukewarm (98° F) water. Leave for 10 minutes. It should get nice and frothy, indicating that the yeast is alive and well.

Pulse flour and salt a couple of times in food processor to combine. Add the butter, cut into small bits and pulse 2-3 times.

Transfer flour/butter combination to the bowl of a stand mixer. Add the wet to the dry ingredients and mix until combined. Change to dough hook and knead for about 10 minutes, until the dough is smooth and elastic. It will go from rough to shiny.

Place in a bowl, cover with cling film, and leave in a warm place for 45 minutes. Remove from the bowl and knock back , pushing the air out the dough. Rest for 15 minutes, to give the gluten time to relax; this will make shaping easier.

Divide the dough into eight pieces. Roll each piece into a ball. Rest for five minutes more, covered.

Dust a baking dish with flour and place the dough balls, side by side. Dust with flour. Leave in a warm place for 50 minutes.

Preheat oven to  410° F (210° C, gas mark 6.5). Liberally dust the blaas with flour from a sifter for a final time and bake for 15-20 minutes.

Enjoy!

Guinness Beef Short Rib Sandwiches on Waterford Blaa brought to you by: Runcible Eats (www.leaandjay.com)


Upside Down Caramel Apple Cake with Whiskey Whipped Cream

March 9, 2015

IMG_2020

Upside Down Caramel Apple Cake with Whiskey Whipped Cream?!! Now that’s what I’m talking about! I LOVE apples, absolutely one of my favourite fruits who doesn’t love Caramel much less whiskey? This is a perfect St. Patrick’s Day dessert. After all there is a legend that St. Patrick himself planted an apple tree just outside of Armagh city.

IMG_2055

Apparently I am not the only one who was wild about this dessert. I have actually been calling it “Gimlet’s Fall from Grace” around the house. Our pup, Gimlet, is usually very well behaved. He “never” eats food off of the table or even coffee table. It wasn’t too long after I bragged just that about him that I was taking pictures of this cake. Luckily I had pretty much finished with the photo shoot when I was suddenly summoned to come outside. When I returned I was met at the door by a very guilty looking puppy. When I raised my gaze over to the coffee table where I take most of my photos, what did I see but my beautiful Upside Down Caramel Apple Cake with a big old chomp taken right out of it! What the what! This dog never messes up!  We have left cheese and crackers and sausage on that table over night and he didn’t even give it a second look. Well…I guess that isn’t entirely true. He did succumb to temptation once before. Yup….that time it was a Banana Rum Muffin that did him in. Well, I assure you I tried to be all stern and outraged, telling him what a BAD dog he was, but I have to admit, it was pretty amusing.

How could you be mad at this adorable little face?

How could you be mad at this adorable little face?

And I think a great testimony to how irresistible this Upside Down Caramel Apple Cake truly is.

IMG_2029

I must admit, when I turned that cake over onto the serving platter and saw that rush of molten, gooey caramel pouring down over the cake, I found it a bit difficult to contain myself as well. My first urge was to just take a big old bite right out of the side of it. So I guess I’ll have to give poor Gimlet a break…afterall, he’s only human…

IMG_1988

Upside Down Caramel Apple Cake with Whiskey Whipped Cream

  • Servings: 10 -12 slices
  • Difficulty: easy
  • Print

recipe inspired by: epicurean

Ingredients:

For the Caramel:

  • 1/2 cup firmly packed brown sugar
  • 1/4 cup butter
  • 1/2 teaspoon cinnamon
  • 8 oz. heavy whipping cream, divided

For the Cake:

  • 2 apples – one sliced into thin wedges, one chopped into 1/2″ – 1″ cubes.
  • 1 1/3 cup flour
  • 2 teaspoons baking powder
  • 1 teaspoon cinnamon
  • 1/2 teaspoon salt
  • 1/2 cup butter
  • 1/2 cup plus 1 Tablespoon superfine sugar (caster sugar)
  • 2 eggs
  • 1 – 2 Tablespoons milk

Whiskey Whipped Cream:

  • Remaining whipped cream
  • 2 Tablespoons confectioner’s sugar
  • 2 Tablespoons Irish Whiskey
  • Caramel Sauce for Drizzle (can use store bought or if you are feeling industrious, whip up a batch of my Perfect Salted Caramel Sauce.)

Directions:

Preheat oven to 350° F. Grease a 9 inch round cake pan and set aside.

In small sauce pan over low heat, combine brown sugar, butter and 2 Tablespoons of the whipping cream. Cook and stir until the butter and sugar are melted. Pour caramel into the bottom of the prepared 9″ cake pan. Arrange apple slices in concentric circles on top of caramel. Set aside.

Combine flour, baking powder, cinnamon and salt in bowl. Whisk together. Set aside.

In the bowl of a stand mixer combine butter and superfine sugar. Beat until light and fluffy. Add the eggs 1 at a time, mixing until egg is fully incorporated before adding the next.

Fold in 1/2 the flour mixture, mixing only until just combined. Then add the other 1/2 of the flour mixture and milk. Gently fold in the cubed apple.

Carefully spoon the batter over the caramel/apple mixture in the 9″ cake pan. Bake for 40 -50 minutes, or until toothpick inserted into center comes out clean.

Cool for 2 -3 minutes on a wire rack and then carefully invert the cake onto a serving plate.

Just prior to serving, beat the remaining whipping cream until soft peaks form. Add the powdered sugar and whiskey. Beat until stiff peak form. Dollop over cake slices as they are served.

Enjoy!

Upside Down Caramel Apple Cake with Whiskey Whipped Cream brought to you by: Runcible Eats (www.leaandjay.com)


Savory Crispy Pancakes

March 8, 2015


IMG_1605

So I’ve got a bad feeling right about now. Not one of those “oh no, disaster is imminent” kinds of feelings, but more like a “I totally missed out on that” deprived kind of feeling. As it turns out, kids in  Sweden, the UK, Ireland, Italy and Iceland (and possibly even more countries) have been happily enjoying a childhood staple known as the Findus Crispy Pancake for years. Apparently if you talk to any person who was a child from the 1970’s on in these countries they will become oh so nostalgic and wax poetic about these crispy pancakes, the most wonderful comfort food they remember. From the many blogs I’ve read, it seems that children really wanted these mass-produced , deep-fried, frozen savoury pancakes which were filled with apparently suspect meat (more on that later…) and gloopy sauces, but their wise Moms (lesson here…always listen to your mom…) wouldn’t let them have them. Now that they’re grown, they’ve found that if they are feeling a bit retro and can’t find these little blasts from the past in their local market, (you can possibly blame the great UK Findus Factory fire from a few years back…) they can just make them at home. Even Hugh Fearnley-Whittingstall from the River Cottage has tried his hand at reproducing the classic treat. (Take a look at the video link of him doing just that noted below). But for those of us here in the U. S. of A….not a crispy pancake in sight. In fact, I had never heard of them until I read about them on Warm & Snug & Fat (great blog! ). That was the moment that I figured out that I had been cheated!

IMG_1649

But what is a Crispy Pancake? Well apparently it is a pancake which has been filled with various mixtures of meats and or cheese, folded over, breaded and deep-fried. Findus sold many varieties of these frozen delicacies, such as Cheddar Cheese, Chicken Sweetcorn & Bacon, Chicken Curry, Minced Beef & Onion, Ham & Cheese, Tomato & Mozzarella. They even tried to get a bit posh and sell a Lobster Thermidor one a few years back. But alas, Findus was recently hit with quite a scandal back in 2013 when it was revealed that the “beef” in their beef lasagne was actually mostly horse meat. And that was not true only of the lasagne beef, turns out that the beef in the Minced Beef Crispy Pancake was also quite suspect. Yikes! (As I said…always listen to your Mom).

IMG_1624

Hmmm…I’m thinking that these Findus Pancakes sound a bit like Hot Pockets, but not really. And horse meat scandal aside, I was really curious about these little devils. As I’m sure those of you who have been following along with me know, the husband and I love meat pies, and this is basically a meat pie in a deep-fried kind of pancake way. So, there was nothing to be done but to go ahead a make a bunch up. I did the Chicken, Sweetcorn & Bacon recipe as did Amee at Warm & Snug & Fat. I must say, Savory Crispy Pancakes are delicious! I don’t know if these are anything like those original Findus ones from everyone’s (but mine) childhood, but wow, they are pretty yummy! Crispy and crunchy on the outside, with a warm rich and gooey bacon-y filling. These are great for breakfast, brunch, lunch, dinner…Oh and then there is Pancake Tuesday (Pancake Day). You know the day that some folks call Fat Tuesday? The Tuesday before Lent. These would be just the thing to serve then. Whew! I’m so glad I’m in the know now…make up a batch today so that you will be too! And if you grew up privy to this pancake secret, you should really do a Findus Pancake brunch, complete with fancy champagne drinks and all, just for old times sake…

IMG_1612

Savory Crispy Pancakes

  • Servings: Eight 5
  • Difficulty: easy
  • Print

recipe slightly adapted from Hugh Fearnley-Whittingstall from River Cottage (watch him actually cook them here) via Warm & Snug & Fat

Ingredients:

For the Pancakes:

  • 165 grams all-purpose flour
  • Pinch of salt
  • 1 small egg
  • About 300ml whole milk
  • Oil for frying

For the Chicken/Sweet corn filling:

  • 25 grams butter
  • 25 grams all-purpose flour
  • 250 ml hot chicken stock
  • Kernels sliced from 1 cob of corn (3/4 cup corn)
  • 2 chicken breasts, thinly sliced (about 4 ounces)
  • 6 slices bacon, diced
  • 1 garlic clove, finely chopped
  • 1 tsp chopped rosemary
  • 1 tsp chopped thyme
  • Salt and freshly ground black pepper

For Final Assembly:

  • 6 Tablespoons all-purpose flour
  • Salt and freshly ground black pepper
  • 2 large eggs, lightly beaten
  • 200 grams Panko or fine white bread crumbs
  • A little paprika (optional)
  • A little turmeric (optional) -Apparently these pancakes a la Findus had a pronounced nuclear orange coloring and the tumeric will help you achieve this fake tan look.
  • Oil, for frying

Directions:

For the Pancakes:

Place the flour and salt in a bowl. Break the egg into the centre, then start whisking it into the flour, gradually incorporating the milk. Keep adding milk and whisking until you have a smooth batter the consistency of single cream. Rest the batter in the fridge for 30 minutes.

For the Filling:

Melt the butter in a small pan over a medium heat. Stir in the flour to make a roux, then cook this gently for two minutes. Remove from the heat, add a good splash of the hot stock and beat until you have a smooth paste. Repeat with a little more stock, then a little more. Add the remaining stock in two or three lots, beating well with each addition to get rid of any lumps. Return the pan to the heat. Bring slowly to a simmer, and cook gently for a couple of minutes, stirring often, until thickened. Add the chicken, bacon, corn kernels, garlic and herbs and simmer for another five minutes or so, until the chicken is completely cooked. Season with salt and pepper. Leave to cool.

To Cook the Pancakes:

Heat a little oil in a small frying pan (about 6″ or 15cm in diameter) over a high heat. Pour in 1/3 cup of the pancake batter, immediately swirling the batter around to form a pancake (don’t make it too thin – these need to be a little more robust than your standard crepe). Cook for a minute or two, until bubbles appear on the surface of the  pancake and it is golden-brown underneath. Flip it and cook the other side for another 30 seconds or so. Transfer to a plate. Repeat with the remaining batter.

Final Assembly:

To assemble, take one pancake and spoon some of your chosen filling on to one half of it. You only need a tablespoonful or so – don’t overfill the pancakes. Brush some beaten egg around the edge of the pancake and sprinkle on a little flour to form a natural glue. Fold the pancake over to make a half-moon shape, and press the edges to seal.

Put the flour in a deep dish and season well with salt and pepper. Put the beaten eggs in a second dish, then the Panko or breadcrumbs in a third. Season the breadcrumbs, if you like, with paprika and turmeric – not essential but it gives the pancakes their fake tan orange colour, which is large part of their charm. Dip the stuffed pancakes into each of the three dishes until completely breaded.

Heat a 1mm layer of oil in a large frying pan over a medium heat. Fry the breaded pancakes a few at a time, for about 3 minutes on each side, or until golden brown and piping hot in the middle. Drain briefly on kitchen paper. Serve straight away.

Enjoy!

Savory Crispy Pancakes brought to you by: Runcible Eats (www.leaandjay.com)