Guacamole

April 30, 2013

IMG_2510

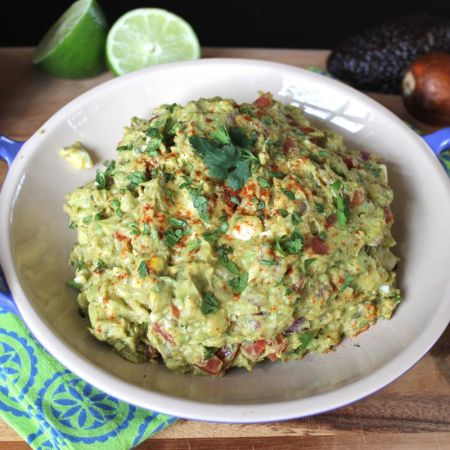
Yuuuuummm! Guacamole!!! I’ve recently been blogging about some great Mexican style dishes in preparation for Cinco de Mayo, which will be here before you know it! First there was the Carnitas Tacos and just a few days ago, I shared my favourite homemade Salsa recipe. Up next is Guacamole, that delicious avocado based sauce. It seems that in addition to Salsa, the Aztecs are also the folks who gave us “ahuaca-mulli” or avocado mix, which we know as Guacamole. Like Salsa, this dish is easy to prepare, with just a small amount of chopping, no food processor is necessary here. The big difference between the two sauces is that Guacamole must be made the day it is to be served. You really can’t refrigerate the stuff long before that yummy vibrant green begins to take on a very unappetizing brown hue. One fun trick I’ve learned is that you can save the three avocado pits and place them on top of your finished Guacamole while you are waiting to serve it. This will actually slow the oxidation which results in the unfortunate color change. The Guacamole recipe that I am sharing today is really more of an El Salvadorian style Guacamole, than Mexican. However, I’m sure you can still serve it on Cinco de Mayo without too many folks getting their panties in a bunch. Though you never know…last year I shared a recipe for one of my favourite dips, Santa Fe Dip and said it would be a great dish to serve at a Cinco de Mayo celebration. Next thing I knew I got a snippity comment informing me that I needed a geography lesson and that Santa Fe was in the United States. Clearly a dish with Santa Fe in the name could NOT be enjoyed on Cinco de Mayo a Mexican holiday!….Really?!! Perhaps we could relax a bit, it’s just a food blog here… Anyway…

IMG_2523

I say this is an El Salvadoran style Guacamole because it has chopped hard-boiled egg in it. I first encountered this type of Guacamole at my favourite Mexican restaurant, DiOGi’s. They serve up amazing latin style cuisine there. If you ever find yourself in Fayetteville, West Virginia, you must pay them a visit! The chef and owner, Oscar Aguilar, is from El Salvador and told us that the egg bit is an El Salvadoran thing. Now don’t scrunch up your nose like that until you try it. It is really good and while pretty subtle it really adds that extra layer of flavour. Bursting with freshness, this Guacamole is great with a basket of tortilla chips, on a taco or even a burger. It easily puts any store-bought cups of green stuff called guacamole to shame. Make a batch up today!

IMG_2477

Guacamole

recipe adapted from: Alton Brown and Oscar Aguilar

Ingredients

  • 3 Haas avocados, halved, seeded and peeled
  • 1 lime, juiced
  • 1/2 teaspoon kosher salt
  • 1/2 teaspoon ground cumin
  • 1/2 teaspoon cayenne
  • 1/2 medium onion, diced
  • 1/2 jalapeno pepper, seeded and minced
  • 2 Roma tomatoes, seeded and diced
  • 1/2 cup chopped cilantro
  • 1 clove garlic, minced
  • 1 hard-boiled egg, chopped

Directions:

In a large bowl place the scooped avocado pulp and lime juice, toss to coat. Using a potato masher add the salt, cumin, and cayenne and mash. Then, fold in the onions, jalapeno, tomatoes, cilantro, garlic and chopped egg. Let sit at room temperature for 1 hour and then serve.

Enjoy!


Salsa

April 23, 2013

IMG_2657

Cinco de Mayo isn’t far off and I just shared a great recipe with you for Carnitas Tacos, which I’m sure would be warmly welcomed at any Cinco de Mayo celebration. One of the fixings you will definitely need to have on hand when you make up a bunch of those afore-mentioned Tacos is a spicy fresh salsa. So I thought I’d go ahead and share my favourite salsa recipe with you. Salsa is easy to make, especially if you have a food processor. But even if you don’t, it is still pretty straightforward, just requiring a bit of chopping. And it tastes fantastic. Wonderfully fresh! So different from that stuff you find on supermarket shelves you’ll be wondering what in the world it was that you were eating out of those jars for all those years. Salsa which simply means “sauce” in Spanish has been around for a long time. In the mid 1500’s, Spanish Franciscan missionaries mentioned it in their writings as a dish the Aztecs enjoyed. And it is still being enjoyed today all over the world. As it turns out Americans have been eating a whole lot of Salsa. In 1991 it overtook ketchup as the top-selling condiment here! This homemade version goes along great with any mexican dish or simply on its own with a big old basket of tortilla chips. Make up a batch for any Cinco de Mayo celebration and you will be the talk of the town. But remember, it takes a little while for all of the lovely flavours to come together, so it is best if you can make this salsa at least 12 hours before you want to serve it. I usually make it the day before. So what are you waiting for? Get chopping!

IMG_2642

Salsa

recipe adapted from: Alton Brown

Ingredients:

  • 6 Roma tomatoes, chopped
  • 4 garlic cloves, minced
  • 2 seeded and minced jalapeños
  • 1 red bell pepper, fine dice
  • 1/2 red onion, fine chopped
  • 1 tablespoon olive oil
  • 1 lime, juiced
  • 1 cup fresh cilantro, chopped (We love cilantro, but if you don’t, you may want to reduce this a bit)
  • Chili powder, salt, and pepper, to taste
  • 5 Fresh scallions, chopped

Directions:

Get a large bowl out and set aside. I use my food processor to chop the tomatoes, red pepper, garlic and onion. I process each vegetable individually (with the exception of the garlic and onion which go in together) so that I can get them to the texture I prefer. As you finish chopping each vegetable, add it to the large bowl and then add in the olive oil, lime juice, cilantro, scallions and spices. Stir to combine. Place in refrigerator for up to 12 hours for optimum flavour infusion.

Serve with tortilla chips.


Carnitas Tacos

April 19, 2013

IMG_2609

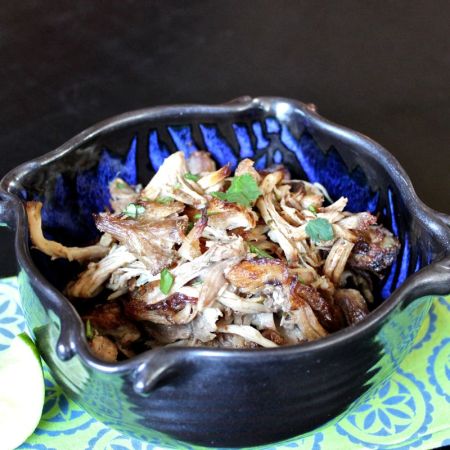
I gotta tell ya’ll, we LOVE any sort of Mexican/Tex-Mex food around here. I’m always more than happy to try out any such recipe. And on Friday night, one of the bands my husband plays in usually arrives here to rehearse. (yup…we have a rehearsal space/recording studio in our basement.) Which is great because it gives me a captive audience to try out new recipes on. And they went absolutely wild for these Carnitas Tacos! What really made these tacos stand out from the run of the mill ground beef tacos was the delicious, spicy, melt-in-your-mouth-tender yet crispy at the edges pork. And the truly wonderful thing about these carnitas is that I was able to make the dish with very little fuss. No really, I kid you not and I’m not even exaggerating the least little bit! You see they are crock pot carnitas. I don’t know about you, but I seem to have some strange ideas about how one gets pulled pork. Perhaps it is a bit of the southerner in me, but I instantly think of a whole pig over a spit and some poor sweltering soul that is left to turn the crank on the spit for the days it takes it to cook. Of course, I fear that I’m going to be that poor soul, so I tend to shy away from any pulled pork recipe. But do you know what I’ve come to realize? You don’t need to man a spit. In fact, you can make some heavenly pulled pork in a crock pot. Go figure! So, this is what I did. I got up the day before folks were going to arrive and put a big old pork shoulder into my crock pot with all the appropriate spices, some lime juice, orange juice and beer and then just turned it on and let it do its thing for 8 hours. When it was all done, I removed the meat, shredded it and popped it into the fridge. The next evening, I got all my taco fixings ready to go, you know the grated cheese, shredded lettuce, salsa, guacamole, diced onions and tomatoes, fresh chopped cilantro, sour cream and tortillas both soft and crispy. Then, shortly before I was going to serve dinner, I put the shredded pork in the broiler to warm it up and get it a little crispy around the edges.

IMG_2585

It was really easy and incredibly tasty! And the other amazing thing is that there were left-overs! On band rehearsal evenings I’m usually feeding six hungry musicians, so more often than not the only thing I bring back into the kitchen are dirty dishes. However, this time I knew I’d be able to get at least one more meal from these carnitas. Hmmm…there are so many possibilities, we could do more tacos, or a tamale pie or pulled pork sandwiches. You’ll have to check back to see what I actually came up with, but I’ll tell you it was just as good as these stop-you-in-your-tracks Carnitas Tacos and that is saying something! But don’t let folks in on the secret, let them imagine you out there toiling endlessly over that spit!

IMG_2635

Carnitas Tacos

recipe from: Pinch of Yum

Yield: 10-12 servings

Ingredients:

  • 4-5 lbs. pork shoulder
  • 5 cloves garlic
  • 1 tablespoon salt
  • 1 teaspoon cumin
  • 1 teaspoon chili powder
  • 1 teaspoon black pepper
  • 1 teaspoon oregano
  • ¼ teaspoon cinnamon
  • ½ teaspoon cayenne pepper
  • 1 tablespoon chipotle hot sauce
  • juice of 2 limes
  • ½ cup orange juice
  • 12 ounces beer
  • ½ cup salsa

Taco Fixings: whatever your favourites are, but here are some suggestions

  • tortillas, soft or crispy – your choice
  • lettuce, shredded
  • tomatoes, diced
  • guacamole or sliced avocados
  • onion, diced
  • cilantro, freshly chopped
  • sour cream
  • shredded cheese
  • salsa
  • hot sauce

Directions:

Place the pork shoulder in the slow cooker, fat side up. Roughly chop the garlic and place in the slow cooker (I actually kind of rubbed it onto the meat to get as much garlic flavor as possible, but you could just toss it in, too).

Sprinkle the meat with salt, cumin, chili powder, black pepper, oregano, cinnamon, and cayenne. Rub seasonings onto the pork.

Add lime juice, orange juice, beer, and salsa. Cover and cook on low for 8 hours.

Remove pork from the slow cooker. Shred meat with two forks. Reserve the sauce separately. The meat should fall apart easily. At this point, you can either place the meat in the refrigerator if you are serving at a later date. Or if you are ready to serve it right then and there, preheat the broiler. Line a baking sheet with aluminum foil. Place the shredded meat on the cooking sheet and pour a few spoonfuls of sauce over the top. Broil for 5-10 minutes or until you get browned edges on the pork.Serve on tortillas with fresh cilantro, avocado, and all the fixins!

Enjoy!


Bourbon Apple Cinnamon Hot Cross Bun Bread Pudding

April 16, 2013

IMG_2899

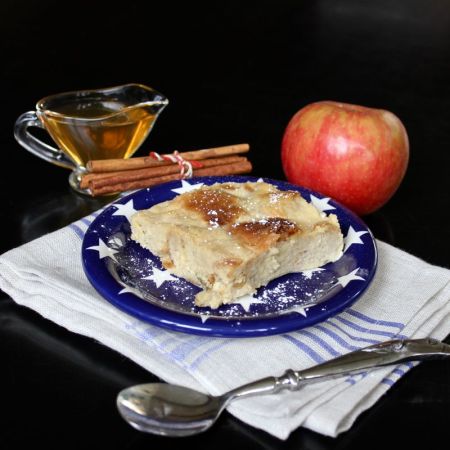
Since I just shared that wonderfully spicy Chicken & Andouille Jambalaya recipe with you, I thought you might like something with a bit of a Creole flavour to serve for dessert. New Orleans Bourbon Bread Pudding is just such a dessert. Usually this bread pudding would be made with a French baguette or other egg rich bread like brioche or challah.But I had just made a huge batch of Apple & Cinnamon Hot Cross Buns on Good Friday. Those Buns were deeee-lish!

IMG_2457

The best Hot Cross Buns I have made to date. However, there were quite of few of those gems sitting around here. Even after the husband and I had eaten our fill, and I’d set one aside for its good luck/medicinal value, we still had quite a few and they were rapidly heading towards a very stale state. Perfect for Bread Pudding! Apple & Cinnamon Hot Cross Bun Bread Pudding!

IMG_2880

Oh and don’t forget that I’m putting some Bourbon in the mix as well. That is always a good thing! I had made Dorie Greenspan’s Bourbon Bread Pudding before and knew it was a winner, so I just made her Bourbon Bread pudding using my Apple & Cinnamon Hot Cross Buns for the bread. I decided to make up a bit of Bourbon Syrup to drizzle over the pudding as well. Oh yeah…and we might have added a little scoop of ice cream on the side. Let me tell you, this bread pudding is just da bomb! I hope you won’t wait until next Easter to make it!

IMG_2916

Bourbon Apple Cinnamon Hot Cross Bun Bread Pudding

Recipe slightly adapted from: Dorie Greenspan’s Baking From My Home to Yours

Yield: 8 servings

Ingredients:

  • 8 ounces left over Apple & Cinnamon Hot Cross Buns
  • 1 1/2 cups whole milk
  • 1 1/2 cups heavy cream
  • 4 large eggs
  • 2 large egg yolks
  • 1/2 cup sugar
  • 1/2 teaspoon ground cinnamon
  • pinch of freshly grated nutmeg
  • 1 1/2 teaspoons pure vanilla extract
  • Demerara sugar to sprinkle over top

For the Bourbon syrup:

  • 1/3 cup water
  • 1/4 cup sugar
  • 1/4 cup Bourbon ( I like Knob Creek)

Directions:

Butter a 9×5 inch loaf pan ( Pyrex or ceramic will work well. I had so many Buns left over to use, I doubled the recipe and made mine in a 9×13″ pan). Line a roasting pan big enough to hold the loaf pan with a double thickness of paper towels. Fill a teakettle with water and put it on to boil; when the water boils, turn off the heat.

Cut the buns into 1″ cubes and remove the cross from the top of the bun as it tends to have a tough texture. If the bread is stale, put it into the loaf pan. If it is not stale, spread it out on a baking sheet lined with parchments and bake it in a 350° F oven to “stale” it for 10 minutes. Once finished, place the bread in the loaf pan and set the loaf pan in the middle of the roasting pan.

Bring milk and cream just to a boil.

Meanwhile, whisk the eggs, yolks, sugar, cinnamon and nutmeg together in a bowl. Still whisking slowly drizzle in about one-quarter of the hot milk mixture-this will temper, or warm the eggs so they don’t curdle. Whisking all the while, slowly pour in the remaining milk. Add the bourbon and vanilla and whisk gently to blend. Rap the bowl against the counter to pop any bubbles that might have formed, then pour the custard over the bread and press the bread gently with the back of a spoon to help cover it with liquid. Cover the pan lightly with wax paper and leave it on the counter, giving the bread the back-of-the-spoon treatment now and then, for 1 hour.

Center a rack in an oven preheated to 350°F.

Discard the wax paper. Sprinkle Demerara sugar over the top of the pudding. Cover the loaf pan snugly with a piece of aluminum foil. Poke about 5 holes in the foil. Slide the roasting pan/loaf pan into the oven and very carefully pour enough hot water into the roasting pan to come halfway up the sides of the loaf pan. Bake the pudding for 30 minutes, then remove the foil and bake for 15 minutes more, or until the pudding is puffed and golden and a knife inserted deep into the center comes out clean. Transfer the baking pan to a rack and cool the pudding until it is just warm, or reaches room temperature.

While pudding is baking make the Bourbon Syrup. Stir the water and sugar together in a medium saucepan over medium heat until the sugar melts, then bring to a boil for about 3 minutes. Remove the pan from the heat and stir in the Bourbon. Pour the syrup into a heatproof bowl and let cool.

Once you a ready to serve the pudding, sprinkle powdered sugar over the top and serve with a Bourbon syrup drizzle. Or you could go even one step further and serve it along with a scoop of ice cream.

Enjoy!


Chicken and Andouille Jambalaya

April 12, 2013

IMG_2740

The other day I thought I might like to make a big old pot of that Classic New Orleans dish Jambalaya, so I began searching around for a recipe. When I thought of Louisiana chefs and Cajun and Creole style New Orleans cooking, the first to come to mind was Emeril Lagasse. No I lie. Truth be told, the first was actually the Cajun Cook Justin Wilson. What a hoot he was! But Emeril’s name followed quickly behind and I was able to find this great recipe of his for Chicken & Andouille Jambalaya. I did find quite a few others that included shrimp or some other seafood. But that is a big “no-no” in this house. Indeed you may have noticed I’ve never blogged any seafood recipe, which might seem a bit weird considering I hail from an Island in the Chesapeake Bay. My father is a 6th generation commercial fisherman (“waterman” as they are called on the island) and I grew up eating seafood for dinner at least a couple of times a week. More shellfish, crabs, clams and oysters, than fin fish, but I’ve eaten and watched my mom prepare a whole lot of seafood. So why the scarcity of it on my blog? My husband is allergic to seafood. Yup. All of it. Fish and shellfish. I remember when I told my parents of his “condition” they kind of looked at me blankly and said “Well what does he eat?” Somehow he has managed to get by and before you start feeling too sorry for him, he doesn’t really know what he is missing. Rather than acquiring the allergy later in life, he has had it from the get go. So he doesn’t feel deprived in the least and associates eating seafood with unpleasant things like projectile puking. So…..no seafood is happening around this place!

NONE of these guys or any of his little sea swelling friends!

NONE of these guys or any of his little sea dwelling friends!

As I set out to making this dish, I started wondering what was the difference between a Jambalaya and a Gumbo. After a bit of research I found that although they both come from Louisiana there are several distinguishing characteristics of each one . Gumbo is a thick soup or stew, often made with a roux, and according to many can not be considered gumbo unless okra is one of the ingredients. It is served over or along side of rice. Now Jambalaya, on the other hand, is more of a casserole in which the rice is cooked in the same pot as the other ingredients. If the Jambalaya has tomatoes in it, as this one does, it is Creole Jambalaya. If there are no tomatoes, it is considered Cajun Jambalaya. Now, what about that name? It is certainly fun to say, but where in the world did it come from? Turns out they don’t really know, but there are a few myths and legends surrounding it. One is that it is a combination of the French word for ham “jambon”, “à la” (with) and “ya” which is an African word for rice. So,  jambon à la ya, or ham with rice. Then there is the story that says it comes from a misunderstanding. Apparently, so it goes, there was a traveller who arrived at a New Orleans Inn long after dinner hours, but was hungry. So the Inn keeper shouted to his cook, whose name was Jean, “Jean, throw something together.” Except he said it in the local speak of the time, so it was a bit more like “Jean balayez” , which the late dinner guest interpreted as a request for a dish called Jambalaya. But perhaps it has a Native American origin. The Atakapa Indians have a saying which is their equivalent of the French Bon Appetit.  It means “Be full, not skinny. Eat up!” and is said “Sham, pal ha. Ya!” Hmmm…which is your favourite?

IMG_2793

Well you won’t have long to ponder it, because this delicious seafood free Jambalaya is easy to make, only dirties one pot and doesn’t take very long to cook at all. I only made a few alterations from Emeril’s original recipe. He calls for Green Pepper, which I do not care for. I like red peppers and yellow peppers, but something about those green ones just bugs me. So I used a red pepper instead. Another big difference is that the original recipe calls for leaving the chicken thighs whole in the finished dish. So when you serve, each guest would get their own piece of chicken. I decided I would rather have the chicken off the bone and shredded. I noted in the recipe below at which point you could do this if you would like. Whether you add this step in or omit it altogether, you will be thrilled with the finished dish, full of tender chicken, spicy sausage and vegetables. Real Creole comfort food. We like it really hot around here, so I served mine with lashings of Tabasco sauce and a side of cornbread. Whooeee…. I guarantee it will put a smile on your face!

IMG_2797

Chicken & Andouille Jambalaya

recipe slightly adapted from: Emeril Lagasse

yield: 6-8 servings

Ingredients

  • 3 pounds bone-in chicken thighs, about 6, trimmed of excess fat
  • 2½ teaspoons salt
  • 1½ teaspoons freshly ground black pepper
  • 3 tablespoons canola oil
  • 1½ pounds smoked andouille sausage, cut into ½ inch dice
  • 2 large yellow onions, chopped
  • 4 medium ribs celery, chopped
  • 1 red bell pepper, chopped
  • 1 bunch scallions, finely chopped, green and white parts reserved separately
  • 6 cloves garlic, minced
  • 2 tablespoons tomato paste
  • 1 can (4 ounces) chopped green chiles, with juices
  • 1 teaspoon dried thyme leaves, crumbled between your fingers
  • 1 bay leaf
  • ½ teaspoon crushed red pepper
  • ½ teaspoon Tabasco or hot pepper sauce
  • 1½ teaspoons Creole Seasoning
  • 4 cups chicken stock or canned, low-sodium chicken broth
  • One 14.5 ounce can diced tomatoes with juices
  • 3 cups long grain white rice
  • ½ cup chopped fresh parsley leaves

Directions:

Season the chicken on both sides with 1 teaspoon of the salt and 1 teaspoon of the black pepper. Heat the oil in a large Dutch oven over high heat. Add the chicken to the Dutch oven and cook until browned on both sides, 3 to 4 minutes per side, working in batches as necessary. Transfer the browned chicken to a platter and set aside.

Add the sausage to the Dutch oven, reduce the heat to medium high, and cook, stirring until the sausage is browned, 4 to 5 minutes. Transfer the sausage to the same platter with the chicken. Add the onions, celery, bell pepper, scallion bottoms, garlic, and tomato paste to the Dutch oven and sauté over medium heat until the vegetables are tender, about 5 minutes. Stir in the green chiles, thyme, bay leaf, crushed red pepper, hot sauce, and Essence. Return the chicken and sausage to the pan, along with the chicken stock and diced tomatoes and bring to a brisk simmer. Cover and reduce the heat to low and cook for 30 minutes, or until the chicken is nearly tender and the broth has absorbed the flavor of the sausage and the seasonings.

Once the chicken is tender, remove it from pot and set aside to cool to the point that you can handle it. Remove meat from the bones and shred it. Add shredded meat back to Dutch oven. (This step can be skipped if you prefer to have whole chicken thighs in the jambalaya.)

Increase the heat to high and add the rice, the chopped scallion tops, and the remaining salt and pepper. Stir well and return to a boil. Immediately reduce the heat to low, cover, and simmer until the rice is cooked and has absorbed all the liquid, about 20 minutes. Remove from the heat, gently stir in the parsley, cover, and let stand 15 minutes before serving.

Enjoy!


Chicken & Dumplings

April 8, 2013

IMG_2394

“Chicken & Dumplings” I heard my husband say the other supposedly Spring day as we were walking our dog through a chilling rain/snowy sleet shower. “I’d really like to have some Chicken & Dumplings sometime soon.” I’m sure it was the lovely weather at the time that inspired him to think of that comforting down-home, southern dish. However, I know he would eat a big old bowl of Chicken & Dumplings any time of the year, regardless of the temperature. In fact, I may have even seen him set the car up on two wheels in an effort to make a quick turn into the parking lot of a country church or Fire Hall which was sporting a sign offering up a fund-raising Chicken & Dumpling dinner. He is that much of a fan and the more rustic the Chicken & Dumplings are the better.

IMG_2380

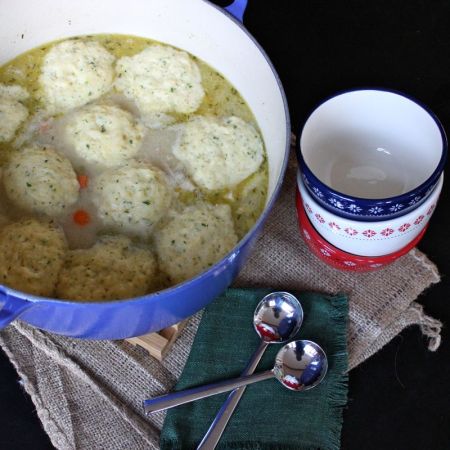
Now I’ve tried quite a few recipes for this classic dish in the past. Some old-fashioned, “just like your momma made it” and some new fangled and “quick for the working woman” varieties. I even made a very tasty TexMex Chicken & Dumplings last year that packed quite a spicy punch. But what he wanted this time was just plain and simple, creamy and comforting Chicken & Dumplings. Luckily I had just seen a recipe from Crumbs and Tales for Chicken & Dumplings that I was excited to try out. The fun thing about this particular recipe is that it used leeks rather than the usual celery. I’ve already told you how much my husband loves leeks, so I knew this ingredient twist would be warmly welcomed. Other than the addition of leeks, this recipe is pretty straight forward old-fashioned and yields up a wonderfully creamy, hearty and comforting version, right down to its fluffy cornmeal dumplings. One bite and my husband said “Mmm…this is really good darlin” and I think I may have even seen the glint of a few tears of joy in his eyes as he went back for seconds. No doubt we will be seeing quite a bit of this particular version of Chicken & Dumplings in the future. Make some for yourself today!

IMG_2385

Chicken & Dumplings

recipe from: Crumbs and Tales

Yield: 4-6 servings

Ingredients:

For the Chicken Stew:

  • 3 lbs  bone-in, skin-on chicken pieces (thighs and legs are the most tender)
  • 1 teaspoon salt
  • 1/2 teaspoon pepper
  • 2 tablespoons vegetable oil, divided
  • 2 tablespoons (1/4 stick) unsalted butter
  • 3 cloves garlic
  • 2  leeks (light green and white parts only)
  • 1 large onion
  • 1 carrot
  • 1 teaspoon salt
  • 1 teaspoon fresh thyme leaves, minced
  • 5 tablespoons unbleached all-purpose flour
  • 5 cups (1250 ml) unsalted chicken broth (or water)
  • 1/4 cup whole milk (or 2%)
  • 1 cup frozen green peas

For the Dumplings:

  • 3/4 cup all-purpose flour
  • 1/4 cup cornmeal
  • 1 teaspoon baking powder
  • 1/2 teaspoon salt
  • 2 tablespoons unsalted butter
  • 2/3 cup buttermilk
  • 1 tablespoon parsley, minced

Directions:

Prepare the chicken stew:  Slice the leeks length-wise and then dice into pieces. Dice the onions and carrots. Wash the chicken pieces and pat dry with paper towels. Season the chicken pieces with salt and pepper. Heat 1 tablespoon of the oil in a wide pot or dutch oven over medium-high heat. Add half of the chicken pieces and par-fry the chicken until golden and crisp on both sides (about 4 minutes on each side). Transfer the chicken to a plate and remove the crisped skin. Add the other tablespoon of oil to the pot and crisp the remaining pieces of chicken and set aside.

In the same pot, melt the butter over medium heat. Mince the garlic, add to the pot and toast lightly for a few seconds. Add the diced carrot, leeks and onion, thyme and 1 teaspoon salt. Sweat the vegetables for about 5 minutes until they are softened. Stir in the flour until the vegetables are coated. Add 1/2 a cup of the chicken stock to create a thick mixture. Add the remaining 4 1/2 cups of stock to the pot along with the milk.  Arrange the chicken pieces in the bottom of the pot. Cover and simmer for about 40-50 minutes until the chicken is fully cooked.

Remove the chicken from the pot and place on a cutting board. Remove the meat from the bones and shred the chicken. Discard the bones. Return the shredded chicken to the pot.

Prepare the dumplings: Stir the flour, baking powder, and salt together. Add the butter (the mixture will be crumbly). Add the buttermilk to the flour mixture until incorporated. Mix in the parsley. Set aside for a few minutes — the baking powder will begin to activate the batter causing it to puff up.

Return the stew to a simmer and stir in the peas. Drop the dumpling dough by tablespoons on top of the stew. You should get about 16 dumplings in total. Leave a little bit of room around each dumpling to allow the dumplings to puff up and expand as they steam.  Reduce the heat to a simmer, cover and cook the dumplings for about 15 minutes until the dumplings have doubled in size. Serve immediately as the dumplings will begin to sop up the juices of the stew. To save time, the stew can be made ahead of time and refrigerated but make the dumpling batter right before you intend to use it and bring the mixture up to a simmer before dropping the dumplings in. For leftovers: If, after refrigerating the stew, the dumplings have absorbed most of the moisture, simply add a little water (and salt if necessary) to the mixture to loosen it up before re-heating.

Enjoy!


German Chocolate Cake

April 3, 2013

IMG_9624

German Chocolate Cake. You know what I’m talking about, a big impressive chocolate layer cake with that distinctive coconut pecan frosting. It always seemed a bit intimidating to me and I had never attempted to make one before. My husband has a texture thing about shredded coconut. So with all of the layers of shredded coconut on this cake, and my unfounded trepidation, it just wasn’t happening. But then, a good friend of mine had a birthday coming up and I asked around to see what his favourite cake might be. Yup. You guessed it, German Chocolate Cake. So I did a bit of recipe research on the good old interwebs and found one that I was sure would produce a fantastic cake.

IMG_9466

I also uncovered a few interesting facts about this confection. Turns out it isn’t German at all! Nope. It is a total German poser! In actuality, this cake is so American it might as well be whistling Yankee Doodle Dandy! You see, back in 1852 there was an American chocolate maker whose name was Sam German. Now he invented a dark baking chocolate for Baker’s Chocolate Company. In honour of Sam, the Baker’s company christened this new chocolate as “Baker’s German’s Sweet Chocolate”. Fast forward 105 years later to 1957, when a homemaker from Dallas Texas published a recipe for “German’s Chocolate Cake”. This recipe became very popular and various newspapers across the country published the recipe. It essentially went, as we would say today, viral causing Baker’s Chocolate sales to increase by as much as 73%. The thing is that some where along its meteoric rise to fame, that possessive “German’s” changed to just “German”. Ahhh….so it became known as “German Chocolate Cake”. Thus conveying it’s false Germanic pedigree to the masses.

IMG_9519

But enough of my historic ramblings, let’s get back to talking about this incredibly decadent cake today. This wonderful recipe comes from the Brown Eyed Baker who adapted it from David Lebowitz. With it you will be able to create a big tall dark chocolate four layer cake. Each of these rich chocolate layers are brushed with a rum syrup which not only intensifies the chocolate flavour but keeps the cake incredibly moist. After being drenched in rum syrup the layers are filled with a custard based toasted coconut pecan frosting. And then, as if anything else was needed, the sides of the cake are covered with a bittersweet chocolate ganache that is just to die for!

IMG_9577

This stunning cake is actually easy to make, though a bit time-consuming. But with just one bite, you will know it was all worth it! Needless to say, my friend was delighted with his German Chocolate Birthday Cake. Indeed my coconut adverse husband even happily ate a slice. But don’t wait for a special occasion to make this cake. Believe me, any day you choose to make this spectacular cake will instantly be transformed into a special occasion. And in the meantime, let’s all raise a glass to Sam German whose lovely German’s chocolate made it all possible…

IMG_9564

German Chocolate Cake

recipe from: Brown Eyed Baker

Ingredients:

For the Cake:

  • 2 ounces bittersweet or semisweet chocolate, chopped
  • 2 ounces unsweetened chocolate, chopped
  • 6 tablespoons water
  • 1 cup unsalted butter, at room temperature
  • 1¼ cup + ¼ cup granulated sugar, divided
  • 4 eggs, yolks and whites separated
  • 2 cups all-purpose flour
  • 1 teaspoon baking powder
  • 1 teaspoon baking soda
  • ½ teaspoon salt
  • 1 cup buttermilk, at room temperature
  • 1 teaspoon vanilla extract

For the filling:

  • 1 cup heavy cream
  • 1 cup granulated sugar
  • 3 egg yolks
  • 6 tablespoons butter, cut into small pieces
  • ½ teaspoon salt
  • 1 cup pecans, toasted and finely chopped
  • 1 1/3 cups unsweetened coconut, toasted

For the Rum syrup:

  • 2/3 cup water
  • ½ cup granulated sugar
  • 4 teaspoons dark rum

For the Chocolate Icing:

  • 8 ounces bittersweet or semisweet chocolate, chopped
  • 2 tablespoons light corn syrup
  • 3 tablespoons unsalted butter
  • 1 cup heavy cream

Directions:

Make the Cake: Preheat the oven to 350 degrees F. Grease two 9-inch cake pans, then line the bottoms with rounds of parchment paper. Sift together the flour, baking powder, baking soda and salt; set aside.

Melt the semisweet and unsweetened chocolates together with the 6 tablespoons of water in a small bowl. Use either a double-boiler or microwave on 50% for 30 seconds to 1 minutes. Stir until smooth, then set aside to cool to room temperature.

In the bowl of an electric mixer, beat the butter and 1¼ cup of the sugar on medium-high speed until light and fluffy, about 5 minutes. Reduce the mixer speed to medium and beat in the melted chocolate until combined, scraping the sides of the bowl as necessary. Beat in the egg yolks one at a time, beating well after each addition.

Reduce the mixer speed to low and add half of the flour mixture, beating until just combined. Add the buttermilk and the vanilla extract, mixing until combined, and then add the remainder of the flour mixture.

In a separate bowl, beat the egg whites on medium-high speed until they hold soft peaks. Slowly add the ¼ cup of sugar and beat until they form stiff, glossy peaks.

Using a rubber spatula, gently fold one-third of the egg whites into the cake batter to lighten it, then fold in the remaining egg whites just until there’s no trace of egg white visible.

Divide the batter into the 2 prepared cake pans, smooth the tops, and bake for about 45 minutes, until a toothpick inserted into the center comes out clean. Cool the cake layers completely (leave them in the pans). While the cakes are baking and cooling, make the filling, syrup and icing.

Make the Filling: Stir together the heavy cream, sugar and egg yolks in a medium saucepan. Put the butter, salt, pecans and coconut in a large bowl and set aside. Heat the cream mixture and cook, stirring constantly (scraping the bottom of the pan as you stir) until the mixture begins to thicken and coats the back of a spoon (an instant-read thermometer will read 170 degrees F.). Pour the hot custard immediately into the pecan-coconut mixture and stir until the butter is melted. Cool completely to room temperature.

Make the Rum Syrup: In a small saucepan, heat the water and sugar, stirring occasionally, until the sugar has melted. Remove from heat and stir in the dark rum. Set aside until ready to use.

Make the Chocolate Icing: Place the chopped chocolate, corn syrup and butter in a medium bowl. Heat the cream in a small saucepan over medium heat until it just begins to boil. Remove from heat and pour over the chocolate. Let stand one minute, then stir until smooth. Cool to room temperature.

Once the filling and icing are both cooled to room temperature, refrigerate for 1 hour.

Assemble the Cake: Remove the cake layers from the pans and cut both cake layers in half horizontally using a sharp serrated knife, so you have four cake layers. Set the first cake layer on a cake plate. Brush the top of the cake layer with the rum syrup. Spread ¾ cup of the coconut filling over the cake layer, making sure to reach to the edges. Set another cake layer on top. Repeat, brushing the top of each cake layer with the rum syrup, then spreading ¾ cup of the coconut filling over each layer, including the top. Ice the sides with the chocolate icing, then pipe a decorative border of chocolate icing around the top, encircling the coconut topping.

Enjoy!