Apple & Cinnamon Hot Cross Buns

March 30, 2013

IMG_2533

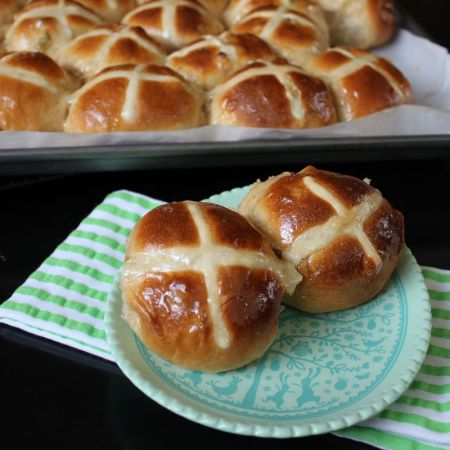
One a penny, two a penny! Hot Cross Buns! That’s right…it’s time for the Hot Cross Buns to make an appearance. I’m sure you’ve been seeing them everywhere, but I must say, look no further! The best Hot Cross Bun recipe can be found right here. This year I made buns with a bit of a twist from the old traditional ones I usually do and baked Apple & Cinnamon Hot Cross Buns. Let me just say, they are dee-lish! They are incredibly moist and bursting with apple and cinnamon flavour, most likely due to a fresh homemade apple cinnamon compote which is added to the dough along with golden raisins, and  bits of dried apple. And if that doesn’t tempt you, as soon as these little buns emerge from the oven, they are drenched in a syrupy apple cinnamon glaze. Do I have your attention now? Yum, yum, YUM!

IMG_2431

On Good Friday I always make Hot Cross Buns. I just have to do it. It’s like I have no choice. I find all of the lore surrounding them fascinating! Hot Cross Buns are traditionally eaten on Good Friday and the cross that adorns them is said to be a symbol of the Crucifixion. However, these little buns may even pre-date Christianity. The cross could possibly have been made in honour of the Saxon Goddess Eostre and in that case would have symbolized the four quarters of the moon. The Buns that are actually baked on Good Friday are said to have quite an array of powers besides their delicious taste. For one thing, these pastrys will never get moldy. I actually have been putting a Good Friday baked bun aside for several years now and I can attest, they do not mold!

Preserved Buns from Easters past!

Preserved Buns from Easters past!

Furthermore, if you hang one in your kitchen, it will not only protect your household from fires but will also work as a charm to ensure all of your bread baking endeavours will be successful. Indeed, a dried bun from the previous year, also has medicinal properties. You can grate a bit of it into the liquid of your choice to make a restorative elixir that will help sick folks regain their health. This powder can also be applied directly to wounds with the same curative results. Amazing!

IMG_2428

Now I must stress that only Hot Cross Buns baked on Good Friday itself have these powers. So most likely you’re going to have to bake them yourself on the actual day to ensure your buns are filled with these magical properties. Hot Cross Buns are made with yeast, so just keep in mind, there are going to be a couple of rise times involved. You need to plan for it and unless you plan on getting up at o’dark thirty to start working on them, you probably won’t have them available for breakfast that morning. But you could have them ready by elevenses! They are a bit of work, but believe me, these buns are so worth it! And I had the most pleasant surprise. When I finished glazing the Hot Cross Buns I actually had some of the Apple Cinnamon Syrup left over. I set it aside and was quite happy to find that it had actually set up upon cooling, leaving me with a scrumptious jelly! Yup….Apple & Cinnamon Hot Cross Buns with Apple Cinnamon Jelly. It just keeps getting better! You’ve gotta make these delicious buns today!

IMG_2457

Apple & Cinnamon Hot Cross Buns

recipe from: Technicolor Kitchen

yield: 20 Buns

Ingredients:

Apple and lemon compote:

  • 1 ¼ cups (250 g) granulated sugar
  • 1 ½ cups + 1 tablespoon (375 ml) water
  • 1 lemon
  • 2 Granny Smith apples, unpeeled, cored, diced
  • 1 cinnamon quill

Dough:

  • 5 cups (700 g) all-purpose flour (I had to add 1 extra cup flour) + 1/3 cup (46 g) extra for the piping mixture
  • 1 cup (155 g) golden raisins
  • 80 g dried apple, diced
  • 14 g (2 sachets/4 ½ teaspoons) dried yeast
  • 3 teaspoons ground cinnamon
  • ½ teaspoon ground allspice
  • finely grated zest of 1 orange and 1 lemon
  • 5 ½ tablespoons (65 g) granulated sugar
  • ½ teaspoon salt
  • 1 ½ cups + 1 tablespoon (375 ml) whole milk
  • 100 g unsalted butter, coarsely chopped
  • 1 egg

Directions:

Start with the compote: combine sugar and water in a medium saucepan, then squeeze in juice of half the lemon and stir over medium-high heat until sugar dissolves. Meanwhile, cut remaining lemon half into 3mm-thick slices, add to saucepan with Granny Smith apples and cinnamon quill. Bring to the simmer, reduce heat to medium and cook until lemon and apple are translucent (20-25 minutes). Strain, reserving fruit and syrup separately. When cool enough to handle, dice lemon, combine with apple. Remove the cinnamon quill, add it to the syrup and set aside.

Combine flour, raisins, dried apple, yeast, ground cinnamon, allspice, zests, sugar, apple compote and salt in a large bowl and make a well in the centre.

Combine milk and butter in a small saucepan, warm over low heat until butter melts and mixture is lukewarm. Whisk in egg, then add milk mixture to flour, stirring to form a soft dough.

Turn onto a lightly floured surface and knead until smooth and elastic (8-10 minutes) – I used my Kitchen Aid with the dough hook to knead the dough; gradually added 1 cup flour because the mixture was too wet. You want the dough to pull away from the sides of the bowl, so just slowly add flour as you are kneading until you see this.
Place in a lightly buttered bowl, cover and stand in a warm place until doubled in size (30-40 minutes). Meanwhile, line a large baking sheet with parchment paper.
Knock back dough, divide into 20 even pieces, then knead each piece into a smooth ball. Arrange dough in a large rectangle or concentric circles, placing balls side by side onto prepared sheet, leaving 1cm between each for dough to expand. Cover with a tea towel and stand in a warm place until doubled in size (30-40 minutes).
Preheat oven to 220°C/428°F. Combine the 1/3 cup extra flour and ¼ cup (60 ml) cold water in a bowl and stir to a smooth paste. Spoon into a piping bag fitted with a small plain nozzle and pipe a cross shape onto each bun.

Bake for 10 minutes, reduce oven to 200°C/400°F and bake until golden and buns sound hollow when tapped (10-12 minutes).
Meanwhile, combine reserved syrup and cinnamon quill in a small saucepan and stir over medium heat until syrupy. Brush thickly over hot buns, then transfer buns to a wire rack to cool.

Enjoy!


Robin Egg Rice Krispie Treats

March 26, 2013

IMG_2327

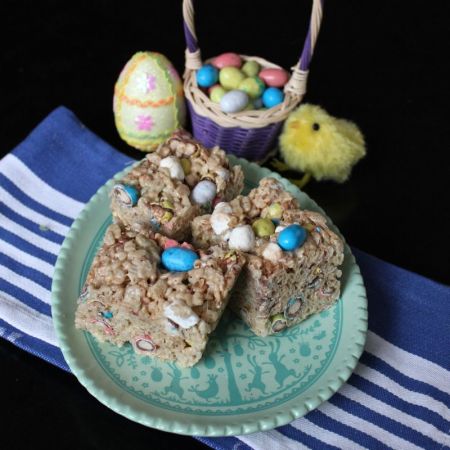
Wow! Time flies! Seems like I just finished my St. Patrick’s Day blogging extravaganza and here it is nearly Easter! Again, my hat is off to all of you daily bloggers out there. I just took a week off to recover from my 17 day stint at it and I still feel a bit wobbly about the whole thing. I thought I’d ease back into the saddle today with a great Easter recipe that is also really easy to make. Robin Egg Rice Krispie Treats are just what they sound like, yummy Rice Krispie Treats with extra malt flavouring and one of my favourite Easter candies, Robin Eggs! For those of you who may be unfamiliar with Robin Eggs, they are made by Whoppers and are egg-shaped malted milk balls covered in pastel speckled candy shells. I love Robin Eggs and am so thrilled when they finally show up in the stores. The only Easter candy that lands above Robin Eggs as far as I’m concerned are Cadbury Mini Eggs. Oh my God! Don’t get me going about those little devils. Addictive, like crack. I literally can’t stop once a bag is opened. I haven’t reached that level with the Robin Eggs, though it may not be far off. I did polish off a bag of them the other day while working on taxes (better a bag of candy than a bottle of wine when tax preparation is concerned). I had one more bag left, so I figured I better do something with them pronto. That’s when I remembered seeing Sweet Southern Blue’s post about these Robin Egg Rice Krispie Treats, so I got right to work. Not that it’s a lot of work, I must admit. I can get a pan of Krispie Treats done and dishes washed in about 15 minutes flat. And I’ve gotta say, it is pretty awesome that you can make such a classic, delicious, crowd pleasing snack at the drop of a hat!

IMG_2359

Sweet Southern Blue makes use of her microwave to melt the marshmallows. I’m still an old-fashioned top of the stove gal and prefer to use the mini marshmallows over the big fellas. My husband and I both like to find the occasional whole unmelted mini marshmallow scattered throughout our treats, so I always hold back a handful or two of them to throw into the melted marshmallow butter mix along with the cereal. And I decided to use the mini version of Robin Eggs, also reserving a few whole eggs from being chopped to decorate the top of the treats. Of course the big version of Robin Eggs would work perfectly well, you just might need to do a bit more crushing prior to adding them into the mix. These treats would be great to make with the kids before Easter or a good way to use up Easter candy afterwards. Indeed, this recipe is certainly adaptable to whatever left over candy is on hand (sorry…what exactly is left over candy?!). Not matter what ingredients you choose, before you know it, these adorable treats will be made and your family singing your praises. I mean who doesn’t like a Rice Krispie treat, and with Robin Eggs to boot…what a winner!

IMG_2307

Robin Egg Rice Krispie Treats

recipe adapted from: Sweet Southern Blue

Yield: 12 squares

Ingredients:

  • 10.4 oz bag of mini marshmallows or 7oz container of marshmallow cream
  • 3 Tablespoons of butter
  • 4 cups of Rice Krispies cereal
  • 2 cups mini Robin Egg malted milk balls, roughly chopped
  • ¼ cup malted milk powder

Directions:

Butter a 8×8″ pan. Set aside.

In a saucepan melt butter over low heat. Add marshmallows (remember to hold back a few if you like seeing the occasional whole unmelted marshmallow) and stir until completely melted and smooth.

Remove from heat and add the malted milk powder stirring until combined.

Add the Rice Krispie cereal and chopped Robin Eggs (as well as any reserved marshmallows). Mix until well coated.

Using a buttered spatula, press mixture into prepared pan.

Cool and cut into squares.

Enjoy!


Chocolate Whiskey Dipped Irish Cupcakes

March 17, 2013

IMG_2260

Lá Fhéile Pádraig Sona Daiobh! (Happy St. Patrick’s Day!) Woohoo! It’s finally here! Everyone is Irish today! I’m sticking with my blogging tradition and featuring a tasty Irish-y cupcake on St. Patrick’s Day. Two years ago it was Irish Car Bomb Cupcakes, last year brought you Guinness Chocolate Cupcakes with a Swiss Vanilla Baileys Buttercream Frosting and today…(drumroll please….) we have these deliciously decadent Chocolate Whiskey Dipped Irish Cupcakes. And just like all of my previous St. Patrick’s Day cupcakes, these little devils are a bit boozy. In fact, they have a perfect trifecta of Irish Booze. The cake portion of this treat is a rich chocolate Guinness creation, which is then topped with a velvety Baileys Cream Cheese Frosting. That sounds great all on its own right? I could’ve stopped there, but oh no….I then dipped the whole thing into a Irish Whiskey spiked Chocolate Ganache! Be still my heart!

IMG_2050

I was inspired to make these when I saw Arctic Garden Studio’s Irish Coffee Cupcakes. I loved the idea of piling on all of that creamy Baileys frosting and then dipping the cupcake into the whiskey chocolate. It reminded me of those dipped soft serve ice cream cones. You know like the ones at Dairy Queen, or from a Mr. Whippy truck or a 99 Flake ice cream for all of you in Britain and Ireland.

Unknown-1

For those of you unfamiliar with a “99” it is a soft serve vanilla ice cream cone which has a piece of a Cadbury chocolate bar which is called a “Flake” stuck into it.

Unknown

You can find them at all the shops etc. in Ireland. I even managed to find a Flake candy bar in good old Virginia, no small feat, and stuck it in one of my lovely cupcakes as a bit of an homage to the “99”.

IMG_2132

Even without the added Flake, these cupcakes are so reminiscent of dipped soft serve ice cream, albeit rather boozy – perhaps there is an adult ice cream truck – that my husband has christened them “Whiskey Whippy Cakes” which I like, but thought it might leave a lot of folks confused, so I went with Chocolate Whiskey Dipped Irish Cupcakes officially, but around here it’s another story! I don’t know what it is about us and ice cream cones recently. Perhaps we’re just ready for Spring, but since we don’t have those Spring temperatures yet, I guess we will just have to make do with these little boozy cupcake imposters.

IMG_2195

Ha! Everyone who knows me, knows I LOVE cupcakes so I’m not making much of a sacrifice here! These Whiskey Whippy Cakes will definitely make our St. Patrick’s Day all the more festive.

IMG_2126

Which reminds me, I think it’s time for a little celebratory drinky. I have managed to blog about an Irish-y dish everyday from March 1st up through today. Phew! I’m probably going to have to take a few days off after today’s publication, but don’t worry, I’m already planning out some great tempting future treats. In the meantime, check out some of my favourite blogs which come to you from Ireland to see what they’re cooking up, like: The Green Apron, I married an Irish farmer, Edible Ireland, Warm&Snug&Fat and The Daily Spud. And when you’ve finished browsing, get busy baking some of these mouth-watering Chocolate Whiskey Dipped Irish Cupcakes with their Guinness and Baileys and Whiskey (Oh My!) Just the ticket for a Happy St. Patrick’s Day! I hope everyone has a great time!

IMG_2166

Chocolate Whiskey Dipped Irish Cupcakes

recipe adapted from: Runcible Eats (the cake part of the cupcake) and Arctic Garden Studio

yield: 30 cupcakes

Ingredients:

For the Chocolate Stout Cupcakes:

  • 2 1/2 cups all-purpose flour
  • 2 1/2 cups granulated sugar
  • 2 teaspoons baking soda
  • 1/2 teaspoon salt
  • 1 1/2 cup (  3 sticks) unsalted butter, room temperature and cubed
  • 1 cup unsweetened cocoa powder
  • 1 1/2 cup Guinness, poured and settled before you measure it out
  • 4 large eggs, room temperature
  • 1 cup sour cream

For the Baileys Cream Cheese Frosting:

  • Two – 8 ounce packages cream cheese, at room temperature
  • 1 cup (2 sticks) unsalted butter, at room temperature
  • 2 cups powdered sugar
  • 6 tablespoons Irish cream liqueur, such as Bailey’s Irish Cream

For the Chocolate Whiskey Glaze:

  • 8 ounces bittersweet or semisweet chocolate, chopped
  • 1/2 cup heavy cream
  • 1 tablespoon plus 1 teaspoon light corn syrup
  • 4 tablespoons whiskey

Directions:

for the cupcakes:

First, bake your cupcakes. Preheat oven to 350°F. Line two 12-cup muffin tins with muffin liners and spray lightly with non-stick spray. In a small saucepan over medium-low heat, melt your butter and set aside to cool slightly, then add in the cocoa powder and whisk until smooth. Whisk in the stout, then set aside to cool completely for another 10 minutes.

In a large mixing bowl, whisk together the eggs and sour cream, then whisk in the cooled chocolate and butter mixture. Whisk in the flour, sugar, baking soda, and salt, combining until just moistened. Fill each muffin cup with 1/4 cup of batter, so that the cups are 2/3 full. Bake for 20-25 minutes, until the cupcakes are set and a toothpick comes out clean (mine took about 24 minutes). Allow to cool completely before frosting.

for the frosting:

In a stand mixer fitted with the paddle attachment beat together the cream cheese, butter, and powdered sugar until smooth. Beat in the Irish cream liqueur.
Pipe frosting on top of cupcakes using a pastry bag or spread on with a spatula. You want a nice thick layer. Place cupcakes in the refrigerator while making the glaze. This will make them easier to dip.

For the glaze:

Melt the chocolate with the cream and corn syrup in a small saucepan over low heat, stirring until smooth. Remove from the heat and stir in the whiskey.
Dip the tops of the frosted cupcakes in the glaze right to the edge of the cupcake paper, let excess glaze drip off before turning upright. Let cool, right side up, until the glaze is firm. Store cupcakes in the refrigerator, remove and bring to room temperature (about 30 minutes) before serving. This recipe makes more glaze than you need, but makes it easier to dunk the tops of the cupcakes. Store remaining glaze in the refrigerator, it will form a whiskey ganache that can be used later as a hot fudge ice cream topping by slowly heating or added to hot milk for a whiskey hot chocolate.

Enjoy!


Sweet & Salty Guinness Chocolate Pie with Beer Marshmallow Meringue

March 16, 2013

IMG_9723

We only have one day to go and it will be here! You know what I’m talking about…St. Patrick’s Day! It’s happening tomorrow ya’ll! Woohoo! I am so ready. I have all of my green clothing laid out and ready to go. Yup. I am going to do the green clothing thing. Now before all ya’ll Irish folks judge me, let me just say, if you don’t wear green over here on the day, people will pinch you! I do NOT want to be pinched and I actually like wearing green. I think it suits me, soooo….there you have it! But we’re here to talk about food right? Not rude, pinchy people, so onto the fabulous recipe. Today it is Sweet & Salty Guinness Chocolate Pie with Beer Marshmallow Meringue. How completely outstanding does that sound….sweet, salty, Guinness, Chocolate, Marshmallow. Good Lord! Bring it on!

IMG_9728

Now this pie has a sweet and salty pretzel graham cracker crust, which is filled with a Guinness infused Chocolate pudding and topped with a toasted Guinness Marshmallow Meringue! What an embarrassment of riches!!!

IMG_9814

And the great thing about this recipe is that it makes two, count them two, pies. This means that you get one entire pie for yourself and you can give one to a friend. (A very deserving friend, mind you. You need to be selective here, as this is not just any old pie!)

IMG_9711

Believe it or not, when I first started talking this pie up to my friends, I did have one who said “Oh, I don’t really like meringue pies very much”. I totally get that. I’m sure it has something to do with dry meringue pies made by totally well-meaning Grandmas. However, this Beer Marshmallow Meringue is like no meringue you’ve experienced. It is more like a melted marshmallow fluff. Totally gooey and delicious! I don’t even know if I can legally call it meringue (I can only hope the “meringue police” are not monitoring me at this moment.) And we’ve only talked about that topping at this point. Let’s not forget the rich, chocolatey Guinness pudding filling or the lovely sweet yet salty pretzel crust. What an absolutely perfect St. Patrick’s Day dessert. And what are you waiting for? It is happening tomorrow! Get busy!

IMG_9758

Sweet & Salty Guinness Chocolate Pie with Beer Marshmallow Meringue

recipe from: Sprinkle Bakes

Yield: 2 pies

Ingredients:

For the Pretzel crust:

  • 2 cups crushed pretzels
  • 1 cup graham cracker crumbs (you can substitute in digestive biscuits crumbs if grahams are unavailable)
  • 10 tbsp. unsalted butter, melted
  • 1/4 cup plus 2 tablespoons light brown sugar (firmly packed)

For the Guinness Chocolate Filling:

  • 8 large egg yolks
  • 1 cup sugar
  • 14.9 oz. can Guinness Draught, divided
  • 2 1/4 cups heavy cream
  • 7 oz. high quality bittersweet chocolate, evenly chopped
  • 1/4 cup cornstarch

For the Beer Marshmallow Meringue:

  • 2 cups sugar
  • 4 egg whites
  • 1/4 cup plus 2 tbsp. water
  • 1/4 tsp salt
  • 12 jumbo marshmallows (or about 18-20 large) cut into quarters with kitchen scissors
  • 3 tbsp. beer reduction ( Place remaining Guinness from chocolate filling in a small saucepan over medium heat and cook until reduced to 3 tablespoons, about 15 minutes)

Directions:

For the Crust:

Reheat oven to 350° F.

In a medium bowl, mix together pretzels, graham cracker crumbs, butter and brown sugar.  Stir together with a rubber spatula until well incorporated.

Divide mixture between two 8 or 9-inch pie plates. Bake for 10 minutes.  Cool completely before filling

For the Filling:

Whisk together egg yolks and sugar in a non-reactive bowl.

Pour 1 cup of Guinness in a heavy-bottomed 3-quart saucepan (reserve the rest for later use – no drinky! Not yet anyway, but remember …St. Patrick’s Day is nigh. Your time will come!). Add heavy cream and whisk to combine.  Set over medium-high heat and cook until very hot but not boiling. Remove from heat and whisk in chocolate.   When chocolate has melted, whisk in the egg mixture in a very thin stream as to not scramble the egg.  Whisk in cornstarch and return to heat source.  Whisk over medium heat until thickened.

Divide mixture between pie pans.  Use a rubber spatula to effectively remove all the pudding from the saucepan; quickly smooth the chocolate into the crust.  Refrigerate while making the marshmallow topping.

For the Beer Marshmallow Meringue:

Whisk sugar, egg whites, water and salt together in a large metal bowl.  Set bowl over a simmering pan of water; whisk constantly until sugar dissolves and mixture is hot to the touch.  Remove bowl from simmering saucepan and stir in marshmallows pieces.  Let stand for 3-5 minutes until marshmallow pieces have softened. Return bowl to simmering water and beat together using a hand-held mixer.  Beat for several minutes until mixture thickens. Remove bowl from simmering water and add beer reduction. Continue to beat mixture until it has cooled slightly.

Preheat oven to broil.

Divide mixture between two pie pans and place under broiler in oven.  Watch constantly – it’s easy for the marshmallow to burn! Remove from oven when nice and toasty.

Refrigerate pies until well set – about 3-4 hours. Do not skip this step. The meringue needs the refrigerator time to set properly.

Enjoy!

Note:  Use a warm knife (dipped in hot water then wiped dry) to achieve cleanly cut slices of pie.  That marshmallow topping is sticky!


Dublin Coddle

March 15, 2013

IMG_0990

So while we’re on the subject of traditional Irish dishes for St. Patrick’s Day, I would be remiss if I didn’t mention Dublin Coddle. Dublin Coddle is a stew consisting of Irish Sausages, potatoes, onions and Irish Bacon. Oh, save us! Now that is my kind of stew! It has been enjoyed in Ireland since the seventeenth century and likely before. It was a favourite of the likes of Jonathan Swift, Seán O’Casey and James Joyce. How is that for an Irish pedigree for you?! The name Coddle, likely comes from the verb “caudle” which means to cook food in water below boiling. Now that below boiling is important, this stew is meant to be simmered or braised in a slow oven or stove-top. Or even in a slow cooker set on low for 4-6 hours. You can’t rush it. Remember, according to those old Irish wives telling tales, “a stew boiled is a stew spoiled“. You must be patient. It is said that some of the popularity of this stew was due to the fact that a wife could leave it simmering on the stove for hours and it would still be delicious when her man finally arrived home from the pub, long after she’d gone to bed!

IMG_1009

If you had not noticed, this stew does not have a heck of a lot of ingredients to it. Sausages, bacon, potatoes, and onions. It’s very simple. But that means it is highly dependent on the quality of the few ingredients involved. You want to source out the best you can find. Now in the States, I was a bit challenged sourcing out Irish style sausages and bacon. But it can be done. I found my Irish Sausages at the Falls Church Farmers Market at Stachowski Brand Charcuterie. They also have a storefront in Georgetown, Washington DC. They did say that these sausages were “English Bangers”, but that is much closer to the style of sausages found in Ireland than the usual  U.S. breakfast sausage. (You could use a regular breakfast sausage link if pressed, but I was trying to go for as close to authentic as I could get.) As far as the bacon goes, “English Rashers” is most likely as close as you will find. Irish bacon is quite different from what we call bacon in the states. Their bacon is taken from back loin, rather than the pork belly from which ours is cut. If you can’t find rashers, go with Canadian Bacon. I was able to find “English Rashers” at the Organic Butcher of McLean. They were absolutely outstanding! Besides salt, pepper and parsley, there are not a lot of spices in Dublin Coddle. I did decide to add some garlic, which I will justify by saying it is not unlikely that garlic would have been available and used in the good old days. I also added a couple of sprigs of thyme to my Coddle, pretty much justifying its presence along the same lines as the garlic. Indeed I will even go a bit further and give you an old Irish folktale about thyme. It is said that keeping a sprig of thyme in your pocket will not only protect you from fairy mischief, but will enable you to see them clearly when passing by a fairy mound. Very useful info I would say! Now I suppose I should take a moment to tell you what is not  to be found in Dublin Coddle….According to my friend Theresa, who lives in Ireland, there are no carrots to be found in Coddle. This is apparently a source of great controversy when one discusses Coddle in Ireland. Theresa’s family clearly comes down on the anti-carrot front and that is good enough for me. No Carrots! Don’t even think about it! (I’m sure I will be getting barraged with e-mails from great old established Dublin families, regaling me with tales of carrot inclusion as you read this… Oh well, I’m sticking to my guns! No carrots I say again!)

IMG_0845

As far as preparation goes, it is traditional to throw all of the ingredients thus mentioned into a pot to simmer away for hours. There is no browning of anything. However, I thought a little browning was in order. I had read that this dish, although incredibly tasty, was not particularly photogenic. I thought a little browning might go a long way there. Turns out, I’m not so sure it made a difference with the photos, though I think it was beneficial to texture and am happy to recommend it. My husband had never tasted Dublin Coddle before and was definitely intrigued as he watched me run hither and thither to gather all of the “required” ingredients. He was not disappointed when presented with a big bowl of Dublin Coddle with a side of Brown Bread to soak up the sauce. Coddle proves “Looks aren’t everything”. It is warm, hearty and delicious, a veritable “hug in a bowl”. Irish comfort food at its best!

IMG_1007

Dublin Coddle

Ingredients:

  • 1-2 tablespoons olive oil
  • 1 lb. Irish Bacon
  • 2 lb. Irish Sausages
  • 2 large onions, sliced
  • 2 cloves garlic, chopped
  • 2 springs thyme, leaves only
  • 4 lbs. potatoes, such as russests or Yukon Gold, peeled and cut into large chunks
  • 2 Cups ham stock (you could use chicken broth if you can’t find ham stock)
  • 1/4 cup cream or milk
  • 1/4 cup fresh parsley, chopped
  • salt and black pepper to taste

Directions:

Heat the olive oil in a large, heavy bottomed fry pan. Add the Irish sausages. Cook until browned on all sides. Transfer to a plate. Cook the bacon until brown, but not crispy. Transfer to a plate. Add the onions and garlic, saute until translucent.

Place a large dutch oven over low heat. Layer 1/2 of the onion/garlic mixture in the bottom of the pan. Sprinkle with salt and pepper. Add 1/2 of the sliced potatoes.

Roughly chop the bacon and add to the pan over the potatoes.

Cut each sausage link in half or into thirds (your preference) and add it to the pan over the bacon. Cover sausage with sprinkling of fresh thyme leaves.

Top with the remaining onions and potatoes. Sprinkle with salt and pepper. Pour 2 cups of ham broth over layers.

Cover dutch oven and leave simmering on stove for 1 1/2 hours over low heat. About 30 minutes prior to serving, stir in 1/4 cup of cream or milk to further thicken the stew. Sprinkle with fresh chopped parsley when ready to serve.

Enjoy!


Champ (Brúitín in Irish)

March 14, 2013

IMG_1231

Champ, one of Ireland’s most delicious side dishes, is made with potatoes, scallions, chives, butter and milk. It is traditionally served with a deep well of butter in the center for dipping each spoonful or bite. Now I’m sure a few of you out there are saying, “Hey…isn’t that just mashed potatoes?”

IMG_1216

That is kind of what I thought until I tasted for the first time. Champ has a truly unique taste which comes from the scallions and scallion simmered milk used in the recipe. Plus I like that the Irish aren’t shy about using butter and each spoonful of Champ is served fully immersed in it. Yum!

IMG_1193

This dish is quite simple and inexpensive to make, but you will find it oh so  tasty, filling and comforting. It goes along wonderfully with any beef, lamb or pork dish, although I know I would be quite happy to make a meal of it, all on its own. It was a common Irish folk custom to leave a bowl of Champ for the fairies under Hawthorn trees on All Hallow’s Eve (Samhain – October 31st). I’m sure those lucky fairies are delighted with the gift wherever it is still given.

IMG_1187

Champ (Brúitín in Irish)

recipe adapted from: The Complete Irish Pub Cookbook

Ingredients:

  • 2 lbs. potatoes – starchy potatoes like russets or Yukon gold, peeled and cut into even chunks
  • 20 scallions, chopped
  • 1 1/2 cups milk
  • 1/4 cup chives, snipped
  • 1 teaspoon sea salt
  • black pepper to taste
  • 1/2 cup (1 stick) Irish salted butter, melted and hot

Directions:

Add the potatoes to a large saucepan of salted boiling water, cover, bring back to a boil, and simmer gently for 20 minutes, until tender. Drain well and put back in the pan. Cover with a clean dish towel for a few minutes to get rid of excess moisture.

While the potatoes are cooking, put the chopped scallions in a saucepan with the milk. Simmer for 5 minutes (do not boil), then drain, reserving the milk and scallions separately.

Mash the potatoes until smooth, stirring in enough of the reserved milk to produce a creamy consistency. Stir in the scallions and chives. Season to taste with sea salt flakes and black pepper.

Transfer the potato mixture to a warm serving dish. Make a well in the center of the potatoes and pour in the hot, melted butter.

To serve, spoon potatoes from the outside, dipping each spoonful into the well of melted butter before plating.

Enjoy!


Chocolate Biscuit Cake

March 13, 2013

IMG_1988

Chocolate Biscuit Cake is one of my favourite cakes. I had never heard of it before heading off to Ireland for college where I ran across it in a little bakery in Cork. The gal behind the counter called it “Tiffin” and after experiencing just one bite of its rich, chocolatey decadence, I was hooked.

IMG_1843

I’m sure many folks in the States had never heard of it either until it got so much press a couple of years ago when Prince William chose it for his groom’s cake, I guess thereby proving it is a confection “fit for a king”. But for those of you who somehow missed out on all of the hoopla surrounding the royal wedding (where exactly were you?), a Chocolate Biscuit Cake is just what it sounds like, a dense chocolate cake with pieces of crumbled biscuits (cookies) running throughout.

IMG_1965

There are so many things that are fabulous about this cake. First of course is how utterly scrumptious it is. I mean complete chocolate bliss. And the cookies stay wonderfully crunchy, even after a day or two. (Ha! As if this cake would still be around a day or two after it is made!) The second glorious thing about this cake is that it is ridiculously easy to make. I’m not exaggerating. There is no baking involved. You basically melt some chocolate with butter, cream, and golden syrup, add some crumbled biscuits and pour it into a prepared pan and stick it in the refrigerator. Ta Da!

IMG_1880

There are a couple “foreign” ingredients you will need to try to track down. The biscuits traditionally used are digestive biscuits and the brand I prefer is McVities. If you are in the States, many larger grocery stores will carry some brand of Digestive Biscuit in their “International Food” section. If you can’t find them you could substitute in a butter cookie like Le Petit Beurre, Rich Tea Biscuits or simply Graham Crackers. Lyle’s Golden Syrup is a treacle, like molasses, but with a lighter color and less bitter taste. Again the best place to look for it is in the International Food section or possibly Baking section of a large grocery store. The King Arthur Flour store also sells it. A good substitution if you absolutely can’t get your hands on it is Dark Corn Syrup. I will also mention that Edible Ireland has posted a great recipe for Chocolate Biscuit Cake that does not require Golden Syrup, so take a look there as well. Chocolate Biscuit Cake is quite versatile. You can make it in any shape pan you prefer, round, square or loaf tins are fine. And you can easily customize this recipe by adding your favourite treats into the mix. I’ve seen recipes that call for rum soaked raisins, various nuts, or chopped up candy bars. Edible Ireland puts espresso powder in their biscuit cake, which I think sounds divine.

IMG_1890

This luscious cake is verrrrrry rich. Think of a cake made of fudge. A tiny sliver of a slice will go a long way. I’m not sure what sort of “chocolate coma” I would be in if I ate a slice the likes of which I have pictured here. Now I’m not saying I haven’t eaten that much biscuit cake in a day. I’m sure I’ve managed even more. But my modus operandi is to methodically slice off “small, little tastes” every time I walk by the cake and then to wonder at the end of the day what it is about being in the refrigerator that causes so much shrinkage in cakes! Treat yourself to a Chocolate Biscuit Cake on this St. Patrick’s Day.

IMG_1936

Chocolate Biscuit Cake

recipe from: Rock Recipes

Ingredients:

  • 2 pounds dark chocolate, roughly chopped (about 50% cocoa)
  • 1 pound unsalted butter
  • pinch salt
  • 1/4 cup whipping cream
  • 1/3 cup Lyle’s golden syrup
  • 1 pound digestive biscuits, broken by hand into postage stamp sized pieces

For the Ganache:

  • 1/2 cup whipping cream
  • 1 tbsp corn syrup
  • 8 ounces dark chocolate chopped

Directions:

Melt the butter over medium low heat. Add the chocolate and salt and continue over medium low heat until the chocolate is fully melted. Remove from heat and stir in the whipping cream and golden syrup until smooth. Fold in the broken biscuits and pour into a 9 inch springform pan that has been lined with plastic wrap or parchment paper. Chill in the fridge for at least 3 hours or overnight. Remove from pan and glaze with chocolate ganache.

For the Ganache:

Scald the cream in the microwave until almost boiling. Pour over chocolate in a small bowl and let stand for five minutes. Stir until smooth then stir in the corn syrup. Pour over the cooled biscuit cake using a spatula to help cover it evenly. Reserve a bit of ganache to decoratively pipe or drizzle onto the top of the cake if so desired.

Enjoy!


Oat & Potato Bread

March 12, 2013

IMG_0930

Oats and Potatoes. Two ingredients which can evoke visions of the Emerald Isle all on their own and go together so well in this Oat & Potato Bread. I baked a loaf of this bread the other day and loved it so much I just knew I had to share it with you for St. Patrick’s Day. This bread is quite soft and moist. It is wonderful as a sandwich loaf but also toasts beautifully to serve with your Traditional Irish fry for breakfast. Now, I love Irish Brown Bread. I can’t get enough of the stuff. But I do have a good number of friends who seem to be a bit challenged by that rough, whole wheat texture. This Oat & Potato Bread is a great soft bread alternative to have on hand for those folks.

IMG_0894

This recipe uses freshly cooked potatoes, but you can use left over mashed potatoes to make this bread if you happen to have any on hand. I’m pretty certain I never will because my husband and I both LOVE Potato Farls. I know that any leftover mashed potatoes are automatically earmarked as “farl potatoes”. We are so obsessed with Potato Farls that I will even make up a batch of mashed potatoes, not so much because I want to serve them with dinner, but just becaue I’ve noticed that we don’t have anymore of our farls in the freezer. Oh yes folks….farls freeze wonderfully. You just take them out of the freezer and pop them directly into the hot oil-preferably bacon grease-and they fry up wonderfully golden and crispy. And then there is Boxty in the Pan, another great Irish bread that is made with left over mashed potatoes. It is baked in a pan, then fried up on a griddle and drizzled with honey. Yum! But I digress….we are talking about Oat & Potato Bread now, which is so delicious that you won’t hesitate to cook some potatoes up fresh if there aren’t any leftovers around!

IMG_0970

Unlike Irish Soda Bread and Irish Brown Bread, which use baking soda as leavener, or my Cheddar & Chive Guinness Bread which uses Guinness as a leavener, this bread does require yeast. Now don’t freak out…I can tell, you’re freaking out. I used to freak out at the mere mention of yeast. But really, there is no need. You can do this. Just make sure you plan ahead, because as with all yeast breads, there are a couple rising times involved here. It is a bit of work, but believe me, you will be thrilled with your finished loaf. Not to mention, your house will smell phenomenal!  This bread will go perfectly with all of your St. Patrick’s Day dishes, especially when it is slathered with Kerrygold Irish Butter!

IMG_0855

Oat & Potato Bread

recipe adapted from: The Complete Irish Pub Cookbook

Yield: One 5X9″ loaf

Ingredients:

  • vegetable oil, for oiling
  • 2 starchy potatoes, such as russets or Yukon gold, cut into even chunks
  • 3 2/3 cup white bread flour, plus extra for dusting ( I prefer King Arthur Bread Flour)
  • 1 1/2 teaspoons salt
  • 3 Tablespoons salted Irish butter, diced
  • 1 1/2 teaspoons active dry yeast
  • 1 1/2 tablespoons dark brown sugar, firmly packed
  • 3 Tablespoons rolled oats
  • 2 Tablespoons dry skim milk
  • 1 cup lukewarm water (98 -105° F or 36.5 -40.5° C)

Topping

  • 1 Tablespoon water
  • 1 Tablespoon rolled oats

Directions:

Oil a 5X9″ loaf pan. Put the potatoes in a large saucepan, add water to cover, and bring to a boil. Cook for 20-25 minutes, until tender. Drain, then mash until smooth. Let cool.

Sift the flour and salt into a warm bowl. Rub in the butter with your fingertips. Stir in the yeast, sugar, oats, and dry milk. Mix in the mashed potatoes, then add the water and mix to a soft dough. (Or you can follow this “High Tech. Version” -if you have a food processor and stand mixer: Place flour and salt in bowl of processor. Pulse a couple times to combine. Add butter and pulse until flour mixture resembles coarse sand. Put flour/butter mixture into bowl of stand mixer fitted with paddle attachment. Add yeast, sugar oats and dry milk. Mix on low to combine. Add the mashed potatoes and mix on low until incorporated. Add the water and mix until you have a soft dough.)

*Note* I had to add an extra half cup of flour to get the dough to reach soft dough stage. The dough should be sticky to tacky to the touch. Sticky means if you touch the dough with a dry finger, it will stick to it. Tacky is more like a post it note where it feels like it will stick at first but you are able to peel it off easily. You can also judge the state of the dough by how it looks in the mixing bowl. If it has pulled away from the sides of the bowl and only a bit remains stuck to the bowl at the bottom, it is likely ready to be kneaded.

Turn out the dough onto a lightly floured surface and knead for 5-10 minutes, or until smooth and elastic. (High Tech. Version: Attach the dough hook and knead on low speed for about 8 minutes, or until smooth and elastic).

Put the dough in an oiled bowl, cover with plastic wrap and let rise in a warm place for 1 hour, or until doubled in size.

Invert the dough onto a lightly floured surface and knead lgihtly. Shape into a loaf and transfer to the prepared pan.

*Note* To shape dough into a loaf, flatten it into a 5X8″ rectangle. Roll into a log starting from the 5″ end. Pinch the seam closed and gently roll the loaf back and forth on the counter to smooth it out. Place the loaf in the prepared pan with the seam side down.

Cover and let rise in a warm place for 30 minutes. Meanwhile, preheat the oven to 425°F.

Brush the surface of the loaf with the water and carefully sprinkle oats over the top. Bake in the preheated oven for 25-30 minutes, or until it sounds hollow when tapped on the bottom. Transfer to a wire rack and let cool slightly. Serve warm.

Enjoy!


Brownie Tart with Irish Whiskey Meringue

March 11, 2013

IMG_0692

Alright, alright, alright! Only seven more days to go until St. Patrick’s Day! I can’t believe I’ve managed to get this far with my blogging extravaganza! I’m almost there! And today I’ve got a great St. Patrick’s Day recipe for you…Brownie Tarts with Irish Whiskey Meringue. Nom, nom, nom! I mean who wouldn’t love a moist, decadently rich, chocolate brownie topped with a veritable mountain of sweet, Irish Whiskey meringue?! Now you can make this dish as one large 9″ dreamy tart, or if you have the smaller, individual sized tart pans, it will make eight of those deliciously cute little devils.

IMG_0699

I’m a sucker for the personal sized dishes. Perhaps it is because small things are so cute…you know like puppies and kittens. It also might have to do with the fact that once you get your hands on an individual sized portion, which is often bigger than you likely would have helped yourself to if left to your own devices, you don’t have to share it with anyone else. Oooo…did I  just admit to not wanting to share? Everyone knows, “sharing is caring”. Except for when it comes to desserts and then I think it is more like “every man for himself”.

IMG_0722

Anywhoo…. I went with the individual tart pans. The original recipe said that it only would make four individual tarts, but I definitely got eight out of it…and they were not skimpy tarts, but filled the whole of each little pan…Dunno…I’m just going to go with “more is better” so lucky me!

IMG_0731

And although this dessert looks quite impressively difficult, it is very easy to make. Everyone can pull off some brownies, so no sweat there . Now meringues have been known to be a bit finicky and temperamental, but this one was very cooperative, rising to celestial heights and perhaps more importantly, once there, staying put and not sinking back down to the gloomy depths the second you turned your back on it. And I should mention, there is Irish Whiskey in this here meringue. I don’t want to leave that essential fact out. Perhaps it is the whiskey that makes that meringue so resilient. It definitely makes it particularly tasty! Come on…make up a batch today…you know you want to!

IMG_0781

Brownie Tart with Irish Whiskey Meringue

recipe from: A Communal Table

yield: Eight 3 1/4″ individual tarts

Ingredients:

For the Brownie Tarts:

  • 200 grams dark chocolate, chopped (about 7 oz.)
  • 1 cup plus 2 Tbsp. butter
  • 2/3 cup superfine sugar
  • 1 cup brown sugar
  • 4 eggs
  • 1 1/3 cups flour
  • 2 Tbsp. good cocoa powder
  • 1 Tbsp. Irish whiskey (I used Jameson’s)

For the Irish Whiskey Meringue:

  • 4 egg whites, room temperature
  • 1 cup superfine sugar
  • 1 Tbsp. cornstarch
  • 2 tsp. white vinegar
  • 1 Tbsp. Irish Whiskey

Directions:

Preheat the oven to 325° F.

Grease a 9 inch removable bottom tart pan or eight 3 1/4 inch individual tart pans and set aside. Add the butter and the chocolate to a medium saucepan and heat over low heat until melted and smooth. Remove from heat. Add the sugars, eggs, flour, cocoa and whiskey to the saucepan and mix until thoroughly combined. Pour batter into prepared tart pan(s). Bake for 25 to 30 minutes or until the brownies are set. Remove from oven and cool.

For the meringue, add the egg whites to a mixer bowl and beat until soft peaks form. Gradually add the sugar while beating until the egg whites are thick and glossy. Add the cornstarch, vinegar and whiskey and beat until combined. Spoon the meringue over the cooled brownie. To toast, either use a kitchen torch or pre heat the broiler to high and broil for 1 minute until the meringue is golden brown. Slice and serve!

Enjoy!


Mince & Cheddar Pasties

March 10, 2013

IMG_0420

I know I have mentioned that my husband and I love meat pies, so I’m very happy to share this recipe for Mince & Cheddar Pasties today. Last year, during my St. Patrick’s Day countdown, I wrote about one of our favourite type of pasty, Chicken & Leek. The origins of the pasty (pronounced pass-tee) are unclear, but it is most usually associated with Cornwall, England not Ireland. However, I ate my first pasty while living in Ireland and therefore when presented with one, warm memories of Ireland always accompany it. But for those of you who might be as of yet unfamiliar with these particular culinary creations, let me start from the beginning. A pasty is a pastry case filled with a meat/vegetable, meat/cheese mixture, or strickly veggie mix, sealed by crimping the edges (more on this “crimping” technique later) and then baked. Oh, and when I say “mince” here, I am talking about ground beef or hamburger. Not whatever that stuff is in mincemeat pies. So Mince & Cheddar pasties are kind of like a “cheeseburger pie” if such a thing exists. (If so, I bet it is delicious!)

IMG_0505

The most difficult thing about making these pasties is getting the edges crimped together properly after you’ve topped the rolled out dough with mince & cheese filling. The easiest thing to do is paint the edges of the dough with water or egg wash, fold it over and then just use a fork to crimp the edges closed, thus sealing it. This technique will certainly get the job done. But I have never been satisfied with that simplified crimp. I wanted to get much fancier and do a proper crimp.

IMG_0490

I took a look out there on the interweb and as it turns out, there is all sorts of controversy surrounding how and where the crimp of a pasty is done. If you crimp your pasty on the side, it can be called a Cornish Pasty, however if you do a top crimp it should be called a Devon Pasty. And believe me, it looks like folks get really riled up over this. Hmmm…Here is a link to a demonstration of how to crimp a pasty, if you are interested in trying to give it a whirl. It does take a bit of practice, but it looks great if you can master it and the thicker crimp provides a great “handle” to hold onto your pasty while eating it.

IMG_0525

Now, if you were pressed for time and didn’t want to bother with fiddling around with the dough much at all, what you could do is get some puff pastry from your local supermarket. Put the mince filling in individual ramekins or a larger pie dish or casserole dish and just cut that store-bought pastry to fit over the top. Easy peasy right? I’m afraid I just couldn’t do that to the husband though, he really loves the pasties when they show up here, so I guess I’ll just keep practicing my crimping.

IMG_0464

When my husband and I visited Ireland this past October, we met friends out in a pub while in Dublin. That particular establishment’s “Pie of the Day” turned out to be a Mince & Cheese Pie. We couldn’t resist and ordered it and while it was good, I was delighted when my husband whispered “yours are better”. I’m hoping it wasn’t just the pints talking! I do think that these Mince & Cheddar Pasties of mine are just little bundles of tasty goodness. The rough puff pastry is buttery and flaky and the mince mixture is really flavourful and oozing with cheddar cheese. Yum! Maybe I can get a job as Top Pasty Chef down at the local pub…

IMG_0452

Mince & Cheddar Pasties

yield: 6 pies

Ingredients:

For the filling:

  • 1 Tablespoon olive oil
  • 1 lb. ground beef (mince)
  • 1 onion, grated
  • 2 cloves garlic, minced
  • 2-3 springs fresh thyme, leaves only
  • 3 Tablespoons Worcestershire sauce
  • 2 Tablespoons Tomato puree
  • 1 Cup beef Broth
  • 1 cup red wine
  • salt and pepper to taste
  • 1 Cup Irish Cheddar

For the rough puff pastry:

  • 2 cups all-purpose flour
  • a pinch of sea salt
  • 2/3 cup chilled unsalted butter, cut into small cubes
  • 1 egg, lightly beaten with 1 teaspoon of milk, for glazing

Directions:

For the Puff Pastry:

To make the pastry, mix the flour with the salt in a food processor. Pulse to combine.

Add the cubed butter pieces and pulse until the mixture resembles coarse crumbs.

Add just enough ice water ( 8 – 10 tablespoons) to bring the mixture together into a fairly firm dough.

Shape the dough into a rectangle with your hands and on a well-floured surface, roll it out in one direction, away from you, so that you end up with a rectangle about 3/8″ thick. Fold the far third towards you, then fold the nearest third over that (like folding a letter), so that you now have a rectangle made up of 3 equal layers. Give the pastry a quarter turn, then repeat the rolling, folding and turning process 5 more times. Wrap the pastry in plastic wrap and rest it in the fridge for 30 minutes or up to 1 hour.

While the dough is chilling, make up the mince and cheese filling.

For the filling:

Heat oil in large frying pan. Add ground beef to pan and cook until browned. Season with salt and pepper to taste. If meat has released a lot of grease, drain off. Return pan to heat and add onion and garlic. Stir to combine. Add Worcestershire sauce, tomato puree and thyme. Cook stirring constantly for 2 minutes or so. Pour in red wine and reduce until it is almost completely evaporated. Add beef stock and bring to boil. Allow to simmer until sauce is thickened. Set aside to cool completely.

Once filling has cooled, Preheat oven to 375° F.

Assembly:

Roll out the pastry on a lightly floured work surface to about 1/8″ thick. Using a plate or cake pan as a template, cut out six 8″ circles.

Brush the around the edges of the circle with the egg wash. Spoon about 1/6 of the mince mixture on to one half of each circle. Cover meat filling with cheddar cheese. Fold the pastry over the filling to form a half-moon shape and crimp the edges to seal.

Place on a baking sheet lined with parchment paper and brush the tops of the pies/pasties with the egg wash. Slice a couple small slits in the top of each pasty. Bake for about 25-30 minutes until golden brown. Eat hot or cold as you wish.

Enjoy!

*Recipe for “Rough Puff Pastry” from Hugh Fearnley-Whittingstall’s “River Cottage Every Day”