
So woooo-hooo! This year I am on it! I am actually blogging about a Halloween recipe, prior to the actual date of the holiday. Last year I didn’t get my Halloween Cupcakes up on my blog until November, so quite an improvement. Now just look at these adorable Frankenstein Cupcakes I have for you this year!

And these cupcakes aren’t only cute…no siree! They are absolutely delish! The cupcake portion is a decadent Black Velvet cupcake, which is so moist it practically melts in your mouth and it is frosted with Swiss Meringue Buttercream Frosting, which is my all time favorite frosting. Unlike American or Simple Buttercream icing which can be very heavy and taste somewhat greasy – this frosting is perfectly sweet light and fluffy.

Halloween is my favorite holiday! I mean, think about it…You get to dress weird, drink booze and eat candy for dinner. In fact all of that fun stuff is encouraged. How could you go wrong on such a day! Halloween actually has Irish origins. Our modern Halloween celebrations are derived from the Celtic holiday of Samhain. Samhain was Celtic New Year. It was a harvest festival which marked the dying of the sun-god and a turning to the colder, dormant half of the year. On this night, the Celts believed the veil between the worlds of the living and the dead was at its lowest point. The dead could more easily travel back over to our side, and if we weren’t careful, we could accidentally wander over in to their world and be trapped-a good reason to stay close to home and bonfires, no doubt! This belief likely gave rise to our Halloween legends of ghosts, ghouls and witches wandering about on this night in particular. I’ve posted some great Halloween recipes in past years ranging from the historically based traditional recipes such as:
Soul Cakes (Traditional Halloween/ Samhain)

Yeasted Irish Barmbrack Bread (traditional Halloween/Samhain)
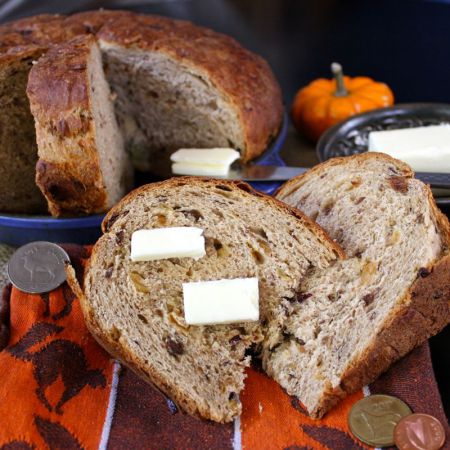
Irish Tea Barmbrack with a Whiskey Honey Glaze (traditional Halloween/Samhain)

To the more whimsical offerings such as:
White Chocolate Mummy Pretzels

Halloween Cookies & Cream Owl Cupcakes

Mini Mummy Brownie Bite Cupcakes

As well as some wonderful boozy libations to kick your celebrations into high gear:


And last year’s Halloween treat which combined whimsical and boozy altogether with these adorable – I mean terribly frightening – Itsy-Bitsy Tipsy Spider Cupcakes.

But let me get back to what’s on the Halloween treat menu this year: Black Velvet Frankenstein Cupcakes.

I was inspired to make these when I saw Your Cup of Cake’s blog featuring them. You should definitely take a look at her blog before you decorate these little monsters. She has a video that shows exactly how she did it. However, she used a different cupcake for her cake portion, as well as a different frosting. I really adore these Black Velvet Cupcakes. Not only are they the perfect darkest of dark shade of black, but they simply taste amazing. And I’ve already told you how I love Swiss Meringue Frosting, so smooth and silky! So I made a few changes to the ingredients to suit my taste, but credit Your Cup of Cake for the perfect design!

All if all, these cupcakes are pretty easy to make. Decorating them is a bit fiddly. Getting the frosting smoothed to the correct shape for the Frankenstein head took some attention. The candy scars took a bit of time the way I did them, but I like the taste of white chocolate better than that gel frosting you find in a tube in the supermarket. Unwrapping all of the Rolo candies was a bit of a pain….But just look at these little monsters! The end, without a doubt, justifies the means here. Folks will go mad for these and you’ll be the belle of the Halloween ball! Sooo…I’ve actually given you enough time this year…what are you waiting for? Get into your laboratory – errr kitchen – and create a batch of these Black Velvet Frankenstein Cupcakes today! Happy Halloween!!!

Black Velvet Frankenstein Cupcakes
recipe: Frankenstein Design by Your Cup of Cake, Black Velvet Cupcake recipe: Craftsy
Ingredients:
For the cupcakes:
- 1½ cups butter (room temperature)
- 2 1/2 cups superfine sugar
- 1 – 2 teaspoons black gel food color
- 2 eggs
- 1 teaspoon vanilla bean paste
- 2½ cups cake flour
- 2 tablespoons baking cocoa powder (dutch process)
- 2 pinches of salt (approx. 1/8 teaspoon)
- 1 cup buttermilk
- 2 teaspoons of white vinegar (distilled)
- 1½ teaspoons baking powder
For the frosting:
- 5 large (150 grams) egg whites
- 1 1/4 cups (250 grams) granulated sugar
- 3 sticks (340 grams) unsalted butter, at room temperature, cut into cubes
- 2 teaspoons pure vanilla extract
- 1/4 teaspoon fine salt
- green gel food coloring
For the decorations:
- Wilton googly candy eyes – unless you want to make eyes with Ghirardelli white chocolate melts and M&M’s as described below.
- Rolo Candy
- Chocolate Jimmy Sprinkles
- Ghirardelli White Chocolate Candy Melts
- Red gel food color
Directions:
For the Cupcakes:
Preheat the oven to 350° F and fill the wells of a cupcake pan with liners. Set aside.
In the bowl of a stand mixer, cream the butter and sugar together until it is light and fluffy. Add black food color until desired shade is reached. Remember – once baked the cupcakes will have a darker color. My batter looked more grey than black, but once baked the cupcakes were very dark.
Add the eggs one at a time, beating well after each addition. Add the vanilla paste and mix to incorporate.
In a separate bowl, mix the flour, cocoa and salt together.
Add the dry ingredients to the butter mixture in thirds, adding buttermilk between each addition. Mix until just combined.
In a small bowl, mix the baking powder and vinegar together. It will bubble and fizz. Add it to the batter and mix until just incorporated.
Using an ice cream scoop or 1/4 cup scoop, fill the lined cupcake tins.
Bake for 20 – 25 minutes
Cool completely on wire rack.
For the Frosting:
Wipe the bowl of an electric mixer with paper towel and lemon juice or vinegar to remove any trace of grease. Make a double boiler by placing the mixer bowl over a saucepan of simmering water, making sure the bowl doesn’t touch the water.
Add the egg whites and sugar to the bowl, whisking constantly but gently, until temperature reaches 140°F, or until the sugar has completely dissolved and the egg whites are hot.
Attach the bowl to the mixer fitted with the whisk attachment and begin to whip until the meringue is thick, glossy, and the bottom of the bowl no longer feels warm, about 7 to 10 minutes.
Switch over to paddle attachment and, with mixer on low-speed, add the butter cubes, one at a time, until incorporated. Continue beating until it has reached a silky smooth texture. If the buttercream curdles simply keep mixing and it will come back to smooth. If the buttercream is too thin and runny, refrigerate for about 15 minutes before continuing mixing with paddle attachment until it comes together. Add the vanilla and salt, continuing to beat on low speed until well combined.
Add green food coloring gel to frosting until it reaches desired hue.
If you would like to make this frosting ahead of time, keep in airtight container in refrigerator for up to one week or in the freezer for up to 2 months. Let come to room temperature and rewhip in the mixer with the paddle attachment before using.
When you are ready to assemble the cupcakes, place frosting in pastry bag fitted with a large round tip & pipe a swirl of frosting on top of each cupcake. Use a knife or offset spatula to flatten the frosting. Turn the cupcake upside down and press into a bowl/plate filled with chocolate Jimmy sprinkles. Press on the eyes (see note below) and use an extra sprinkles to make the eyebrows and mouth . Use Rolo candies to make the bolts. You could also use chocolate chips, bits of a Tootsie Roll or maybe even a mini marshmallows. Press the bolts into the side of his head. Put on a little “stitch” (You can use red store-bought frosting, I used a gel food color to color Ghirardelli white candy melts.
I used Wilton Candy eyes on these Frankenstein cupcakes, mostly because I was a bit pressed for time. There is certainly nothing wrong with those candy eyes, and they don’t really taste bad, but for more tasty eyes you can melt some of the Ghirardelli white candy melts. Place the melted candy into a piping bag and then pipe out little white eyes onto parchment paper. Place M&M candies into the white chocolate before it hardens to make the “iris” of the eye and voila – There you have it – tasty candy eyes. For the “stitches” I colored the white chocolate with red gel food color and then piped it onto parchment paper. Once it hardened, I transferred the stitches to the Frankensteins.
Enjoy!
Black Velvet Frankenstein Cupcakes brought to you by: Runcible Eats (www.leaandjay.com)


 Posted by liadh1
 This cake is amazingly moist and tender, just bursting with apple flavour. It would be delicious simply unadorned, but it is completely over the top when brushed with some boozy cider glaze and dusted, quite liberally with crunchy cinnamon sugar.
 It is great anytime of the day, for breakfast, tea-time snack, dessert or even when eaten in the dark in the middle of the night while everyone else is sleeping. What? Like you haven’t done that?
 And I must say, this cake is a breeze to make. I love Apple Cider Donuts, let there be no doubt. But a gotta say, they are a bit fiddly to make, what with the rising and the frying etc. Definitely a labour of love. Now, this cake will lead folks to believe you slaved away all day….when really you were outside enjoying the beautiful Fall weather. And I won’t tell them otherwise. Mum’s the word.


