Cookies & Cream Salted Caramel Popcorn Bars

October 31, 2013

IMG_4617

Happy Halloween! I LOVE Halloween. Our neighborhood, which is near “Sleepy Hollow” (I kid you not!) is all decked out in all of its spooky finery

IMG_1141

I’ve noticed quite a few new residents

IMG_1138

who seem to be getting up to all sorts of mischief

IMG_1140

and well some of them are just downright creepy!

IMG_1129

I am so sad to say that the husband and I have not attended a proper Halloween costume party since 2010! I am simply appalled!! Unfortunately that trend is continuing this year as we have no big plans at all. As I mentioned in my last blog, things around here are craaaaZy (that’s right…with a capital Z) right now. I had all sorts of plans for the Halloween goodies I was going to conjure up for you. I’ve made some really fun treats in the past. I think my all time favourite Halloween creation is the Soul Cake.

IMG_8703

It might just be the historian in me that makes me love it so much, because truth be told, unlike most sugar laden, tooth-achingly sweet candies found in abundance on Halloween, these little cake like cookies are only mildly sweet. There is not a speck of chocolate to be found in them, only a few currants top the cakes arranged in a cross pattern. What can I say, sometimes less is more. Here is a little bit from my Soul Cake blog post which talks about the origins of Halloween and the Soul Cake connection.

Our modern Halloween celebrations are derived from the Celtic holiday of Samhain. Samhain was Celtic New Year. It was a harvest festival which marked the dying of the sun-god and a turning to the colder, dormant half of the year. On this night, the Celts believed the veil between the worlds of the living and the dead was at its lowest point. The dead could more easily travel back over to our side, and if we weren’t careful, we could accidentally wander over in to their world and be trapped-a good reason to stay close to home and bonfires, no doubt! This belief likely gave rise to our Halloween legends of ghosts, ghouls and witches wandering about on this night in particular. As Christian beliefs took hold, Samhain celebrations became re-branded as All Soul’s Eve. By the eighth century beggars, rather than the spirits from the other world, would travel door to door on this night. In exchange for their prayers for the family’s departed, they were given a small cake, known as a Soul Cake.

IMG_8684

I also was quite fond of these Halloween Popcorn Balls I made back in 2011.

IMG_8443 - Version 2

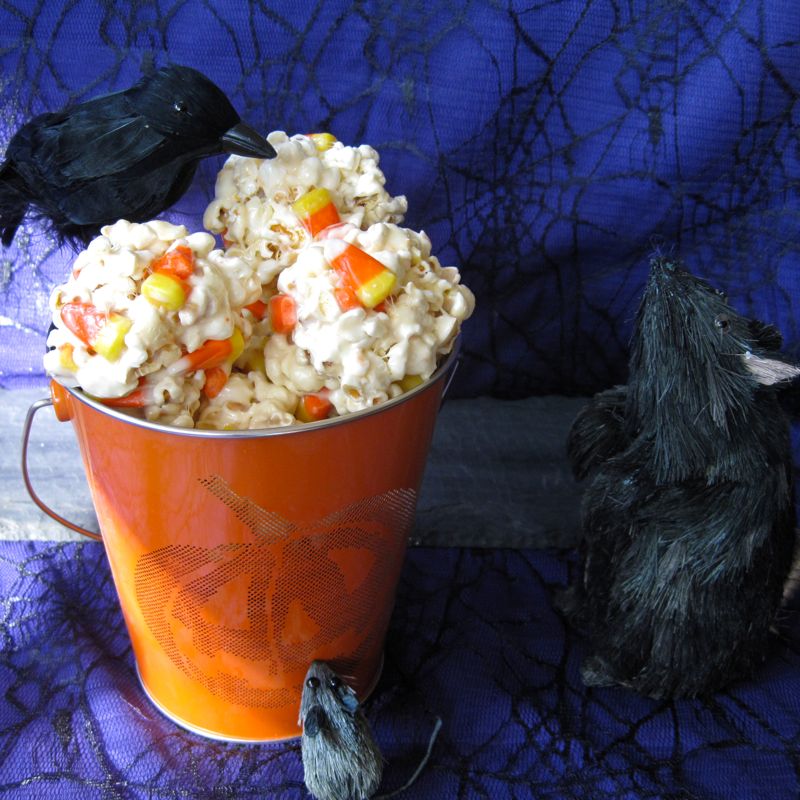
The husband is a big fan of popcorn. He would be quite happy to eat it every day. And I think his love of popcorn has rubbed off on our pup. He actually recognizes that word now and can make it into our kitchen from anywhere in the house in less than 10 seconds when he hears the telltale rattle of the popcorn kernels hitting the metal pan.

IMG_8506

Alas, all I could manage to get done this year was this batch of Cookies & Cream Salted Caramel Popcorn Bars. Yup, there sure is popcorn in this treat. I figured if I could only get one of my intended treats done, I would pick one that I knew would make the husband very happy. And turns out this one was a real winner!

IMG_4618

Believe me, if you find yourself a little short on time today and haven’t managed to conjure up any fabulous holiday treats, this might be the recipe for you. But let me tell you about these little devils. The bottom layer is a cookie dough crust. I used chocolate chips and those Halloween white chocolate Candy Corn M&M’s that can be found this time of year. I am so thankful that they are only found around this time of year, because those things are similar to the Cadbury Mini Eggs for me…pure crack! I could literally eat them until I popped….or more likely until the top button popped off my britches! So as happy as I am to see them arrive in stores, I am somewhat relieved when they disappear again. But back to the recipe, if you aren’t as fond as I am of the Candy Corn M&M’s (I can’t imagine!) you can throw in a cup of whatever candy you like and customize it to fit your taste. The original recipe I had for these uses Reese’s peanut butter cups, which I think would be delicious as well. I am a big fan of the Reese Cup, but I was really trying to Halloween things up around here so the candy corn colours of the M&M’s won out. On top of that great cookie base you will find a thin cream layer, similar to what you find sandwiched in the middle of a Oreo cookie. The top layer consists of gooey salted caramel coated popcorn, which has been drizzled with chocolate and sprinkled with flaky sea salt. Good grief! They are amazing! I think I chose well.

IMG_4588

Although there are several steps involved in making these bars, they are all pretty quick and easy. Make sure you allow for cooling time for the bottom cookie layer as well as at least 1 hour or so for the bars to set before cutting them. If you want to make them look even more “Halloween-y” you could sprinkle some candy corn over the caramel popcorn layer or even some Candy Corn M&M’s that you have left over from the cookie base. I’m sure you know by now that I did not have any “left over” M&M’s by the time I was adding the salted caramel popcorn layer. Nope I promptly inhaled the rest of the bag shortly after it was opened. I had to keep my strength up in the kitchen, I had no choice. But you might be able to exercise some self-control and set a few aside. Although I really wish the husband and I were getting all dressed up tonight and heading out to a fancy party to celebrate Halloween, I guess there is always next year. I definitely feel somewhat less deprived finding myself in possession of these sinfully delicious, salty sweet bars. Or maybe it is them who have possessed me……Mwa-hah-hah! Happy Halloween!

IMG_4625

Cookies & Cream Salted Caramel Popcorn Bars

recipe slightly adapted from: Half Baked Harvest

yield: 18 -20 bars depending on how you slice them

Ingredients:

For the Cookie Layer

  • 2 1/2 cups all-purpose flour
  • 1 teaspoon baking soda
  • 1 teaspoon salt
  • 2 teaspoons water
  • 1 cup (2 sticks) unsalted butter, softened
  • 1/4 cup granulated sugar
  • 3/4 cup brown sugar
  • 2 teaspoons vanilla extract
  • 2 large eggs
  • 1 cup semi-sweet chocolate chips
  • 1 cup Halloween Candy Corn M&M’s (or your favourite)

For the Cream Layer

  • 1 stick (1/2 cup) butter, softened
  • 1 1/4 cups powdered sugar
  • 1 teaspoon vanilla extract
  • 1/4 teaspoon salt

For the Salted Caramel Popcorn

  • 1/2 cup brown sugar + 1/4 cup water
  • 1/4 cup butter, cut into cubes
  • 3/4 cup cream
  • 1 Tablespoon vanilla extract
  • 1/4 cup butterscotch chips
  • flaked sea salt
  • 5 cups popped popcorn
  • melted chocolate for drizzling

Directions:

Preheat the oven to 350° F. Grease a 9×13″ baking tin or line in with parchment paper.

Combine the flour, baking soda and salt in small bowl. Beat the butter, granulated sugar, brown sugar and vanilla in large mixer bowl until creamy, about 3-5 minutes. Add the eggs one at a time, beating well after each addition. Gradually beat in the flour mixture and the 2 teaspoons water. Fold in the chocolate chips and M&M’s (or candy of your choice.)

Spread the dough into the prepared pan. Bake 18 – 25 minutes, until just set in the center. Allow to cool completely before adding the cream layer. You can pop the pan into the freezer or fridge to accelerate the cooling process if you are pressed for time.

Once the cookie layer is cool, make the cream layer. In a stand mixer, beat the butter until smooth and creamy. Add the powdered sugar slowly. I usually do 1 heaping Tablespoon at a time. It will be less gritty if you add the sugar slowly. Add the vanilla and salt and beat until smooth. Spread the cream over the cookie layer.

Now for the caramel popcorn. Combine the brown sugar and water in a small saucepan over medium high heat. Bring the mixture to a boil. Once it begins to boil watch closely and whisk until the mixture starts to smell like caramel. This will take about 5-6 minutes. Add the butter cubes and slowly pour in the cream, whisking constantly. Continue to heat over medium-high until the mixture has thickened, about 5 -10 minutes more. rEmove from the heat and stir in the butterscotch chips, vanilla and a good pinch of salt. Stir until smooth. Place the popcorn in a large bowl and pour the caramel over it. Toss well and then spread the popcorn over the cream layer. Melt 1/4 cup chocolate chips and drizzle over the top. Sprinkle with a good amount of flaked sea salt. If you would like to add some additional candy decoration such as candy corn or the elusive “left-over” Candy Corn M&Ms, do so now. Let sit at least 1 hour before cutting. You can place them in the ridge to help them set faster. Cut into bars.

Enjoy!


Cheesy Zucchini Bacon Casserole

October 27, 2013

IMG_4138

I seem to be getting a bit behind with my blogging again. Though I must say this past week has been a doozy! You know that old saying, “when it rains, it pours”? Well I’m getting ready to break out one of those little Zodiac inflatable boats you always see those Greenpeace folks buzzing about in. Yikes! But looking to the positive side of things for a minute, I am happy to say that it has been a bit cooler around here. I’m actually wearing light gloves and a hat on the morning and evening dog walks, which raises both my and the pup’s spirits. Fall is here and I believe next week the clocks “fall back” which I absolutely love. Nearly as much as I despise it when the clocks leap forward. I do wish we would just pick a time and go with it. But I digress…on to the recipe at hand! Today’s dish is another zucchini recipe which comes from my Mom. This one is just perfect for that transition time between summer and fall. You know what I’m talking about…there are still some zucchini hanging around from the warmer weather, but it’s just started to get a bit chilly where a warm, cheesy casserole would be very welcome. And really folks, how could you go wrong with this one…you’ve got the good-for-you-veggies in the zucchini, but yes you might have noticed there is also a bit of cheese and bacon thrown in for good measure. Hopefully these ingredients don’t cancel out the benefit of the zucchini. :p

IMG_4167

I don’t know what to say, cheese and bacon are nothing short of magic in my opinion. The recipe comes together very quickly and is quite tasty. Great as a side dish or I suppose it wouldn’t be too dreadful if you left the bacon out (OMG…am I really saying this?!!) and served it on a Meatless Monday. I’ll leave that up to you, but mark my words..you’re going to love this one!

IMG_4180

Cheesy Zucchini Bacon Casserole

recipe from: My Mom

Ingredients:

  • 5 cups zucchini (about 5 -6 small to medium zucchini)
  • 1 cup sour cream
  • 2 egg yolks
  • 2 tablespoons flour
  • 2 egg whites-stiffly beaten
  • 2 cups shredded cheddar cheese
  • 10 -12 slices of cooked Bacon, crumbled (approx. 10-12 tablespoons of real bacon bits)
  • 1 cup Panko, tossed with 2 tablespoons melted butter.
 Directions:

Preheat oven to 350° F and butter a 13×9″ baking dish.

Cook zucchini in small amount of boiling, salted water -about 5 min.

Mix together sour cream, egg yolks and flour and then fold in the egg whites.

Layer ingredients in the prepared 13×9″ casserole dish, starting with the zucchini, followed by the sour cream egg mixture, the bacon and then the cheese.

Top with butter tossed Panko.

Bake for 20 minutes or until cheese is melted and it is bubbling.

Enjoy!


Blue Moon Orange Slice Cupcakes

October 18, 2013

IMG_4400

I have a very important question for us to ponder today. What is the true way to a man’s heart? I’m not 100% sure, but what I do know is making these cupcakes spiked with Blue Moon beer and topped with Orange Slice candies will certainly get you pointed in the right direction! I mean come on, made with beer and candy, these are truly “manly cupcakes” if  such a thing exists.

IMG_4429

These little devils were quite popular with my husband to say the least. He is definitely a fan of craft beer, to the point that he actually has started brewing his own. (Stay tuned for more on that story). And Blue Moon Brewing Company’s Belgian White is a craft beer high up on his list. You’ve probably noticed it being served when you’ve been out and about before. It is the beer that is served garnished with an orange slice. This is done to heighten the taste of the Valencia orange peel which is used in brewing. So I thought you just couldn’t go wrong using this particular brew in these orange themed cupcakes. I actually used Blue Moon Brewery’s summer ale, Honey Moon, which is brewed with honey and orange peel. I am sad to say that this particular seasonal has been discontinued. But don’t despair!  As I mentioned their old standard, Belgian White, contains orange peel as well and would work wonderfully with this recipe. Their Spring Ale, Valencia Grove Amber, would be wonderful as well. Or you could consider trying these cupcakes with their current Summer Ale, Agave Nectar Ale. This offering uses agave nectar in the mix which is sweeter than honey and has a nuttier taste. Really, you just can’t go wrong with any of the Blue Moon brews!

IMG_4368

I originally came across the recipe for these Blue Moon Cupcakes on Spoon Fork Bacon and was instantly inspired. In their version, the cakes are frosted with an orange cream cheese frosting and topped with orange zest. I wanted to play on the usual orange slice garnish found on Blue Moon pints, so I decided to garnish my cupcakes with Orange Slice candy. Plus, I knew how fond my husband was of this particular sweet. I also used an orange infused Swiss Meringue Buttercream Frosting, rather than the Orange Cream Cheese one. Just a personal frosting preference. I did include the Orange Cream Cheese Frosting Recipe below for all you cream cheese lovers and you can go with your favourite. Either way, I’m sure you won’t be disappointed.

IMG_4426

These Blue Moon Orange Slice Cupcakes really are delicious, tender, moist and bursting with orange flavours.  I think they’re a great summer/fall transitional cupcake having the citrus-y summer notes and the wonderful orange colours of fall and Halloween. And don’t forget those tasty Orange Slice candies. I know the husband won’t. Believe me, with these little gems I have managed to score some serious points with him!

IMG_4456

Blue Moon Orange Slice Cupcakes

recipe adapted from: spoon fork bacon

yield: 15 cupcakes

Ingredients:

  • 1/2 cup unsalted butter, softened
  • 1 1/4 cup granulated sugar
  • 1 2/3 cup all-purpose flour
  • 1 teaspoon baking powder
  • 1/8 teaspoon salt
  • 2 eggs, room temperature
  • 1 teaspoon vanilla extract
  • 1 orange, zested
  • 2/3 cup Blue Moon beer
  • 2 tablespoons whole milk

Directions:

Preheat oven to 375°F. Line a muffin tin with 15 cupcake liners.
In a mixing bowl, sift together flour, baking powder and salt.Set aside.
In a stand mixer fitted with a paddle attachment, or with a hand mixer, cream butter for 1 minute. Add sugar and cream together with butter for about 3 to 4 minutes.
Add eggs, one at a time, scraping down after each addition.
Add vanilla and orange zest and mix until just combined.
In a mixing bowl whisk together beer and milk. Alternatively add beer mixture and flour mixture to butter mixture until fully incorporated.
Fill cupcake liners 1/2-2/3 full. I always use a large cookie scoop to make sure they are all a uniform size.
Bake for 15 to 18 minutes until golden brown and a toothpick inserted in center comes out clean. Transfer cupcakes onto a cooling rack and allow to cool completely.

Orange Swiss Meringue Buttercream Frosting

Ingredients:

  • 2 1/2 Large Egg Whites (I know it may be difficult to get an exact 1/2 of an egg white from an egg, just eye-ball it 🙂 It should be approximately 5 Tablespoons if you must measure)
  • 3/4 Cups Sugar
  • 1 Cups (2 sticks) Butter, cut into 1/2 inch cubes, cool but not cold
  • 1/8 tsp Salt
  • 3 teaspoons orange extract

For the topping:

  • 15 pieces of Orange Slice Candies
  • Orange sanding sugar

Directions:

In a medium bowl, whisk the egg whites and sugar together. Set the bowl over a pan of simmering water but do not let the water touch the bottom of the bowl. Heat the mixture until the sugar is completely dissolved and the color is milky white, about 2-3 minutes.

Transfer the egg mixture to the bowl of an electric mixer fitted with the whisk attachment, and beat on medium-high speed (start slowly at first) until smooth and fluffy, about 5 minutes. Remove the whisk attachment and replace with the paddle attachment. Add the cubed butter and beat on medium-high speed (start slowly at first) until smooth and fluffy, about 5 minutes. If the buttercream looks like it is breaking, don’t worry, it will eventually come together.

Add the salt and orange extract and beat for 5 seconds to combine.

Place frosting in piping bag and pipe onto cupcakes. Top with Orange Slice candy and sanding sugar.

Orange Cream Cheese Frosting

Ingredients:

  • 4 ounces cream cheese, softened
  • 1/2 cup (1 stick) unsalted butter, softened
  • 2 1/2 cups powdered sugar, sifted
  • 2 tablespoons freshly squeezed orange juice

For the topping:

  • 15 pieces of Orange Slice Candies
  • Orange sanding sugar

Directions:

In a stand mixer, or with a hand mixer, cream together butter and cream cheese. With motor running add sugar, 1/2 cup at a time until all sugar has been added, scraping down sides of the bowl after each cup of sugar. Stir in the orange juice until fully incorporated.

Place frosting in piping bag and pipe onto cupcakes. Top with Orange Slice candy and sanding sugar.

Enjoy!


Israeli Couscous & Orzo Salad with Fresh Mozzarella, Corn & Cherry Tomatoes

October 15, 2013

IMG_4081

This lovely pasta salad, chock full of fresh vegetables and herbs, practically screams summer. And although I am ready for some Fall weather, it is still fairly warm around here, so this salad would still be very welcome at any picnic or potluck to which you may find yourself invited. The combination of the zesty grilled corn, tangy tomatoes, fresh mozzarella and herbs is nothing short of addictive.

IMG_4087

Now I should mention, this recipe makes a whole bunch of this salad. If you’re only making it for a couple of folks, you might want to cut it in half. Either that or content yourself with the knowledge that you’ll be nibbling on it all week, which isn’t a bad thing at all! The original recipe recommends that you use raw corn, straight from the cob. No cooking necessary. However, as I’ve mentioned, I’ve been a bit obsessed with grilled corn and think that is the best way to go. However if you find yourself pressed for time, you could go with the raw option or just use some canned or frozen corn and you will still find this salad to be quite a delightful, healthy and refreshing summer time treat!

IMG_4094

Israeli Couscous & Orzo Salad with Fresh Mozzarella, Corn & Cherry Tomatoes

recipe from: The Cafe Sucre Farine

Ingredients:

  • 8 ounces Israeli Couscous
  • 8 ounces Orzo
  • ⅓ cup extra virgin olive oil, plus extra for drizzling over pasta
  • 3 cloves fresh garlic, finely minced
  • ½ cup fresh basil, finely chopped
  • ¼ cup fresh oregano, finely chopped
  • zest of 1 lemon
  • 2 teaspoons Italian seasoning
  • 1 teaspoon sea salt, more to taste
  • ¼ teaspoon freshly ground black pepper
  • 1 pint yellow cherry tomatoes, halved
  • 1 pint red cherry tomatoes, halved
  • 1 bunch green (spring) onions, thinly sliced
  • 6 ears fresh corn, shucked, grilled (see Tex-Mex Grilled Corn instructions here) and kernels cut from cobs or use 2-3 cups canned corn
  • 8 ounces fresh mozzarella, drained (if in brine) and cut in bite sized pieces
  • sea salt and freshly ground black pepper, to taste
  • small fresh herb leaves, if desired, for garnish
  • extra virgin olive oil, for drizzling

Directions:

Bring a large pot of water to a boil on the stove top. Add a generous measure of salt (about a tablespoon) and return to a boil. Add couscous and orzo, allow water to return to a boil and cook for about 10 minutes or until al dente. Stir frequently while pasta is cooking. Drain well and drizzle with olive oil, just a teaspoon or two to keep the pasta from sticking together.Stir to coat well to coat and allow to cool.

Combine the ⅓ cup olive oil, garlic, fresh herbs, lemon zest, Italian seasoning, sea salt and freshly ground black pepper in a large bowl.

Add halved tomatoes, green onions, corn and pastas. Stir to combine. Taste and add more sea salt and freshly ground black pepper as needed.
Add fresh mozzarella cubes and stir gently. Transfer to a serving bowl or platter. Add fresh herb leaves for garnish, if desired. Drizzle with a bit more extra virgin olive oil and serve.
Enjoy!

Banana Pudding Parfaits

October 11, 2013

IMG_3961

So I know veggies are great, delicious and nutritious. And we were really into gobbling them up this summer. In fact, I have a few more recipes in which those great summer vegetables play a starring role. However, I’m thinking it might be time to take a break from the veggies and talk a little dessert. Like take a peek at these wonderful Banana Pudding Parfaits. Yummy! Rich and creamy, they were really quite decadent. And folks, the pudding part of this recipe is not from a box. That’s right! It is homemade pudding, layered with buttery Scottish shortbread cookies or good old-fashioned vanilla wafers, fresh bananas and topped with just a sprinkling of mini chocolate chips, all bottled up in an adorable little mason jar.

IMG_3979

That made these desserts very portable. I just took care not to over fill them when assembling the parfaits, leaving just enough room to screw on the tops. Then I was able to transport them to the picnic in a cooler with no problems whatsoever. Not to mention, the mason jars just look very rustic and down home, even if your parfaits don’t need to travel.

IMG_3990

I had never attempted making pudding from scratch, always reaching for that quick and easy box mix before. I will admit, homemade pudding does take a bit longer, but it is oh so worth it! You will most definitely taste a difference. The homemade sweetened whipped cream lightens the pudding up. I used both traditional Nilla Wafers as well as Shortbread cookies, making half the jars with one type of cookie and half with the other. Both were delicious and it was fun having the choice. I bet chocolate covered graham crackers would be great in these as well…or maybe some of those Pepperidge Farms Milanos…The possibilities are endless! But let me tell you, folks went wild for these, just as they were. Bet you will too!

IMG_3950

Banana Pudding Parfaits

recipe from: Once Upon a Chef

yield: 8 half pint mason jars

Ingredients:

For the Pudding

  • 3/4 cup sugar
  • 1/4 cup + 2 tablespoons cornstarch
  • Heaping 1/4 teaspoon salt
  • 6 egg yolks
  • 3-1/2 cups whole milk
  • 2 tablespoons unsalted butter
  • 1 tablespoon vanilla extract
  • 1 tablespoon dark rum

For the Sweetened Whipped Cream

  • 1/2 cup heavy cream, cold
  • 2 tablespoons Confectioners’ sugar

For Assembling

  • 3-4 large bananas, very ripe but not mushy, sliced
  • 1-1/2 boxes Walkers Pure Butter shortbread cookies, or similar, broken into 1/4-inch pieces or Nilla Wafers, as you prefer!
  • Mini Chocolate chips

Directions:

In a medium saucepan, stir together the sugar, cornstarch, salt and yolks. Whisk in the milk and bring to simmer, stirring frequently, over medium heat (it will take 5-8 minutes). When the mixture starts to bubble, turn the heat down to low and continue cooking, whisking constantly, for 1-2 minutes until the mixture thickens. Remove the pan from the heat and immediately whisk in the butter, vanilla and rum. Transfer the mixture to a bowl and place a piece of saran wrap directly over the pudding to prevent a film from forming. Chill in the refrigerator until cool, a few hours. (To hurry it up, you can place the bowl in an ice bath and whisk occasionally until cold.)

Once the pudding is cold, place the heavy cream in a medium mixing bowl. Using an electric mixer, whip on medium-low speed until the whisk or beaters begin to leave tracks in the cream. Add the Confectioners’ sugar and whip until the cream holds medium, silky peaks. Go slowly towards the end; if it gets grainy or curdled, you’ve gone too far. Use a rubber spatula to fold the whipped cream into the cold pudding.

Spoon a large dollop of the pudding mixture into the bottom of each parfait glass or 1/2 pint mason jar, as I’ve used. Top with one layer of cookie pieces and one layer of sliced bananas. Repeat once and top with a final layer of pudding. Top with mini chocolate chips. Refrigerate until ready to serve.

*Do not slice the bananas until you are ready to assemble the parfaits. Parfaits are best when made 3-4 hours ahead of time.

Enjoy!


Zucchini Parmesan

October 8, 2013

IMG_4067

Alright, I’ve talked tomatoes and corn and the summer-like temperatures seem to be persisting around here… It must be time to talk Zucchini! I’ve seen some mouth-watering zucchini breads and muffins on various food blogs this summer, as well as some tasty looking zucchini sides, which got me itching to jump on that zucchini band wagon.

IMG_4037

I got this wonderful Zucchini Parmesan recipe from my Mom and after adding a bit of this and a bit of that, I’ve come up with a dish that is quick, tasty and nutritious! Great for Meatless Mondays or any other day of the week for that matter. If you’ve still got some Zucchini lingering about, give this dish a try!

IMG_4069

Zucchini Parmesan

recipe from: My Mom!

Ingredients:

4-5 small zucchini, sliced

1 small yellow onion, chopped

2 cloves garlic, minced

2-3 tablespoons fresh basil, chopped

2-3 tablespoons fresh oregano, chopped

1/2 jar spaghetti sauce ( whatever your favourite is…we like Arrabiata!)

1 cup mozzarella cheese, shredded

1 cup Panko

1/3 cup parmesan cheese

1 tablespoon butter, melted plus a few teaspoons more to dot over casserole

Directions:

Place sliced zucchini in casserole dish. Layer onion over the top. Sprinkle with chopped garlic. Dot with a few teaspoons of butter. Microwave on high for 15 minutes.

Preheat oven to 350°F.

Cover zucchini mixture with chopped basil and oregano. Pour spaghetti sauce evenly over dish. Cover sauce with shredded mozzarella.

Mix Panko and parmesan cheese together. Melt 1 tablespoon of butter and toss with Panko parmesan mixture. Top zucchini dish with Panko mixture.

Place dish in preheated oven and bake until top browns and cheese is bubbly.

Enjoy!


Tex-Mex Grilled Corn & Tomato Salad

October 5, 2013

IMG_3873

Hmmm….I was afraid I might have waited a little too late in the season to talk about all of the delicious late summer veggies. I really did think Fall was here. Boy was I wrong, not only has the mercury hit 85° F (29°C) around here but sounds like it is slated to shoot up to 88° F (31 °C) on Saturday. Really?!! Completely out of line Mother Nature! So, I guess it isn’t too late to talk about those summer veggies after all. I talked up tomatoes last time and today I will be talking about corn. I’m always happy to see corn on the cob at summer picnics and BBQs. Grilled up with this spicy marinade, you’ll think of it more as a treat than a vegetable!

IMG_3779

We certainly ate a lot of this Grilled Corn & Tomato Salad this summer. (It was another vehicle for my plethora of cherry tomatoes!) Sometimes we served it as a side dish, but a few times we made a big salad, added a few strips of grilled chicken and then spooned this spicy corn and tomato mixture over the top as a zesty dressing.

IMG_3882

If you have never grilled corn before, you simply must get started! Grilling it gives it a wonderful smoky flavour which goes along wonderfully with the natural sweetness of the corn.

IMG_3808

Simply peel those husks back, remove the corn silk, brush the salad dressing over the kernels and then gently fold the husks back over the corn. Grill for 20-25 minutes. Believe me, you will have a hard time not gobbling all that corn up right off the cob before you can get it anywhere near the salad bowl. Delicious! Absolutely one of summer’s best!

IMG_3905

Tex-Mex Grilled Corn & Tomato Salad

recipe from: Mom Foodie

Ingredients:

  • 3-4 ears of fresh corn in husk
  • 1 cup grape tomatoes (sliced in half)
  • ¼ cup chopped fresh cilantro
  • 1 jalapeno, (de-seeded & diced)
  • 2 tablespoons olive oil
  • 2 tablespoons fresh lime juice
  • 2 cloves of garlic, finely chopped
  • ¾ tsp Kosher salt
  • 1 tsp light brown sugar
  • ¼ tsp chili powder

Directions:

Combine olive oil, lime juice, garlic, salt, brown sugar and chili powder in small bowl and whisk together. Separate dressing in half. Use half to baste the corn and the other half to dress the salad.
Preheat grill.
Peel back the corn husks, discarding all but a couple inner layers. Remove corn silk, then baste with dressing, and recover corn with remaining husk.
Grill on med-high for 20-25 minutes, turning 3-4 times during cooking time.
Remove the corn from grill and allow to cool a few minutes, then cut off stem end, place the flat cut end on bottom of large bowl, and use a corn zipper to strip the kernels from the cob. Or if you don’t have a zipper, run a small sharp knife down the length of the cob, slicing off kernels.
Add the tomato, cilantro, jalapeno and ½ the dressing. Mix well.
Serve at room temp or chilled.

Enjoy!


Summer Cherry Tomato Pasta Salad

October 2, 2013

IMG_4210

Just the other day after a notably chilly dog walking session, I was just thinking that summer was gone. I didn’t really want to say it out loud because I was afraid I would jinx it, but I think I might have murmured something to that effect to the husband. Apparently that was all it took because I see that the temperature will be shooting back up to 85° F (29° C) on Wednesday. That doesn’t really seem to be fitting weather for October if you ask me. But I really don’t like summer weather (as I’m sure those who know me have heard before) and was really looking forward to Fall. There are a couple of things I will miss about summer though. No…not the humidity or the rabid mosquitoes (may their wings freeze off soon…), it is the fresh tomatoes, corn and zucchini. We have really enjoyed eating those veggies this summer. In fact, Jay and I actually took a stab at growing our own tomatoes and herbs this year. Yup, we were “plastic farmers”. (ie. we grew our plants in plastic containers on the deck, rather than planted properly in the ground). It was overall pretty successful.

IMG_4190

Our cherry tomato plants went wild and gave us all we could eat, that is all we could eat that I managed to pluck off the vine before the birds and chipmunks, who were quite fond of them as well, were able to get at them.

Tomato thief!

Tomato thief!

Luckily I had come across this recipe for Cherry Tomato Vinaigrette in Bon Appetit magazine, so I was somewhat ready for our bumper crop of tomatoes. This Vinaigrette is really delicious and so versatile. The majority of the time that I made it, we tossed it with pasta, feta cheese, fresh basil and chives to make a lovely Summer Cherry Tomato Pasta Salad.

IMG_4235

This salad was great warm or room temperature. In fact, I might have seen my husband eat it cold right out of the fridge on the rare occasion that we had any leftovers. But there are lots of other ways to use this vinaigrette, like simply as a tangy salad dressing. Or it is great as a condiment over omelets or grilled steak. We never got tired of it. I certainly will still be making it this winter. Though it won’t be quite as fun using those store-bought tomatoes as it was using the ones we grew ourselves. Make up a batch of this vinaigrette soon and I just bet you’ll be hooked as well!

IMG_4254

Summer Cherry Tomato Pasta Salad

recipe slightly adapted from Bon Appetit

serves: 4

Ingredients:

  • 8 oz. pasta of your choice (I used Gemelli)
  • 1 batch of Cherry Tomato Vinaigrette (recipe below)
  • 1/3 cup crumbled feta cheese
  • handful of fresh basil, chopped

Directions:

Prepare Cherry Tomato Vinaigrette (without chives). Set aside.

Cook pasta and drain.

Toss Cherry Tomato Vinaigrette and feta cheese with pasta.

Add handful of fresh basil and chives just before serving.

Cherry Tomato Vinaigrette

recipe slightly adapted from Bon Appetit

Ingredients:

  • 1 pint cherry tomatoes
  • 3 Tablespoons Extra Virgin Olive Oil, divided
  • 1 shallot, finely chopped
  • 2 cloves garlic, finely chopped
  • 1 Tablespoon (or more to suit your taste) red wine vinegar
  • Kosher salt, freshly ground pepper
  • 1/8-1/4 tsp. red pepper flakes (optional)
  • 2 Tablespoons chopped fresh chives

Directions:

Cut half of cherry tomatoes in half. Heat 1 Tablespoon of the oil in a medium saucepan over medium heat. Add shallot and garlic and cook, stirring often, until softened, about 4 minutes.

Add halved and whole tomatoes and cook, stirring occasionally, until beginning to release juices, 4-6 minutes. Mash some of the tomatoes with a spoon.

Add 1 Tablespoon vinegar and remaining 2 Tablespoons oil; season with salt and pepper and add red pepper flakes if you would like to spice it up a bit!  Serve warm or room temperature; add chives just before serving.

*This vinaigrette can be made (without the chives) 2 days ahead. Cover and chill. Bring to room temperature and stir in chives.

Enjoy!