Holiday Leftover Pies!

November 28, 2016

img_5322

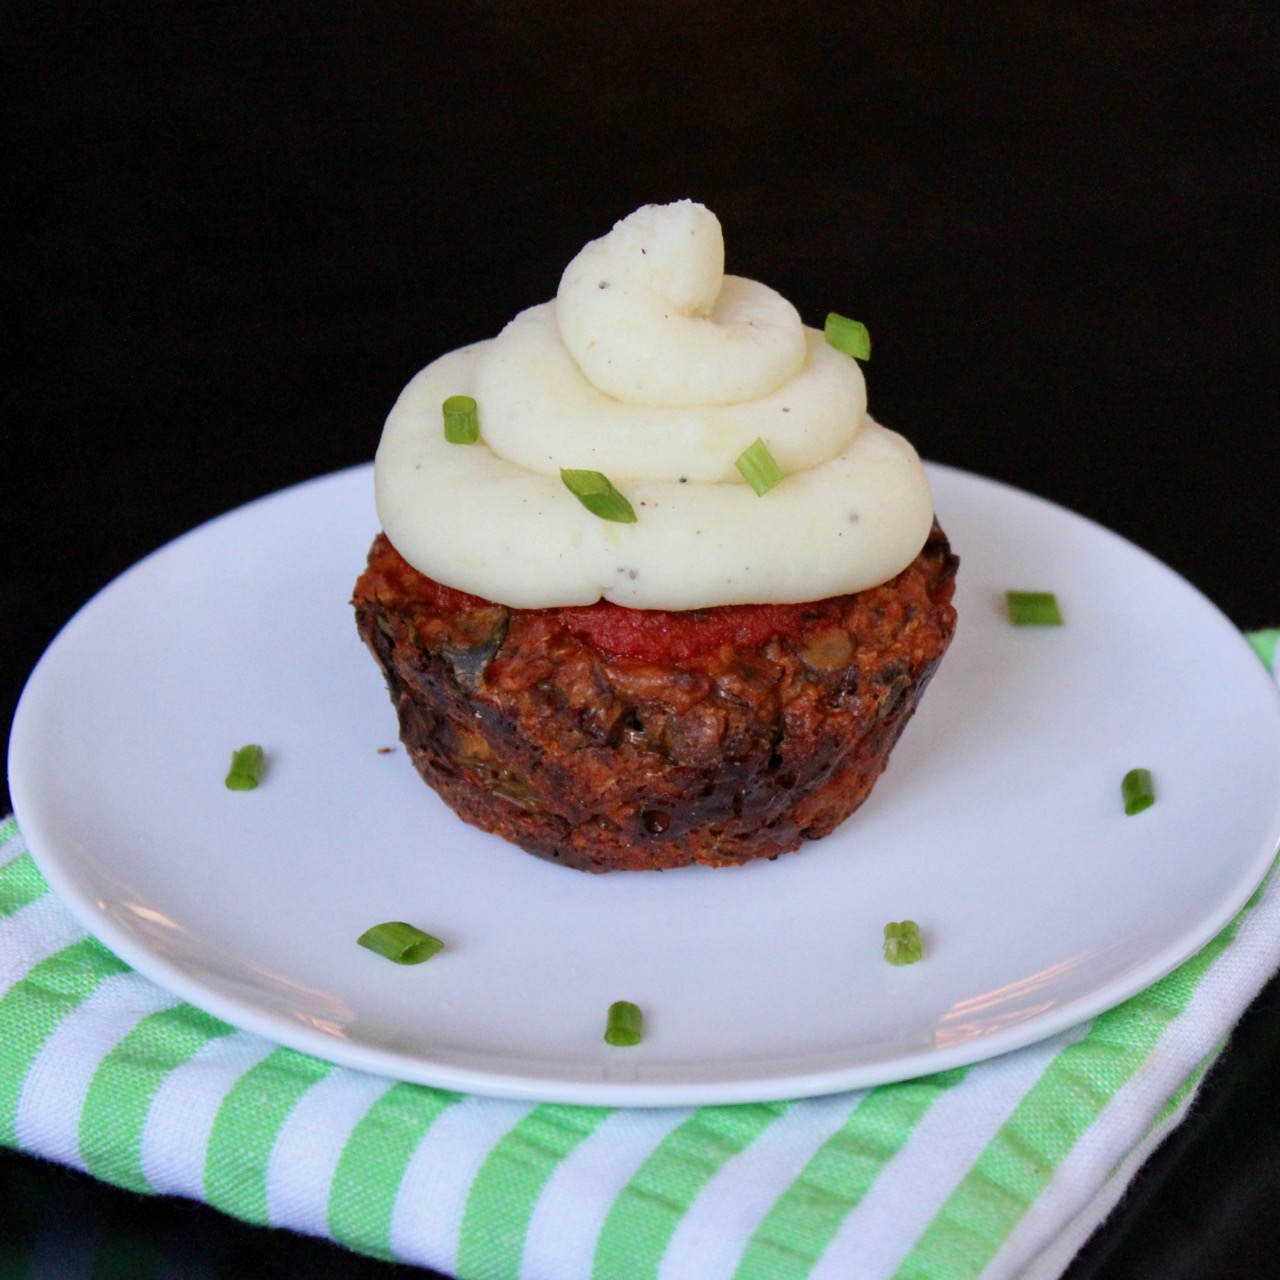
Who out there has leftovers? I bet one or two of you do if your Thanksgiving feasts looked anything like ours did. Well boy oh boy do I have an awesome recipe for you today… Holiday Leftover Pies! Now I will admit, this might be a bit of a replay on my part, but I got the idea from those delicious Pirozhki’s that I blogged about a couple of weeks ago. Pirozhkis are little Russian yeast buns which have been stuffed with ground beef, leeks and cheddar. Quite yummy as you can imagine. So I was thinking about them. Well, them and the fact that the Husband loves the day-after Thanksgiving sandwich. You know – the Thanksgiving dinner -turkey, stuffing, mashed potatoes and gravy – squished between two slices of bread. Yeah, well he loves it…quite possibly more than he likes the original Thanksgiving Day feast. So, combining the two thoughts, I stuffed these little Thanksgiving Pirozhkis with leftover turkey and all the trimmings, baked ’em up and let me tell you…They were Awesome! Dare I say even better than the sandwich version.

img_5330

And the fact that you are working with a filling that has spent at least one day in the fridge is a big benefit as well. I mean cutting off a slice of gravy to add to the filling rather than working with a hot liquid version when stuffing dough is a far superior experience. Just take a few moments to dice up any meat into bite sized cubes and the rest is easy-peasy. The total amount of filling, whatever leftovers you might have on hand, should be about 2 – 2 1/2 Tablespoons per bun. And I will say that when you pinch the folded over dough together to seal the bun, don’t hold back! Give it quite a pinch or use a fork like you would in making a pie crust to ensure that the bun edges stick together and don’t pop open in the oven. But if they do, no worries. I assure you, it won’t effect the taste one little bit!

img_5323

These Day-After Leftover Pies will be a tradition after every holiday feast from this day forward, I can assure you. We’re already thinking ahead to Christmas when we’ll have leftover prime rib, mushrooms, mashed potatoes and gravy. Drool, drool, drool! So I just had to share this with everyone. If you’ve already gobbled down all your Thanksgiving leftovers, keep these in mind for Christmas. You, and whomever you decide to share with, will be delighted!

img_5339

Holiday Leftover Pies

  • Servings: 16 pies
  • Difficulty: easy
  • Print

Holiday Leftover Pie dough recipe from: King Arthur Flour

Ingredients:

For the Dough:

  • 4 cups (17 oz /482 grams) All Purpose Flour
  • 1/4 cup (1 oz./28 grams) Vermont Cheese Powder (don’t have cheese powder? you can substitute grated parmesan or leave it out altogether.)
  • 1/2 cup (4 oz./113grams) sour cream
  • 1/4 cup (4 tablespoons, 2 oz./57grams) soft unsalted butter
  • 1/2 cup (4 oz./113grams) warm water
  • 2 large eggs
  • 2 tablespoons (7/8 oz./25grams) sugar
  • 1 1/2 teaspoons salt
  • 2 teaspoons instant yeast

For the filling:

  • Whatever leftovers you have, such as: diced turkey, stuffing, mashed potatoes, gravy & cranberry sauce

Directions:

To make the dough: Combine all the dough ingredients and mix and knead — by hand, mixer, or bread machine — until a soft, smooth dough forms.

Transfer the dough to a lightly greased bowl, cover, and allow to rest for about 90 minutes, until puffy but not necessarily doubled in bulk.

Divide the dough into 16 equal pieces; if you have a scale they’ll weigh about 2 ounces each. 

Shape the pieces into balls, and place them on lightly greased or parchment-lined baking sheets, leaving about an inch between them. 

Cover the dough balls, and allow them to rest for about 15 minutes.

Ready your leftovers. Don’t reheat them, leave them cold. They will be much easier to work with.Chop any large pieces of meat into a smaller dice.

Shape each ball into a flattened round about 5″ in diameter, brush the surface with some of the egg/water wash, and place 2 tablespoons of filling onto the center of each round. 

Pull the dough over the filling, pinching two opposite edges together tightly, to seal in the filling; it should look like a dumpling. 

Place the buns on two lightly greased or parchment-lined baking sheets. Cover the buns, and allow them to rise for 1 hour, or until puffy.

Towards the end of the rising time preheat the oven to 400°F.

Brush the buns with the remaining egg wash. Bake the buns for 15 to 20 minutes, until golden brown. It’s OK if some of the seams have come undone and the filling is visible; they can be prettier that way!

Remove the buns from the oven and allow them to cool for 5 to 10 minutes before serving.

Store any leftover buns in the refrigerator.

Enjoy!

Holiday Leftover Pies brought to you by: Runcible Eats (www.leaandjay.com)

Useful Links for Kitchen Tools & Ingredients for Holiday Leftover Pies:

6 Quart Dough Rising Bucket

Norpro 2 Tablespoon Cookie Scoop

SAF Instant Yeast

Vermont Cheese Powder


Thanksgiving Pie – Toffee Blonde Pie with Cinnamon Toast Crumb Crust, Pumpkin Ganache & Boozy Cranberry Sauce

November 22, 2016

img_3579

I’m sure you already know this but…Thanksgiving is upon us! It is time to get all your menus for the big day finalized and you just might want to start cooking! But before you make that final shopping run, I wanted to share a great dessert recipe with you. I call it “Thanksgiving Pie”. Now I’m sure there are a lot of folks out there who consider Pumpkin Pie or even Sweet Potato Pie to be their “Thanksgiving Pie”. I get that. But they haven’t tasted this Thanksgiving Pie. In fact, I’d wager that with one little forkful, this pie would be able to wrest that title away from any other contender. You see my Thanksgiving Pie is actually a Toffee Blonde Pie with Cinnamon Toast Crumb Crust, and a Pumpkin Ganache topping. And as if that wasn’t enough, I serve it with a garnish of Boozy Cranberry Sauce drizzled over the top. You see….that title is ridiculously long winded. Hence, Thanksgiving Pie. Or maybe you could call it “Special Thanksgiving Pie”.

img_3563

It has got all of those iconic Thanksgiving flavors going on, the pumpkin, the cinnamon, the cranberry. Yum, yum yum! I got the idea for this amazing pie from Chef Christina Tosi in her Momofuku Milk Bar Cookbook. If you look, you won’t see a recipe for this actual pie there. I cobbled it together from various recipes listed there. The cookbook is designed around “mother recipes” and then lists variations you can take to build on that recipe. There are definitely some tried and true Momufuku Milk Bar favorites listed there, but you can also get creative with the flavor profiles and come up with your own favorites.

img_3562

Now keep in mind, there are a few steps involved here in making this masterpiece. You definitely must plan ahead because I know things tend to get really hectic this time of year. But there is still plenty of time, no worries whatsoever. And you can make the Blonde Pie Filling and Pumpkin Ganache ahead of time and then just make the crust and assemble when you are ready. It can all be done the day before the big day and just be chilling somewhere.

img_3558

Once folks are just starting to slip into their Turkey Comas but still want a little dessert before completely losing consciousness, voila! You will be ready with the Thanksgiving Pie of their dreams!

img_3553

Thanksgiving Pie - Toffee Blonde Pie with Cinnamon Toast Crumb Crust, Pumpkin Ganache & Boozy Cranberry Sauce

  • Servings: 1 Ten inch pie 8-10 slices
  • Difficulty: moderate - a lot of steps and recipes within recipes
  • Print

recipe cobbled together from various Christina Tosi recipes found in the Momofuku Milk Bar Cookbook

Ingredients:

For the Cinnamon Toast Crumb Crust:

  • 2 sticks unsalted butter
  • ½ cup sugar
  • 1 teaspoon kosher salt
  • 1 teaspoon cinnamon
  • 4 cups diced crusts and end pieces from 1 loaf of packaged white bread (10 ounces of crusts)

For the Blonde Pie filling:

  • 160 grams (5 1/2 oz.) white chocolate
  • 55 grams (4 Tablespoons) unsalted butter
  • 2 egg yolks
  • 40 grams (3 Tablespoons) sugar
  • 105 grams (1/2 cup) heavy cream
  • 52 grams (1/3 cup) flour
  • 1 cup toffee chips
  • 4 grams (1 teaspoon) kosher salt

For the pumpkin ganache:

  • 150 grams (5 1/4 oz.) white chocolate
  • 25 grams (2 tablespoons) butter
  • 50 grams (2 tablespoons) glucose ( no glucose? substitute 18 grams (1 Tablespoon) corn syrup
  • 55 grams (1/4 cup) cold heavy cream
  • 75 grams (1/3 cup) Libby’s pumpkin puree
  • 4 grams (1 teaspoon) salt
  • 1 gram (1/2 teaspoon) cinnamon

For the garnish:

  • Fresh cranberry sauce (optional. You can use store-bought cranberry sauce or if you aren’t already spending enough time on this pie and you can’t bear to leave the kitchen yet – see Cranberry Sauce recipe below)

Directions:

Make the Crust:

Preheat the oven to 325° F. In a saucepan, melt the butter. Cook over moderate heat, stirring, until the butter is golden brown, about 8 minutes; strain into a glass measuring cup.

Pour half of the melted butter into a bowl. Add the sugar, salt, cinnamon and chopped bread, and toss. Spread the mixture on a baking sheet and bake for 35 minutes, stirring once or twice, until golden. Let cool.

Rewarm the remaining butter. Place Cinnamon Crunch croutons in a food processor. Pour the remaining butter over the croutons. Pulse until fine crumbs form. Place the crumbs into a 10-inch pie plate. Refrigerate for 5 minutes. Press the crumbs evenly over the bottom and sides of the pie plate. Refrigerate the crust until chilled, 15 minutes.

Make the Toffee Blonde Pie Filling:

Combine the white chocolate and butter in a microwave-safe bowl and gently melt them on medium, in 30 second increments, stirring between blasts. Once melted, whisk the mixture until smooth.

Put the egg yolks and sugar in a medium bowl and whisk together until smooth. Pour in the white chocolate mixture and whisk to combine. Slowly drizzle in the heavy cream and whisk to combine.

Stir the flour, toffee chips, and salt together in a small bowl, then carefully fold them into the filling. Use immediately, or store in an airtight container in the fridge for up to 2 weeks.

Make the Pumpkin Ganache:

Combine the white chocolate and butter in a microwave safe dish and gently melt them in the microwave in 15 second bursts, stirring between blasts. The result should be barely warm to the touch and totally homogeneous.

Transfer the chocolate mixture to a container that can accommodate and immersion blender (yes, it must be an immersion blender, Chef Tosi insists!) – something tall and narrow. Warm the glucose in the microwave for 15 seconds, then immediately add to the chocolate mixture and buzz with the hand blender. After a minute, stream in the heavy cream, with the hand blender running – the mixture will come together into something silky, shiny and smooth.

Blend in the pumpkin puree, salt and cinnamon. Put the ganache in the fridge to firm up before using, at least 4 hours, or ideally, overnight. Stored in an airtight container, pumpkin ganache will keep fresh in the fridge for 1 week.

Assemble the pie:

Once your Cinnamon Toast Crumb Crust has chilled, fill it with the cooled Toffee Blonde Pie filling. Use a spatula to smooth top. Place cooled Pumpkin Ganache in a piping bag fitted with a star tip. Pipe ganache over the top of the pie. If you would rather, you can simply use a spatula to smooth the ganache over the top of the Toffee Blonde Pie filling. Serve with a side of Boozy Cranberry Sauce if you desire. (and why wouldn’t you….)

Enjoy!

Thanksgiving Pie brought to you by: Runcible Eats (www.leaandjay.com)

Boozy Cranberry Sauce

Ingredients:

  • 12 ounces, weight Fresh Cranberries
  • 3/4 cups Granulated Sugar
  • 1 Tablespoon Loosely Packed Orange Zest
  • 1/2 cup Freshly Squeezed Orange Juice
  • 1 stick Cinnamon
  • 1/2 cup quality Bourbon

Directions:

Pick through the cranberries, removing any stems or berries that don’t look plump and ripe. Rinse the remaining cranberries well, then place them in a heavy bottomed saucepan with the sugar, orange zest, orange juice, and cinnamon stick. Stir to combine, then place the pan over medium heat. Cover the pan with a lid and cook for 15 minutes, stirring every 5 minutes or so.

After 15 minutes, the cranberries should all have burst. Remove the pan from the heat. The sauce will look very liquidy, but will thicken as it cools. After the sauce has cooled completely, stir in the bourbon. Remove the cinnamon stick and serve the cranberry sauce at room temperature or chilled.

Cranberry sauce can be made 2–3 days ahead of time.

Links to Useful Kitchen tools and Ingredients for Thanksgiving Pie:

Momofuku Milk Bar Cookbook

OXO Good Grips Stainless Steel Food Scale

Cuisinart Pro-Classic Food Processor

Kitchen Aid Hand Blender

Heath Bits O’Brickle Toffee Bits

Libby’s Pumpkin Puree (This link is for 6 -15 oz. cans. Way more than you need for this recipe. However, you can at least see what it looks like here and then maybe find it in your local market or heck, get all 6 and be ready anytime a pumpkin need arises)

Glucose


Cinnamon Apple Twist Bread & Rolls

November 18, 2016

img_5194

Now here is one lovely recipe to add to your Fall baking repertoire – Cinnamon Apple Twist Bread and/or Cinnamon Apple Rolls. You will love how scrumptious your house smells when it is filled with the cozy, comforting aroma of cinnamon and apples. But you know what you’ll really love? How delicious this soft, tender and sweet bread tastes. I’ll consider you pretty dang accomplished if you can keep from eating it all in one sitting!

img_5189

I know you might be thinking that this bread looks a bit complicated. But don’t fear. It is actually pretty easy to make. I used to be awfully intimidated by any recipe that called for yeast. Now I don’t even give it a second thought. It really isn’t that hard and the results for your efforts are so worth it. So to make this bread have such a lovely swirled appearance, you simply roll your filled dough up as though you were making a jelly roll or cinnamon buns.

img_5215

Then rather than cutting the individual rolls, you cut the roll in half lengthwise and twist the two pieces together. Now I will admit, the filling does leak out a bit, but don’t freak out, there is still plenty of filling left inside. The day is not lost. I will say that the original recipe called for a King Arthur Flour product called Clear Jel (link provided below). Apparently this powder thickens fillings and sauces without giving them a starchy taste. I didn’t have any on hand, though will be getting some in my next King Arthur Flour shipment, so I used flour as the thickener for this batch. Since I already know I will be making this amazing bread again, I’ll try that Clear Jel out next time.

img_5190

This recipe is pretty versatile too in that you can make either two loaves of twisted bread, two pans of apple cinnamon rolls or one loaf of twisted bread and one pan of rolls. So if you are really anxious about trying the twisty bread, make the rolls. They are pretty easy-peasy.

img_5212

Your family will be thrilled with this delicious Fall treat! And don’t forget, Thanksgiving is right around the corner. How amazing would it be to wake up with that turkey hang-over the day after and have a batch of this Cinnamon Apple Bread waiting for you? Just saying…

img_5182

Cinnamon Apple Twist Bread & Rolls

  • Servings: 2 loaves of twist bread or 16 to 18 rolls or 1 loaf and 8 - 9 rolls
  • Difficulty: easy
  • Print

recipe from: King Arthur Flour

Ingredients:

For the Dough:

  • 3 1/4 cups Pastry Flour Blend or All Purpose Flour
  • 1/4 cup potato flour OR 1/2 cup dried potato flakes
  • 3 tablespoons granulated sugar
  • 1 1/2 teaspoons instant yeast
  • 1 1/4 teaspoons salt
  • 3 tablespoons butter
  • 1 teaspoon vanilla extract
  • 1 large egg
  • 1 cup room-temperature or lukewarm milk

For the Filling:

  • 1/2 cup granulated sugar
  • 3 tablespoons All-Purpose Flour
  • 1 teaspoon cinnamon
  • 1 cup peeled, grated apple (1 to 2 large apples)
  • 1 tablespoon lemon juice

For the Glaze:

  • 1 cup confectioners’ sugar
  • 1 teaspoon vanilla extract
  • 1 1/2 tablespoons heavy cream
  • 1/2 tablespoon boiled cider (if you don’t have boiled cider, just use 2 tablespoons heavy cream. The boiled cider just bumps up the apple flavor. There is a link below to where you can buy it.)

Directions:

To make the dough: Whisk together all of the dry ingredients , then add the butter, flavor, egg, and milk, mixing until a shaggy dough forms. Let the dough rest for 30 minutes; this resting period allows the flour to absorb the liquid fully, making it easier to knead.

Knead the dough for about 10 minutes; it should feel slightly sticky and soft. Add a couple of tablespoons of water if the dough feels firm or dry. Place the dough in a greased bowl, turning to coat. Cover the bowl, and let the dough rise until it’s almost doubled in bulk, about 1 1/2 to 2 hours. The amount of time this takes will depend on the temperature of your kitchen; yeast works the fastest at about 85°F, but we prefer the flavor the bread gets from a longer, cooler (about 70°F) rise.

To make the filling: While the dough is rising, make the filling. Whisk together the sugar, ClearJel, and cinnamon. (If you substitute flour for the ClearJel, the filling will be runny at first, but will firm up when baked.)

Toss the grated apple with the lemon juice, then add that to the ClearJel and sugar mixture. Mix well, and set aside.

To assemble the loaf: Gently deflate the risen dough and turn it out onto a lightly floured or greased work surface. Fold it over once or twice to remove the excess gas. Divide the dough in half. Roll the first half into a 10″ x 12″ rectangle. Spread half the filling over the rolled-out dough, leaving a 1/2″ margin clear of filling along all sides.

Starting with a long side, roll the dough into a log, taking care to pinch the edges closed as you are rolling. This will help keep the filling from leaking out. Finish your roll with the seam on top, rather than underneath of the roll and then seal that edge. Use a pizza cutter or sharp knife to cut the log in half lengthwise. Place the half-logs, filled side up, side by side on a well-greased or parchment-lined baking sheet. Keeping the filling side up, twist or “braid” the two logs together, working from the center to each end. Pinch the ends together. Repeat with the second piece of dough. Cover the twists lightly, and set them aside to rise for 1 to 2 hours.

To make rolls: Follow the directions above to the point where you’ve rolled the dough into a log. Repeat with the remaining piece of dough, then cut each log into 1″ slices. Some folks recommend a sharp knife or a pizza cutter to cut the rolls. I prefer using a strand of unflavored dental floss. Place the slices cut side up in well-greased or parchment-lined pans, placing them close together (though not touching) for soft-sided rolls, or about 2 inches apart for crustier rolls. Allow the rolls to rise until they’re puffy. 

To bake the bread: Bake the loaves in a preheated 350°F oven for 30 to 35 minutes (or the rolls for 18 to 20 minutes), until they’re lightly browned. Check the loaves after 20 minutes and tent with aluminum foil if they’re browning too quickly around the edges. Remove the bread from the oven and allow it to cool for about 1 hour before glazing and serving.

To make the glaze: Mix together all of the glaze ingredients. Drizzle over the loaves or rolls once they’re cool.

Enjoy!

Cinnamon Apple Twist Bread and Rolls brought to you by: Runcible Eats (www.leaandjay.com)

Links to Useful Kitchen Tools & Ingredients for Cinnamon Apple Twist Bread & Rolls:

OXO Good Grips Stainless Steel Food Scale

Cuisinart Pro-Classic Food Processor

6 Quart Dough Rising Bucket

Kitchen Aid Artisan Stand Mixer

SAF Instant Yeast

Clear-Jel

Boiled Cider


Stuffed Buns (Pirozhki)

November 15, 2016

img_5116

Look what I’ve got here…little yeast buns stuffed with ground beef, leeks and cheddar! YUM! Comfort food at its best! Known as Pirozhki in their native Russia, which actually means “small pie”, these savory, individual sized pies will soon be found in high rotation in your meal plans.

img_5134

We fell head over heels for them straight away. I mean what’s not to love? There’s a soft pillowy dough which encircles a savory blend of meat and cheese – Oh yes! Count me in.

img_5131

Exceedingly portable, these buns are not only delicious hot from the oven, but are also fabulous at room temperature and may have single-handedly saved us on a particularly rainy camping weekend. They are very versatile, so if ground beef and cheddar isn’t your thing, you could try a meatless option with sautéed onions, cabbage and chopped hardboiled eggs. And don’t forget, Thanksgiving is coming up soon. That means leftovers. A post-holiday Pirozhki with chopped turkey, stuffing, mashed potatoes, gravy and cranberry sauce is very likely to make an appearance in my house. I’ll let you know how it goes, but in the meantime, give these Stuffed Buns a try!

img_5123

Stuffed Buns (Pirozhki)

  • Servings: 16 Buns
  • Difficulty: easy
  • Print

recipe from: King Arthur Flour

Ingredients:

For the Dough:

  • 4 cups (17 oz /482 grams) All Purpose Flour
  • 1/4 cup (1 oz./28 grams) Vermont Cheese Powder (don’t have cheese powder? you can substitute grated parmesan or leave it out altogether.)
  • 1/2 cup (4 oz./113grams) sour cream
  • 1/4 cup (4 tablespoons, 2 oz./57grams) soft unsalted butter
  • 1/2 cup (4 oz./113grams) warm water
  • 2 large eggs
  • 2 tablespoons (7/8 oz./25grams) sugar
  • 1 1/2 teaspoons salt
  • 2 teaspoons instant yeast

For the Filling:

  • 1 tablespoon vegetable or olive oil
  • 1 small peeled onion or shallot, finely diced; about 3/4 cup (3 1/2 oz./14 grams) (loving leeks as we do, I went with leeks)
  • 1 clove garlic, finely chopped
  • 8 ounces (227 grams) ground beef
  • salt and pepper, to taste
  • chopped parsley, fresh or dried, to taste
  • 1 1/2 cups (6 oz./170grams) shredded cheddar cheese
  • 1 large egg beaten with 1 tablespoon water, to brush on dough

Directions:

To make the dough: Combine all the dough ingredients and mix and knead — by hand, mixer, or bread machine — until a soft, smooth dough forms.

Transfer the dough to a lightly greased bowl, cover, and allow to rest for about 90 minutes, until puffy but not necessarily doubled in bulk.

To make the filling: Heat the oil in a sauté pan set over medium heat. 

Add the onion and cook until translucent. 

Add the garlic and ground beef and cook for 5 to 10 minutes, breaking the meat up as it browns, until it’s cooked through. 

Season the filling with salt, pepper, and parsley, remove it from the heat, and cool to room temperature. 

Stir in the cheese. The filling can be made ahead of time, then wrapped and stored in the refrigerator until ready to use.

Divide the dough into 16 equal pieces; if you have a scale they’ll weigh about 2 ounces each. 

Shape the pieces into balls, and place them on lightly greased or parchment-lined baking sheets, leaving about an inch between them. 

Cover the dough balls, and allow them to rest for about 15 minutes.

Shape each ball into a flattened round about 5″ in diameter, brush the surface with some of the egg/water wash, and place 2 tablespoons of filling onto the center of each round. 

Pull the dough over the filling, pinching two opposite edges together tightly, to seal in the filling; it should look like a dumpling. 

Place the buns on two lightly greased or parchment-lined baking sheets. Cover the buns, and allow them to rise for 1 hour, or until puffy.

Towards the end of the rising time preheat the oven to 400°F.

Brush the buns with the remaining egg wash. Bake the buns for 15 to 20 minutes, until golden brown. It’s OK if some of the seams have come undone and the filling is visible; they can be prettier that way!

Remove the buns from the oven and allow them to cool for 5 to 10 minutes before serving.

Store any leftover buns in the refrigerator.

Enjoy!

Pirozhki brought to you by: Runcible Eats (www.leaandjay.com)

Links to Useful Kitchen Tools & Ingredients for Stuffed Buns (Pirozhki):

OXO Good Grips Stainless Steel Food Scale

6 Quart Dough Rising Bucket

Norpro 2 Tablespoon Cookie Scoop

SAF Instant Yeast

Vermont Cheese Powder


Spicy Italian Lentil Loaf Cupcakes

November 11, 2016

img_1443

Yay! We’ve finally started getting some Fall type weather. I know a lot of folks have been digging that extended summer kind of thing that we’ve had going on, but I’m ready for some colder temperatures. And as that mercury falls, I’ve got a great comfort food recipe to share with you today: Spicy Italian Lentil Loaf Cupcakes! Yum, yum, yum! This delicious Meatless Monday favorite of ours will be loved by vegetarians and carnivores alike, I guarantee.  And you did hear me right – there is not one shred of meat in this dish – it is a vegetarian meatloaf. But that doesn’t mean it is lacking in taste. I do promise, you will not miss the meat one little bit once you take a bite of these savory little gems.

img_1427

This recipe is so versatile. You can bake it in cupcake tins or if you prefer in a loaf pan for a more traditional meatloaf appearance. I prefer the cupcake tins because of the cute factor. Kids will certainly find them more appealing and will have no idea how many veggies they are scarfing down. The cupcake version also has portability and ease going for it. Having a single serving all ready to go, no fooling around with trying to cut even slices in a loaf works out great for me. But really we love these little cupcake shapes because of the extra crunchy edges you get from baking them in cupcake tins.

img_1470

You can also prepare these cupcakes with or without the mashed potato “frosting”. Kids will definitely prefer the potatoes piped onto the top so that it actually looks more cupcake like. When I make this dish though, I usually prepare them “naked” topped only with the arrabiata sauce, fresh mozzarella and basil. I serve the mashed potatoes on the side. These cupcakes are fantastic warm from the oven, but I’ve also enjoyed them the next day cold right out of the fridge. They are high in protein and fiber. I’m telling you, you can not go wrong with this recipe!

img_1447

Spicy Italian Lentil Loaf Cupcakes

  • Servings: 20 cupcakes
  • Difficulty: easy
  • Print

Recipe inspired by: Really Good Vegetarian Meatloaf (Really!)

Ingredients:

  • 2 cups vegetable broth or water
  • 1 cup lentils
  • 2 leeks, sliced – white and light green parts only
  • 8 oz. cremini mushrooms, sliced
  • 1 cup quick cooking oats
  • 3/4 cup grated mozzerella cheese
  • 1/4 cup grated parmesan cheese
  • 2 eggs, beaten
  • 6 ounces of spaghetti sauce + a bit more for spooning over the top (we use a spicy arrabiatta sauce)
  • 1 teaspoon garlic powder
  • 1 handful fresh basil, chopped
  • 1 Tablespoon Worchestershire sauce
  • 1/4 teaspoon black pepper
  • 1/4 teaspoon cayenne pepper (we love spicy food – but if you don’t feel free to leave this out)
  • 1/2 teaspoon Spanish smoked paprika
  • 1/2 teaspoon salt
  • 20 slices fresh mozzarella
  • Mashed potatoes for “frosting” if desired
  • Fresh Chives & Basil for garnish

Directions:

Place 2 cups broth or water in saucepan and bring to a boil. Add the lentils and cook at a simmer, covered, for about 25 – 30 minutes, or until the lentils are soft.

In the meantime, melt 2 tablespoons of butter in a pan and sauté the mushrooms and leeks until they are fragrant and softened. Set aside to cool.

Drain any remaining liquid from the lentils. Mash approximately half of the lentils. Place them into a large mixing bowl and allow them to cool.

Preheat oven to 350° F. Generously spray two muffin tins with non-stick cooking spray. *If you would rather bake this as a traditional meatloaf, generously grease a loaf pan. You will also likely need to adjust your baking time to 40 -45 minutes.

Once lentils have cooled, add the leek/mushroom mixture, oats, and cheeses to the lentils and stir to combine.

Add the eggs, sauce,garlic powder, basil, Worcestershire sauce, peppers, paprika and salt to the bowl and stir until combined.

Fill prepared muffin tins 3/4 of the way full with lentil mixture.

Bake for 30 – 35 minutes.

If you wish to have mashed potato “frosting” for the cupcakes. Go ahead and make the mashed potatoes while the cupcakes are baking.

After 30 -35 minutes, remove the pans and add a teaspoon full of spaghetti sauce to the top of each cupcake, as well as a spice of fresh mozzarella.

Bake until mozzarella is melted.

Remove from oven and allow cupcakes to cool in the pan on a rack for about 10 minutes.

Run a knife around the edges of pan to loosen the cakes and then carefully remove from the tins.

Pipe mashed potato frosting onto the cupcakes if you desire and decorate with chive sprinkles. Or if foregoing the frosting, garnish “naked” cupcakes with freshly chopped basil.

Enjoy!

Spicy Italian Lentil Loaf Cupcakes brought to you by: Runcible Eats (www.leaandjay.com)


Mississippi Mud Brownies

November 8, 2016

img_4818

Hmmmm….what is going on with me? I mean my blood sugar levels have barely recovered from my self-induced Halloween Candy Coma and here I am posting a recipe for more sweeties! Oh…and let me tell you, this isn’t just any old dessert. No sir-ee…this here is one of the most rich, decadent and utterly addictive brownie creations I have ever had the pleasure of sinking my teeth into…Mississippi Mud Brownies! Now I am well aware that there are countless Mississippi Mud Brownie recipes out there, not to mention the legions of Mississippi Mud Cakes, Mississippi Mud Pies and Mississippi Mud bars. Seems folks just can’t get enough of that good ole Mississippi Mud. What all of these delectable creations have in common is lots and lots of rich chocolate and oooey – gooey marshmallow. Many also have some nuts thrown into the mix and I even came across a few that make some good use of peanut butter. Yup many variations indeed. It seems like this quintessentially Southern dessert must have been around forever. But it looks like it actually originated in the 1970’s and was wildly popular back then. Apparently it wasn’t just a fad. Mississippi Mud desserts are still hot to this day!

img_4832

This particular Mississippi Mud Brownie recipe will deliver you up a batch of moist, rich, dense chocolate chip filled brownies which are topped with a layer of fluffy marshmallow creme and lovingly drizzled with even more chocolate. I really think critical chocolate mass was achieved here. No nuts in these little gems, but as I’ve mentioned the recipe is easily customizable. Have a nut lover in your house? Throw a few handfuls into the mix or sprinkle them over the top. You can’t go wrong with this mouth-wateringly delicious creation. And perhaps if you hop to it you can have a batch ready before the final election results are in. I’m sure the resulting sugar rush will help soothe your frayed nerves. Though you might need to add something a bit more medicinal to that glass of milk – if you know what I’m saying. 😉

img_4839

Mississippi Mud Brownies

  • Servings: one 13x9 inch pan
  • Difficulty: easy
  • Print

recipe slightly adapted from: Pass the Sushi

Ingredients:

For the Brownies:

  • 6 oz unsweetened chocolate, chopped
  • 2 sticks unsalted butter
  • 1 1/2 cups flour
  • 1/2 cup cocoa powder
  • 1/2 teaspoon salt
  • 3 cups sugar
  • 5 large eggs
  • 3/4 cup chocolate chips – I used semisweet

For the Topping:

  • 3/4 cup marshmallow creme
  • 1/4 cup semisweet chocolate chips
  • 2 teaspoon coconut oil

Directions:

Preheat the oven to 325° F. Line a 9 x 13 inch baking dish with aluminium foil and spray with baking spray.

Melt chocolate and butter in a double boiler over barely simmering water, stirring occasionally, until smooth, 5-7 minutes. Cool slightly.

In a medium bowl, whisk together the flour, cocoa powder and salt.

In the bowl of a stand mixer fitted with the paddle attachment, mix the eggs and sugar on low speed until completely incorporated. Pour in the melted chocolate and continue to mix. Add the flour and beat mixture until no streaks of flour remain. Remove the bowl from the mixer, and fold in chocolate chips.

Scrape the batter into the prepared baking dish and using a rubber spatula, smooth out evenly.

Bake for 40 -50 minutes or until a toothpick inserted in the center comes out with a few wet crumbs. Place on a wire rack.

Scoop dollops of the marshmallow creme onto the hot brownies and let sit for one minute until softened.  Spread the marshmallow creme evenly over the brownies. Meanwhile, in a heat proof bowl, combine the chocolate chips and oil and microwave until smooth, 30 – 60 seconds. Using a spoon, drizzle the melted chocolate over the marshmallow creme layer.

Cool for at least 2 hours before removing from pan, cutting into squares, and serving.

Enjoy!

Mississippi Mud Brownies brought to you by: Runcible Eats (www.leaandjay.com)


Pan-Roasted Chicken with Harissa Chickpeas

November 4, 2016

img_5019

I’ve got a delicious spicy dish for you today that will definitely warm you up this Fall…Pan-Roasted Chicken with Harissa Chickpeas. Oh my goodness! It is just absolutely delicious with that golden crispy skinned chicken and those devilish little harissa chickpeas that pack quite a punch! For folks unfamiliar with harissa, it is a spicy North African Red Chili Paste. It is available at most large grocery stores. You can sometimes find it in a can in the ethnic food section or occasionally you will find in fresh in the refrigerated section. I have also provided you with a link below if you wish to buy it online. I will warn you though that not all harissas are created equal. Some are much spicier than others, so although this recipe calls for 1/4 cup, you should definitely taste the harissa you are working with first and decide how much to add depending its spice level and your sensitivity. We love spicy in this household so we just shoveled it in!

img_5007

Besides being wonderfully flavorful, this dish is also great because you only need dirty one dish to make it. You want to use a large oven-proof skillet. My 12″ le creuset skillet was just perfect. Serve this dish over couscous with a little tzatziki or other yogurt sauce on the side to help cool the burn. Just the thing to warm you up as the temperatures cool down this Fall!

img_5010

Pan-Roasted Chicken with Harissa Chickpeas

  • Servings: 4
  • Difficulty: easy
  • Print

recipe slightly adapted from: Bon Appetit

Ingredients:

  • 1 tablespoon olive oil
  • 8 skin-on, bone-in chicken thighs (about 3 pounds)
  • Kosher salt, freshly ground pepper
  • 1 small onion, finely chopped
  • 2 garlic cloves, finely chopped
  • 2 tablespoons tomato paste
  • 2 15-ounce cans chickpeas, rinsed
  • 1/4 cup harissa paste
  • 1/2 cup low-sodium chicken broth
  • 1/4 cup chopped fresh cilantro
  • Lime wedges, for serving
  • Tzatziki Sauce, for serving (Optional but can help cool the burn if your harissa is very spicy!)

Directions:

Preheat oven to 425°F. Heat oil in a large ovenproof skillet over medium-high heat. Season chicken with salt and pepper. Working in 2 batches, cook until browned, about 5 minutes per side; transfer to a plate.

Pour off all but 1 tablespoon drippings from pan. Add onion and garlic; cook, stirring often, until softened, about 3 minutes. Add tomato paste and cook, stirring, until beginning to darken, about 1 minute. Add chickpeas, harissa, and broth; bring to a simmer.

Nestle chicken, skin side up, in chickpeas; transfer skillet to oven. Roast until chicken is cooked through, 20–25 minutes (until it reaches 165 °F with meat thermometer). Top with cilantro and serve with lime wedges for squeezing over.

Enjoy!

Pan-Roasted Chicken with Harissa Chickpeas brought to you by: Runcible Eats (www.leaandjay.com)

Links to Useful Kitchen Tools & Ingredients for Pan-Roasted Chicken with Harissa Chickpeas:

Le Creuset Iron Handle Skillet

Harissa