Pigs in a Blanket Baked Brie

February 20, 2019


IMG_7502 (1)

So look-y here! Pigs in a Blanket Baked Brie is what’s on the menu today! I was absolutely amazed when I saw this gorgeous creation from Host the Toast (check it out! a beautiful blog full of great recipes) and could not wait to try my hand at it. I was sure it would end up as one of those situations where you see this gorgeous culinary creation, but your attempt to reproduce it ends up an unrecognizable epic fail. Not so with these little piggies. I would say Host the Toast’s presentation is still better than mine, but mine is not too shabby if I do say so myself.

IMG_7497

It is actually quite easy to do. I do recommend watching the video that Host the Toast did showing how it’s done before you try it for yourself.

Watch the video showing how to make it from Host the Toast! 

The one tip that I have is make sure that your pie crusts have warmed a bit before you try to fold the top one around the Brie wheel. You don’t want to have the pastry crack at all because it will allow that melted Brie to leak out a bit. You can see mine sprung a bit of a leak, but I think most of the Brie stayed within its pastry case.

IMG_7455

Perfect for any gathering from potluck to fancy cocktail party. And what a dream Super Bowl Snack! You’ll be the MVP on the refreshment front for sure! (Only second to whoever brought the beer). I’ve made it several times now and folks just can’t stop ohhh-ing and ahhh-ing over it. But sure you only hear that for a few seconds, because what’s even better than hearing all that admiration is that fact that this dish is really yummy. It will be scarfed down in no time flat! I mean come on – buttery, flaky pastry wrapped around a creamy gooey herbed Brie with smoky cocktail sausages – yeah….I bet that tastes just awful right?

IMG_7488

Pigs in a Blanket Baked Brie

  • Servings: 8
  • Difficulty: easy
  • Print

recipe from: Host the Toast

Ingredients

  • 1 (8 ounce) wheel Brie Cheese
  • 2 pre-made (store-bought) circular pie crusts
  • 1 clove garlic, minced
  • 1/2 teaspoon chopped fresh chives
  • 1/2 teaspoon chopped fresh rosemary (optional – I did not use it)
  • 36 cocktail sausages
  • 1 egg yolk, beaten
  • sesame seeds/poppy seeds for garnish (optional)

Directions:

Preheat the oven to 400°F. Line a baking sheet with parchment and set aside.

Carefully cut the top from the Brie wheel and set aside. Place the Brie on one of the unrolled pie crusts. Sprinkle the exposed cheese with garlic, chives and rosemary if you are using it. Replace the top on the Brie Wheel.

Lay the second pie crust over the brie. Carefully press the edges of the pie dough up against the brie and smooth over the bottom crust.

Cut even-sized strips all around the brie, like a sun, making 18 total cuts. Place one cocktail sausage at the outer leftmost corner of one of the strips at a slight angle. Roll it inward to wrap in the pie dough and press the edges to seal. Continue all the way around the dough until all of the top layer of strips have a cocktail sausage nestles within them.

Move on to the bottom layer of strips and do just as you did above, wrapping until all of the cut strips contain sausages. You may have to gently lift the top layer to snuggle the bottom layer up under them.

Brush generously with egg yolk and sprinkle with any seed garnish that you may be using.

Carefully transfer the Brie to the prepared baking sheet. Bake until the pastry is deep golden-brown, about 30 – 40 minutes.

Allow to cool for 5 – 10 minutes. Cut the top off the baked brie and serve warm.

Enjoy!

Pigs in a Blanket Baked Brie brought to you by: Runcible Eats (www.leaandjay.com)

Useful links for Kitchen Tools & Ingredients for Pigs in a Blanket Baked Brie:

Hillshire Farms Cocktail size Lit’l Smokies – this is for 3 packs of them, but hey they freeze well and you’ll be ready next time you need to whip this amazing snack together.


Twice Baked Breakfast Popovers

February 14, 2019

IMG_5282

Happy Valentine’s Day! Now I know you probably were most likely expecting some sort of gorgeous confectionary treat for a Valentine’s Day post. Some sugary, chocolatey delicious explosion. I know. And you can believe me when I say that is exactly what I would want. Truth be told…in a the shape of a cupcake for me. However, I wasn’t making myself a Valentine’s Day treat, I was making one for The Husband. Though one year I did get away with serving him up some cupcakes by making them Gin & Tonic Cupcakes:

img_5546

Sneaky right? But I can’t really do that every year. As I’ve mentioned before, he doesn’t even really like chocolatey desserts. (I know…weird right?!!!) And if he is going to get worked up about a dessert, it would probably be a fruit type thing like this lovely Cashew Crusted Blackberry & Lime Tart:

IMG_1687

But this year, I didn’t really have any dessert recipe in mind. Then it occurred to me… the Husband really likes eggs. I mean he really likes eggs. Like he says he “never gets tired of them” and “could eat them every day” kind of likes eggs. And he loves popovers.

IMG_5245

And who doesn’t like bacon? So although a bit unconventional, here is an incredibly tasty savory Valentine’s Day treat: Twice Baked Breakfast Popovers!

IMG_5277

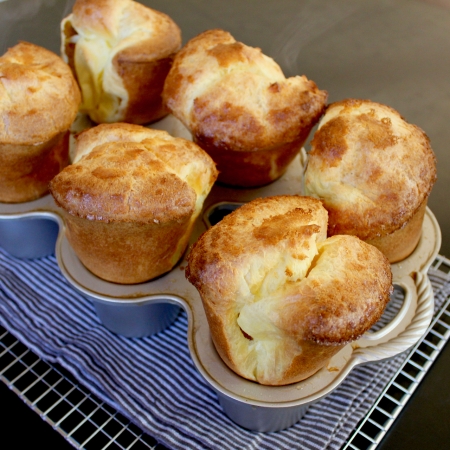
Yup, that is freshly baked, golden brown popovers – hot from the oven

IMG_5244

Look at that steam1

just stuffed full of moist fluffy eggs, crispy bacon and gooey cheese. Yum right?!!!

IMG_5274

These delicious little devils were right up the Husband’s alley. And lucky for me they were quick and easy to make. The most difficult thing was not opening the oven to peek in on the popovers while they were baking. Frying bacon and scrambling eggs…peice of cake! And speaking of cake…the Husband didn’t miss it all! Valentine’s Day is all about spoiling your sweetie with their favorite treats. Just so happens my darlin prefers eggs over chocolate!

IMG_5263

Twice Baked Breakfast Popovers

  • Servings: 6 standard sized popovers, 12 medium-sized or 18 minis
  • Difficulty: easy
  • Print

recipe from: King Arthur Flour

Ingredients:

For the Popovers:

  • 4 large eggs, warmed in a cup of hot water for 10 minutes before cracking
  • 340 grams (1 1/2 cups or 12 oz.) milk (skim, low-fat, or full-fat), lukewarm
  • 3/4 teaspoon salt
  • 177 grams (1 1/2 cups or 6 1/4 oz.) all-purpose flour
  • 43 grams (3 tablespoons or 1 1/2 oz.) melted butter

For the Filling:

  • 1 pound bacon
  • 2 tablespoons butter
  • 12 large eggs
  • 1/4 cup milk or cream
  • 1/2 teaspoon salt
  • 1/4 teaspoon ground black pepper
  • 1 bunch scallions, chopped, white and light green pieces separated from dark green pieces
  • 1/2 cup grated cheddar cheese, plus extra for sprinkling on top

Directions:

Preheat the oven to 450°F. Position a rack on a lower shelf. The top of the fully risen popovers should be about midway up the oven. What you don’t want is for the tops of the popping popovers to be too close to the top of the oven, as they’ll burn.

Grease the wells of the popover pan. Make sure the oven is up to temperature before you begin to make the popover batter.

Use a wire whisk to beat together the eggs, milk, and salt. Whisk till the egg and milk are well combined, with no streaks of yolk showing.

Add the flour all at once, and beat with a wire whisk till frothy; there shouldn’t be any large lumps in the batter, but smaller lumps are OK. OR, if you’re using a stand mixer equipped with the whisk attachment, whisk at high-speed for 20 seconds. Stop, scrape the sides of the bowl, and whisk for an additional 20 to 30 seconds at high speed, till frothy.

Stir in the melted butter, combining quickly.

Pour the batter into the popover pan wells, filling them about 2/3 full.

Make absolutely certain your oven is at 450°F. Place the pan on a lower shelf of the oven .

Bake the popovers for 20 minutes without opening the oven door. Reduce the heat to 350°F (again without opening the door), and bake for an additional 10 to 15 minutes, until they’re a deep, golden brown. If the popovers seem to be browning too quickly, position an oven rack at the very top of the oven, and put a cookie sheet on it, to shield the popovers’ tops from direct heat.

While the popovers are baking, prepare the bacon egg and cheese filling. Fry the bacon until crispy, then crumble it into 1/4″ – 1/2″ pieces. Set aside.

Beat the eggs with the milk or cream, salt and pepper. Set aside.

Melt the butter in a large frying pan over medium heat. Add the light green and white parts of the scallions and cook until softened. Add the egg mixture and cook, stirring until the eggs have just barely set. Remember, the eggs will cook further after they have been placed in the popovers. You do not want them overcooked.

Transfer the scrambled eggs & scallions to a mixing bowl and allow them to cool slightly. Then add the bacon and cheese.

Once the popovers are out of the oven and cool enough to handle, cut a slit in the side of each popover but don’t cut them completely in half. Spoon the egg mixture into the hollow portion of each popover.

Place the stuffed popovers on a parchment lined baking sheet, sprinkle with any remaining cheese and bake at 400°F for 10 – 12 minutes, until the cheese has melted.

Remove the popovers from the oven, garnish with he dark green scallions and serve hot or warm.

Enjoy!

Notes:

*You can buy a popover mix from King Arthur Flour (amazon link below as well) if you don’t want to make the popovers from scratch – although they are pretty easy to make.

*You can make these popovers in a muffin pan, though I do recommend getting a proper popover pan (link supplied below). If you are using a muffin pan make sure you grease it well, covering the area between the cups as well as the wells.

Twice Baked Breakfast Popovers brought to you by Runcible Eats (www.leaandjay.com)

Useful links for Kitchen Tools & Ingredients for Twice Baked Breakfast Popovers:

King Arthur Flour Popover Mix

Nordic Ware Grand Popover Pan

Oxo Good Grips Stainless Steel Food Scale

Kitchen Aid Artisan Series 5 Qt. Stand Mixer

Scanpan Classic 10.25″ fry pan – I love my Scanpan frying pan! Wouldn’t scramble an egg in any other!


Nutella Star Bread

February 5, 2019


IMG_7478

So I gotta ask….are there any Nutella fans out there? Cause let me tell you I love me some Nutella! I did actually didn’t even know it existed until I was living in Ireland and my friend Theresa had a jar. I watched with amazement as she spread it over her toast. I was like “What! You can eat chocolate on toast!” I had no idea it was a thing. Yup, love at first bite. And I love bread as well. So making this Nutella Star Bread was a no brainer for me!

IMG_7459

It is not by chance that I’m blogging a recipe which features Nutella today. Today February 5th is World Nutella Day. This celebration of all things Nutella was started in 2007 by Sara at Ms. Adventures in Italy and Michelle at Bleeding Espresso as a day to celebrate, get creative with and most importantly, to EAT Nutella.

World_Nutella_Day_Final_m-300x207

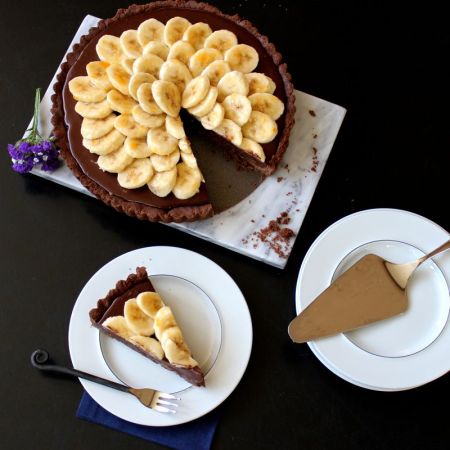
A couple of years ago, the founders have transferred Nutella Day to Ferrero the company who owns that most beloved spread. Take a peek at their Facebook page and see how folks are celebrating the day! I love Nutella so I usually try to participate with a Nutella laden recipe every year. One of my favorite Nutella creations was this Nutella, Double Chocolate & Banana Tart which was quite stunning if I do say so myself.

IMG_1065

And there was the amazing Nutella Chocolate Chip Babka:

img_5446

And for quite a few years I was on a cookie streak. I made some Nutella Sea Salt Stuffies:

IMG_3782

And there were these irresistible Salted Peanut Butter & Nutella Sandwich Cookies – sweet salty bliss I tell you!

IMG_1115

I was still loving the salty / sweet thing when I blogged about  Salted & Malted Nutella Caramel Chocolate Chip Cookies. These cookies feature silky, decadent Nutella, creamy caramel, nostalgic malted goodness and rich chocolate chips, all rolled up together in a crunchy chewy salted cookie.

IMG_5120

But let me get back to talking about the recipe I’m sharing today: Nutella Star Bread. I found this recipe on the King Arthur Flour blog. The folks at King Arthur made it with a Cinnamon Sugar filling, which is delicious as well. That Christmas-y version is a staple around here come December.  So being very familiar with the recipe, I thought it would be quite easy to swap out the cinnamon sugar for Nutella, what with it being World Nutella Day and all. Worked like a charm!

IMG_7460

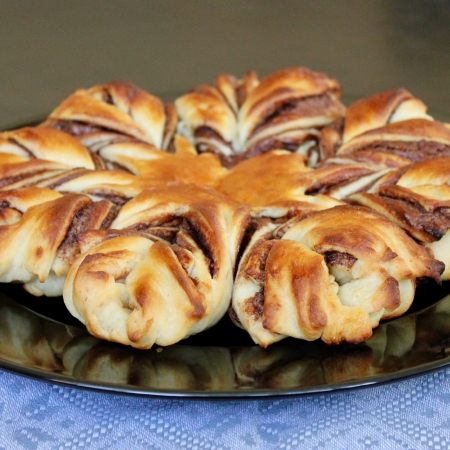
Visually stunning, everyone is always super impressed and thinks it must be soooo difficult to make. Truth be told it is pretty easy. It just involves making up an easy yeast dough, dividing it into 4 parts and rolling them out to 10″ circles and then a little layers, cutting and twisting of the dough.

IMG_7453

And I must say this treat isn’t all looks, this decadent, Nutella stuffed bread practically melts in your mouth!

IMG_7480

So what are you waiting for?! Grab you a jar of Nutella and dive right in! Great as a dessert, for breakfast or with a cup of tea or coffee, you just can’t beat this time-tested comfort food treat. So get your Star Bread baking and have a Happy Nutella Day!

IMG_7484

Nutella Star Bread

  • Servings: one star loaf - about 8 servings
  • Difficulty: easy
  • Print

recipe slightly adapted from: King Arthur Flour

Ingredients:

  • 241 grams (2 cups) all-purpose flour
  • 46 grams (1/4 cup) potato flour or instant mashed potato flakes
  • 35 grams ( 1/4 cup) nonfat dry milk
  • 198 grams to 227 grams (3/4 cup + 2- 4 Tablespoons) lukewarm water, enough to make a soft, smooth dough
  • 57 grams (1/4 cup) unsalted butter, at room temperature
  • 1 teaspoon vanilla extract
  • 2 teaspoons instant yeast
  • 25 grams (2 Tablespoons) sugar
  • 1 teaspoon salt

For the filling:

Nutella Hazelnut Spread ( I used about 1/2 of 13 oz. jar)

Directions:

First, measure the flour by gently spooning it into a cup, then sweeping off any excess. Or better yet, measure the weight of the ingredients using a handy-dandy kitchen scale. It is much more accurate than the using cups measurement systmen. Next, sift the flour, potato flour, and dry milk through a strainer; this is an important step to prevent lumps in the dough. (If you’re using instant mashed potatoes rather than potato flour you can skip this sifting step.)

To make the dough: Combine all of the dough ingredients and mix and knead — by hand, mixer, or bread machine — to make a soft, smooth dough.

Place the dough in a lightly greased bowl, cover, and let it rise for 60 minutes, until it’s nearly doubled in bulk.

Divide the dough into four equal pieces – again a kitchen scale really comes in handy here. Shape each piece into a ball, cover the balls, and allow them to rest for 15 minutes.

On a lightly greased or floured work surface, roll one piece of dough into a 10″ circle. Place the circle on a piece of parchment and carefully spread the Nutella over it, leaving approximately 1/4″ – 1/2″ bare dough around the perimeter.

Roll out a second circle the same size as the first, and place it on top of the filling-covered circle. Repeat the layering process — Nutella spread, dough circle — leaving the top circle bare.

Place a 2 1/2″ to 3″ round cutter in the center of the dough circle as a guide. With a bench knife or sharp knife, cut the circle into 16 equal strips, from the cutter to the edge, through all the layers.

Using two hands, pick up two adjacent strips and twist them away from each other twice so that the top side is facing up again. Repeat with the remaining strips of dough so that you end up with eight pairs of strips.

Pinch the pairs of strips together to create a star-like shape with eight points. Remove the cutter.

Transfer the star on the parchment to a baking sheet. Cover the star and let it rise until it becomes noticeably puffy, about 45 minutes.

While the star is rising, preheat the oven to 400°F.

Brush the star with a thin coat of the beaten egg. Bake it for 12 to 15 minutes, until it’s nicely golden with dark brown cinnamon streaks; the center should register 200°F on a digital thermometer.

Remove the loaf from the oven and allow it to cool for about 10 minutes before serving. Dust with confectioners’ sugar and serve warm or at room temperature.

Store any leftover bread, well wrapped in plastic, at room temperature for several days. Freeze for longer storage.

Enjoy!

Nutella Star Bread brought to you by: Runcible Eats (www.leaandjay.com)

Useful links for Kitchen Tools & Ingredients for Nutella Star Bread:

Oxo Good Grips Stainless Steel Food Scale

Kitchen Aid Artisan Series 5 Qt. Stand Mixer

SAF Instant Yeast

Thermapen Instant Read Thermometer by Thermoworks

6 Quart Dough Rising Bucket

Whole Milk Powder or here from King Arthur


English Muffin Toasting Bread

February 1, 2019

img_7261

Here it is…February already. And tomorrow, my favourite varmint, Punxsutawney Phil, will be stepping out of his burrow at Gobbler’s Knob and letting everyone know if there will be 6 more weeks of winter or if instead Spring is on the way. So far this Winter we’ve had a couple of pretty snows, but really it has been pretty mild overall…you know aside from that crazy Polar Vortex that hit us Wednesday night. The Husband and I were prepared for it though. We’ve got a little holiday coming up soon where we are headed somewhere much colder than our usual Iceland visits. Stay tuned for that! Needless to say, we love winter, so I’ve gotta admit, I’m hoping that the little Punxsutawney critter sees his shadow!

1-2-1ED9-25-ExplorePAHistory-a0n1g5-a_349

One extraordinary rodent!

Phil & all the folks up in Punxsutawney aren’t the only ones celebrating now. February 1st, which falls half way between Winter Solstice and Spring Equinox, also marks the festivals of Imbolc, St. Brigid’s Day and Candlemas, all of which are associated with fertility, fire, purification and weather divination. Quite an auspicious time of year! I’m very happy to be marking an event today as well. February 1st just happens to be the 8th year anniversary of  the my cooking blog! Yup… Eight years ago today I posted my first recipe. It was for Cream Tea Scones with Currants.

IMG_4970 - Version 2

Last year I was negligent and didn’t post anything at all on February 1st. I do have a wee bit of an excuse though. I was off on an incredible holiday in Scotland. I just posted about the first leg of our trip in Glasgow and am working on writing up the second leg now. But a couple of years prior, I did share one of my favorite recipes with you: Model Bakery’s English Muffins:

IMG_3611

And let me take this opportunity to remind you of some of the other “anniversary edition” recipes I have shared. There was the one for those completely decadent  Banana Rum Muffins:

IMG_0395

That jaw-dropping, over the top Crack Pie:

IMG_0897

And who can forget that magical “caviar of the South” –  Pasture’s Pimento Cheese:

img_5289

But let me get back to today’s recipe: English Muffin Toasting Bread! I don’t know about you, but I love English Muffins. As I mentioned, one of my all time favorite recipes is the Model Bakery’s English Muffins.

IMG_3643

Those muffins bake up wonderfully fluffy and light as a cloud, yet are substantial enough to hold up to any breakfast sandwich you might send their way. The reason I don’t have a constant supply of those Muffins here in this house is that although the recipe isn’t particularly difficult to make, it does involve several steps and dough rising times. In fact, you have to be organized to make a biga the day prior to baking. I’d love to say that I am that organized and have everything all scheduled out, but I’m afraid it isn’t so. That was why I was so delighted to find King Arthur Flour’s recipe for English Muffin Toasting Bread.

img_7265

This bread is ridiculously easy to make. You literally just mix it all up, slap it in the pan for about a 1 hour rise and then pop it in the oven. You heard me right…a yeast bread that requires no endless kneading and not one bit of fiddly shaping. The resulting bread makes the perfect toast and has a rough craggy texture very reminiscent of English Muffins. Indeed, it’s just the perfect vehicle for lashings of salty butter and sweet fruity jam.

img_7235Not to mention it can stand up to any egg sandwich you want to throw its way.  Now in the spirit of full disclosure, I must admit that if I could wave a magic wand and have either the English Muffin Toasting Bread or one of the Model Bakery’s English Muffins appear with a poof in front of me, I would probably go for the actual English Muffin. But I must have slept through the Breakfast Bread conjuring class at Hogwarts and I can’t seem to pull that spell off no matter how hard I try. So the Model Bakery’s Muffins will likely remain my “flashy special occasion kind of thing”. Whereas the English Muffin Toasting Bread is my “roll out of bed and whip something really yummy together in a flash” kind of thing. Believe me, you’ll be amazed how easy this bread is to make. It’s a good thing too because as quickly as folks will devour a loaf, you’ll be making another before you know it. Get to baking!

img_7234


English Muffin Toasting Bread

  • Servings: 1 loaf bread
  • Difficulty: super easy!
  • Print

recipe from: King Arthur Flour

Ingredients:

  • 361 grams (3 cups) All-purpose Flour
  • 14 grams (1 Tablespoon) sugar
  • 1 1/2 teaspoons salt
  • 1/4 teaspoon baking soda
  • 1 tablespoon instant yeast
  • 227 grams (1 cup) milk
  • 57 grams (1/4 cup) water
  • 25 grams (2 Tablespoons) vegetable oil or olive oil
  • cornmeal to sprinkle in pan

Directions:

Whisk together the flour, sugar, salt, baking soda, and instant yeast in a large mixing bowl, or the bowl of a stand mixer.

Combine the milk, water, and oil in a separate, microwave-safe bowl, and heat to between 120°F and 130°F. Be sure to stir the liquid well before measuring its temperature; you want an accurate reading. If you don’t have a thermometer, the liquid will feel quite hot (hotter than lukewarm), but not so hot that it would be uncomfortable as bath water.

Pour the hot liquid over the dry ingredients in the mixing bowl.

Using an electric beater, or stand mixer with beater attachment, beat at high-speed for 1 minute; the dough will be smooth and very soft. If you don’t have an electric mixer, beat by hand for 2 to 3 minutes, or until the dough is smooth and starting to become elastic.

Lightly grease an 8 1/2″ x 4 1/2″ loaf pan, and sprinkle the bottom and sides with cornmeal.

Scoop the soft dough into the pan, leveling it in the pan as much as possible.

Cover the pan, and let the dough rise till it’s just barely crowned over the rim of the pan. When you look at the rim of the pan from eye level, you should see the dough, but it shouldn’t be more than, say, 1/4″ over the rim. This will take about 45 minutes to 1 hour, if you heated the liquid to the correct temperature and your kitchen isn’t very cold. While the dough is rising, preheat the oven to 400°F.

Remove the cover, and bake the bread for 22 to 27 minutes, till it’s golden brown and its interior temperature is 190°F.

Remove the bread from the oven, and after 5 minutes turn it out of the pan onto a rack to cool. Let the bread cool completely before slicing.

Enjoy!

English Muffin Toasting Bread brought to you by: Runcible Eats (www.leaandjay.com)

Useful links for Kitchen Tools & Ingredients for English Muffin Toasting Bread:

Oxo Good Grips Stainless Steel Food Scale

Kitchen Aid Artisan Series 5 Qt. Stand Mixer

SAF Instant Yeast

Thermapen Instant Read Thermometer by Thermoworks