So yup…still in lock-down. I don’t know about you, but not only have my workouts suffered over the past two months, but my stress eating and drinking have definitely increased. I hear folks talking about the “Covid 19” just like they do about the “Freshman 15” and considering the state of me, I think a gain of 19 pounds is a serious possibility! Yikes! So I thought maybe today I would offer up a recipe that is a bit kinder on your waistline while still being delicious – Cauliflower Fried Rice!
That’s right! Carbs be gone!!! This Cauliflower Fried Rice is just bursting with flavor with none of those pesky carbs. Will you be fooled into thinking you’re eating rice? Nope. You won’t. Buuuuut – your pants might fit better. And this dish is actually delicious. The cauliflower does take on all of the flavor from those lovely seasonings. You won’t actually miss the rice, all things being considered.
This dish comes together quickly. Just have everything all prepped before you begin cooking. Just perfect for a Meatless Monday or a “I better lose some weight before quarantine is lifted and I have to waddle out into the light of day”, moment of reckoning. Just saying…
64 gramschopped scallions, light and green parts separated (you’ll need 5-6 scallions)
3garlic cloves, minced
1 Tablespoonfinely chopped fresh ginger
One900-g head cauliflower (or 900 grams ready to cook cauliflower)
4-5 Tablespoons soy sauce (use gluten-free if needed)
1/4 teaspoonred pepper flakes
1 teaspoonsugar
130 gramsfrozen peas and carrots
1 teaspoonrice vinegar
1 teaspoonAsian sesame oil
30 grams chopped cashews or peanuts (optional)
Directions:
Given that riced cauliflower is so easy to find in grocery stores, I urge you to save yourself a lot of trouble and just buy it “ready to cook”. However, if you truly love to grate things, see the following instructions. Grate the cauliflower in a food processor fitted with the grating disc. Alternatively, grate on the large holes of box or hand-held grater. Set aside.
Heat 2 teaspoons of vegetable oil in a large (10 or 12-inch) nonstick skillet over medium heat. Add the eggs and a pinch of salt and scramble until the eggs are cooked. Transfer to a small plate and set aside. Wipe the pan clean.
Add 3 tablespoons of vegetable oil to the pan and set over medium heat. Add the light green scallions, garlic, and ginger. Cook, stirring often, until softened but not browned, 3 to 4 minutes. Add the grated cauliflower, 4 tablespoons of the soy sauce, red pepper flakes, sugar, and 1/4 teaspoon salt. Continue to cook for about 3 minutes. Add the peas and carrots. Stir to combine and continue cooking until the cauliflower “rice” is tender-crisp and the vegetables are warmed through, a few minutes. Stir in the rice vinegar, sesame oil, dark green scallions, nuts (if using) and eggs. Taste and adjust seasoning (adding the remaining tablespoon of soy sauce if necessary). Serve hot.
Enjoy!
Cauliflower Fried Rice brought to you by: Runcible Eats (www.leaandjay.com)
Links for Helpful Kitchen Tools & Ingredients for Cauliflower Fried Rice:
Once Upon a Chef, the Cookbook by Jennifer Segal – You will not find the recipe for Cauliflower Fried Rice in this cookbook, but will fin da bunch of other awesome tasty recipes. I love this cookbook, as well as the Once Upon a Chef blog. All of Jennifer’s recipes are easy to make and absolutely delicious!
So the Husband and I went on this amazing trip to Scotland back in January of 2018. I told you a bit about the Glasgow portion of our adventures in a post back on January 26th of last year. I meant to fill you in on the rest of the trip…the part that was actually the most exciting. You see, we went up to Lerwick in the Shetland Islands for Up Helly Aa – which is Europe’s largest Viking fire festival! Think of it like Mardi Gras if it took place on the same latitude as Greenland! Alas, you know that thing about the best laid plans of mice and men and all that. Long story short…I just flaked and did not write the post. However, that is a wrong that I can easily right. It only took a little pandemic to get me writing. Anyway, I’m going to tell you all about it today along with travel tips and recommendations! And I will give you a great recipe for Scottish Oat Cakes. These cracker/cookies are great on their own and also lovely with a slice of cheese or some jam.
So when last I left you, we were hanging out in Glasgow – taking in all the sights, seeing a bunch of live music at the Celtic Connections festival, tasting whisky and chocolate and sipping champagne in a spa. Before we knew it, it was time to get on up to the Shetland Islands to see those Vikings! The Husband doesn’t really get nervous about most things, but he was not looking forward to flying over the North Atlantic in a tiny plane with propellers. But when faced with the alternative of spending 12 hours on a ferry crossing the North Atlantic in January, he was sure he could tolerate an hour or so on a tiny propeller plane. So he took a shot or two of liquid encouragement and on the teeny plane we went!
Up Helly Aa (pronounced Up Hell ee Ah) is held the last Tuesday in January in Lerwick every year. It marks the end of the Yule season with a nod to the Shetlands Viking heritage. (Up is from uppi which means “end” Helly means “holy days” and Aa is “all” – hence “The end of all Holy days.”) The Shetlands were ruled by the Norse for some 500 years until they became part of Scotland in 1468. On this day, once night falls, the town lights are extinguished and a band of over 900 blazing torch bearing guizers (folks in various disguises – think Halloween) led by a modern day Jarl and his Squad who are kitted out as Vikings, go on a procession through the streets with a full size replica Viking longship, that they have lovingly built, in tow. Once they reach a designated spot, they throw their torches into the ship, turning it into the largest bonfire you’ve ever seen! Sounds absolutely amazing right?!! Let me tell you it absolutely was!!!
But I’m getting ahead of myself. Let me start at the beginning. Our arrival in Lerwick after the scary mini propeller plane adventure. Once again on terra firma, we met up with out good friends and fellow Viking enthusiasts, Bill & Virginia and headed off to check into our lovely AirBnB and have a poke about the town. The town of Lerwick is charming.
OMG! Remember these?!!
Another thing which made me very happy was that there were plenty of Shetland ponies around. I love horses and often carry sugar cubes or apples with me if I think there is a chance I might encounter any.
We had been dreaming about going to this festival for some time, so we were all very excited! First thing we needed to do was get ahold of the Raven Banner which would fly over the town on Up Helly Aa, signifying the Guizer Jarl was in charge.
Up Helly Aa starts pretty early with the Jarl Squad marching to Market Cross. So who is the Jarl? Well a different man is chosen to be Jarl each year. This is a huge honor for the chosen one.
Jarl Stewart Jamieson (portraying Viking Thorvald Thorvaldsson) Lewick 2018 Up Helly Aa
He then selects the men he wishes to be in his Viking squad. These men are the only ones you will see dressed as Vikings (besides the Junior Jarl and his Viking squad). There are no guizers in the morning march, only Vikings. This is the first time anyone in the town gets to see the Jarls squads outfits as well as their replica longship, which have been designed with the utmost secrecy. So believe me, everyone is super curious. The modern day Vikings draw a big crowd as they march through the streets, the Guizer Jarl and his squad lead the way
Followed by the Junior Jarl & his squad
until they reach the Market Cross, where they stop and read The Proclamation (or Bill).
This document, which has also been kept secret until the big day, includes instructions for the day along peppered with a healthy dose of local jokes and satire. The Jarl Squad then departs to go pose for formal pictures with their galley at Alexandra Wharf.
Post photo op, the Jarl Squads departs to visit various primary schools, hospitals and retirement homes. We took the opportunity to wander about the town and do some shopping. Many of the shop owners participate in a window decorating competition for the festival.
The Jarl will later chose the winner later, but I had a definite favorite! The Viking in a bubble bath at the Shetland Soap Company was perfect.
Everyone in the town was in great Viking form! Lots of horned helmets (yes, we know the Vikings didn’t actually wear them, but wearing a horned helm is really fun!) Here are some wee Vikings we encountered along the way:
Wee Vikings in training! Photo Credit for wee red haired Viking to Bill Watson.
The Husband had grown out his beard for months so I could get these braids in it. I think it’s a great look for him, though it took awhile for him to get used to the feeling of them!
After some shopping, we set off to see The Fiery Sessions which showcase some of Shetlands best traditional music. Then we somehow found ourselves in a pub for some more live music and perhaps a drink or two.
And finally it was time for the main event! The big burn! Now this event goes on no matter what the weather may be. “No postponement for the weather” is the boast often heard throughout the town. And you can imagine at that time of year in the North Atlantic – the weather can be remarkable – snow, sleet, rain, hail and gale force winds have been know to make an appearance. On our night, we considered ourselves pretty lucky, as it was only a bit wet and windy. As you can see, there might have been a few sparks flying about, so it’s a good thing that everything in town was thoroughly dampened!
The procession starts at 7:30. All of the torches are lit and the Jarl, perched in his longship, is pulled through the streets by his Viking squad
followed by hundreds of those guizers that I mentioned. Those are the other participants in the festival. Traditionally groups of townsmen, though recently that is changing as there are now some female guizers, form dozens of squads. Each squad has it’s own costume theme ranging from hula girls, to belly dancers to StormTroopers, to cats, cows or skeletons. Again the squads have kept their particular costume a secret from everyone until this procession.
The torchlit procession, 900-ish folks strong, then winds through Lerwick’s streets
until the longship is pulled into a park where once the Jarl disembarks and gives the signal, all of the torches are pitched into the longship.
Jarl getting ready to leave the longship before the big burn!
And if you haven’t had your fill of fire, there was a bit more to be seen overhead.
But the party doesn’t end here. No, no no! It literally goes on all night long! At this point folks all retire to different halls around town for the after -parties. Now these halls are ticketed events and are usually by invitation only, though some tickets are made available to the public. Our AirBnB hosts were kind enough to score some tickets for us.
At the Halls you will find food, drink and dancing. The Guizers squads that I mentioned before then take turns visiting the different halls to perform an act – such as singing, dancing or doing a comedy sketch.
It is a tradition that every Guizer must dance with at least one of the ladies in each hall and take a dram. Considering there are around 11 or 12 halls each year, can you just imagine the state of the poor Guizers in the morning?!! Good thing that the day after Up Helly Aa is a public holiday! What an unforgettable experience!!! Watch the action packed day in the following video.
And I should mention that in addition to all of the excitement of the festival, the Shetland Islands are gorgeous. We visited a place called Jarlshof which is a prehistoric & Norse settlement archaeological site.
Located in Sumburgh on the tip of the mainland Shetland it contains settlement sites which range over 4000 years of human history – from late Neolithic through Bronze and Iron Ages, the Norse settlement all the way up to a 16th Century Laird’s house.
We absolutely loved exploring here, despite the fact that the weather was certainly not the best that day. High winds and torrential downpours. We were soaked to the skin, but couldn’t tear ourselves away. Definitely a must see if you are visiting Shetland!
Now I guess I should get back to those oatcakes I mentioned at the outset. Oatcakes are a staple in most Scottish kitchens. Kind of a cross between a cookie and a cracker they have a lovely texture and a slightly sweet and salty taste.
They are very easy to make and quite versatile. You can eat them plain, with a bit of butter, jam,
smoked salmon or with cheese. They are a perfect addition to your cheeseboard!
So if Up Helly Aa sounds right up your alley – get planning right away! Lots of folks are interested in going and there are only so many places to stay. And while your making your arrangements – you can pour yourself a wee dram and nibble on some of these tasty Scottish Oat Cakes!
Scottish Oat Cakes
Servings: 16 - 25 pieces - depending on how you cut them
2 cups old fashioned rolled oats (not quick cooking or instant)
1 cup all-purpose flour
1/2 cup brown sugar
1 teaspoon fine sea salt
1/2 teaspoon baking soda
3/4 cups butter – cut into 1″ cubes
1/4 cup very hot water
Maldon flaky Sea Salt for finishing
Directions:
Preheat the oven to 375° F. Line a baking sheet with parchment paper and set aside.
Place the oats, flour sugar, salt and baking soda in a food processor. Scatter the butter cubes over the dry ingredients.. Pulse until the mixture looks like coarse grains of sand. Add the hot water slowly, using only as much as you need to get the oat/flour/butter mixture to form into thick dough.
Dust the counter with some extra flour and turn the dough out onto the work surface. Roll the dough out to a 1/4″ thickness. Use a cookie cutter to cut out the oatcakes.
Place the oat cakes on the prepared sheet. Sprinkle a small amount of Maldon sea salt over the cakes. Bake for 15 – 20 minutes until lightly browned.
Remove cookies to a rack to cool.
Enjoy!
Scottish Oat Cakes brought to you by: Runcible Eats (www.leaandjay.com)
Links for Planning your vacation in The Shetland Islands, Scotland:
Car Rental: We rented our car from Star Rent a Car and were very pleased with both the car and the agency. I definitely would recommend that you do rent a car. Sumburgh Airport is about 20 -25 minutes away from Lerwick. There are taxis available, but if you would like to explore the island, outside of town, you pretty much need a car to do so. And if you are not used to driving on the left side of the road, you will likely want an automatic car, as to avoid shifting gears with your left hand. The number of automatics available are limited, so please remember to reserve your car well ahead of time!
Accommodation: Lerwick is a pretty small town and most of the accommodation available books well in advance (like a year prior) of the festival. I was ready to give up looking (I didn’t realize how difficult it would be to get accommodation and had waited until May 2017 to try to book for January 2018) and just plan on going the following year when just by chance, someone cancelled an AirBnB reservation while I happened to be on the sight. I grabbed it immediately and it was absolutely perfect. Ramsay & Nikola’s stylish and cozy house is conveniently located, close to a large grocery store, a delicious restaurant Called Fjara, an Iron Age Broch as well as being a short walk into town. It was immaculatly clean, had all the amenities one could want and was well stocked with tea and coffe. Nikola & Ramsay were friendly and warm hosts. They thoughtfully provided us with milk, bread, the local paper as well as a couple bottles of wine and spot on recommendations for local restaurants. All of our communication with them were easy and their responses prompt. We were visiting Shetland for Up Helly Aa and Ramsay was able to get tickets to one of the Halls for us which we would not have likely been able to do on our own. Furthermore he gave us advice concerning where to stand for the best views during the procession. All of his assistance greatly enhanced our overall festival experience. Here is a link to Ramsay’s house – though I’m not sure if he is still offering it for rent: Refurbished & Modern House in Lerwick.
Before finding the Airbnb, I had emailed many other hotels and guesthouses. Most did not even bother to respond, however Anona Michael of Rockvilla Guesthouse did respond promptly. Sadly she was all booked up, but took the time to recommend other accommodations for me to check availability, as well as offer advice on the festival in general. Rockvilla Guesthouse is right on the procession route, so if you could score a room with them it make things much easier for you!
Restaurants:
Fjara Cafe Bar – Loved this restaurant! Friendly and welcoming, with simply amazing views, it is open for breakfast through dinner and even later for cocktails. Seasonal menu features Shetlands finest ingredients, homemade baked goods and local brews.
Peerie Shop Cafe – Cozy & bustling cafe located in the heart of Lerwick. Features delicious homemade breakfasts, baked goods, soups, sandwiches and coffee. Don’t miss out on their scones with clotted cream and jam!
Sumburgh Hotel Restaurant – This is a strange recommendation for me as our experience here was …. well…quite strange! I will let my trip advisor review entitled “We only met one rude person in the Shetland Islands…” do the talking here:
Let me start this by saying, I usually do not write bad reviews. And I hesitate to do so even now, however we experienced such poor hospitality, I don’t think I can let it go without saying something. At the end of January, friends and I visited Jarlshof which is located right near the Sumburgh Hotel. It was raining, cold and windy. After taking in the sights, we hoped to grab some lunch at the Sumburgh Hotel Lounge. Unfortunately, it was after two and lunch service had finished. This is when we encountered the only rude person we met during our entire visit to the Shetland Islands. The good news for the Shetland Island folks is this person was not a local. She had an accent, maybe Italian. She briskly told us lunch was over at 2 pm. Although it was only five after two, we said we understood this but asked if there wasn’t anything at all, maybe even some crisps or bar snacks we could have. She seemed very annoyed and said, “all we have it soup”. A warm bowl of soup sounded great to us. Then, rather than seating us in the warm lounge, she ushered us out to a sort of sun porch type of area, which was unheated and very drafty and cold. We asked if we could eat in the dining room and she said “no, lunch is over.” But other folks were still seated inside and more came in a took seats while we were shivering on the porch like unwanted step children! The barman, who was very friendly to us, seemed somewhat embarrassed by her behavior. I don’t know what had happened to that woman before we showed up to put her in such a mood, but she definitely took it all out on us. We ate our soup, which was very good by the way, and left. Otherwise the hotel seemed nice. As long as you don’t meet up with the rude woman, I’m sure you’ll be fine.
Shopping:
Mirrie Dancers Chocolates – Mirrie Dancers is the name the locals on Shetland use for the Aurora Borealis or Northern Lights. These gorgeous, handmade chocolates take inspiration from this natural phenomenon as well as the beauty which abounds in Shetland and Orkney. You will find these little gems both beautiful and incredibly delicious! Lovely treat for yourself and a great souvenir to carry back home.
Ninian Gift Shop – Fantastic gift shop which has everything from lovely unique handmade Shetland knitwear to jewelry to stationary to home goods. Wonderfully curated, you will definitely find the perfect gift here for yourself and others as well!
Things to do:
Up Helly Aa: Um….have you read this blog? Yeah, you want to go to this festival!!!
Shetland Arts & Craft Trail – If you are visiting during Up Helly Aa, these shops will likely have very limited opening, since it is off season, so call ahead to make sure they are open
How does that saying go… Thirty days hath September, April, June and November? Yeah right! By my reckoning March had about 2 years worth and April has about 8,ooo days at this point and counting! Just kidding!!! I know there are folks out there quarantining with toddlers, so the Husband and I who are just locked in with some talkative cats, have it pretty dang good, all things considered. Although Spring is definitely in the air, some chilly weather keeps trying to wiggle back into play. I’ve been cooking up quite a few warming, hearty stews, lentil dishes and chilis. These spicy Corn Muffins have been the perfect accompaniment to many a dinner.
These muffins are very easy to make and come together quickly. I think it is quite likely that you will have most of these ingredients ready to go in your pantry as well. And these spicy devils do have a good kick to them. But if you aren’t a fan of spice, simply leave out the jalapeños and cup back on the cayenne. These moist flavorful muffins are not really sweet at all, which is how the Husband and I like our cornbread. They are delicious all on their own and you just can’t beat them when slathered with butter!
recipe from: The King Arthur Flour Baker’s Companion
Ingredients:
8 oz. (1 cup) milk
4 7/8 oz. (1 cup) cornmeal
6 1/4 oz. (1 1/2 cups) all purpose flour
1 Tablespoon baking powder
1 teaspoon ground cumin
1/4 teaspoon cayenne
1/2 teaspoon black pepper
1/2 teaspoon salt
2 large eggs
3 1/2 oz.(1/2 cup) vegetable oil
1 7/8 oz (3/4 cup) minced scallions (could sub. in shallots)
3 Tablespoons jalapeño peppers, minced
4 oz. (1 cup) shredded pepperjack cheese
Directions:
Preheat the oven to 425°F and heavily grease the wells of a 12 muffin baking tin.
In a small bowl, pour the milk over the cornmeal and set the mixture aside to soak while you assemble the dry ingredients.
In a medium-sized bowl, whisk together the flour, baking powder, spices and salt. Beat the eggs and add them to the cornmeal mixture with the oil. Add the cornmeal and milk to the dry ingredients, stirring until just blended; don’t beat this batter or your muffins will be tough. Fold in the scallions, jalapeños peppers and 1/4 cup of the pepper jack cheese. Using a 1/4 cup muffin scoop, place the batter in the prepared pan. Sprinkle the remaining cheese over the top of the muffins and bake them for 18 – 22 minutes, until they are golden brown.
Enjoy!
Useful links for Kitchen Tools & Ingredients for Corn Muffins with a Kick:
Mason Cash “Into the Forest” mixing bowl – Sure…you don’t need this mixing bowl to make these muffins, but I absolutely love my Mason Cash bowls, so just thought I’d give them a shout out!
Here is a fantastically easy yeast bread recipe for everyone out there practicing social distancing: No-Knead Crusty White Bread. This recipe bakes up a crusty artisan loaf that anyone would be proud of.
And here is some more awesomeness about it – once you mix the dough up it just sits in your fridge, developing more and more flavor, until you are ready to bake it! Yup, just pinch off a bit of the dough – as much as you want for your evening meal – and leave the rest in the fridge. You heard me – multiple loaves of fresh bread in a week with minimal effort! Oh – bestill my heart!!!
I know some folks are a little nervous about baking anything with yeast. I was that way in the past. But seriously, you’ve got to just get over it and take the plunge. Well, I guess you need to make sure you have the ingredients. There was a run on flour and yeast when all of the lockdowns started happening. I had yeast, but found myself running low on flour. I had mentioned to you in a couple of posts back that I was eagerly awaiting a delivery from Giant’s Peapod grocery delivery service. I had to wait about three weeks to get a delivery time slot and had no idea what I would be getting from my list as the service had stipulated that certain items might be removed depending on availability. So, it would be a surprise – kind of like Christmas morning. It turned out it was more like Christmas morning than I had intended as the time slot I got was 6:30 am – 8:30 am and don’t you know it, that driver was at my door at 6:30 am sharp. Yeah, we are definitely not early birds around here but it was a pretty big day for us, so while not bright eyed and bushy tailed, we were awake and ready. While I am grateful to get anything without having to venture to the store, I must say Peapod did not win me over. I ended up not getting about 1/2 of the items on my list. The biggest disappointments of the missing items for me were no flour and no sugar. And some of the produce that was sent to me were not items I would have picked – ie. the apples had big brown spots and were going bad. The other delivery services I was aware of, like Instacart, had absolutely no availability. So I decided to take a look at Harris Teeter ExpressLane. They offered an express service whereby you could order and pay online, then one of their personal shoppers would pick out your items and finally all you would have to do is just drive up to the store and someone would come out and put the items in your trunk. Nice & contactless! The problem there was getting a time slot. When I looked, everything was booked out for six days. So I readied the items in my cart and just sat there refreshing the page. Kind of like trying to score tickets to a hot concert. And voila – a time slot suddenly came available just two days away, so I grabbed it immediately! I must say, it was a much better experience. Not only did I not have to wait nearly a month, but I was also able to purchase two bags of King Arthur Flour and two bags of sugar! Score! And I know you will find this hard to believe, but they even were able to grant my toilet paper wish! SUPER AMAZING score!!!
Oh yeah, but back to this wonderful Crusty White Bread I was telling you about. This is such an easy-peasy recipe!
I will say that if you are an experienced bread baker, this dough is much stickier than what you will be used to. You will end up using a good amount of flour while shaping it! But don’t fret, it will actually bake up very nicely. I experimented with baking one of the batches I made in a dutch oven and was very pleased with the result. The bread did rise up higher and the crust was absolutely phenomenal – crisp and chewy, glossy and golden – as if it came out of a professional bakery!
Apparently the steam that is created and sealed in when you slip the dough into the preheated Dutch oven is the thing that transforms the crust. I have included some info on how this is done below and here is a helpful article from King Arthur Flour on Bread Baking in a Dutch Oven. Just for comparison, I also baked a couple of loaves simply on a bread stone, following the recipe below, and they came out quite lovely as well. The crust was not as crackly or crisp but still had a deliciously chewy texture.
If it is your first time baking yeast bread, I urge you to give this recipe a try.You will be amazed at the masterpiece that will come out of your oven. No doubt you’ll be a bread baking convert!
7 1/2 cups (907g) King Arthur Unbleached All-Purpose Flour
3 cups (680g) lukewarm water
1 tablespoon salt
1 1/2 tablespoons (14g) instant yeast or active dry yeast
Directions:
The flour/liquid ratio is important in this recipe, so measure carefully. Your best bet is to weigh the flour; or measure it by gently spooning it into a cup, then sweeping off any excess.
Combine all of the ingredients in a large mixing bowl, or a large (6-quart), food-safe plastic bucket. For first-timers, “lukewarm” means about 95° – 105°F, but don’t stress over getting the temperatures exact here. Comfortably warm is fine; “OUCH, that’s hot!” is not. Yeast is a living thing; treat it nicely.
Mix and stir everything together to make a very sticky, rough dough. If you have a stand mixer, beat at medium speed with the beater blade for 30 to 60 seconds. If you don’t have a mixer, just stir-stir-stir with a big spoon or dough whisk until everything is combined.
Next, you’re going to let the dough rise. If you’ve made the dough in a plastic bucket, you’re all set — just let it stay there, covering the bucket with a lid or plastic wrap; a shower cap actually works well here. If you’ve made the dough in a bowl that’s not at least 6-quart capacity, transfer it to a large bowl; it’s going to rise a lot. There’s no need to grease the bowl, though you can if you like; it makes it a bit easier to get the dough out when it’s time to bake bread.
Cover the bowl or bucket, and let the dough rise at room temperature for 2 hours. Then refrigerate it for at least 2 hours, or for up to about 7 days. (If you’re pressed for time, skip the room-temperature rise, and stick it right into the fridge). The longer you keep it in the fridge, the tangier it’ll get; if you chill it for 7 days, it will taste like sourdough. Over the course of the first day or so, it’ll rise, then fall. That’s OK; that’s what it’s supposed to do.
When you’re ready to make bread, sprinkle the top of the dough with flour; this will make it easier to grab a hunk. Grease your hands, (Seriously. Grease. Your. Hands. This dough is really sticky!) and pull off about 1/4 to 1/3 of the dough — a 14-ounce to 19-ounce piece, if you have a scale. It’ll be about the size of a softball, or a large grapefruit.
Plop the sticky dough onto a floured work surface (let me repeat that – FLOURED. Work Surface. Again – this dough is Sticky!), and round it into a ball, or a longer log. Don’t fuss around trying to make it perfect; just do the best you can. If you would like to try your hand at baking in a Dutch Oven – see notes below*
Place the loaf on a piece of floured parchment (if you’re going to use a baking stone); or onto a lightly greased or parchment-lined baking sheet. Sift a light coating of flour over the top; this will help keep the bread moist as it rests before baking.
Let the loaf warm to room temperature and rise; this should take about 60 minutes (or longer, up to a couple of hours, if your house is cool). It won’t appear to rise upwards that much; rather, it’ll seem to settle and expand. Preheat your oven to 450°F while the loaf rests. If you’re using a baking stone, position it on a middle rack while the oven preheats. Place a shallow metal or cast iron pan (not glass, Pyrex, or ceramic) on the lowest oven rack, and have 1 cup of hot water ready to go.
When you’re ready to bake, take a sharp knife and slash the bread 2 or 3 times, making a cut about 1/2″ deep. The bread may deflate a bit; that’s OK, it’ll pick right up in the hot oven.
Place the bread in the oven — onto the baking stone, if you’re using one, or simply onto a middle rack, if it’s on a pan — and carefully pour the 1 cup hot water into the shallow pan on the rack beneath. It’ll bubble and steam; close the oven door quickly.
Bake the bread for 25 to 35 minutes, until it’s a deep, golden brown.
Remove the bread from the oven, and cool it on a rack. Store leftover bread in a plastic bag at room temperature.
Enjoy!
* Notes on Baking in a Dutch Oven:
When you are ready to bake, measure out a two pound ball of dough. Shape the dough as best you can, on a piece of floured parchment. Leave the dough ball seam side up. Again this dough is ridiculously sticky. Be very liberal with the flour.
Preheat your dutch oven 30 minutes prior to your loaf being ready to bake. I used a 3.5 quart Le Creuset Dutch oven. A 4.5 quart oven should work as well.
When ready to bake, remove the hot Dutch Oven and spray the interior with a burst of vegetable oil non-stick spray and sprinkle cornmeal in the bottom of the pan to prevent the bread from sticking.
Slide your hand under the parchment paper and plop the dough into the hot pan. Don’t fret if the dough sticks to the parchment a bit. Mine did and it caused the dough to deflate a bit, but again all was well.
Make a few slashes in the top of the loaf. A bread lamé would work great here. I did not have one and had difficulty fitting my knife into the hot pan without hitting my wrist on the edge – OUCH!
Bake 25 – 30 minutes and then remove the lid and bake for another 5 – 10.
Links for Helpful Kitchen Tools & Ingredients for No-Knead Crusty White Bread:
So yeah…I told you all about how motivated I was in Stage I of our lockdown. Just an amazing little cleaning whirlwind. Full of energy, and raring to beat everything into a shining perfection of organization. Well, that anomaly has passed and I’ve moved into Stage II – complete lethargy. There is definitely still a lot that could be cleaned and organized around here, it isn’t like I’ve run out of things to do. It is just at this point I don’t really care to do them. I mostly just get up in the morning and start reading all of the depressing news from around the world. And even once I tear myself away from the old computer, I obsessively go back to those news sites again and again throughout the day to check for updates. Definitely not good. As a fun diversion, I’m trying to refocus on planning a trip for us when this is over.
Yup. You were right – I’m not dreaming of a beach vacation. I’m looking at the Arctic again!
And speaking of trips, I have a bunch of blogs in the works from trips we’ve taken in the past which I have yet to write up. You know the thing, the Husband and I take a trip and then I will cook up a recipe which is inspired from the locale and share that along with some lovely photos. I also give you recommendations for accommodations, activities, restaurants and tours, should you be inspired to visit on your own. you can see the ones I’ve done previously by clicking on “Travels” in the top navigation bar. So be on the look out for a few of those in the future. But for today, I would like to share this amazing recipe for Spinach Croissants!
These Spinach Croissants are also made with Baker’s Croissant Dough. This type of dough is a yeasted laminated dough. Basically you mix up a yeasted dough, roll it out and place a layer of butter on top of it. You then enclose the butter within the dough and proceed to roll it out and fold it over and over again. This creates a dough which has multiple alternating layers of dough and butter. The butter evaporates when baked and that is what forms all those lovely flaky layers in a croissant.
Once the dough is ready, rather than filling it with anything sweet, these little devils are stuffed full of a savory filling made up of spinach, cheeses & roasted red peppers. And no meat in sight, so perfect for Meatless Monday.
These Spinach Croissants are amazing! That buttery, flaky pastry dough simply melts in your mouth and the savory filling is just delicious. These croissants are conveniently portable and are great at room temperature but also crisp up well if you are reheating them. While it is a bit time consuming to make up that laminated dough, it is 100% worth it! Make a batch up today!
10 ounces (283 grams) chopped frozen spinach, thawed and well drained
1/2 cup (3/4 ounce/21 grams) fresh bread crumbs
1/2 cup (2 ounces/57 grams) crumbled feta
1/2 cup (1 3/4 ounces/50 grams) grated parmesan cheese
1/4 cup (2 ounces/57 grams) diced roasted red peppers
salt and pepper to taste
For the egg wash:
1 large egg beaten with 1 Tablespoon water
Directions:
For the Filling:
In a large skillet, heat the oil over medium heat. Add the onions and cook, stirring occasionally, until translucent (about 5 minutes). Add the spinach and bread crumbs and stir until well combined. Remove from the heat, transfer to a bowl, and let cool to lukewarm.
Stir in the cheeses and peppers and season with salt and pepper.
Note* This amount of filling is enough for a full batch of the Baker’s Croissant Dough. So, you can either use all of the dough, halve the filling ingredient or just save the other half of the filling for later. The spinach filling is great as a topping for pizza as well!
Line two baking sheets with parchment.
To assemble:
Roll the dough into a 12″ x 18″ rectangle. Trim 1/4″ of dough from the edges; this will give you a higher puff in the oven.
Cut the dough in thirds in both directions, to make nine 4″ x 6″ rectangles. Place 2 tablespoons of the filling on one side of each rectangle.
Fold the dough over twice to enclose the filling, with the seam ending up on the bottom. Press the croissant down slightly to flatten it.
Place the croissants on the prepared baking sheets and let them rise for 1 to 1 1/2 hours at room temperature. They should expand noticeably, and when you gently press one with your finger, the indentation should remain.
Partway through the rise time, preheat the oven to 425°F.
When the croissants are not quite doubled, brush with the egg wash and bake for 15 minutes. Reduce the oven temperature to 350°F and bake for 15 minutes more, until the croissants are a deep golden brown, even where the dough overlaps (that’s where you want to look when checking for doneness).
Remove from the oven and cool on a rack for 20 minutes before serving. Watch out, the filling will be hot!
Store, wrapped in the refrigerator, for up to two days. Refresh for 10 minutes in a 350°F oven before serving.
Baker’s Croissants Dough
Ingredients:
For the dough:
2 large eggs + enough warm water to make 2 cups (454g) of liquid
1/4 cup (50g) sugar, divided
5 1/2 to 6 cups (659g to 723g) All purpose Flour
2 1/4 teaspoon instant yeast
2 tablespoons (28g) butter, melted
1/2 cup (71g) Bakers Special Dry Milk or nonfat dry milk, optional
1 scant tablespoon salt
1 teaspoon vanilla extract (optional; for sweet pastry)
For the Butter:
1 7/8 cups (425g) unsalted butter, cool to the touch
3/4 teaspoon salt
1/2 cup (60g) All purpose flour
Directions:
For the dough: Put the eggs and water in a large mixing bowl. Add 1 tablespoon of the sugar, 3 cups (362g) of the flour, and the yeast. Mix until well blended; set aside to let the sponge work.
For the butter: Cut the butter into 1˝ chunks and combine with the salt and flour at low speed in a stand mixer just until smooth, with no lumps. Be careful not to beat too much; you don’t want to incorporate any air.
Spread the butter on a piece of plastic wrap and shape into an 8˝ square. Wrap and refrigerate for 30 minutes.
Finish the dough: Add the melted butter to the sponge. Whisk together the remaining sugar, 2 1/2 cups (298g) of the flour, the dry milk, and salt and add to the sponge. Mix until the dough forms. Knead for 5 minutes; touch the dough lightly with your finger. If it’s still sticky, add the remaining flour 2 tablespoons at a time until the dough is the desired consistency. Once the dough is smooth and elastic, pat it into a 9˝ square, then wrap and refrigerate for 30 minutes.
Laminate the dough: Remove the chilled dough from the refrigerator and gently roll it to a 12″ square.
Unwrap the butter square and place it in the center of the dough at a 45° angle, so it looks like a diamond in a square. Pull the corners of the dough into the center of the butter diamond. Moisten the edges with a little water and pinch the seams together well to enclose the butter. Dust the top with flour and turn the packet over.
Tap the dough all over with a rolling pin, encouraging it into a rectangular shape. Once it’s pliable, roll it to a 20˝ x 10˝ rectangle, picking it up and dusting lightly with flour as needed.
When you’ve reached the proper size, use a dry brush to sweep off any excess flour and fold the dough in thirds, like a business letter. Take care to keep the edges straight and line them up directly over each other. If the dough slides around, use a little water at the corners to tack them in place. This is your first turn.
Rotate the dough out so it looks like a book about to be opened. Roll the dough out once more to 20˝ x 10˝ and fold it as before. This is the second turn. Wrap the dough and refrigerate it for 30 minutes to allow the gluten in the dough to relax.
Give the dough two more turns after its rest, then wrap the dough well and refrigerate for at least 1 hour or overnight before using. You can also freeze the dough at this point.
Enjoy!
Useful links for Kitchen Tools & Ingredients for Spinach Croissants:
Happy Good Friday everyone! Wait…can you say that? You hear a lot of “Happy Easter” but not really “Happy Good Friday”. Hmmm…well I’ll ask you to indulge me today because I am very happy today! My Apple Cinnamon Hot Cross Buns that I make every year ( you have to bake them on Good Friday or they don’t have all of the special powers) are well under way!
I wasn’t sure if I was going to be able to make them this year what with all of the quarantining shortages in the stores, but luckily I was able to score some flour and sugar. Hoooray! And not only am I making the traditional Hot Cross Buns today, but I am also going to share a great Easter bread recipe with you: Polish Babka!
When you hear “Babka” you might think of the Jewish version of the bread, which is often a twisted bread filled with chocolate or cinnamon and topped with a streusel. That is definitely tasty, but not the treat I’m talking about today. Today we look to Poland.
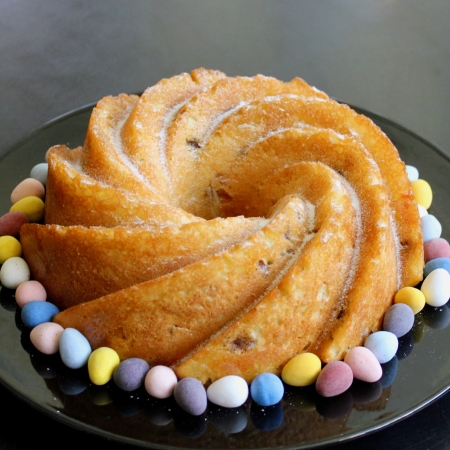
Polish Babka is a rich, buttery bread which is shot through with rum soaked fruit, brushed with a rum syrup and dusted with confectioner’s sugar.
Traditionally served on Easter in Poland, there are many different versions of this recipe, with each family claiming the bread made by their “Babka” which means grandmother in Polish, is the best!
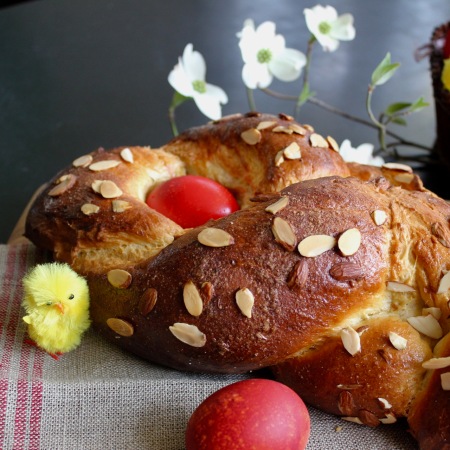
Folks in many countries around the world have a special bread that they bake for the Easter holidays. I have shared quite a few of these recipes with you over the years. Last year was Cozonac – Romanian Easter Bread.
That’s a lot of Easter breads huh?!! But let me get back to talking about this Polish Babka. This Babka is a cross between a bread and a cake in a way. You do start with a sponge, which boosts the rise that you get from the yeast, but you don’t have to knead it all, so it is a bit like a batter bread.
A loaf of Babka is often included in the swiecone basket that Polish families take to church with them on Easter Saturday to be blessed. The basket contains food such as meat, eggs, cake and breads, which will be eaten at the Easter meal after Mass. Each of the food items in the basket are symbolic. For example eggs represent new life and the yeast bread represents the risen Lord.
If you hadn’t guessed, I love bread. I love baking it and I love eating it. Guess that’s why I could not stick with the South Beach diet! This bread was pretty easy to make and will be a fantastic Easter treat.
Now you can make a rum icing to drizzle over the Babka if you wish. I have included it in the recipe. Since the Husband really isn’t a fan of super sweet desserts, I chose to just dust our Babka lightly with confectioner’s sugar. But you should do whatever you prefer.
With its tender crumb and rich rum soaked fruit I’m also looking forward to the French Toast I will be making soon as well.
recipe from: King Arthur Flour (I have incorporated a lot of the advice from the reviews of this recipe from bakers on the KAF site.)
Ingredients:
For the Starter Sponge:
60 grams (1/2 cup) All-purpose flour
2 teaspoons instant yeast
113 grams (1/2 cup) lukewarm (95°F) milk
For the Babka:
3 large eggs, at room temperature
heaping 1/2 teaspoon salt
50 grams (1/4 cup) granulated sugar
57 grams (4 tablespoons, 1/4 cup) softened butter
181 grams All-Purpose Flour (if you do not wish to do the sponge – it is 241 grams (2 cups flour)
43 grams (1/4 cup ) currants or raisins (golden raisins preferred)
43 grams (1/4 cup) candied mixed fruit or candied mixed peel, or mixed dried fruit, chopped
For the Rum Syrup:
99 grams (1/2 cup) granulated sugar
57 grams (1/4 cup) water*
14 grams to 28 grams (1 to 2 tablespoons) rum*
*If you prefer not to use Rum you could substitute apple juice for the water and rum mixture.
For the Icing (Optional – you can just go with a dusting of confectioners’ sugar):
113 grams (1 cup) confectioners’ sugar
pinch of salt
28 grams (2 tablespoons) milk, or a combination of milk and rum or apple juice
Directions:
Begin by making a starter sponge: In the bowl of a stand mixer, mix 60 grams of the flour and two teaspoons instant yeast with 113 grams of the lukewarm milk. Cover with plastic wrap and set aside to let rise for 1 hour.
Place the raisins and candied mixed fruit in a small bowl and cover with rum. Allow to soak while the sponge is rising.
After on hour, add the rest of the remaining ingredients, except the fruit, to the mixing bowl. Beat at medium speed until cohesive. Increase your mixer’s speed to high, and beat for 2 minutes.
Add the rum soaked fruit, beating gently just to combine.
Cover the bowl, and let the dough/thick batter rest/rise for 60 minutes; it won’t appear to do too much.
Scoop the batter into a greased 10-cup Bundt Pan. (If you don’t have a Bundt pan you can also bake the bread in an 8 1/2″ X 4 1/2″ loaf pan). Cover the pan, and let the dough rest/rise for 30 minutes, while you preheat your oven to 350°F.
Bake the babka for 35 to 40 minutes, until an instant-read thermometer inserted into the center of the loaf reads at least 190°F.
While the babka is baking, prepare the rum syrup. Combine all of the syrup ingredients in a small saucepan set over medium heat. Bring the mixture to a boil, and boil, swirling the liquid in the pan, until the sugar dissolves. Remove from the heat.
Remove the babka from the oven. Poke it all over gently with a toothpick or fork, and slowly pour the syrup over the babka’s surface.
When the syrup is fully absorbed (about 20 minutes or so), carefully loosen the Babka’s edges, and turn it out of the pan onto a rack.
If you choose to use the icing: Mix all of the ingredients together, stirring until smooth. Drizzle over completely cool Babka.
Enjoy!
Links for Helpful Kitchen Tools & Ingredients for Polish Babka:
Ok…so things have really changed…for everyone…everywhere! And these changes are not going to be changing back anytime soon from the looks of it. Covid-19 has hijacked life as we know it. The world is pretty much on pause and folks everywhere are sheltering in place. At first, what I will call Stage I of my quarantine/lockdown, I was very motivated. I went on a cleaning spree, did loads of paperwork I had procrastinated on and finished our taxes. Then I totally organized my pantry, making an inventory of all that we had available and then sat down to plan out what meals were possible with the ingredients we had on hand.
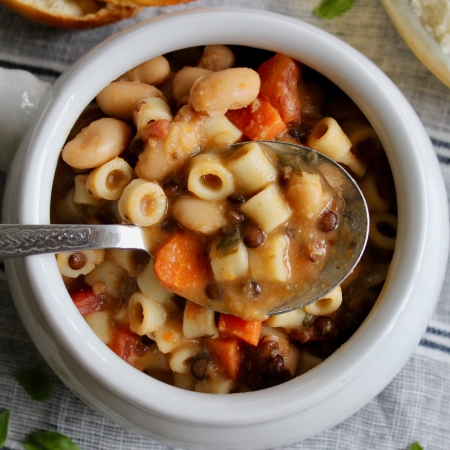
I wondered how easily it would be to have groceries delivered, so I signed up for Peapod through Giant groceries stores. Well, I found out that Giant did have quite a few items, no toilet paper mind you, but fairly well stocked all things considered. The a-ha moment came when I went to schedule a delivery. Not one time slot was available for three weeks! Yes. Three! Luckily our pantry was pretty full to begin with so three weeks was actually not a problem for us. Now, just because I put those items in my cart, doesn’t actually guarantee that I will get them. Giant does let you know that they may remove items from your cart if they are not available at the time of your delivery. So I don’t actually know what I will be getting. It will be a surprise. You know, kind of like opening Christmas gifts. So wish me luck! But let me get on with today’s recipe: Pasta e Fagioli (Pasta and Beans). This dish is also known as Pasta e Fasule (pasta fazool), which is its Neapolitan name.
My pantry held almost all of the ingredients needed to make this hearty and filling traditional Italian soup. What I did not have, I was able to easily sub in alternatives. For instance, I did not have a yellow onion, but did have a package of pearl onions. Problem solved! Not to mention, there are many variations of this soup found in Italy. Sometimes it is completely vegetarian, sometimes it is made with sausage or beef, sometimes it has a tomato base and sometimes it doesn’t. So feel free to cook up your own versions depending on the ingredients you have on hand.
This recipe that I’m sharing today makes a flavorful, fresh, creamy, and somewhat thicker soup with pancetta, white wine, carrots, cannelleni beans, lentils and pasta.
And good news! This soup freezes very well. So if you are quarantined alone, you can freeze the soup prior to adding the pasta, which once added, tends to soak up a lot of the broth. When you are ready to eat it, just defrost and add the pasta before serving. It is a wonderfully delicious and comforting meal to warm you up on these still chilly Spring days! Stay safe out there and remember to wash your hands!
2 tablespoonsextra virgin olive oil, plus more for serving
110 gramspancetta, diced (could sub in bacon)
1medium yellow onion, finely diced
2 medium carrots, finely diced
2 medium ribs celery, finely diced
2cloves garlic, minced
120 mlwhite wine
1.5 Llow sodium chicken broth
1 teaspoonsalt
1/4 teaspoonfreshly ground black pepper
2(439 gram) cans cannelleni beans or chickpeas (or combination), rinsed and drained
50 gramsdried lentils, rinsed (preferably French green lentils, but any green or brown lentils are fine)
230 gramsdiced or chopped canned tomatoes, with their juices (I only had a really spicy chili blend on chopped tomatoes – so our soup had quite a kick to it!)
2 bay leaves
1 tablespoonminced fresh rosemary (I did not have any rosemary, so substituted in fresh basil)
105 gramsdried pasta, such as ditalini (or whatever you might have in the pantry)
35 gramsfreshly grated Parmigiano-Reggiano, plus more for serving
Directions:
Heat the 2 tablespoons of olive oil in a large pot over medium-low heat. Add the pancetta and cook until the fat begins to render, about 5 minutes. Add the onion, carrot and celery and increase the heat to medium; cook, stirring frequently, until the onions become translucent, about 5 minutes. Add the garlic and cook 1 minute more, stirring constantly so the garlic doesn’t stick to the bottom of the pan and burn.
Add the wine and cook until it has nearly evaporated, about 5 minutes. Add the broth, salt, pepper, beans, lentils, diced tomatoes, bay leaves and rosemary. Increase the heat to high and bring to a boil, then reduce the heat to medium-low and simmer, uncovered, until the lentils are just tender, 15-30 minutes, depending on the type of lentils you used.
Use a slotted spoon to transfer 240 ml of the bean mixture and a little liquid to a blender. Remove the center knob so steam can escape. Hold a paper towel or kitchen towel over the opening to prevent splatters. Purée until smooth and set aside. An immersion blender would work here as well.
Add the dried pasta to the pot and stir to incorporate. Turn the heat up to a gentle boil and cook until the pasta is tender but still firm to the bite, anywhere from 8-12 minutes depending on the type of pasta you used. The soup will thicken a bit by the time the pasta is cooked. Fish out and discard the bay leaves.
Stir the reserved puréed bean mixture into the soup. (If you’re having a hard time getting the mixture out of the blender, remove as much as you can with a rubber spatula, then add some of the hot soup broth to it and swirl around to loosen it up; it should come right out.) Cook briefly, until the soup is heated through.
Remove the soup from heat and stir in the Parmigiano-Reggiano. If the soup seems too thick, gradually add 240-480 ml of water or more chicken broth and thin to desired consistency (note: the longer it sits on the stove, the thicker it will get). Season to taste with salt and pepper. Ladle the soup into bowls. Drizzle each portion with a touch of extra-virgin olive oil and sprinkle with more cheese, if desired.
Note: This soup is best served immediately; as it sits, the pasta and beans soak up the broth. If the soup gets too thick, you can thin it with a bit of broth or water.
Freezer-Friendly Instructions: The soup can be frozen, without the pasta, for up to 3 months. Defrost the soup in the refrigerator for 12 hours and then reheat it on the stovetop over medium heat until simmering, add the pasta, and cook until the pasta is tender. (The beans may have soaked up some of the broth while frozen, so add more broth to thin out the soup, if desired.)
Enjoy!
Pasta e Fagioli brought to you today by: Runcible Eats (www.leaandjay.com)
Useful links for Kitchen Tools & Ingredients for Pasta e Fagioli:


 Posted by liadh1

 But I’m getting ahead of myself. Let me start at the beginning. Our arrival in Lerwick after the scary mini propeller plane adventure. Once again on terra firma, we met up with out good friends and fellow Viking enthusiasts, Bill & Virginia and headed off to check into our lovely AirBnB and have a poke about the town. The town of Lerwick is charming.


 Another thing which made me very happy was that there were plenty of Shetland ponies around. I love horses and often carry sugar cubes or apples with me if I think there is a chance I might encounter any.

 Up Helly Aa starts pretty early with the Jarl Squad marching to Market Cross. So who is the Jarl? Well a different man is chosen to be Jarl each year. This is a huge honor for the chosen one.


 This document, which has also been kept secret until the big day, includes instructions for the day along peppered with a healthy dose of local jokes and satire. The Jarl Squad then departs to go pose for formal pictures with their galley at Alexandra Wharf.


 The procession starts at 7:30. All of the torches are lit and the Jarl, perched in his longship, is pulled through the streets by his Viking squad


 until the longship is pulled into a park where once the Jarl disembarks and gives the signal, all of the torches are pitched into the longship.


 At the Halls you will find food, drink and dancing. The Guizers squads that I mentioned before then take turns visiting the different halls to perform an act – such as singing, dancing or doing a comedy sketch.
 Located in Sumburgh on the tip of the mainland Shetland it contains settlement sites which range over 4000 years of human history – from late Neolithic through Bronze and Iron Ages, the Norse settlement all the way up to a 16th Century Laird’s house.


 Here is a fantastically easy yeast bread recipe for everyone out there practicing social distancing: No-Knead Crusty White Bread. This recipe bakes up a crusty artisan loaf that anyone would be proud of.


 Folks in many countries around the world have a special bread that they bake for the Easter holidays. I have shared quite a few of these recipes with you over the years. Last year was


 A loaf of Babka is often included in the swiecone basket that Polish families take to church with them on Easter Saturday to be blessed. The basket contains food such as meat, eggs, cake and breads, which will be eaten at the Easter meal after Mass. Each of the food items in the basket are symbolic. For example eggs represent new life and the yeast bread represents the risen Lord.