Cherry Tomato Cobbler with Cornmeal-Cheddar Chive Biscuits

September 30, 2014

IMG_9635

I think summer is winding down around here and Fall is just right around the corner. Usually I would be beside myself, desperate for Fall to make its appearance. But I must admit, this Summer in Virginia has been quite pleasant. We really only had a handful of weeks where that characteristic Virginia hot and swampy weather predominated. But don’t get me wrong, I am ready for Fall. I mean you can’t trust Summer. It lulls you into a false sense of “oh Summer is pretty well done and it’s actually going to be pretty pleasant around here” and then WHAM…Summer rises back up and smacks you down with a string of oppressive mind numbingly humid days which melt the few remaining leaves right off of those trees. And yes…it can happen in late September and on into October. So I say bring on the Fall weather! I am ready for jackets, apples, falling leaves and sitting round the fire pit in the evenings. I think I can comfortably turn the oven back on and cook some great warming comfort food dishes. You know like cobblers. And remember, not all cobblers are sweet. This Cherry Tomato Cobbler with Cornmeal-Cheddar Biscuits is a splendid example of a delicious savoury cobbler and is the perfect meal for the transition from the Summer to Fall season .

IMG_9699

The husband and I did plant a few cherry tomato plants this year and they were champs. We had an abundance of tomatoes all summer and didn’t have nearly as much trouble with our cadre of tomato thieves as we did last year.

WANTED! For questioning concerning the Great Cherry Tomato Heist of 2013!

WANTED! For questioning concerning the Great Cherry Tomato Heist of 2013!

I don’t know if they ate their fill last year or what, but they pretty much left us in peace. And the little tomato plants are still at it, but I’m not sure if it will continue much longer. I think this might be my last big harvest of the season, so I wanted to make something special with them and this cobbler was certainly that. Those sweet cherry tomatoes rest in a balsamic/red wine thyme sauce and are nestled between a layer of caramelized onion and cheesy buttery cornmeal biscuits. Yum, yum, yum.

IMG_9641

Warm, comforting and filling yet not as heavy as a Chili or a Chicken and Dumplings type of dish. (Shhhh! Don’t let the husband hear Chicken & Dumplings. He feels that dish has no “season” in which it should be served, but should be served all seasons, all the time. I think this cobbler has distracted him for the moment) Another great thing about this dish is that you can cook it in one pan. I used a cast iron Le Creuset skillet. As long as your cast iron skillet is seasoned well, you don’t have to worry about the acidity of the tomatoes damaging the pan. Or you could always use a 13 X 9″ baking dish. But whatever you do, while you are waiting for Fall to get itself all settled in, gather up those last little summertime cherry tomatoes and treat yourself to this delightful cobbler.

IMG_9717


Cherry Tomato Cobbler with Cornmeal-Cheddar Chive Biscuits

  • Servings: 6 - 8
  • Difficulty: easy
  • Print

recipe slightly adapted from: The Kitchn

Ingredients:

  • 4 pints cherry tomatoes
  • 2 tablespoons unsalted butter
  • 2 onions, peeled and thinly sliced
  • 1 1/2 teaspoons salt, divided
  • 4 cloves garlic, minced
  • 2 tablespoon balsamic vinegar (or you can sub. in 1/4 cup red wine)
  • 1/4 cup all-purpose flour
  • 1 teaspoon pepper
  • red pepper flakes, to taste
  • 4 springs fresh thyme, leaves only
  • Handful of fresh basil leaves, sliced into ribbons
  • Parmesan/Reggiano Cheese, grated, to sprinkle over the top.

For the biscuits:

  • 1 1/4 cup all-purpose flour
  • 3/4 cup cornmeal
  • 1 tablespoon baking powder
  • 1/2 teaspoon baking soda
  • 1/2 teaspoon salt
  • 6 tablespoons cold unsalted butter
  • 1 cup + 1/2 cup grated cheddar cheese, divided
  • 2 tablespoons fresh chives, chopped
  • 3/4 to 1 cup buttermilk, plus extra to brush

Directions:

Heat the oven to 375°F with a rack placed in the middle of the oven

Pick the stems off of the cherry tomatoes and rinse them under running water.

Warm the olive oil in a 12-inch cast-iron or high-sided stainless steel skillet over medium-high heat. When warm, add the onions. Toss gently to coat with butter. Caramelize the onions, checking and stirring them every 5 – 10 minutes. Continue to cook for about 50 minutes, until they are a dark brown color.

Stir the garlic into the onions and cook until fragrant, 30 to 60 seconds. Pour in the wine (or balsamic) and cook until the wine has mostly evaporated. Stir in the flour and cook until the flour is paste-like. Remove the pan from heat. Stir in the cherry tomatoes, 1 teaspoon of salt, 1 teaspoon of black pepper and a pinch of red pepper flakes, carefully stirring and folding until the onions are evenly mixed with the tomatoes. Sprinkle grated Parmesan/Reggiano cheese over the top. Sprinkle fresh basil over the top.

To prepare the biscuits, combine the flour, cornmeal, baking powder, baking soda, and salt in the bowl of a food processor. Pulse a few times to combine. Cut the cold butter into chunks and scatter it over the flour. Pulse a few times until the butter has been cut into pea-sized pieces.

Transfer the flour-and-butter mixture to a bowl and stir in 1 cup of the cheddar (reserve the other 1/2 cup for sprinkling over the top). Form a well in the middle and pour in 3/4 cup of buttermilk for firmer biscuits, or 1 cup of buttermilk for looser biscuits. Use a spatula to gently stir the buttermilk into the flour; continue stirring until all the buttermilk has been incorporated and no more dry flour remains.

Drop the dough over the tomatoes, making 7 to 8 biscuits. Brush the biscuits with a little buttermilk. Place the skillet on a baking sheet to catch drips, and then transfer to the oven.

Cook for 55 to 60 minutes, until the tomatoes are very bubbly and the tops of the biscuits are nicely browned. About 10 minutes before the end of baking, sprinkle the tops of the biscuits with the remaining 1/2 cup of cheddar.

Remove from the oven and let the cobbler rest for at least 15 minutes before eating. Leftovers will keep for about a week.

Enjoy!

Tomato Cobbler with Cornmeal-Cheddar Chive Biscuits brought to you by: Runcible Eats (http://www.leaandjay.com )


Baked Mozzarella Chicken Rolls

September 26, 2014

IMG_8612

I am so excited to tell you about these Baked Mozzarella Chicken Rolls. They are absolutely one of my favourite discoveries this year. And let me tell you with a list of ingredients that includes fresh spinach and basil, creamy ricotta and mozzarella cheese, savoury grated Parmesan Reggiano, moist, tender chicken breast, crispy panko breading and zesty Arrabiatta sauce, how could this dish go wrong? The answer is simple.. it doesn’t! It not only delivers on flavour, but it is also actually pretty low in calories – that is if you manage to refrain from eating the whole pan in one sitting, which I’ll admit is a bit of a challenge. These little devils are that delicious!

IMG_8648

And they are pretty easy to make. Though I will say, they are a bit “fiddly”. And if you are freaked out by handling raw chicken, you might have to take a few deep breaths (ie. glasses of wine or shots of whisky…depending on how serious your phobia is) because you are going to have to get a bit messy. Basically you take a flatened chicken breast, place the creamy spinach/ricotta mixture on top and then roll it up. Yes, it will try to sneak out of the ends, you’re going to have to be expecting that little trick and keep heading it off at the pass and herding it back into that roll of chicken. Then you take that roll, dip it in the egg whites and roll it in a panko/Parmesan Reggiano breading. So yeah, a bit messy. But just you wait…it is so worth it. Once you’ve wrangled all of those chicken rolls into the baking dish, just pop them in the oven and you just won’t believe how wonderfully they bake up. They are moist and tender on the inside with layers of gooey ricotta spinach all wrapped up in a golden crunchy panko crust on the outside. You’ll be tempted to chow down on them right now, but show some restraint! You aren’t finished with this dish….no indeed. Next you take some of your favorite marinara sauce – you know us by now, we went for super spicy Arrabiatta – and ladle it over the top. Wait! There’s more. Then you top it with some big slices of fresh mozzarella. Remember, I said fresh! Not those little shredded plastic shards. Pop it back into the oven. Once the marinara sauce and mozzarella are piping hot and bubbling, take it out of the oven and sprinkle a bit of fresh basil over the top.

IMG_8609

I am telling you, it is to die for! Creamy, dreamy, gooey, crunchy, cheesy, zesty bliss. You’ve got to make a big pan of these Baked Mozzarella Chicken Rolls today!

IMG_8618

Baked Mozzarella Chicken Rolls

  • Servings: 8
  • Difficulty: easy - but a bit fiddly
  • Print

recipe slightly adapted from: Pinch of Yum

Ingredients:

  • 2 lbs. boneless skinless chicken breasts (8 4-ounce pieces)
  • 1 cup Italian style Panko
  • 6 tablespoons grated Parmesan Reggiano cheese, divided
  • 5 ounces fresh baby spinach
  • 1 clove minced garlic and olive oil for sauteing
  • ½ cup part-skim ricotta cheese
  • ⅓ cup beaten egg whites
  • 3 ounces fresh mozzarella cheese, thinly sliced
  • 1 cup  of your favourite marinara sauce (you know spicy us…we chose Arrabiatta!)
  • fresh basil for topping

Directions:

Prep the chicken: Cut the chicken into 8 pieces and pound the pieces until they are thin (for quick cooking) and have expanded in surface area (for more filling). Place the breadcrumbs in a shallow bowl with 2 tablespoons of Parmesan Reggiano cheese and set aside.

Prep the filling: Chop the spinach and saute it with the garlic and just a drizzle of olive oil for 2-3 minutes or until just barely wilted. Combine the sautéed spinach with the ricotta, Parmesan cheese, and 2-3 tablespoons of the egg whites. Place the remaining egg whites in a separate shallow bowl and set aside.

Assemble the chicken: Oil the bottom of a large baking dish and preheat the oven to 450º F. Place one piece of chicken on a flat working surface. Put a spoonful of ricotta-spinach filling right in the middle and roll the chicken up so that the edges meet to form a “seam”. Dip the entire chicken roll in egg whites, and then roll it in the breadcrumbs. Place in a baking dish, seam side down. Repeat for the remaining 7 pieces of chicken, taking care not to crowd the pieces in the dish. If the sides of the rolls are not touching they will be crispier. Bake for 25 minutes.

Finishing touches: After 25 minutes, the chicken should be cooked through and browned on the top. Cover the chicken with the marinara sauce and slices of fresh Mozzarella. Bake for another 3-5 minutes or until cheese is melting. Sprinkle with fresh basil.

Enjoy!

Baked Mozzarella Chicken Rolls brought to you by: Runcible Eats (http://www.leaandjay.com )


Perfect Coconut Party Cake

September 23, 2014

IMG_7724

Recently another friend of mine had a birthday. Now I’ve told you how much value I place on the homemade birthday cakes. So of course, I started making baking plans for her cake. I wanted it to be a surprize, so this took a bit of sneaky detective work on my part. I was eventually able to deduce that her favourite cake was ” a yellow cake with white frosting and coconut all over it”. Hmmm…possibly a problem. I was familiar with the cake as it was described to me, but I didn’t have any coconut cake experience. The husband doesn’t like coconut. Actually he likes the flavour of coconut just fine, but finds the texture very objectionable, so I don’t pay a lot of attention to any recipes which call for the stuff. But luckily I had Dorie Greenspan’s Baking From My Home to Yours close at hand. And voila! It seemed I flipped the book open to the exact recipe I needed, Dorie’s Perfect Party Cake.

IMG_7707

She claimed that this cake will be “just-right” for any celebration and as usual, she did not fail me. The cake not only looks festive, but also tastes delightful and met all of the requirements for my friend’s favourite cake, layers of delicious bright lemony cake interspersed with summery raspberry preserves and lemony buttercream frosting all topped with sweet coconut flakes.

IMG_7776

Well, I guess it met almost all of them. This cake is not yellow, but is a snowy white cake which makes the contrast of that raspberry jam layer all the more vibrant and festive! This cake is a reason for celebrating all on its own if you didn’t already have one in mind. And even better, it is easily customizable to fit your celebratory needs, switch out the raspberry preserves for another or you could use fresh berries along with a whipped sweetened cream frosting, …the possibilities are endless. The cake layers are moist, light and fluffy yet won’t crumble when you split them in half or begin piling on layers of preserves and frosting. This truly is a perfect cake recipe that you should always keep close at hand. It will make any celebration all the merrier!

IMG_7757

Perfect Coconut Party Cake

recipe from: Dorie Greenspan’s Baking From My Home to Yours

Ingredients:

For the Cake:

  • 2 1/4 cups cake flour
  • 1 Tablespoon baking powder
  • 1/2 teaspoon salt
  • 1 1/4 cups buttermilk
  • 4 large egg whites
  • 1 1/2 cups sugar
  • 2 teaspoons grated lemon zest
  • 1 stick ( 8 tablespoons) unsalted butter, at room temperature
  • 1/2 teaspoon pure lemon extract

For the Buttercream

  • 1 cup sugar
  • 4 large egg whites
  • 3 sticks (12 ounces) unsalted butter, at room temperature
  • 1/4 cup fresh lemon juice ( from 2 large lemons)
  • 1 teaspoon pure vanilla extract

For Finishing:

  • 2/3 cup seedless raspberry preserves, stirred vigorously or warmed gently until spreadable
  • About 1 1/2 cups sweetened shredded coconut

Directions:

Center a rock in the oven and preheat the oven to 350° F. Butter two 9 X 2″ round cake pans and line the bottom of each pan with a round of buttered parchment or wax paper. Put the pans on a baking sheet.

Sift together the flour, baking powder and salt.

Whisk together the milk and egg whites in a medium bowl.

Put the sugar and lemon zest in a mixer bowl or another large bowl and rub them together with your fingers until the sugar is moist and fragrant. Add the butter and, working with the paddle or whisk attachment, or with a hand mixer, beat at medium speed for a full 3 minutes, until the butter and sugar are very light. Beat in the extract, then add one third of the flour mixture, still beating on medium speed. Beat in half of the milk/egg mixture, then beat in half of the remaining dry ingredients until incorporated. Add the rest of the milk and eggs, beating until the batter is homogeneous, then add the last of the dry ingredients. Finally, give the batter a good 2 minute beating to ensure that it is thoroughly mixed and well aerated. Divide the batter between the two pans and smooth the tops with a rubber spatula.

Bake for 30 to 35 minutes, or until the cakes are well risen and springy to the touch – a thin knife inserted into the centers should come out clean. Transfer the cakes to cooling racks and cool for about 5 minutes, then run a knife around the sides of the cakes, unmold them and peel off the paper liners. Invert and cool to room temperature right side up. (The cooled cake layers can be wrapped airtight and stored at room temperature overnight or frozen for up to 2 months).

For the Buttercream: Put the sugar and egg whites in a mixer bowl or other large heatproof bowl, fit the bowl over a pan of simmering water and whisk constantly, keeping the mixture over the heat, until it feels hot to the touch, about 3 minutes. The sugar should be dissolved and the mixture will look like shiny marshmallow cream. Remove the bowl from the heat.

Working with the whisk attachment or with a hand mixer, beat the meringue on medium speed until it is cool, about 5 minutes. Switch to the paddle attachment if you have one, and add the butter a stick at a time, beating until smooth. Once all the butter is in, beat the buttercream on medium-hight speed until it is thick and very smooth 6 to 10 minutes. During this time, the buttercream may curdle or separate just keep beating and it will come together again. On medium speed, gradually beat in the lemon juice, waiting until each addition is absorbed before adding more, and then the vanilla. You should have a shiny, smooth, velvety, pristine white buttercream. Press a piece of plastic against the surface of the buttercream and set aside briefly.

To assemble the Cake: Using a sharp serrated knife and a gentle sawing motion, slice each layer horizontally in half. (or use a cake leveler, like I did.) Put one layer cut side up on a cardboard cake round or a cake plate protected by strips of wax or parchment paper. Spread it with one third of the preserves. Cover the jam evenly with about one quarter of the buttercream. Top with another layer, spread with preserves and buttercream and then do the same with a third layer (you’ll have used all the jam and have buttercream left over). Place the last layer cut side down on top of the cake and use the remaining buttercream to frost the side and top. Press the coconut in the frosting, patting it gently all over the sides and top.

Enjoy!

Perfect Coconut Party Cake brought to you by: Runcible Eats (http://www.leaandjay.com )


Smoky Harissa Burgers on Homemade Pretzel Buns

September 19, 2014

IMG_9415

How could we have gotten through most of the outside Summer backyard grilling time without me mentioning one single burger recipe? I guess I have been focused quite a bit on Meatless recipes this summer, and well a burger is usually chock full of meat of some type. At long last, carnivore’s take note, here is a recipe for a juicy, spicy, flavour filled Smoky Harissa Burger. The meat patty itself is quite tasty, but there are also a delightful array of toppers which put this burger way over the top and make your taste buds sing. First of all there is that Harissa Aoili. Harissa is spicy North African and Middle Eastern hot pepper chili paste which contains red peppers, Serrano peppers as well as some other peppers thrown in for good measure, and spices and herbs such as garlic and coriander. I bought some which was freshly prepared at my local Whole Foods market, but I have also purchased a tin of Harissa paste at a local Lebanese market. If you like spicy, as you know the husband and I do, you are going to LOVE Harissa Aoili. Kicked up burgers to the extreme! Next this burger is topped with Lime Pickled Red Onion, which adds a delightful tangy bite to the sandwich. Of course there is some wonderfully creamy gooey melted cheese, peppery arugula for a bit more crunch and finally….bacon! Oh yes bacon! I know you carnivores are dancing the happy bacon dance. Yup….the happy bacon dance does exist. Instructional video to follow…or if you’d like to submit your own, I would love to see it! All that adds up to one MONSTER of a burger.

IMG_9444

It is so good, there is just not enough summer time left. I bet you’ll be standing out in your snowy backyards during this winter’s blizzards (the weather has been nutty huh?) and grilling them up. (I would love to receive those pics too…) AND…I served these gems up on those ever so trendy (deservedly so…they are TAAAE-STEEE) Pretzel Sandwich Buns which I just told you about in my last blog. Yup. You thought this burger couldn’t get any better and lookie what I did! So what are you waiting for? Get grilling! Time’s a wasting!

IMG_9451

Smoky Harissa Burgers

  • Servings: 4 burgers
  • Difficulty: easy
  • Print

recipe slightly adapted from: Feasting At Home

Ingredients:

  • 1 lb ground beef – makes Four – 4 ounce burgers
  • 2 garlic cloves, minced
  • ¼ Cup finely diced onion, shallot or scallion
  • ½ -¾ teaspoon kosher salt
  • ½ teaspoon cracked pepper
  • 1 tablespoon Worcestershire sauce
  • 1/2 teaspoon Spanish Smoked Paprika

For Serving:

  • 3-4 Tablespoons Harissa Aioli -see recipe below
  • ¼ Cup lime pickled red onions-see recipe below
  • 8 slices crispy bacon -2 slices per burger
  • 4 Pretzel buns- or store-bought buns of your choice
  • 1 Cup baby arugula
  • 4 oz. cheese sliced ( any melty cheese- jack, provolone, cheddar, Edam, gouda)

Instructions:

Make Pretzel Buns or Purchase Buns of your choice.

Pre heat grill to medium high.

Make lime pickled onions, refrigerate. ( see recipe below)

In a medium bowl, using your hands, combine ground beef with onion, garlic, salt, pepper, Worcestershire sauce and smoked paprika just to combine, being careful to not over mix. Form patties. I use a kitchen scale to ensure uniform sizes. I made 4 ounce burgers with this recipe. Shape burgers into a ball and then flatten to form a disc. Push your thumb down into the center of each patty to form a small depression. This will help the burgers to cook evenly and hold their shape. Set aside.

Fry bacon slices, set on paper towel to drain.

In a small bowl, whisk mayo with harissa paste. Set aside.

When grill is hot, grill patties to medium rare or medium. Toast buns at the same time.

Top burger patties with cheese and close grill lid turning heat off , allowing cheese to melt- (or place in a warm oven, topping with cheese, to allow it to melt).

Assemble. Once cheese has melted, assemble. Spread aioli on the buns, place burgers, bacon, more aioli, arugula and pickled onions and then the bun top. Serve immediately. 

Lime Pickled Red Onions

Ingredients:

  • 4 Tablespoons (60 ml) freshly squeezed lime juice
  • 1/2 medium red onion, finely diced
  • table salt

Directions:

Mix the lime juice, onion and a pinch or two of salt in a small dish or mason jar. Let stand for 15 minutes, stirring occasionally. Refrigerate until ready to use.

Harissa Aioli

Ingredients:

  • ½ Cup mayo
  • 1-2 Tablespoons harissa paste 

Directions:
Stir the harissa paste  into the mayo in a small bowl, set aside. 

Enjoy!

Recipe brought to you by: Runcible Eats (http://www.leaandjay.com )


Pretzel Sandwich Buns

September 16, 2014

IMG_9363

Pretzel Sandwich Buns are all the rage these days. You can’t turn on the television without seeing ads from all of the fast food restaurants offering their newest sandwich on a Pretzel Roll. And they are definitely a mainstay bun in all of those popular upscale gastropub establishments. It seems folks in Europe have known all about these Pretzel Rolls for years in, but they’ve only recently made their way over here to the US of A. So they do have a great Euro-chic vibe that most folks claim they don’t care about, but flock towards anything that has it in droves. But that being said, Pretzel Rolls also evoke some good old American “Take Me Out to the Ballgame” nostalgic vibe. Who doesn’t love a big old salty soft pretzel and a beer at the Ball Park? Seems these Pretzel Buns have it all going on. I just couldn’t resist jumping on the Pretzel Roll bandwagon and baking up a batch of them at home.

IMG_9382

The results were stunning. Not only did these buns look professional, like straight out of the bakery. I tell you they were beauties, puffed up nice and plump, golden brown color speckled with bright white chunks of salt. But they were also really easy to make and they tasted amazing! The crust was chewy, yet a bit crisp, enticingly salty and the inside was soft and tender.

IMG_9390

Yet this bun is sturdy enough to hold up to your biggest, juicy-ist burger ever! You could even make these rolls a bit smaller (say using 2 0z. of dough instead of 4 oz.) and serve them along with a bowl of soup or just in your bread basket with dinner. I can see what all the fuss was about. Jump up here on the Pretzel Roll bandwagon with me, there’s plenty of room, and bake up a batch of these today!

IMG_9361

Pretzel Sandwich Buns

  • Servings: 8 Buns
  • Difficulty: easy
  • Print

Recipe slightly adapted from: King Arthur Flour

Ingredients:

1 3/4 cups warm water ( 95º F – 105º F)
2 Tablespoons (28 grams) unsalted butter, melted
3/4 tsp salt
4 1/2 cups (539 grams) all-purpose flour
1/4 cup (35 grams) nonfat dry milk
2 teaspoons instant yeast
1 egg, beaten (for brushing)
coarse sea salt, for topping

For the water bath:
2 quarts water
1 Tablespoons (14 grams) salt
1/4 cup (57 grams) baking soda

Directions:

Combine all ingredients for the dough (except for the egg) in the bowl of a standing mixer. Using the paddle attachment, turn on the mixer on lowest speed and mix until a shaggy dough forms. Turn mixer off and let dough rest for 5 minutes to fully hydrate the flour. Switch to the dough hook and knead on low speed, adding flour if needed, until a smooth, cohesive dough is formed, about 8 minutes.

Remove the dough from mixer bowl and allow it to rise in a lightly greased bowl, covered, for about 1 hour, until doubled. Gently deflate the dough, and transfer it to a lightly greased work surface.

Divide the dough into 8 pieces. If you would like a smaller bun, you could divide the dough into 10 pieces. I use a kitchen scale to weigh the dough to ensure the buns are a uniform size. My dough pieces for this batch weighed 129 grams ( 4 1/2 ounces). Shape each piece into a smooth ball. Place the balls on a parchment covered baking sheet. Cover with plastic wrap of a linen or cotton towel and let rest for 15 minutes.

Preheat the oven to 400°F.

Prepare the water bath: Bring the water, salt, and baking soda to a boil in a large pot.

Drop 4 dough balls at a time into the water bath. Cook for 30 seconds, flip over, and cook for 30 seconds longer. Using a slotted spoon, return the buns to the baking sheet. Do not skip this step! The baking soda bath is the thing that gives these rolls their gorgeous deep brown hue and chewy crust! Brush the top of the buns with the beaten egg, then sprinkle with coarse sea salt. Using scissors or a sharp knife, cut 1/2″-deep crosses into the center of each bun.

Bake the buns for 20 to 24 minutes, or until they’re a deep-dark brown. Remove them from the oven, and transfer to a rack to cool.

Enjoy!

Pretzel Sandwich Buns brought to you by: Runcible Eats (http://www.leaandjay.com )


Spicy Lager Lentil Tacos

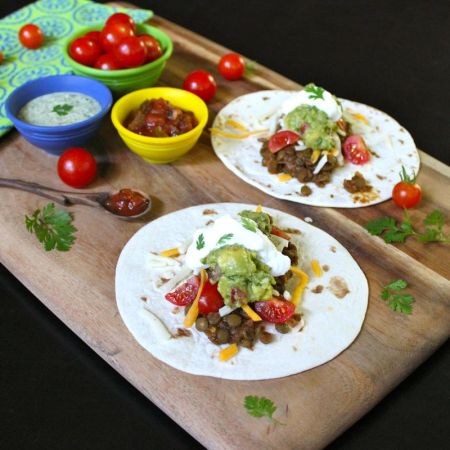
September 12, 2014

IMG_9301

I’ll keep those Meatless Monday recipes flowing with this my latest offering…Spicy Lager Lentil Tacos! Everyone loves tacos right? We love all spicy food around here and tacos are not exception. I must admit though, usually when we have tacos they are stuffed with some sort of spicy grilled meat. Just take a look at these Carnitas Tacos, Double Decker Taco Cupcakes, and Carne Asada Tacos. I think my Breakfast Tacos are the only meatless variety I’ve mentioned thus far, and they are stuffed full of egg, which I know is off limits for some folks. So here is a spicy, flavourful meatless taco that everyone will love…Spicy Lager Lentil Tacos!

IMG_9339

I found this recipe over at Delish Knowledge. Now the recipe as they posted it is very healthy and vegan. Mine, well…..I’d like to think it was a bit healthier than your average meat-stuffed taco, however  I must admit I took that virtuous vegan creation and altered it a bit. Yup…I added in some beer, a bunch of cheese and some sour cream. Go figure! What can I say, I have a weakness of cheese…oh yeah and beer….

IMG_9319

So although these tacos are not suitable for vegans anymore, they still do offer all the benefits of lentils. Lentils, besides being quite tasty, are packed full of protein, essential amino acids and vitamins. They are also pretty inexpensive if you are on a budget. They add great texture to these tacos and really take on the wonderful smoky spicy flavours of the spice mixture.

IMG_9359

We had several meals from this batch of lentils, tacos one night, followed by burritos and finally as a Spicy Lager Lentil Taco Salad. I tell you, you won’t miss the meat at all and I bet you’ll find that you are eating them on days other than Meatless Monday.

IMG_9305

Spicy Lager Lentil Tacos

  • Servings: 12-14 tacos
  • Difficulty: easy
  • Print

recipe adapted from: Delish Knowledge

Ingredients:

  • 1 cup lentils, cooked (you will end up with about 2 cups of lentils when cooked)
  • 1 white onion, finely diced
  • 1 tbsp. olive oil
  • 1-2 garlic cloves, minced
  • 4 oz. chopped green chilis
  • 1/2 cup salsa (your favourite – We love Green Mountain Gringo Salsa)
  • 6 oz.- 8 oz. lager beer (I used Estrella Damm, Dos Equis would be great too )
  • 12 – 18 small taco sized Corn or Flour Tortillas, or Taco Shells

For the spice mixture:

  • 1 tablespoon chili powder
  • ¼ teaspoon garlic powder
  • ¼ teaspoon onion powder
  • ¼ teaspoon crushed red pepper flakes
  • ¼ teaspoon dried oregano
  • ½ teaspoon Spanish Smoked paprika
  • 1½ teaspoons ground cumin
  • 1 teaspoon sea salt
  • 1 teaspoon black pepper

For the Taco toppings:  Your choice of: shredded lettuce, sliced jalapenos, diced tomatoes, shredded mexican cheese, sour cream, cotija cheese, fresh cilantro, guacamole, sliced avocados, jalapeno/cilantro crema

Ingredients:

Heat 1 tablespoon of oil in a large frying pan or dutch oven over medium high heat. Add the onion and cook for 4-5 minutes until translucent. Add the garlic and tin of green chilis, cook for another minute or two.  Add the spice mixture and cook, stirring frequently. You don’t want to burn the spices just crank up the flavor by cooking them.

Add the lentils, salsa and 6 ounces of the beer and stir to combine. Let cook for 2-3 minutes. Using a potato masher or fork, gently mash the lentils until the mixture reaches the consistency you are happy with. Cook another few minutes until hot. If the lentils start to dry out, add another glug or two of the lager. ( If you haven’t slurped it down…cooking is hard & thirsty work!)

Place a heaping spoonful or two into warmed taco shells or tortillas and add your toppings. The lentil filling will make about 12-14 tacos, depending on how stuffed you like them!

Enjoy!

Spicy Lentil Tacos brought to you by: Runcible Eats (http://www.leaandjay.com )


Rustic Caprese Galette

September 9, 2014

IMG_8222

Ahhhhh…..Caprese Salad. How I do love you! Summertime eating at it’s best. Insalata Caprese, or Salad of Capri, which is a small island off Italy’s southern coast, is a simple salad made with mozzarella cheese, tomatoes and basil, sprinkled with salt and drizzled with olive oil and balsamic vinegar. It is often served as an antipasto (starter) in Italy. I like it as a starter, I like it as a side dish and as the main dish, truth be told.  Indeed, I like all of its various incarnations. I’ve eaten it as a sandwich on some nice crusty bread, I’ve gobbled it up as a pizza and I’ve even scarfed it down on top of a grilled chicken breast. Always delicious! So when I found myself with a bumper crop of cherry tomatoes and a batch of fresh basil pesto, straight from my little deck garden, I knew just what I wanted to do. I had already served up quite a lot of the traditional Caprese Salad this summer and wanted to put a different little spin on the dish. That is when I decided to go with a Rustic Caprese Galette.

IMG_8213

I used my favourite pie dough for the galette crust. Luckily for me, I already had a batch of that dough ready to go. The recipe I give you below makes enough for two pie crusts, so I always freeze one so that I’ve got one ready at a moment’s notice. Instead of fresh basil leaves, I used my fresh basil pesto as the sauce. Now be careful, you don’t want to apply the pesto as thickly as you would a sauce. A little goes a long way. I covered that with fresh halved cherry tomatoes and then added a layer of fresh mozzarella cheese. The real stuff ok…don’t use that pre-shredded plastic that the supermarkets claim is mozzarella. Not wanting to leave out the classic Caprese Salad ingredients of salt  and olive oil, I painted a flavoured Italian Olive Oil over the folded edges of the tart and sprinkled it with Maldon Smoky Sea Salt flakes. Right before serving I drizzled a little balsamic vinegar reduction over the top.

IMG_8240

The results were delicious! Flaky, buttery crust, fresh fragrant veggies, creamy dreamy mozzarella and tangy balsamic bliss. Summertime perfection!

IMG_8230


Rustic Caprese Galette

Ingredients:

For the galette crust:

  • 2 1/2 cups (360 grams) all-purpose flour
  • 1 teaspoon kosher salt
  • 1 cup (227 grams) very cold unsalted butter, cut into 1/2-inch cubes (2 sticks)
  • 6 tablespoons vodka (chilled)
  • 2 Tablespoons ice water

For the filling:

  • 3-4 Tablespoons Basil Pesto (recipe below/ or store bought if you are in a rush)
  • 18 -20 cherry tomatoes (halved)
  • 12 -14 slices fresh mozzarella cheese
  • 1/4 cup Balsamic vinegar
  • Olive Oil to brush over folded edges of galette
  • Maldon Smoked Sea Salt for sprinkling

Directions:

This recipe will make enough dough for two pie crusts. The second one can be kept in the fridge for up to two days or frozen for 3 months. If you’re making dough, you may as well make a second one while you’re at it and then you’ll be ahead of the game when preparing your next delicious creation.

Mix 6 tablespoons of vodka and 2 tablespoons of water. Put in fridge or freezer (don’t forget it) to chill.

Add 1 1/2 cups flour, salt to a food processor. Pulse 2 to 3 times until combined.

Scatter butter cubes over flour and process until a dough or paste begins to form, about 15 seconds. (There should be no uncoated flour).

Scrape bowl, redistribute the flour-butter mixture then add remaining 1 cup of flour. Pulse 4 to 5 times until flour is evenly distributed. (Dough should look broken up and a little crumbly).

Transfer to a medium bowl then sprinkle 6 tablespoons of ice water/vodka over mixture. Using a rubber spatula, press the dough into itself. The crumbs should begin to form larger clusters. If you pinch some of the dough and it holds together, it’s ready. If the dough falls apart, add 1 to 2 tablespoons of extra water/vodka and continue to press until dough comes together.

Remove dough from bowl and place in a mound on a clean surface. Work the dough just enough to form a ball. Cut ball in half then form each half into discs. Wrap each disc with plastic wrap and refrigerate at least 1 hour, and up to 2 days. You can also freeze it for up to 3 months (just thaw it overnight in the fridge before using).

Preheat your oven to 375°F. Line a baking sheet with parchment paper.

Transfer one disc (save the other for some other delicious creation) of the pastry dough from the refrigerator to a lightly floured work surface. Roll out to a 12 inch circle. Transfer the dough to the prepared, parchment lined baking sheet.

Sprinkle a bit of Parmigiano-Reggiano cheese over the dough where the filling will be placed. This not only adds a lot of flavour, but will also keep the crust from getting soggy – so I’m told. Spread the basil pesto evenly over the pastry, leaving a 2-inch border all around.  Remember you don’t need a whole lot with pesto, a little goes a long way. Cover the pesto with the halved cherry tomatoes and then place the mozzarella slices over the top. Gently fold over the pastry border, overlapping the edges as much as possible and gently pressing the folds together.

Brush the folded edges of the crust with an infused or flavoured olive oil. I used italian spice blend olive oil. Or simply use a beaten egg yolk. Sprinkle the smoked flaky sea salt  over the crust. Bake for 30-40 minutes, or until the crust has become a lovely golden brown.

While your galette is in the oven, place the balsamic vinegar in a small saucepan. Bring to a gentle boil and cook for 3-5 minutes until the vinegar becomes syrupy. Remove from the heat and set aside.

Remove galette from oven and drizzle with the balsamic reduction just prior to serving.

Enjoy!

Basil Pesto

Ingredients:

  • 2 cups fresh basil leaves
  • 4 cloves garlic
  • 1 cup of pine nuts, toasted
  • 3/4 – 1 cup olive oil
  • 1 cup Parmesan Reggiano, freshly grated
  • 1 teaspoon salt
  • 1 teaspoon black pepper
  • 1/2 teaspoon cayenne pepper
  • 2 Tablespoons lemon juice

Directions:

Arrange pine nuts on baking tray. Toast in 375º F oven until golden brown. Keep an eye on them as they can burn quickly. Remove from tray and set aside to cool.

Place all ingredients except olive oil in food processor. Whizz all ingredients together while slowly drizzling in olive oil, stopping to scrape sides down occasionally, until thick and creamy consistency is reached.

Adjust spices to taste.

Store in airtight container in refrigerator. Will keep for 1 -2 weeks.

Rustic Caprese Galette brought to you by: Runcible Eats (http://www.leaandjay.com )


Slow-Cooker Black Bean Ragout

September 5, 2014

IMG_9136

You know how I just told you all about those wonderful Rustic Ciabatta Loaves I baked the other day? That bread was deee-lish all on its own. And toasted with a big old dollop of butter melted over the top? Pure bliss I tell you. And guess what guys…today I have another unbelievably tasty topping for you to pile onto a thick toasted hunk of that Ciabatta. Slow-Cooker Black Bean Ragout. Oh my goodness. Just think about that title….Slow Cooker -Great because it sounds super easy and Black Bean Ragout – well you just know its going to be a spicy, zesty Meatless Monday masterpiece!

IMG_9116

I found this gem of a recipe in the Smitten Kitchen Cookbook. And as with every single recipe I have made from that veritable treasure trove, it was truly fantastic. And even better, sooooo easy. You just throw all of the ingredients into your slow cooker and walk away. About 6 -8 hours later you come back, fiddle around a bit with thickening up the beans if you wish, putting the final touches on the spices and preparing a couple of lovely accompaniments, the cumin crema – who would’ve ever thought sour cream could be so much better by simply adding a bit of cumin – and those addictive lime-pickled red onions – the husband is curious why lime-pickled red onions are not served along with every meal, and you’re golden.

IMG_9115

This recipe makes up about 6 cups of Black Bean Ragout, which was enough for several meals for us. Luckily it was very versatile, so we never grew tired of it. We ate it over toasted Rustic Ciabatta bread, we ate it over rice, and I made a couple southwestern style omelets with it for brunch one day. I think it would be a great black bean side dish served along with any Tex Mex favourite. Refreshing and light in the summer, but also easily a hearty, stick to your ribs cold weather comfort dish. All that and very little time and effort on your part. We’ve hit the Black Bean jackpot with this one. You simply must make a big pot of this today!

IMG_9142

Slow-Cooker Black Bean Ragout

  • Servings: 6 cups of ragout
  • Difficulty: easy
  • Print

recipe from: Deb Perlman’s Smitten Kitchen Cookbook

Ingredients:

For the Bean Ragout:

  • 1 large onion, finely chopped
  • 3 garlic cloves, minced
  • 1 Tablespoon ground cumin
  • 1/2 teaspoon dried oregano
  • 2 teaspoons smoked paprika
  • 1 pound (455 grams or 2 1/4 cups) dried black beans, rinsed if not already soaked
  • 4 ounces chopped green chilis
  • 2 Tablespoons (35 grams) tomato paste
  • 2 teaspoons table salt
  • 9 cups water or unsalted vegetable or chicken stock
  • 1 tablespoon lime juice

For the Garlicky Toast:

  • 1 inch thick slice of bread (such as the ciabatta recipe I just gave you!)
  • olive oil
  • table salt
  • 1 large garlic clove, halved

For the Cumin Crema

  • 1 teaspoon ground cumin
  • 1 cup (240 grams) sour cream, crème fraîche, or crema mexicana

For the Lime-Pickled Red Onions

  • 2 Tablespoons (30 ml) freshly squeezed lime juice
  • 1/4 medium red onion, finely diced
  • table salt

For serving:

  • Cilantro leaves, fresh avocado wedges, cotija cheese crumbles, fresh cherry tomatoes

Directions:

Put all of the bean ragout ingredients except lime juice in a 6 quart slow-cooker (the slow-cooker doesn’t care how you layer your ingredients). Cover and cook at high setting until beans are very tender, about 3 -6  hours.

Or if you don’t have a slow-cooker, you can do this on stove top. Just place all of the bean ragout ingredients except lime juice in a large pot or dutch oven and bring to a boil. Reduce to a very low simmer and cook for approximately 3 hours until the beans are tender.

To make the toasts: Brush the bread with olive oil and sprinkle lightly with salt. Toast the bread under the broiler and as soon as you take it out of the oven, rub it with the raw garlic clove.

To Make the Crema: Stir together 1 teaspoon of ground cumin with sour cream and set aside.

To Make the Pickled Red Onions: Mix the lime juice, onion and a pinch or two of salt in a small dish or mason jar. Let stand for 15 minutes, stirring occasionally. Use to garnish black-bean ragout.

Once the beans are cooked, stir in the lime juice. Adjust seasonings to taste. If the ragout is thinner than you would like, transfer 1 – 2 cups of the cooked beans to a blender and pulse to puree. Return the puree to the ragout and stir to combine. Ladle black beans over the garlicky toasts and sprinkle with chopped cilantro, cumin crema, lime pickled onions and fresh cherry tomatoes. Serve with avocado wedges.

Enjoy!

Black Bean Ragout brought to you by: Runcible Eats (http://www.leaandjay.com )


Rustic Ciabatta Bread

September 2, 2014


IMG_9069

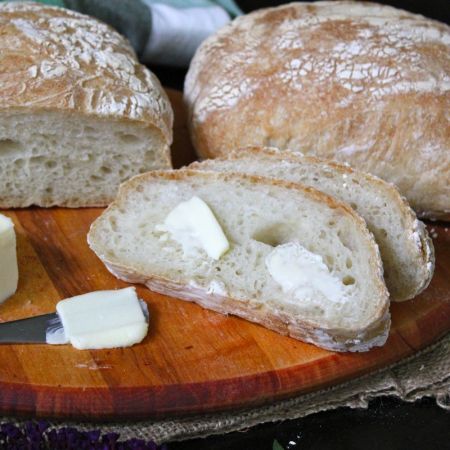
I think it is about time to bake some bread. Recently I’ve had quite the craving for some good, hearty, home-baked bread. The store-bought variety just won’t do. I simply can’t abide that pillowy squishy white Wonder bread that practically dissolves to mush when you bite into it….I’m talking about some bread you can really sink your teeth into, with a chewy yet crispy crust surrounding a light, airy, springy interior with lots of nooks and crannies to hold all of the dipping oil, butter, jam or jelly I can pile onto it.  Ciabatta Bread is what I want. Ciabatta, which means “slipper”, is the Italian answer to French baguettes. The dough for this yeast bread has high hydration which gives it all of those lovely bubbles, making the finished loaves appear riddled with holes. It also makes the bread very difficult to shape, (take note here, when the recipe below says “wet or floured” hands, you better do it. This dough is sticky beyond all reason!) resulting in broad somewhat flatter loaves which kind of resemble a flat old house slipper. I guess that doesn’t sound very appetizing come to think of it, but take my word for it, this bread is delicious!

IMG_9036


Once I had decided to make this particular bread, I knew just where to turn for the perfect recipe, Peter Reinhart’s Artisan Breads Every Day is one of my favourite cookbooks. It is just chock full of wonderful bread recipes. I’ve made quite a few of them is the past, such as Napoletana Pizza Dough, Pain a l’Ancienne Focaccia, Chocolate Cinnamon Babka, Struan and his Best Biscuits Ever and I have always been delighted with the outcome, so I just knew his Rustic Ciabatta Bread would be fantastic as well. Boy oh boy was I right. This bread was everything I hoped. I couldn’t believe it came out of my little old kitchen and not a fancy bakery!

IMG_9046

Now I wouldn’t say this bread is difficult to make, but I will say there are quite a few steps involved and an overnight cold fermentation. So you need to plan ahead. It is not really a spur of the moment, I need a loaf of bread for dinner in a couple of hours kind of thing. And there are some tools of the trade which I definitely recommend. It is not that you can’t make this bread without them, but if you have them, your life will be far easier. So here is a rundown of my bread baking essential tools. This bread requires an instant yeast which is different from active dry yeast. You can substitute in active dry yeast if that is all you have, but you should increase the amount of yeast by 25 percent. I love the SAF Red Instant Yeast and keep a canister of it in my freezer all of the time. I think that a stand mixer is pretty essential for me, though this bread can be made by hand. A good thermometer, like this Thermapen, which takes quick readings, is great. A kitchen scale is very handy as well. You will be able to get a much more accurate measurement if you weigh ingredients, rather than trying to rely on volume measurements, such as cups. Everyone scoops ingredients differently. A cup scooped by me, will likely weigh different from a cup scooped by another person. Dough Rising Buckets are a great thing to have on hand. You can simply let your dough rise in a big bowl, if you don’t have a bucket, but these are great because they are easy to close or cover to prevent drafts, and there are measurements marked on the outside making it easier to tell when your dough has doubled in size. And finally, I recommend having a baking stone to bake your bread upon. A baking stone will absorb and retain heat better than a regular sheet pan. That radiated heat will encourage more oven spring. Oven spring is the final burst of rising that happens just after bread is introduced to the oven, before the crust begins to harden. If you are able to produce a good oven spring your bread will have a light and airy texture. Steam also helps at this moment. Steam will keep the outside of the bread softer for a bit longer so that you can maximize the oven spring of the yeast. It also makes the crust a bit more crackly and chewy. Suggestions for producing a blast of steam in a home oven are included in the directions below. Now don’t let all of those tools overwhelm you. You don’t have to have all of them to make this bread. You can put some of these nifty tools on your baking wish list and in the meantime just go on ahead a make up a batch of this bread. I think you’ll be very pleased with yourself as well as with these Rustic Ciabatta Loaves. Light and airy, soft and springy surrounded by a satisfyingly chewy yet crispy crust.. Yum! There is nothing quite like home-baked bread!

IMG_9079

Rustic Ciabatta Bread

  • Difficulty: moderate
  • Print

recipe from: Peter Reinhart’s Artisan Breads Every Day

Ingredients:

  • 4 1/2 cups (20 oz./567 grams) unbleached bread flour (I used King Arthur’s Unbleached Bread Flour)
  • 1 3/4 teaspoons (0.4 oz/11 grams) salt, or 2 1/2 teaspoons coarse kosher salt
  • 1 1/4 teaspoons (0.14 oz/4 grams) instant yeast (my favourite yeast is saf-instant yeast)
  • 2 cups (16 oz./454 grams) chilled water (about 55ºF or 13ºC)
  • 1 Tablespoon (0.5 oz/14 grams) olive oil

Directions:

Combine the flour, salt, east and water in a mixing bowl of a stand mixer. Use the paddle attachment and mix on the lowest speed for 1 minute. The dough should be coarse and sticky. Let the dough rest for 5 minutes to fully hydrate the flour.

Drizzle the olive oil over the dough. Then mix on medium-low speed using the paddle attachment for 1 minute. The dough should become smoother but will still be very soft, sticky and wet. Use a wet bowl scraper or spatula to transfer the dough to a clean, lightly oiled bowl.(I use these plastic dough rising buckets) Cover the bowl with plastic wrap and let the dough rest at room temperature for 10 minutes.

Transfer the dough to a lightly oiled work surface. With wet or oiled hands, reach under the front end of the dough, stretch it out, then fold it back onto the top of the dough. Do this from the back-end and then from each side, then flip the dough over and tuck it into a ball. The dough should be significantly firmer, though still very soft and fragile. Place the dough back in the bowl, cover and let sit at room temperature for 10 minutes. Repeat this process three more times, completing all repetitions within 40 minutes.

After the final stretch and fold, immediately cover the bowl tightly and refrigerate over night or for up to 4 days. The dough will rise, possibly to double its original size, in the refrigerator. If you plan to bake the dough in batches over different days, you can portion the dough and place it into two or more oiled bowls at this stage.

When ready to bake, remove the dough from the refrigerator three hours in advance ( or an hour earlier if the dough hasn’t increased to 1 1/2 times its original size in the refrigerator overnight.)

One hour after taking the dough out of the refrigerator, line the back of a sheet pan with parchment paper and generously dust the entire surface with flour. Use a wet or oiled bowl scraper to transfer the dough to the work surface, taking care to handle the dough as little as possible to avoid degassing it.

Dust the top surface of the dough with flour and also flour your hands. Using your hands or a metal pastry scraper, gently coax and pat the dough into a rough square measuring about 9 inches on each side, still taking care to degas it as little as possible.

Cut the dough into 3 even strips about 3 inches wide and 9 inches long. The pieces will each weigh about 12 ounces or 340 grams. With floured hands, gently fold the dough in thirds, like folding a letter but without applying any pressure. Gently roll the folded dough in the dusting flour to coat it and then lift the dough and place it on the parchment paper, again rolling it in the dusting flour on the parchment. Rest the dough seam side down on the parchment and repeat with the other pieces of dough.

Mist the tops of the dough pieces with spray oil and loosely cover the pan with plastic wrap or a clean, lint free towel. After 1 hour, gently roll the pieces over so the seam side is up, lift and cradle each piece with floured hands, and, working from the underside, gently coax it to a length of 5 inches. Lay the pieces back on the parchment seam side up. Straighten the sides of each piece with your hands or a pastry scraper so that they are more rectangular than oblong, mist with spray oil again, the cover loosely and proof for 1 hour more.

About 45 minutes before baking, preheat the oven to 550ºF (288ºC) or as high as it will go. Place a baking stone, if you are using one, or sheet pan if you prefer, as well as a steam pan in the oven to preheat as well. The steam pan can be either a sheet pan with a 1″ rim or a lasagna pan with taller side, or even a cast-iron frying pan. The steam pan should be placed on the shelf under the baking stone.

When ready to bake, slide the dough, parchment and all, onto the stone or sheet pan. Pour 1 cup of hot water into the preheated steam pan, Always use an oven mitt or a hot pad and wear long sleeves when adding water to the hot steam pan to prevent steam burns. You should also cover oven windows with a dry dish towel or rag to prevent backsplash from hitting the window and cracking it. Do not forget to remove the towel before closing the oven door! Use a watering can with a long spout when pouring water into the steam pan.You can also use a spray bottle such as a plant mister, to spritz the oven walls a few times to create additional steam. Then close the door and lower the oven temperature to 450ºF (232ºC).

Bake for 12 minutes, then rotate the pan and bake for 15 to 20 minutes more, until the crust is a rich brown (streaked with dusting flour). The bread should puff a little, and the crust should be hard when tapped (it’ll soften as it cools). Cool on a wire rack for 45 minutes before slicing

Enjoy!

Rustic Ciabatta Loaves brought to you by: Runcible Eats (http://www.leaandjay.com )