Heavenly West Virginia Dinner Rolls

November 28, 2014

IMG_0519

I have a confession to make. I love bread. I LOVE it. When I did that South Beach Diet a few years ago and bread was completely out of the question, I thought I might die. I guess that is when I figured out South Beach was not really sustainable in my world. Nope. In my world there is a lot of fresh baked bread, preferably slathered in lovely salty butter.

IMG_0555

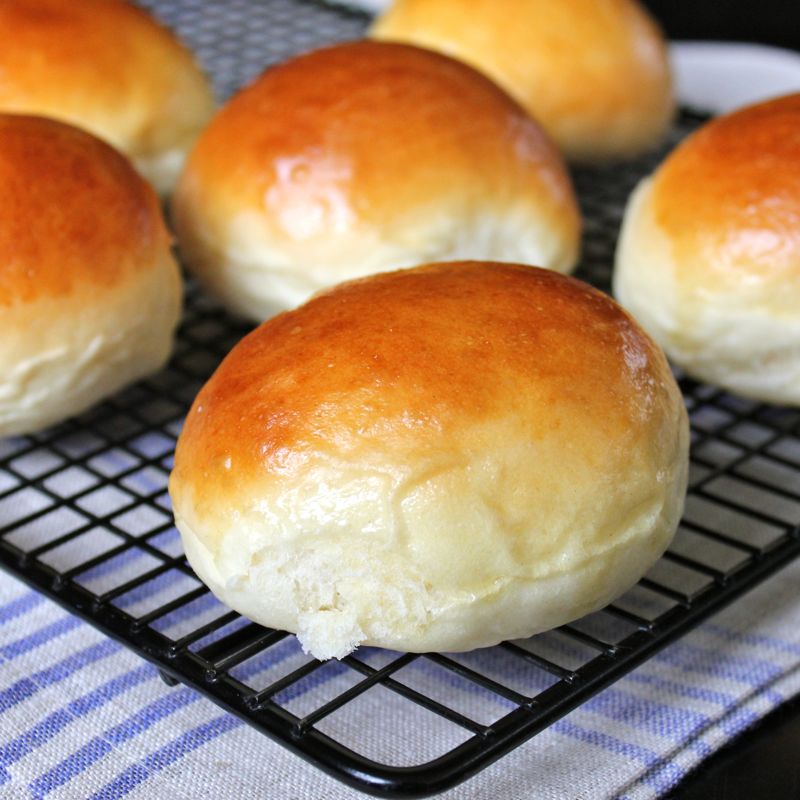
I guess I’ll have to hit the gym a little longer to make sure that in my world I can still get my britches buttoned. But if that’s what it takes to chow down on bread, then so be it. And these little dinner rolls that I’m about to talk about, well they are definitely worth undertaking a few extra revs in the gym. Moist, tender and slightly sweet, they are my go-to roll for all dinners. I probably should have let you know about these before Thanksgiving, but hey –  Christmas and New Year’s are right around the corner!

IMG_0493

You may wonder why I call them West Virginia Rolls. Well, I originally came across this recipe when I was looking for Pepperoni Roll recipe. The husband and I love to visit West Virginia every chance we get. Especially the town of Fayetteville, which I’ve told you all about in previous blogs. Pepperoni Rolls, soft white yeast roll which are stuffed with pepperoni, cheese and possibly some peppers, are like the State food of West Virginia. You can find them everywhere from bakeries to gas stations. I wanted to recreate them at home and found an absolutely to die for recipe on Martha Miller’s blog. Her recipe yielded up some truly Heavenly Pepperoni Rolls. The bread called for in that recipe, which was from Martha’s grandmother Yie’s dinner roll recipe, is the same bread used in these rolls. I called them Yie’s Rolls for a while, but everyone around here thought I was saying “yeast rolls” and they were wondering which yeast rolls I meant. Now, when I say West Virginia Rolls, everyone knows exactly what I mean and starts drooling immediately!

IMG_0507

I used to be intimidated by any recipe that had yeast in it. I was sure it was just too difficult to pull off. Now I know that baking with yeast is not really difficult at all, though it can be a bit persnickity, so it helps if you have a few tools on hand. You definitely need a good thermometer which will give you a fast read. And the type of yeast you use is important. Personally I love the SAF Instant Yeast I keep a canister of it in the freezer at all times. And a dough rising bucket is also nice to have. You could probably get by without these tools, but having them makes things go much more smoothly. So now you’re ready to make some lovely yeast dinner rolls. These flavourful little gems are easy to make, though I will admit they are a bit time-consuming with two separate rise times, so make sure you have plenty of time set aside for them on baking day. Now don’t get discouraged. I know you’re thinking “there is no way I have time for all that nonsense especially around the holidays.” But here is a great secret I am happy to pass along to you. Sometime prior to the big dinner you have planned, when you have some free time on your hands (yeah right, huh?) you can make a bunch of these rolls up and par-bake them. So that means you just bake them for 7 minutes, take them out of the oven to cool and then freeze them in heavy ziplock freezer bags. (They will keep in the freezer for several months.) Then, when the day of the big dinner arrives, you simply take them out of the freezer and pop them frozen right onto the baking tray and bake at 375° F for about 8 -10 minutes. And voila! Lovely dinner rolls, fresh from the oven, melt in your mouth, golden brown and irresistible. You will be amazed how quickly these little devils disappear from your table!

IMG_0575

Heavenly West Virginia Dinner Rolls

  • Servings: 3 dozen
  • Difficulty: easy - but time consuming
  • Print

recipe from: Martha J Miller

Note: This recipe makes a lot of rolls! My stand mixer is not even big enough to handle the full recipe. I usually make 1/2 of the recipe which yields about 18 -20 rolls.

Ingredients:

For the bread:

  • 2 cups milk
  • 2/3 cup oil (canola or vegetable)
  • 4 tsp salt
  • 3/4 cup sugar
  • 2 packages instant yeast (4 1/2 teaspoons – a yeast packet contains 2 1/4 tsp. yeast)
  • 1 cup warm water (about 110°F)
  • 1 tsp sugar
  • 2 large eggs
  • 9-10 cups unbleached all-purpose flour, plus more for dusting

Directions:

In a small saucepan, heat the milk over low heat until just before it comes to a boil (heat to about 190 – 195° F). Do not let the milk boil. In a small bowl, combine the warm milk, oil, salt and 3/4 cup sugar. Stir until the sugar dissolves and let the mixture cool to lukewarm (98°F).

Meanwhile, in the bowl of stand mixer combine the two packages of yeast, sugar and warm cup of water. Stir gently with a fork to break up any clumps and let stand 5 minutes or until mixture becomes bubbly. Pour the lukewarm milk mixture into the yeast mixture and stir to combine. Add the eggs one at a time and beat to combine.

On low speed, begin to slowly add the flour, one cup at a time until a loose dough forms. There is no precise measurement for the flour as it will vary depending on your individual environment’s humidity, elevation, etc. but it will be somewhere between 9 to 10 cups. The finished dough will pull away from the sides of the mixing bowl, be slightly sticky and slack, but still hold together well.

Turn the dough out onto a well floured surface and knead, incorporating more flour to prevent the dough from sticking to your hands and the counter top. Knead by hand for 6 to 10 minutes or until the dough is smooth and elastic. Or you can just switch to your dough hook and let the mixer knead it for about 6 – 8 minutes. To test if the dough is ready, gently poke your finger into the dough and if the indentation remains but slowly comes back, you have kneaded long enough. Place dough in a rising bucket or if you don’t have one, a large lightly oiled bowl, cover with plastic wrap and a kitchen towel. Place in a warm draft-free place and let rise until dough doubles, about 2 hours.

After the first rise, gently remove the dough and knead lightly 2 or 3 times on a floured surface to remove any large air pockets. Next, divide the dough into 2 ounce pieces preferably using a kitchen scale. If you do not own a kitchen scale the dough should divide out into roughly 3 dozen small pieces and once shaped, be about 1-1.5 inches in diameter.

Shape dough pieces into rolls by pinching two opposite sides of the dough and then pinching together the other two sides to form a ball.

Place shaped rolls on greased sheet pans with enough room for them to rise without touching and lightly cover with plastic wrap. Let rise until doubled, approximately 2 hours.

Preheat oven to 375°F. Lightly beat one large egg with a splash of water and paint egg wash gently over each roll. Bake rolls for 12-20 minutes until golden brown. Cool finished rolls on a rack and re-warm before serving.

To par-bake the rolls simply remove the partially cooked rolls after 7 minutes, let cool, and freeze in heavy duty plastic bags. To finish, place frozen rolls on a greased sheet pan and cook at 375°F for 8-10 minutes. Frozen par-baked rolls will keep in your freezer for several months.

Enjoy!

Heavenly West Virginia Dinner Rolls brought to you by: Runcible Eats (www.leaandjay.com)


Inside out Pumpkin Muffins filled with Cider Cinnamon Cream Cheese

November 25, 2014

IMG_0364

Thanksgiving is nearly upon us and I’m sure you probably feel as though you were drowning in a sea of pumpkin-y recipes. So what do I do, well how does that saying go, “if you can’t beat ’em…” I jumped right on the old band wagon and today bring you a recipe for Inside Out Pumpkin Muffins filled with Cider Cinnamon Cream Cheese.

IMG_0391

Now this isn’t you’re regular old pumpkin bread muffin, oh no. This moist muffin is just full of all of those wonderful flavours that you associate with Thanksgiving – like pumpkin (duh), sweet and tangy apple cider and warm cinnamon. As a bonus, they are stuffed with the most delicious Apple Cider Cinnamon Cream Cheese Spread. This cream cheese spread is made with that boiled cider that I’ve been talking up recently. And you only end up using about 1/2 of the Cider Cinnamon spread in these muffins, so you’ll have plenty around to spread on a bagel or English Muffin, or to dip apple slices or pita chips into, or to just schmear more all over the top of these pumpkin muffins. Hey, I know it is already baked into the middle, but believe me, this spread is amazing! You won’t be able to get enough of it! Yup, it definitely elevates these Pumpkin Muffins to a cut above the regular ones out there. I baked my muffins in an adorable Nordic Ware Maple Leaf Pan, which certainly adds to the harvest vibe.

IMG_0396

However, these muffins bake up brilliantly in regular muffin tins if you don’t have a Maple Leaf Pan. No worries! Perfect with a cup of tea on Thanksgiving morning as you gear up for your busy day or very welcome when passed around to folks as a pre-meal snack. Make up a batch today, Trust me, you will be so thankful you have these little treats on hand!

IMG_0334

Inside Out Pumpkin Muffins filled with Cider Cinnamon Cream Cheese

  • Servings: 12 - 16 muffins
  • Difficulty: easy
  • Print

recipe from: King Arthur Flour

Ingredients:

  • 1 cup pumpkin purée (about half a standard 15-ounce can)
  • 2 large eggs
  • 1/2 cup brown sugar
  • 3 tablespoons vegetable oil
  • 1/4 cup boiled cider (for best flavor), or dark corn syrup
  • 1/2 teaspoon salt
  • 1 1/2 teaspoons pumpkin pie spice; or 1 teaspoon ground cinnamon + 1/4 teaspoon ground cloves + 1/4 teaspoon ground ginger
  • 1 teaspoon baking powder
  • 1/2 teaspoon baking soda
  • 1/3 cup milk
  • 1 1/2 cups Unbleached All-Purpose Flour
  • 1/2 batch of Apple Cider Cinnamon Spread (recipe below)

Directions:

Preheat the oven to 400°F. Line a standard 12-cup muffin pan with muffin papers, and grease the papers. Or lightly grease a maple leaf pan.

To make the batter: Whisk together the pumpkin, eggs, brown sugar, oil, boiled cider or corn syrup, salt, spices, baking powder, baking soda, and milk. Scrape down the sides and bottom of the bowl.

Add the flour and mix until well combined.

Drop about 2 tablespoons of the batter (a tablespoon cookie scoop works well here) into each muffin cup, spreading it to cover the bottom. Dollop on a heaping tablespoon of filling, then cover with another 2 tablespoons of batter. Sprinkle a little Demerara sugar over the top if you like.

If you’re using maple leaf molds, drop about 1 1/2 tablespoons of batter into each of the 6 molds. Add a scant tablespoon of filling, and spread about 1 1/2 tablespoons batter on top. The recipe will make 16 maple leaves, so you’ll need to bake in batches.

Bake the standard muffins for 18 to 20 minutes, until a cake tester inserted in the center comes out crumb-free. Bake the leaf muffins for 16 to 18 minutes, testing them the same way.

Remove the muffins from the oven. After 5 minutes, gently loosen the edges of the leaf muffins, and turn the pan over onto a cooling rack; the muffins should drop out. For regular muffins, simply transfer them to a rack to cool.

Apple Cider Cinnamon Spread

You will only use about 1/2 of this spread in the pumpkin muffins, but it is great to have on hand. Use it as a delicious spread for bagels or English muffins or dip pita chips or apple slices into it.

Ingredients:

  • 1 1/2 cups cream cheese; low-fat is fine
  • 1/4 cup sugar
  • 1 1/2 teaspoons ground cinnamon
  • 1/8 teaspoon salt
  • 2 tablespoons boiled cider

Directions:

Beat the cream cheese until it’s light and airy.

Add the remaining ingredients and beat until well incorporated.

Enjoy!

Inside Out Pumpkin Muffins filled with Apple Cider Cinnamon Cream Cheese brought to you by: Runcible Eats (www.leaandjay.com)


Mini Cinnamon Sugar Fried Apple Pies with Salted Caramel Drizzle

November 21, 2014

IMG_9918

So yeah…I might still be a bit obsessed with deep frying things. First it was those Apple Cider Glazed Donuts and now it is these adorable Mini Cinnamon Sugar Fried Apple Pies.

IMG_9956

I think this recipe is just wonderful. It has so many of the things I love in it…like apples – my favourite fruit. And these apples…well they are entirely covered with that amazing Perfect Salted Caramel Sauce that I told you about earlier this Fall. Not to mention that they were first sauteed in a boozy butter/brown sugar/cinnamon mix before they met up with the caramel. And as if that wasn’t enough, they are then wrapped up in a buttery puff pastry, deep fried and then sprinkled quite liberally with Cinnamon Sugar. Get out of here! – Right?!!

IMG_9901

They are sooo tasty! And being the perfect individual pop-into-your-mouth two-bite size, they are completely irresistible. Folks gathered around the Thanksgiving table would certainly be delighted by their appearance, but these mini pies are great for any get together this Fall. Easy to pass around on an appetizer plate, but also easy to dress up a bit for a fun Fall dessert with an additional drizzle of Salted Caramel Sauce and a scoop of Cinnamon Vanilla Bean Ice Cream. Dee-lish!

IMG_9923

Mini Cinnamon Sugar Fried Apple Pies

  • Servings: 10 pies
  • Difficulty: easy
  • Print

recipe slightly adapted from: half baked harvest

Ingredients:

  • 10 ounces puff pastry
  • 4 Granny Smith or Honeycrisp apples
  • 4 tablespoons unsalted butter
  • 1/2 cup light brown sugar
  • 1/2 teaspoon ground cinnamon
  • 1 tablespoon bourbon
  • 1 teaspoon apple vinegar cider
  • 1 teaspoon vanilla bean paste (can substitute in vanilla extract)
  • 10 teaspoons Salted Caramel Sauce plus more for garnish
  • 3 quarts oil, for frying
  • 1/4 cup granulated sugar
  • 2 teaspoons ground cinnamon

Directions:

Chop the apples into thin slices. Heat a skillet over medium heat and add the butter. When it’s melted, throw in the apples, brown sugar, and cinnamon, and cook the apple slices, stirring occasionally, for about 10 minutes, or until the apples are caramelized.

During the last minute, add the bourbon, apple cider vinegar, and vanilla. Cook for another minute, then remove the skillet from the heat and set it aside.

If needed, roll out your pastry dough so that it’s 1/4-inch thick. Cut the dough into 3-inch circles. Divide the apple filling among half of the pastry rounds. Top each mound of apples with 1/2 – 1 teaspoon Salted Caramel Sauce.

Place the remaining rounds over top of the apples (you may need to stretch the dough to help it fit over the apples). Crimp the edges of the pies with the tines of a fork. 

Heat a pot of oil to 350° F. Fry the pies in the hot oil for about 30 seconds on each side, until they are golden brown. Place them on a baking sheet lined with paper towels to drain.

Mix together the cinnamon and the sugar and use it to dust each pie.

Serve all on their own or with a big scoop of Cinnamon Vanilla Bean Ice Cream drizzled with Salted Caramel Sauce. Have Mercy!

Mini Cinnamon Sugar Dusted Fried Apple Pies brought to you by: Runcible Eats (www.leaandjay.com)


Cinnamon Vanilla Bean Ice Cream

November 18, 2014

IMG_0272

Brrr! Is it cold! Seems the Polar Vortex is upon us. And simply everyone I chat with wants to tell me how terribly cold this Winter will be. Better stock up on the snow shovels, de-icer pellets and re-stock the liquor cabinet. (Hey…shoveling snow can be very thirsty work…) I’m sure the last thing you want to hear about is a summery dessert classic like ice cream. But you might want to reconsider. Don’t be too hasty. Because what I’ve got here is Cinnamon Vanilla Bean Ice Cream.

IMG_0276

This delicacy, with its warm Fall cinnamon flavor, is just what you need. Not only does it taste dreamy all on it’s own, but it will also perfectly compliment all of those lovely apple-y, maple-y Fall desserts you’ve been making. I made a big batch of it up a couple weeks ago and we’ve enjoyed it with our Apple Cider Donut Cake as well as our Apple Cider Glazed Donut Bread Pudding. Yum! And although a naked scoop of it is fantastic, I was feeling a bit naughty one night and heated up a bit of that Salted Caramel Sauce I’ve told you about and drizzled that over the top. Oh. My. God. Completely irresistible.

IMG_9934

So don’t be so quick to turn up your nose at ice cream this winter. It’s not like you’ll be eating it standing outside in the middle of a snowpocalypse. You’ll be curled up on your sofa, all cozy under some blankets next to a roaring fire, enjoying a big old bowl of this Cinnamon Vanilla Bean Ice Cream.

IMG_0288

Cinnamon Vanilla Bean Ice Cream

  • Servings: 2 quarts
  • Difficulty: easy
  • Print

recipe from: The Foodie Affair

Ingredients:

  • 2 egg yolks
  • 1 cup granulated sugar
  • 2 teaspoons cinnamon
  • 1 vanilla bean pod, split in half or 1 teaspoon of vanilla bean paste
  • 2 cups whole milk
  • 2 cups heavy cream

Directions:

In a small bowl lightly beat egg yolk and set aside.

In a medium saucepan, stir in sugar, 1 cup of the milk and add the eggs. Cook over low heat stirring frequently until is begins to thicken slightly. Whisk in all remaining ingredients; milk, cream, vanilla pod, cinnamon, and continue to cook until the ingredients coats the back of the spoon.

Remove from heat and put in a container that the ingredients can cool in. Place plastic wrap directly on the mixture to prevent a film from forming. Chill in the refrigerator for 2 hours.

Remove vanilla bean pod and pour cold mixture into prepared frozen ice cream insert and process according to manufacturer’s directions.

Enjoy!

Cinnamon Vanilla Bean Ice Cream brought to you by: Runcible Eats (www.leaandjay.com)


Apple Cider Glazed Donut Bread Pudding with Maple Butter Rum Sauce

November 14, 2014


IMG_0189

Yes. You did read that recipe title correctly. It does indeed say Apple Cider Glazed Donut Bread Pudding. And yeah, I doesn’t stop there, it then adds the phrase  “with Maple Butter Rum Sauce”. I can hardly believe it myself and I actually made the dish, which I can tell you is exactly as amazing as you might imagine. Perhaps even more so. I found myself just staring at the husband in some sort of a donut bread pudding induced stupor and saying “this is really good”…”no..I mean this is really good!” over and over. This might actually be the best bread pudding I’ve ever had.

IMG_0152

So I know I just told you about how I went a bit mad with the deep-fryer earlier in the week and fried up a big batch of Apple Cider Glazed Donuts. Well the husband and I polished off quite a few of them as soon as they hit the cooling and rack and I immediately sent a fresh batch over to the neighbors. Yet, we still had quite a few of those little devils lurking about the kitchen. It was then that I remembered seeing a recipe at Sift & Whisk for a Cinnamon Sugar Donut Bread Pudding and knew just what I was going to do. And boy oh boy was I glad I did!

IMG_0210

Any type of donut you have on hand will work here, the cake type or the yeast risen type. And I suppose you don’t need to go all crazy like I did and make all the donuts yourself. (Though you really should…) You could go to one of those lovely Farmer’s Markets, or even your local bakery, and simply buy a dozen. But believe you me, you do want to make this pudding!

IMG_0244

Warm, comforting, apple-y, maple-y Fall bliss! I absolutely loved the tiny bits of apple added into the mix. And that Maple Butter Rum Sauce? It is divine! How could it not be? It’s got Maple Syrup, butter and Rum in it! I could probably just lap that up all on its own. The husband, who adores Bread Pudding, was completely over the moon with this dish. He didn’t hesitate to declare it the best he’d ever eaten. And I wager you’ll say the same. I mean come on…lets just say it again. Apple Cider Glazed Donut…Bread Pudding…with Maple Butter Rum Sauce. And there you have it!

IMG_0154

Apple Cider Glazed Donut Bread Pudding with Maple Butter Rum Sauce

  • Servings: 6
  • Difficulty: easy once you have the stale donuts on hand
  • Print

recipe adapted from: Sift and Whisk

Ingredients:

For the Bread Pudding:

  • 5 tablespoons (70 grams) unsalted butter, divided
  • 1 large Honeycrisp apple, peeled, cored, and cut into ½-inch cubes (or whatever type apple you prefer)
  • 1 cup plus 2 tablespoons (225 grams) granulated sugar, divided
  • ¼ teaspoon cinnamon
  • 2 eggs
  • 1 egg yolk
  • 1 cup heavy cream
  • 1 teaspoon vanilla paste (or sub in vanilla extract if you don’t have the paste)
  • 1 Tablespoon boiled cider (optional – but it will really kick up that apple flavour!)
  • 8 stale Apple Cider glazed donuts, cut into cubes (or whatever stale donuts you have on hand)

For the Maple Butter Rum Sauce:

  • 1/4 cup maple syrup
  • 3 Tablespoons unsalted butter
  • 1/4 cup brown sugar
  • 1 -2 Tablespoons dark rum
  • Demerara sugar for sprinkling over the top

Directions:

Preheat oven to 350°F.

In a sauté pan, melt 4 tablespoons (55 grams) of butter over medium-high heat. Add apple cubes and 2 tablespoons (25 grams) sugar and cook until apples are soft and translucent, 10-12 minutes. Remove from heat and stir in cinnamon.

In a large mixing bowl, whisk together remaining 1 cup (200 grams) sugar, eggs, egg yolk, cream, vanilla paste and boiled cider until smooth. Add donut cubes and cooked apples and gently toss to coat. Let soak for 5 – 10 minutes, occasionally turning the mixture gently so that all of those donut cubes get a good soaking.

Melt the remaining 1 tablespoon of butter. Brush a 9×9-inch (or similar sized – I used a gratin dish) baking pan with ½ tablespoon of butter. Pour bread pudding into the pan and distribute evenly. Drizzle remaining ½ tablespoon of butter over the top of the pudding. Sprinkle a bit of Demerara sugar over the top.

Place Bread Pudding Pan in a large roasting pan. Fill the roasting pan with water until it comes half way up the sides of the Pudding pan. ( I suppose this is optional. The original recipe which I adapted did not use a water bath. However, when baking bread puddings I always do. Likely because my Mom did. But I have read that a water bath ensures the custard will not curdle and that the top of the pudding will remain moist and tender. All of which sound good to me…so I persist.)

Bake for 45 – 50 minutes, until custard is set up. Cool slightly on a wire rack. Serve with Maple Butter Rum Sauce.

For the Maple Butter Rum Sauce:

In a small saucepan, combine maple syrup and butter and heat over medium-high heat until butter is melted. Add the brown sugar and stir to dissolve. Cook for 30 seconds, then remove from heat and stir in rum. Drizzle over warm bread pudding.

Enjoy!

Apple Cider Glazed Donut Bread Pudding with Maple Butter Rum Sauce brought to you by: Runcible Eats (www.leaandjay.com)


Apple Cider Glazed Donuts

November 11, 2014

IMG_0060

Have mercy! Would you just look at all of these scrumptious Apple Cider Glazed Donuts. There is nothing quite like a warm, fresh, melt in your mouth glazed donut!  You know what I’m talking about . I’m sure you’ve been lusting after them  if you’ve stopped by any Farmer’s Markets recently. Those Apple Cider Donut stands seem to always somehow pop up there magically this time of year.

IMG_0033

Somehow I hadn’t fallen victim to their charms this Fall. In fact, I just told you all about that delicious Apple Cider Donut Cake and how it was so tasty and so much easier to whip up than actual Apple Cider Donuts. Yup I was sure I’d bested them this year. That was until I made the mistake of watching the movie Chef, which is a great by the way. If you haven’t seen it yet, definitely get it in your movie queue. No, there is no mention of donuts in it, but beignets get quite a lot of screen time. So you’re probably wondering what a beignet has to do with a donut huh? Well, my husband had never experienced a beignet. He has heard me “oooh” and “ahhh” over them and listened to all my heretofore empty promises that I would soon fry him up a batch. So when they showed up it the movie, he gently reminded me that he had yet to ever see any materialize from our kitchen. I resolved right then and there that I would set things right and make good on my promise. The very next morning I broke out the deep fryer, filled it up with some oil and launched into all out beignet production. They did not disappoint, I must say. Hang on…I’m getting to the donut bit of the story. So anyway, after we gobbled up every last beignet in sight, I found myself wondering what else I could fry up. I always seem to go a bit deep-frying crazy once I get started. I mean it isn’t often that the deep fryer makes an appearance around here. And there it was all full of oil and ready to go. Certainly there had to be an endless supply of things that were just begging to be deep-fried…what was that thing I heard about some State Fair and deep-fried butter? And that’s when the idea of Apple Cider Glazed Donuts settled firmly into my consciousness. (Thank God…I don’t know if I could stand myself if I actually set about deep-frying butter….)I couldn’t resist. I mean who knows when I’ll get that fryer out again. I just had to make up a batch of those quintessential Fall donuts. Now I have made a lot of cake style, baked donuts, but I had never tried to do the yeast dough, deep-fried variety and was excited to give it a whirl. So I got busy, much to the delight of the husband and the neighbours (who were the unsuspecting recipients of a batch of excess “hot donuts now” – #Krispy Kreme’s got nothing on me – straight from my kitchen).

IMG_0026

I’m telling you, these Apple Cider Glazed Donuts are nothing short of amazing. So tender, so moist and just bursting with Fall Apple-y, cinnamon-y goodness. I should take a moment to tell you about my secret (well…I guess “secret” up til now) ingredient that I love to use in all of my Fall apple recipes. Boiled Cider.

IMG_0295

This amazing syrup, which is made by boiling down apple cider, serves to intensify that apple taste that everyone craves. It is like a bushel of apples in one little old tablespoon of that liquid gold. You can of course make up a batch yourself, but you can also find it all done and bottled for you at King Arthur Flour or on Amazon. I love this stuff! It is so versatile, great as a flavour accent, but equally good simply drizzled over a stack of pancakes. And even though I did reduce 1 cup of fresh cider to make the glaze for these donuts, I still added some of that bottled Boiled Cider to take that apple taste way up over the top. And it worked! We reached some sort of Apple Nirvana with the first bite of these Apple Cider Glazed Donuts.

IMG_0082

So if you are pressed for time, there is no doubt that you should go with that Apple Cider Donut Cake. However, if you’ve got a bit of time on your hands and don’t mind a bit of clean up, make these Apple Cider Glazed Donuts as a special treat this Fall.

IMG_0013

Apple Cider Glazed Donuts

  • Servings: 15 donuts
  • Difficulty: easy, but involves dough rising time and deep frying mess
  • Print

recipe slightly adapted from: Chelsea’s Messy Apron

Ingredients:

For the Donuts:

  • 3-1/4 to 4 cups all-purpose flour
  • 4 1/2  teaspoons (about 2 envelopes) Instant Yeast
  • 2 tablespoons white sugar
  • 1 teaspoon salt
  • 1 teaspoon ground cinnamon
  • 1/4 teaspoon nutmeg, freshly ground
  • 1 cup + 2 tablespoons milk
  • 1/4 cup butter
  • 3 large egg yolks
  • Corn Oil or Peanut oil for frying

For the Apple Cider Glaze:

  • 1 cup apple cider
  • 2 cups powdered sugar
  • 1 tablespoon Light Corn Syrup
  • 1 teaspoon vanilla extract
  • 2 Tablespoons boiled cider (optional – but it will really kick up that apple flavour if you have it!)

Directions:

For the donuts:

Combine 2 cups flour, undissolved yeast, sugar, salt, cinnamon and nutmeg in a large mixer bowl. In a small bowl combine the milk and butter and warm in the microwave to very warm (120° to 130°F).

Beat in the egg yolks to the flour mixture and then add in the milk + butter mixture. Beat for 2 minutes at low speed. Continue adding the remaining 1 and 1/2-2 cups of flour, until a soft dough forms.

Knead dough on a lightly floured surface until smooth and elastic (about 4 to 6 minutes). Cover and let rest for 10 minutes.

Roll out dough on a lightly floured counter into a 12-inch circle, about 1/2-inch thick. Using a donut cutter, cut out as many rounds as possible, separating the donut holes from the rounds. If you don’t have a donut cutter, you can use a 3-inch cookie or biscuit cutter to cut out the rounds. Then use a 1-inch cutter to punch out the donut holes in the center.

Place doughnuts and holes about 2 to 3 inches apart on a parchment lined baking sheet. Re-roll and cut remaining dough. Cover doughnuts and let rise for 45 minutes to 1 hour.

To fry: Heat at least 2 inches of oil in a deep fryer or deep pan to 350°F. Fry 2 to 3 doughnuts at a time, turning occasionally until well browned, about 2 to 3 minutes. Remove from oil and drain on paper towels. If you simply can not fry these donuts, you can bake them. I will mention that frying is more delicious, but to each his own. To bake: Preheat your oven to 375°F, and bake the risen doughnuts for 8 to 10 minutes.

Cool and then transfer to wire rack. Using tongs, dunk the doughnuts in the Apple Cider Glaze. Serve warm.

For the Apple Cider Glaze:

Boil the apple cider in a small saucepan until reduced in half, about 7 to 10 minutes. Place powdered sugar in medium bowl. Whisk in hot reduced cider, vanilla, corn syrup and boiled cider until smooth.

Enjoy!

Apple Cider Glazed Donuts brought to you by: Runcible Eats (www.leaandjay.com)


Apple Cider Donut Cake

November 7, 2014

IMG_9747

I warned you didn’t I? Here we go now with the first of what may prove to be a parade of Fall-time apple-y goodness…Apple Cider Donut Cake! Whaaat? Yup….Apple. Cider. Donut. Cake. Could I have crammed any more deliciousness into that recipe title? I’ve already told you how I love apples. And Apple Cider…especially the type that is a bit more medicinal…if you know what I’m saying…is exciting. Donuts! Who doesn’t love cinnamon sugar laden apple cider donuts?! Well you get all of those mouthwateringly yummy flavours all wrapped up in one gorgeous big old bundt cake.

IMG_9788

This cake is amazingly moist and tender, just bursting with apple flavour. It would be delicious simply unadorned, but it is completely over the top when brushed with some boozy cider glaze and dusted, quite liberally with crunchy cinnamon sugar.

IMG_9750

It is great anytime of the day, for breakfast, tea-time snack, dessert or even when eaten in the dark in the middle of the night while everyone else is sleeping. What? Like you haven’t done that?

IMG_9735

And I must say, this cake is a breeze to make. I love Apple Cider Donuts, let there be no doubt. But a gotta say, they are a bit fiddly to make, what with the rising and the frying etc. Definitely a labour of love. Now, this cake will lead folks to believe you slaved away all day….when really you were outside enjoying the beautiful Fall weather. And I won’t tell them otherwise. Mum’s the word.

IMG_9804

Apple Cider Donut Cake

  • Servings: 15 -18 slices - depending on how you cut them
  • Difficulty: easy
  • Print

recipe slightly adapted from: Two In the Kitchen

Ingredients:

  • 1/2 cup of unsalted butter, softened
  • 2 large Granny Smith apples, peeled, cored, and chopped
  • 1 1/2 cups apple cider *(see information below)
  • 1/2 cup milk, at room temperature
  • 2 1/2 cups all-purpose flour
  • 1 1/2 teaspoons baking powder
  • 1/2 teaspoon baking soda
  • 1 teaspoon salt
  • 1/4 teaspoon ground nutmeg
  • 1/4 teaspoon ground cloves
  • 1 teaspoon ground cinnamon
  • 3/4 cup sugar
  • 1/2 cup packed light brown sugar
  • 3 large eggs, at room temperature
  • 1/4 cup coconut oil, melted (you can substitute vegetable oil – but coconut tastes better!)
  • 1 teaspoon pure vanilla bean paste (can substitute in extract if you don’t have paste…put get some paste, you won’t regret it!)

For the Cider Glaze:

  • 1/4 cup butter
  • 1/4 cup sugar
  • 1/8 cup water
  • 1/8 – 1/4 cup hard cider *(see below for substitutions)

For the Cinnamon Sugar Coating:

  • 6 tablespoons granulated sugar
  • 1 teaspoon ground cinnamon
  • 1/8 teaspoon ground nutmeg

Directions:

Preheat the oven to 350ºF and spray a bundt pan with baking spray. (Recently I have had a couple of folks mention that they haven’t had much success with the baking spray saying that the cake stuck to the pan. Then I recently experienced the same thing myself. When I made the cake again the following day and greased the pan with butter & flour and the cake came out perfectly. Don’t know why this is, but just thought I’d share.)

In a medium saucepan, bring chopped apples and cider to boil over medium heat. Reduce heat to medium and simmer until apples are fork tender. About 10 to 12 minutes. Remove pan from heat, cool for a few minutes, then pulse in a food processor or blender until pureed. Measure out 1 cup apple mixture and stir the milk into it. Set the apple/milk mixture aside for later. (As for the remaining cider/apple puree, it is left over. I usually save it and put it over yogurt, or oatmeal. It is also fabulous heated slightly and drizzled over ice cream.)

In a medium bowl, combine flour, baking powder, baking soda, salt, nutmeg, cloves and cinnamon and set aside.

In a large mixing bowl, cream the butter, sugar, and brown sugar on medium speed until light and fluffy. Add the eggs, one at a time, mixing until incorporated. Add the oil and mix well. CAUTION: If you are planning on using coconut oil, make sure those eggs are at room temperature or slightly warmer if your house is chilly. If the eggs are cold and you add coconut oil to the mixture, the coconut oil will solidify and you will end up with a clumpy mess!

Add the flour mixture and apple/milk mixture alternatively in three additions, scraping the bowl as needed and mixing after each addition. Add the vanilla and beat once more, just to combine.

Scrape batter into prepared pan. Bake for 35-45 minutes or until a toothpick inserted in the center comes out clean. Place the cake in its pan on a cooling rack for ten minutes before removing the cake itself to a cooling rack for at least 30 minutes.

While cake is baking, prepare Cider Glaze. Melt butter, sugar and water over medium high heat. Bring mixture to a boil and let boil for 1-2 minutes. Remove from heat and immediately add the cider, stirring to combine.

Place baking sheet under wire rack. Using a pastry brush or marinate brush, cover cake with glaze. I usually do this in several passes, letting one application of glaze sink in and then going back over the cake with another.

Prepare the Cinnamon Sugar Coating. Combine sugar, cinnamon, and nutmeg in a small bowl. Sprinkle the warm, glazed cake with cinnamon sugar, using fingers to rub it onto the sides of the cake. (I usually place my cinnamon sugar mixture in an empty spice bottle, or salt shaker and then sprinkle it over the cake.)

*Since I originally posted this recipe, I have had quite a few questions about hard cider vs. fresh cider. So let me just start out by saying fresh cider is the juice from pressed apples. It is unfiltered and often appears cloudy. Unless you buy it directly from an orchard it has likely also been pasteurized. Hard Cider occurs when unpasteurized fresh cider is allowed to ferment. It becomes carbonated and alcoholic. This cider can be found wherever beer is sold. Now as far as substitutions: If you do not wish to use hard cider in the glaze, you can substitute in fresh cider. However, fresh cider is often sweeter than hard cider and the glaze will be a bit sweeter, but still delicious I’m sure. You can also just leave the cider out of the glaze, which would then just be a sweet buttery glaze, but lack apple flavor. Another possibility for a substitution that lacks alcohol, but still gives you an intense apple flavor is boiled cider. Boiled Cider is fresh cider which has been boiled down to produce an intensely flavored apple cider syrup. I have provided a link below if you wish to try that ingredient. I always use hard cider for my glaze, so I’m not sure how much boiled cider you should use as a substitution. I would start with 1/2 Tablespoon and taste it until it reaches your desired level of apple-y goodness.

Enjoy!

Apple Cider Donut Cake brought to you by: Runcible Eats (www.leaandjay.com)

Links to Useful Kitchen Tools & Ingredients for Apple Cider Donut Cake:

Kitchen Aid Artisan Stand Mixer

Microplane Grate & Shake Nutmeg Grater

Oxo Silicone Pastry Brush

Nordic Ware Bundt Cake Pan

Oxo Dusting Wand for Sugar

Nielsen-Massey Madagascar Bourbon Vanilla Bean Paste

Boiled Cider


Lentil & Mushroom Ragu

November 4, 2014

IMG_9811

I’m going to have to beg your patience today. You see, I’m still a bit addled with jet lag as the husband and I just got back from a terrific vacation to Italy! (More on that to come…both recipes and pictures…I promise)

sneak preview ...on the Cinque Terre trail to Manarola

sneak preview…hiking on a Cinque Terre trail from Volastra to Manarola

Yeah, we have gone through the “falling back” bit of the time change thing twice, this past weekend here in the States and the weekend before in Italy. Not to mention having to deal with the usual 6 hour time difference to boot. Our whole sleep schedule thing is shot! But it was so worth it. We did make it back for Halloween, in an appropriate zombie like condition I must say. I can’t believe Halloween is now done and dusted! Time is just flying by. Thanksgiving and dare I mention it, Christmas will be here before we know it. Fall is my favourite season though, so I certainly don’t want to rush things. I’m going to try to take a bit of time to enjoy the right here and now, with all of its wind-blown, rustling leaves and crisp Autumn temperatures. And I’ve got some great Fall recipes coming up. I should probably warn you that there might be a fair few apple dishes on the way. I love apples. My favourite fruit and they are in season right now, so look out! But no apples today. Nope, no dessert dish today, but a lovely versatile dinner offering. This Lentil & Mushroom Ragu will blow your mind. I’m telling you, you will not miss the meat one little bit in this hearty veggie sauce.

IMG_9832

The husband and I both love lentils and mushrooms, so this Meatless Monday offering was a no-brainer. Not to mention that it is full of so many of the flavours that I just adore….like balsamic vinegar, red wine and basil. And it even has some red pepper flakes to kick up the spice factor. It almost seems that the folks over at Foxes Love Lemons, where I found this delicious recipe, made it up with me in mind! I served it over a bowl of fresh pasta, but it would be equally delicious over a salad. As we were chowing down on the last little bite of this stupendous sauce I found myself dreaming about using it as the sauce in a veggie lasagna. I imagine it would be so stunning nestled in between layers of pasta sheets, with some spinach and fresh mozzarella and parmesan! Now that the weather has turned a bit colder, this Lentil & Mushroom Ragu was sheer perfection! I think it will be in heavy rotation on the winter dinner menu.

IMG_9841


Lentil & Mushroom Ragu

  • Servings: 6 -8
  • Difficulty: easy
  • Print

recipe slightly adapted from: Foxes Love Lemons

Ingredients:

  • 2 tablespoons olive oil
  • 12 ounces baby bella (cremini) mushrooms, sliced
  • 4 garlic cloves, minced
  • 1 large carrot, chopped
  • 1/2 red bell pepper, chopped
  • 1/2 medium yellow onion, chopped
  • 1/4 cup red wine
  • 1 bay leaf
  • 1 can (28 ounces) crushed tomatoes
  • 2 Tablespoons balsamic vinegar
  • 2 cups water
  • 1 cup brown lentils, rinsed and picked through
  • 2 teaspoons dried oregano
  • 1/2 teaspoon kosher salt
  • 1/4 teaspoon ground black pepper
  • 1/4 teaspoon red pepper flakes
  • 1 tablespoon chopped fresh basil
  • 1 box (16 ounces) spaghetti or whatever pasta you prefer
  • Chopped fresh parsley, for garnish
  • Grated Parmesan cheese, for serving

Directions:

In large saucepot, heat oil over medium-high heat. Add mushrooms, garlic, carrot, bell pepper and onion. Cook until vegetables are very brown and soft, about 15 to 20 minutes, stirring frequently.

Add wine; cook 1 minute, stirring constantly. Use wooden spoon to scrape browned bits from bottom of pan.

Stir in bay leaf, crushed tomatoes, balsamic vinegar, water, lentils, oregano, salt, black pepper and red pepper flakes. Heat to boiling, then reduce heat to medium-low. Simmer until lentils are tender, about 25 minutes, stirring occasionally. Add more water, as needed, if ragu gets too thick. Remove bay leaf and stir in basil.

Meanwhile, prepare spaghetti according to package directions.

Serve ragu over spaghetti. Garnish with parsley and serve with Parmesan cheese.

Enjoy!

Lentil & Mushroom Ragu brought to you by: Runcible Eats (www.leaandjay.com)