Banana Honey Cornbread

August 27, 2015

IMG_3075

What do we have here? A bread which combines two tastes the husband and I just adore…bananas and cornbread. It is wonderfully flavorful and quite moist and tender. Sweetened with honey and just a sprinkling of Demerara sugar, it is great along with a cup of tea or coffee to start the day or equally well enjoyed as an afternoon snack.

IMG_2908

The cornmeal gives this bread a much heartier texture than many banana breads out there, yet it still has a soft and tender crumb. The crust is crispy when it first comes out of the oven, but after it has been wrapped and stored for the night, it mellows to become more moist. And with honey being the only sweetener, besides that little bit of sprinkled sugar on top, this loaf is slightly sweet, much more bread like than dessert like. That being said, it is pretty versatile. If you do happen to have a real sweet tooth, this bread is the perfect vehicle for a dollop of honey butter, or whatever other jam or jelly you might desire. I have even topped a slice of it with fresh berries and whipped cream and served it for dessert! The husband was really happy with this bread and proclaimed it to be just what “I always wanted Banana Bread to be”. I couldn’t really ask for a better review than that! So the next time you have a couple of bananas that are getting a bit long in the tooth, mix up a batch of this Banana Honey Cornbread. You will be delighted!

IMG_3083

Banana Honey Cornbread

  • Servings: one 8x4 inch loaf of bread
  • Difficulty: easy
  • Print

recipe adapted from: Peas And Crayons

Ingredients:

  • 1½ cups unbleached all-purpose flour
  • ½ cup stone-ground cornmeal
  • 2 Tablespoon baking powder
  • ½ teaspoon salt
  • ½ teaspoon cinnamon
  • ¼ teaspoon freshly grated nutmeg
  • ½ cup super-ripe banana, packed [about 2 medium bananas]
  • 2 Tablespoon room temperature coconut oil
  • ½ cup milk – room temperature
  • ¼ cup honey
  • 1 teaspoon vanilla extract (or vanilla paste)
  • 2 large eggs -room temperature (not kidding here…room temperature! If you add right out of the fridge cold eggs to room temperature coconut oil it will seize up to a gloppy mess!)
  • Demerara sugar to sprinkle over top

Directions:

Preheat oven to 400° F.

Combine flour, cornmeal, baking powder, salt, cinnamon, and nutmeg in a medium bowl.In a large bowl, mix together bananas, milk, coconut oil, honey and vanilla.

Add two slightly beaten eggs to the wet mixture and mix with a fork to incorporate.

Slowly add the cornmeal/flour mixture in; sifting in three batches. Do not over mix the batter or the bread will be tough. Mix only until the dry mixture is just combined. The batter should be slightly sticky.

Spoon into a greased 8×4″ loaf pan, sprinkle Demerara sugar over the top and place atop a baking sheet in the oven.

Next reduce the heat from 400°F to 350°F and bake for 35-40 minutes or until toothpick inserted into the center of the loaf comes out clean.

Enjoy!

Banana Honey Cornbread brought to you by: Runcible Eats (www.leaandjay.com)


Zucchini Fritters with Feta & Dill

August 19, 2015

IMG_3056

Hooray! It’s zucchini time! Yup…that most delicious of summer squashes is here in abundance now. We love, love, love it around here. One zucchini feast after another. So hold onto your hats…I’m going to be sharing quite a few of the recipes we’ve been enjoying. I’m starting today off with a fantastic one for Zucchini Fritters with Feta & Dill.

IMG_3045

Now I just knew this one was going to be a winner. I already told you how we feel about zucchini and I’m pretty certain I  can also say I’ve never really met a fritter that I didn’t like. But I will admit, sometimes fritters can be a bit on the heavy side. Maybe not something you want to indulge in when your fairly wilted from all the hot and steamy summery temps. Well, that is why I’m so excited to share this with you. These Zucchini Fritters will not “weigh you down”. Far from it. They are wonderfully light a fresh. They will have you at the first bite – which is truly amazing. They have a crispy crunchy exterior which covers a delightfully creamy salty center. The scallion, dill, feta & zucchini combo is just the perfect summery taste sensation.

IMG_3048

They are great as appetizers, or as a side dish to some grilled meat or even as a light Meatless Monday meal. We enjoyed ours with a dollop of Tzatziki sauce, but they are also delicious all on their own. They come together pretty quickly (just make sure to get rid of as much of the liquid the zucchini releases as you can, otherwise you won’t get as much of that crispy factor as you want.) and are good hot off the griddle or even at room temperature. Believe me folks, you don’t want to miss out on this dish, so get out there, grab some of those zucchinis and make up a batch of these today!

IMG_3039

Zucchini Fritters with Feta & Dill

  • Servings: 12 Fritters
  • Difficulty: easy
  • Print

recipe from: Once Upon a Chef

Ingredients:

  • 1 pound zucchini (about 2 medium), trimmed
  • 1 teaspoon salt
  • 2 large eggs
  • scallions, minced
  • 2 tablespoons minced fresh dill
  • 1/2 cup crumbled feta cheese
  • 1 medium garlic clove, minced or pressed through a garlic press
  • 1/4 teaspoon black pepper
  • 1/4 cup corn starch or all purpose flour
  • 1/2 teaspoon baking powder
  • 6 tablespoons olive oil
  • Lemon wedges, for serving
  • Tzatziki Sauce, for serving

Directions:

Shred the zucchini on the large holes of a box grater or in a food processor fitted with the shredding disk. Transfer the zucchini to a fine mesh strainer and set over a bowl. Toss the zucchini with the salt and let it sit for 10 minutes. Wring all of the excess liquid out of the zucchini with your hands, or in a clean dish towel or even paper towels. Just make sure you get as much of that water out as possible, then set aside.

Beat the eggs in a large bowl. Mix in the dried zucchini, scallions, dill, feta, garlic and black pepper. Sprinkle the corn starch and baking powder over mixture and stir until uniformly incorporated.

Heat 3 tablespoons olive oil in a large non-stick skillet over medium heat. Drop 2-tablespoon sized portions into the pan, then use the back of a spoon to gently press the batter into 2-inch-wide fritters. Pan-fry until golden brown on both sides, 2-3 minutes per side. Transfer the fritters to a paper towel-lined plate. Wipe the skillet clean with paper towels. Return the skillet to medium heat, add the remaining 3 tablespoons olive oil, and repeat with remaining batter. Serve warm or room temperature with lemon wedges and tzatziki sauce if desired.

Tzatziki Sauce

Ingredients:

  • 1 cup greek yogurt
  • 1 cup English cucumber, diced
  • 2 cloves garlic, finely minced
  • 1 Tablespoon freshly squeezed lemon juice
  • 2 teaspoons olive oil
  • 2 Tablespoons dill, chopped
  • 1/4 teaspoon kosher salt
  • black pepper to taste

Directions:

Mix all ingredients together and chill until ready to serve.

Enjoy!

Zucchini Fritters with Feta & Dill brought to you by: Runcible Temps (www.leaandjay.com)


Angel Food Cake with Fresh Berries & Whipped Cream

August 12, 2015

IMG_2791

There’s no cake that is quite as summer-y as a slice of light and spongy Angel Food cake topped with fresh sliced berries and a big ole dollop of whipped cream. That cake is so tender and moist and the berries so sweet and refreshing, it raises your mood to a more transcendental level and could almost make you forget how utterly swampy it is outside. I had never attempted to make one at home, always being somewhat intimidated for unknown reasons. Not to mention that I knew, come every May, the local grocer would have Angel Food cakes stacked nearly up to the celestial host they were named after. I rationalized my fear away by thinking -Why should I bother – it would be silly to spend all that time at home making one when I could just pick one up at the store and be done with it. Those store-bought cakes always taste pretty good right? Hmmmmm…..I thought so, until I went ahead and made one at home and found that I was definitely mistaken. Once I took a bite of a homemade Angle Food cake I realized that the store-bought ones were a bit more akin to sweetened styrofoam than I had ever known. Yup….homemade is entirely superior. And I found out that it really was not nearly as difficult to make this classic summer cake as I had previous imagined.

IMG_2806

Now that being said, there are a few things to keep in mind. This cake is mostly egg whites with a little flour added in to help set the structure. So you want to make sure those egg whites whip up fully. To ensure this, your mixing bowl must be clean and free from any oils and not one little bit of egg yolk can be allowed to sneak into your separated egg whites. Once the cake batter is all whipped together, you want to spoon it into a tube pan which has not been greased. The batter will cling and climb up the sides allowing it to rise higher. Once the cake has finished baking, here is the part that completely freaked me out – you have to turn it upside down and leave it inverted to cool. You see, the egg whites are the things that give this cake the rise and until they cool down, the structure is not set and could collapse under the weight of itself. Once I removed what seemed to be a perfect cake from the oven, I just stood there staring at it. I had horrible visions that the second I inverted it, it would crash out onto the counter into a big heap of crumbs. But finally I took a deep breath and just flipped it right on over. All was fine. It just hung upside down there for about 2 hours. The result was this lovely spongy texture. Moist and airy and not too sweet. Perfectly complemented by the sweet fresh berries and cream. Quite heavenly indeed! So if you find yourself with a bunch of extra egg whites this summer, like maybe after you’ve made a big old batch of ice cream, try your hand at a homemade Angel Food Cake. Dare I say you’ll find it…well, divine!

IMG_2765

Angel Food Cake with Fresh Berries & Whipped Cream

  • Servings: one 10 inch cake
  • Difficulty: easy
  • Print

recipe slightly adapted from: Completely Delicious 

Ingredients:

  • 1 cup cake flour (113 grams)
  • 1 2/3 cup (333 grams) superfine sugar, divided (can substitute granulated sugar if you don’t have superfine)
  • 1 3/4 cup egg whites (will take 12 -13 eggs depending on their size)
  • 1/2 teaspoon salt
  • 1 teaspoon cream of tartar
  • 1 teaspoon vanilla bean paste (can substitute vanilla extract)
  • confectioners sugar for dusting
  • Fresh sliced berries – whatever is in season – for serving
  • Whipped Cream for topping

Directions:

Preheat oven to 300°F.

Sift the flour three times, then add 2/3 cup of the sugar and sift again.

Beat the egg whites on low-speed until frothy. Add the salt and cream of tartar and continue to beat until they just begin to form soft peaks. Slowly add the remaining sugar – only adding 2 tablespoons at a time – and beat until the egg white /sugar mixture holds soft peaks. Beat in the vanilla paste.

Here you want to work quickly, but with a gentle hand. Sift the flour mixture over the whipped egg white mixture in 4 additions, gently folding in each addition by hand until it is just incorporated before adding the next.

Spoon into an ungreased 10×4″ tube pan. Rap the pan on the counter a few times to release any bubble and smooth the top before popping it into the oven

Bake cake for approximately 1 1/4 hours, or until it is spongy to the touch and a toothpick inserted into the center comes out clean.

Here comes the scary part….If your pan is a true angel food cake pan and has little feet around the top edges, flip the pan upside down onto a flat surface and let it cool undisturbed for 2 hours. If your pan does not have feet, simply invert it over the neck of a bottle.

Once cool, use a thing knife to gently cut around the edges of the pan to release the cake.

Dust top of cake with confectioners sugar.

Slice cake with a serrated knife, using a gently sawing motion (this cake is delicate and will smoosh easily) and serve with sliced fresh berries and whipped cream.

Enjoy!

Angel Food Cake with Fresh Berries and Whipped Cream brought to you by: Runcible Eats (www.leaandjay.com)


Pretzel Dogs!

August 6, 2015

IMG_9891

I’mmmmmmmmm back! Good Lord above, I can not believe that I haven’t written one tiny little thing on this blog since April 3rd!  And that post was written after I had taken a sizeable break after my St. Patrick’s Day blog-a-thon. Yup…back then I said I’d be getting right back into the kitchen. I don’t know what got into me. Wellll….I kinda do. You see I’ve been busy planning a big bathroom renovation. I’m not sure if I mentioned it or not, but about 1 1/2 years ago we had a bathroom fire that was started by a faulty bathroom exhaust fan. (Here’s a tip for all you readers out there…Do NOT leave your exhaust fan running over night. The motor in our’s heated up and because our bathroom had last been renovated sometime in the 70’s, the fan did not have a thermal fuse, so it just kept getting hotter and hotter until it caught the insulation in the ceiling on fire. We were very lucky that the bathroom was all that burned up.) So yeah, you did read that right…the fire happened all that time ago and we are just now getting around to doing something about it. How pathetic is that? Seriously, we just sealed that bathroom off with plywood, moved to the guest bathroom down the hall and have been doing our best to ignore it. But I’m happy to report that we’ve finally got our act together and have hired a contractor and have nearly finished the design. Construction is nigh I tell you!

IMG_1340 - Version 2

Big gaping hole which we unbelievably ignored for over 1 year!!!

And then we just purchased a condo down in Richmond Virginia. Yes….I did say “down”. That is because Richmond is even further south in Virginia than we currently are now. I’m sure you all know how I loathe summer weather in Virginia and what did we do? Went further south! Must be stone cold crazeeee! So that has taken a bit of doing. The good news is as it turns out, Richmond is quite the hidden foodie destination. So I’m looking forward to telling you about some of our future dining exploits. But here is a sneak preview pic:

IMG_2931

Green Eggs & Lamb & Non-Huevos Rancheros with Griddled Jalapeno Grits, Black Bean Chili & Carnitas at Black Sheep brunch! #RVA#BlackSheepRVA

And last but not least, we just returned from a completely fantastic holiday in Iceland. Yup, we’ve been there before, three times now counting this visit and I am completely smitten! I’ve got a post coming up about a delicious Icelandic doughnut I sampled there.

IMG_2554 - Version 2

Icelandic Doughnut or ástarpungar from the Geirabakarí in Borgarnes…stay tuned for the recipe!

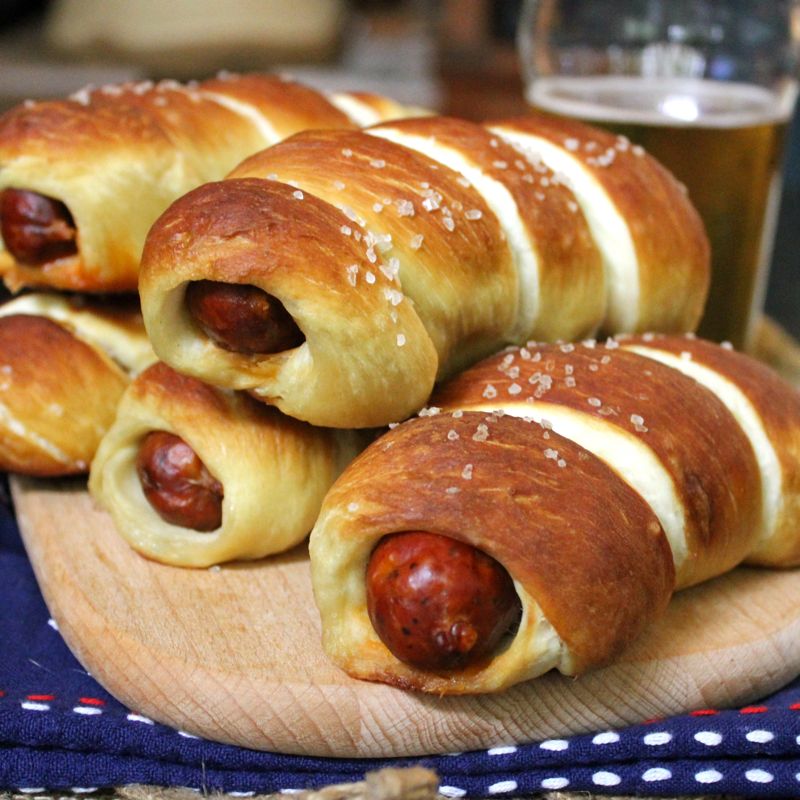
So anyhoo…..I should probably make you some sort of assurances that I’ll settle down again and blog faithfully, but I’m not sure it would be prudent to make such pledges. I do have good intentions….but I am the person that walked around with a boarded up bathroom for almost two years. So there you have it. I can be a bit negligent. But I beg your forgiveness and will try to be better. I’m going to start out fresh today with a great recipe for Pretzel Dogs!

IMG_9850

At this point, I don’t know if I even need to say one other word, their name says it all. Who doesn’t love those big soft chewy salty pretzels? And hot dogs? We loooove hot dogs in this house. I’ve posted quite a few hot dog blogs in the past, like how ’bout those Bacon Wrapped Dogs,

IMG_8314

or those tasty little Mini Corn Dogs?

IMG_6772

Yup, we’re big fans. I just told you we were recently off visiting Iceland. Well, as it turns out Icelanders love hot dogs too. There is this famous hot dog stand, Bæjarins Beztu Pylsur, in downtown Reykjavik and the husband and I made it a point to stop there every single day for one of their hot dogs with everything (“eina með öllu.” – they have a whole bunch of delicious toppings like mustard, raw onions, crispy onions and some sort of special hot dog remoulade).

IMG_2836

Day one….

IMG_2837

Day two….

And I can truly say the husband and I have never met a pretzel we didn’t like. Usually we nibble on the hard and crunchy store-bought variety, but certainly do love the big soft and chewy ones. So when I came across a recipe for  Pretzel Dogs, I knew without a doubt I would be giving it a whirl. Basically you just make up a yeast dough, similar to what you would do for bread. The thing that magically transforms it into a pretzel is the alkaline bath that it is dipped into prior to baking. That magical soak is crucial for both the texture as well as the color of pretzels. Once that yeast dough is introduced to this bath, the outside of the dough is gelatinized which prevents the usual “springing” of the dough which occurs during baking, giving you the chewy texture, distinct pretzel-y flavour and lovely brown colour. Once upon a time, pretzels were a noticeably darker brown color. This was achieved with a dip in a lye bath – albeit a food grade lye ( sodium hydroxide) bath. Now that stuff, “food grade” or not, is actually quite the hazardous chemical. I’m serious….you can still use it but you’re going to have to go all “Breakin Bad” and wear big rubber gloves and safety goggles when you’re doing your cooking. Personally, I don’t think I need to be that authentic. I’m happy to go with the old tried and true baking soda as a substitute. Everyone has a box of that lingering on their shelves at home. It will definitely give you that lovely soft and chewy brown pretzel crust that you’re longing for without any hazardous chemical concerns.

IMG_9883

And now that we’ve covered the pretzel bit, lets not forget that oh so important dog that it is wrapped around. So everyone has their favourite brand, and far be it from me to tell you what you should buy. However I will say, I like a dog that has a bit of flavour and a little snap when you bite into it. Usually we buy Hebrew Nationals, Nathan’s or Boar’s Head brands, but I’ll leave that choice up to you. As far as I’m concerned, you really can’t go wrong with these. Straightforward and easy to make….not to mention so delish! Comfort food extraordinaire! With a little side dish of good ole yellow mustard for dipping, you’re totally set. Don’t even get me started thinking about the spicy nacho cheese dip possibilities. So don’t be a proscrastinator – like yours truly – jump right on this and make up a batch of these comfort food gems today!

IMG_9885


Pretzel Dogs

  • Servings: 8 pretzel dogs
  • Difficulty: easy
  • Print

recipe from: Bake with Christina

Ingredients:

  • 1½ cups warm (110 to 115° F) water
  • 1 Tablespoon granulated sugar
  • 2 teaspoons kosher salt
  • 1 package (2 1/4 teaspoon) active dry yeast
  • 4½ cups all-purpose flour
  • ¼ cup unsalted butter, melted
  • Vegetable oil, for pans
  • 10 cups water
  • 2/3 cup baking soda
  • 8 hot dogs (we love Hebrew National, Nathans and Boars Head)
  • 2 tablespoons butter, melted
  • Kosher salt, for sprinkling

Directions:

Combine the water, sugar, and salt in the bowl of a stand mixer and sprinkle the yeast over top. Let sit for 5 minutes, or until the mixture begins to foam. In the meantime, lightly oil a large bowl and set aside.

Using a dough hook, add the flour and melted butter to the yeast mixture on low-speed until well combined. Increase speed to medium and knead until the dough is smooth and pulls away from the side of the bowl (about 4 to 5 minutes).

Place the dough in the lightly oiled bowl. Cover with plastic wrap and place in a warm area for an hour, or until the dough has doubled in size.

Preheat the oven to 450° F. Line two baking sheets with parchment paper and lightly brush with the vegetable oil. Set aside.

Pour 10 cups of water in an 8 quart pot which has deep sides. Bring the water to a rolling boil. Carefully add the baking soda. The mixture will foam up quite a bit, hence the deep sided pot recommendation. Stir until the soda has dissolved and then lower the heat to medium and keep the solution simmering.

In the meantime, turn the dough out onto a slightly oiled work surface and divide into 8 equal pieces. Roll out each piece of dough into a rope that’s about 24-inches long. Starting at one end, wrap the dough around the hot dog, pinching each end together so that it’s sealed and stays in place. Take care to make sure you have a good seal or your pretzel dogs will begin to unravel in the baking soda bath. Place onto the baking sheets and repeat with the remaining dough and hot dogs.

Lower the pretzel dogs into the boiling water two at a time and boil for 30 seconds. Using a large flat slotted spatula, remove them from the water and place on the baking sheets. Brush the tops with melted butter and sprinkle with the coarse kosher salt. Bake for 12-14 minutes, or until they are golden brown. Transfer to a wire rack and let cool for at least 5 minutes before serving.

Enjoy!

Pretzel Dogs brought to you by: Runcible Eats (www.leaandjay.com)