Festy Besty Boozy S’mores Fudge

July 28, 2014

IMG_8835

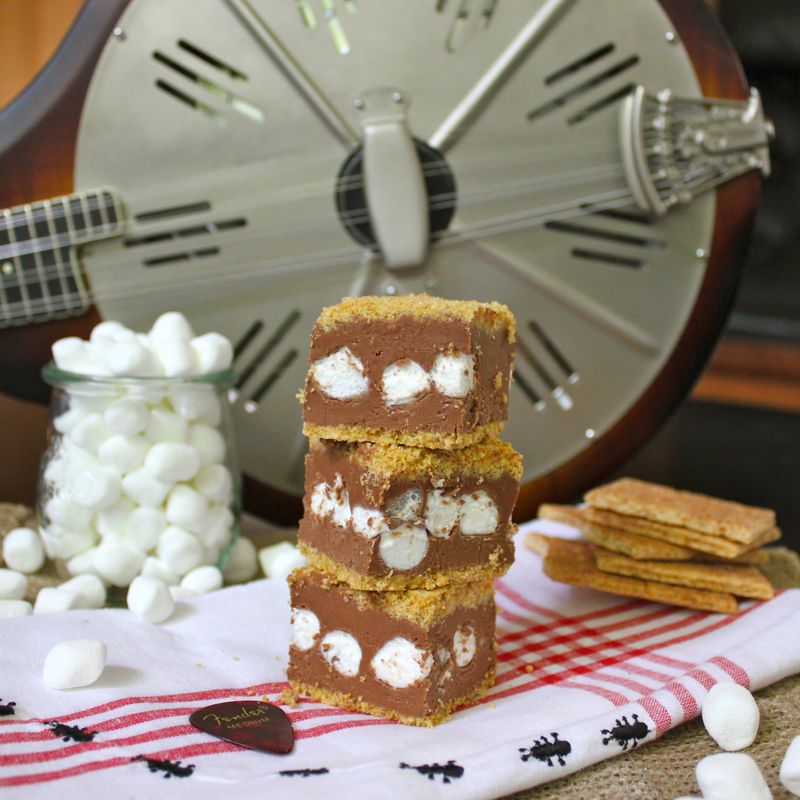
Woo wee! Would ya’ll just take a look at this fabulous S’mores Fudge I just whipped up!  Yup, what you’re seeing there is a rich decadent creamy chocolate fudge, surrounding fluffy mini marshmallows, all sandwiched between a buttery graham cracker crust. And you did read that title right…there’s booze in it! Marshmallow Vodka booze to be exact, which goes along just perfectly with the whole s’mores vibe. (Though I suspect Bourbon would be a good choice as well.) Why is it that I’m always reaching for that bottle of booze to give recipes that little something extra? Wait…don’t answer that. 🙂

IMG_8879

Anyhoo… This fudge was super easy to make and only required me to have the stove top on for 5 minutes and there was nary a bit of oven time need at all. As I’ve mentioned in past blogs, heating up the kitchen one fraction of a degree during these hot swampy Virginia summers is really frowned upon. So no-bake desserts are very popular around here right now. The only thing you might be left wondering at this point is what is the meaning of that “Festy Besty” bit in my recipe title. Well let me explain and also take a moment to plea for a favour.

IMG_8921

The Festy is this phenomenal 3 day camping music festival which takes place the 2nd weekend in October on the beautiful grounds of the Devils Backbone Brewery in Nelson Country Virginia (about 45 minutes away from Charlottesville). This event is the brain child of  The Infamous Stringdusters. The Stringdusters are a pop bluegrass, progressive bluegrass or newgrass band – take your pick of descriptors there. Basically  these incredibly talented musicians are schooled in traditional bluegrass which they are able to combine seamlessly with the improvisational skills and blistering solos of a consummate jam band. To hear a recording of them is delightful but let me tell you, seeing their enthusiastic and passionate performance live is a unforgetable experience to say the least! Every year, The Stringdusters hand-pick the line up of bands which will perform at the Festy in an attempt to display a wide range of musical genres, not just bluegrass. Yeah…you heard me. A music festival… held on the grounds of a brewery! And you don’t have to worry about driving anywhere after a full day of listening to a lineup of smoking hot bands, eating tasty grub and washing it all down with cold refreshing Devils Backbone brews. Nope cause you’ve got a tent pitched only a small bit away from the stages. Brilliant!  (And even more brilliant if you leave all that tent pitching work to the Show Sherpa. Sooooo worth it!) The husband and I went last year for the first time and that is all it took. We were hooked and have vowed not to miss any of the future Festys come what may! (I think there is supposed to be a vow which specifies something about hell and high water here…)

P1000460

I don’t know if I’ve mentioned it our not, but the husband and I are both musicians. I play mandolin and he plays pretty much anything with strings, but most recently has been seen with a banjo over his shoulder.

P1020842

We love to play bluegrass tunes as well as some Old Time and Americana songs. So we are really looking forward to the Festy this year because in addition to hearing all those great acts over the weekend, there are many impromptu jam sessions taking place back at the camp sites and everyone gets to join in. That is where this Festy Fudge comes in.

IMG_8937

When we are ready to take a break from picking, I will be ready to offer everyone some of that delicious Festy Besty S’mores Fudge. It will be just perfect, enough sugar to keep you going, a little booze to keep you loose and the wonderful campy S’mores vibe to boot. I mean what is camping without s’mores? And these little gems are coated with a graham cracker crust which will keep the melted chocolate off of your fingertips, and hopefully off of your strings, when the snacking is done and the playing resumes.

IMG_8829

The husband and I will definitely be in attendance at Festy 5 come this October. In fact, I even entered a photo contest which the Festy Experience is hosting. And I’m a finalist!!! Here is what I hope will be the winning pic:

festybesty

The winner gets free weekend camping and back stage passes. Oh my goodness! We would so love to win this. And this is where that favour I mentioned come into play. I’m going to have to ask you for some help. You see the winning photo will be chosen from the photo that gets the most votes. So….Please…pretty, pretty please with S’mores Fudge on top, please take a couple of minutes and cast a vote for our picture at this link: http://thefesty.com/festybesty-finalists-cast-vote-winner/ The deadline for voting is Sunday August 3rd, and thus far, I don’t really have a lot of votes compared to some. Help a girl out ya’ll! But regardless, even if you don’t do the “vote for people” thing, you should check out the Festy. Tickets are on sale and the lineup looks incredible. You don’t want to miss the raging good times to be had by all! If you are a bit too far away to take part in the Festy, make some of this stunning S’mores Fudge to console yourself. You won’t regret it and keep your fingers crossed for us to win!

IMG_8861

  • Servings: 16 pieces
  • Difficulty: easy
  • Print

recipe slightly adapted (I added the booze bit – go figure!) from: On Sugar Mountain

Ingredients: 

For the Graham Cracker Crust:

  • 1 1/2 cups graham cracker crumbs
  • 1/3 cup sugar
  • 6 Tablespoons melted butter

For the fudge:

  • 1 cup granulated sugar
  • 1 cup brown sugar
  • 1/2 cup butter
  • 3/4 cup heavy cream
  • pinch of salt
  • 1 (7 ounce) jar of marshmallow fluff
  • 1 (12 ounce) bag of semisweet chocolate chips
  • 3 -4 Tablespoons Marshmallow Vodka  (some folks would say this is optional. I don’t think so, but do as you will…)
  • 1 1/2 cups mini marshmallows

Directions:

Prepare the graham cracker crust. Line one 9 X 9″ square pan with aluminum foil. Combine graham cracker crumbs, sugar and melted butter in a medium bowl and stir until well combined. Press half of the graham cracker mixture evenly into the bottom of the pan. Set the remaining graham cracker mixture aside for the moment.

Make the Fudge. Add the sugars, butter, heavy cream and salt into a medium-sized , deep pot and bring to a boil Boil for five minutes, stirring occasionally. Remove from heat and using and electric mixer, beat in the marshmallow fluff. Next add the chocolate chips to the mixture and beat until the all of the chocolate has melted and the fudge is smooth. Add the Marshmallow Vodka to the mixture and continue to beat until combined.

Pour half of the fudge over the prepared graham cracker crust in the 9 X 9″ pan. Top with the mini marshmallows. Cover the mini marshmallow layer with the remaining chocolate fudge and smooth the top. Cover the top of the fudge with the remaining graham cracker mixture and press down gently. Cover the pan and place it into the refrigerator to set for at least four hours. Cut into squares and serve.

Enjoy!

Boozy S’mores Fudge Brought to you by: Runcible Eats (http://www.leaandjay.com )


Carne Asada Tacos

July 25, 2014

IMG_8573

Taco Time! And not just any old tacos, but mouth-wateringly delicious Steak Carne Asada Tacos. These were some of the best steak tacos I’ve ever eaten. And I swear, I’m not just saying that. The meat, which had been marinated overnight, and grilled to perfection thanks to the mad grilling skills of the husband, was very flavourful and truly tender. It practically melted in your mouth. And the toppings…Oh the toppings!

IMG_8543

There was the usual mexican cheese blend and sour cream to be sure, and I had just made up a batch of that stunning Zesty Black Bean & Grilled Corn Salsa that I told you about a couple of days ago. And although tasty perched on top of tortilla chips, that salsa really shone on top of these spicy tacos. And then I really turned up the heat by adding a bit of that Jalapeno/Cilantro Crema that I told you about a week or so ago. That was nothing short of spectacular! My taste buds were singing, let me tell you! Yup, exactly like I said…Best. Tacos. Ever.

IMG_8556

Carne Asada means grilled meat and traditionally steak is the meat of choice, usually a flank steak or skirt steak to be specific. Personally I love flat iron steaks and lucky for me (and the folks I was serving) flat iron was on sale at my local grocery store. So if you are making these tacos, or should I say, when you are making these tacos, once you have managed to choose the steak, the next step is to marinate it. I believe allowing the meat to sit overnight really gives that tangy marinade time to work its magic, but I suppose if you are really pressed you could call it quits after about 4 hours. And if you are not a fan of tacos, which I can’t imagine. I mean…what are you like?!!!  Everybody like tacos!

IMG_8577

This marinade will yield up a wonderfully flavourful steak that you can eat all on its own, cut up into chunks for skewers,  or slice thinly over a fresh green salad. Bottom line is, whatever you do, grill up some of this unbelievable Carne Asada Steak. You’ll be glad you did!

IMG_8553

Carne Asada Tacos

  • Servings: 4-6
  • Difficulty: easy
  • Print

recipe for marinade from: Plentytude

Ingredients:

  • 6 cloves garlic, minced
  • 1 large handful fresh cilantro leaves, minced
  • Juice of 3 limes and 1 orange
  • 1/2 cup olive oil
  • 1 tsp. cumin
  • 1 tsp. salt
  • A few turns of freshly cracked black pepper
  • a couple of dashes of cayenne pepper
  • 2 – 2 1/2 lbs. flat iron or flank steak
  • 12 taco sized (the smaller ones) flour or corn tortillas
  • taco toppings like: shredded Mexican Cheese, crumbled cotija cheese, zesty black bean & grilled corn salsa, fresh salsa, guacamole, Jalapeno/Cilantro Crema, fresh diced tomatoes, sour cream, fresh cilantro

Directions:

Combine garlic, cilantro, lime juice, orange juice, olive oil, cumin, salt, and pepper in a large bowl. Cover another bowl with a gallon-size plastic zip bag, and roll down the sides to cover the zipper area. Place steak in bag and pour marinade on top of steak. Close the bag securely, pressing out excess air, and massage the marinade thoroughly into the steak. Leave the bag in the refrigerator overnight.

Heat up a grill. Season each piece of meat with a few turns of freshly cracked sea salt and black pepper, and grill to desired doneness. Remove steak from heat and let rest for 5 minutes. Slice steak across the grain into thin slices and serve with tortillas and taco toppers of your choice.

Enjoy!

Carne Asada Tacos brought to you by:  Runcible Eats (http://www.leaandjay.com )


Zesty Black Bean & Grilled Corn Salad

July 22, 2014

IMG_8562

I’ve got a great Summer Salad recipe for you today. Zesty Black Bean & Grilled Corn Salad is just the perfect dish to enjoy on those hot and steamy days. Served cold it is wonderfully refreshing, and just bursting with fresh summer flavours. Not to mention, this baby has got a bit of a kick to it! With all of those jalapenos, cayenne peppers and red pepper flakes, your taste buds will sit up a take notice! Now I prefer to grill up some corn to use in this recipe. I know it is a bit of extra work, but it is so worth it. Corn is in season right now and there is an abundance of it at all of the local markets. Lovely fresh corn, spiced up with a marinade and fired over a grill just puts that frozen or canned corn to shame!

IMG_3808

This dish is very versatile and works great as a side salad, is very tasty over some greens as a Meatless Monday entrée or makes a delicious salsa served with tortilla chips. I most recently served it along with some Carne Asada Tacos (recipe soon to follow – stand by) and folks went wild! Definitely add this little gem to your summer recipe book of tricks!

IMG_8567

Zesty Black Bean & Grilled Corn Salad

recipe slightly adapted from: Bowl of Delicious

Ingredients:

  • 1/4 cup olive oil
  • 2 teaspoons honey
  • juice of 3 limes
  • 1/4 tsp cumin
  • pinch of cayenne pepper
  • pinch of red pepper flakes
  • salt and pepper to taste
  • 2 cans black beans, drained and rinsed
  • 2 cups of fresh grilled corn (scroll down for recipe)
  • 1 -2 jalapenos, diced fine
  • 1/2 red bell pepper, diced fine
  • 1/2 cup chopped fresh cilantro
  • 2 avocados, diced

Directions:

Prepare Spicy Grilled Corn as per the recipe below.

Whisk together olive oil, honey, lime juice, salt, pepper, cumin, red pepper flakes  and cayenne pepper in a large bowl.

Add black beans, grilled corn, jalapenos, red pepper cilantro and avocados to bowl. Toss gently to coat with dressing.

Refrigerate for at least 30 minutes prior to serving.

For the Spicy Grilled Corn:

Ingredients:

  • 3-4 ears of fresh corn in husk
  • 2 tablespoons olive oil
  • 2 tablespoons fresh lime juice
  • 2 cloves of garlic, finely chopped
  • 3/4 tsp Kosher salt
  • 1 tsp light brown sugar
  • ¼ tsp chili powder

Directions:

Combine olive oil, lime juice, garlic, salt, brown sugar and chili powder in small bowl and whisk together.
Preheat grill.
Peel back the corn husks, discarding all but a couple inner layers. Remove corn silk, then baste with dressing, and recover corn with remaining husk.
Grill on med-high for 20-25 minutes, turning 3-4 times during cooking time.
Remove the corn from grill and allow to cool a few minutes. Once it has cooled enough to handle, cut off stem end, place the flat cut end on bottom of large bowl, and use a corn zipper to strip the kernels from the cob. Or if you don’t have a zipper, run a small sharp knife down the length of the cob, slicing off kernels.

Enjoy!

Zesty Black Bean & Grilled Corn Salad brought to you by: Runcible Eats (http://www.leaandjay.com )


Bacon Wrapped Hot Dogs with Jalapeno/Cilantro Crema on Buttery Buns

July 18, 2014

IMG_8314

Summer grilling weather is happening as we speak. Temperatures have certainly soared to a level at which the thought of turning on the stove top, or heaven forbid the oven is ludicrous. Yup…I say don’t do a thing that would encourage that mercury to climb one fraction of an inch higher inside your house. Come supper time, send the husband out into the wilds of the backyard to grill up some meat. A favourite summer grilled entree around here is the humble yet very tasty hot dog. No fuss, no muss! And how in the world could a hot dog get any better? Well there is that bit where you can add some chili and cheese to arrive at the Chili Cheese Dog. Those are pretty special, but I think I’ve found something to add that might even surpass them. Are you ready for it? Wrap them in Bacon!

IMG_8334

Everything is better with bacon and hot dogs are no exception to that rule. I don’t know why I haven’t done this sooner, but I am so glad that I finally got around to it. The addition of a little strip of bacon makes those dogs seem so much fancier.

IMG_8327

And when you throw in some home-baked Buttery Hot Dog Buns (so much for keeping the oven off 🙂 ) and a delicious condiment like this Jalapeno/Cilantro Crema, the simple grilled dog has gone completely over the top…soaring to – dare I say it – gourmet heights! Now I knew that bacon wrapped hot dogs would be fantastic. And I must say, these Buttery Buns are perfection – rich, tender and soft, yet tough enough to stand up to not only a bacon wrapped dog but also all of the toppings you can heap on as well.

IMG_8328

But the big surprize was this Jalapeno/Cilantro Crema. I am completely head over heels in love with it. It hits your taste buds with a wonderfully fresh and spicy zing which is quickly followed with a smooth, cooling creaminess. I’m a bit out of control, putting it on everything. I just can’t get enough. I’ve probably whipped up my 4th batch at this point. Now I will warn you, it is spicy! So for those of you with tender tongues, go easy. You have been warned. But for those of you out there like the husband and myself, get ready for a new addiction. So what are you waiting for? Get that grill fired up and make some of these Bacon Wrapped Hot Dogs with Jalapeno/Cilantro Crema today.

IMG_8323

Bacon Wrapped Hot Dogs with Jalapeno/Cilantro Crema on Buttery Buns

  • Servings: 5-10
  • Difficulty: easy
  • Print

sources: Jalapeno/CilantroCrema sauce inspired by: Milk & Honey , Buttery Hot Dog Buns from: King Arthur Flour

Ingredients:

  • 10 hot dogs (your choice – but I love Hebrew Nationals or Nathans)
  • 10 strips of bacon (not thick cut)
  • 10 Homemade Buttery Hot Dog Buns (recipe below-or just use store-bought ones if your oven is entirely off-limits!)
  • Jalapeno/Cilantro Crema (recipe below)
  • Additional toppings such as: cheese, chopped white onion, mustard, ketchup, coleslaw

Directions:

Bake Buttery Hot Dog Buns (recipe will follow) and set aside to cool.

Prepare Jalapeno/Cilantro Crema (recipe will follow). Pour into squeeze bottle and place in fridge to cool.

Wrap each hot dog with a strip of bacon. You can secure each bacon end into the hot dog with a toothpick if you wish, but I didn’t and the bacon stayed put!  Cook each hot dog on a grill over a medium to low heat. Do not try to turn your dog too soon or the bacon will be more likely to stick to the grill. Gently rotate each bacon wrapped hot dog as they cook so that all sides can be cooked evenly. Remove from the grill when the bacon becomes crispy. 

To get those nice grill marks on your hot dog buns: Brush each side of hot dog rolls with melted butter and place on the grill for 15 -20 seconds before flipping to other side. Set aside and keep warm.

When ready to eat, grab a warm home-made bun, place a bacon wrapped dog in it, squeeze some of that delicious Jalapeno/Cilantro Crema over it and add whatever other toppings you desire!

For the Buttery Hot Dog Buns:

Ingredients:

  • 3 cups (361 grams) King Arthur Unbleached Flour
  • 2 1/2 teaspoons instant yeast
  • 3 tablespoons (35 grams) sugar
  • 1/4 cup (28 grams) nonfat dry milk
  • 1/4 cup (46 grams) potato flour or 1/2 cup instant mashed potato flakes
  • 1 1/4 teaspoons salt
  • 6 tablespoons (85 grams) soft unsalted butter
  • 1 cup (227 grams) lukewarm water

Directions:

Combine all of the ingredients, mixing then kneading to make a smooth dough. Let the dough rise, covered, until nearly doubled in bulk, about 1 hour.

Lightly grease a New England-style hotdog bun pan. (if you don’t have a hot dog pan – see below)

Gently deflate the dough, and stretch it until it’s about 15″ long and 6″ wide. Place the dough into the pan, stretching it to the edges.

Let the dough rise for 45 to 60 minutes, until it comes to within 1/2″ of the top of the pan. Towards the end of the rising time, preheat the oven to 350°F.

Grease a baking sheet, and place it on top of the risen buns.

Put the covered buns into the oven, weighing the baking sheet down with something heavy and oven-safe; a cast-iron skillet works well.

Bake the buns for 18 minutes, remove the weighted baking sheet, and bake for 2 to 5 minutes longer, if necessary, to brown the buns.

Remove the pan from the oven, and cool the buns in the pan for 5 minutes. Turn them out onto a rack, rounded side up, to cool completely.

Slice each bun down the middle vertically, without cutting through the bottom; then cut between the buns to separate them.

No Hot Dog Pan Option: To make regular (not New England-style) hotdog buns without a pan, divide the dough into 10 equal pieces and form each piece into a cylinder 6″ in length. Transfer buns to a parchment-lined baking sheet. Flatten the buns slightly (dough rises more in the center, so this will give them gently rounded tops), then allow to rise for 90 minutes. Bake in a preheated 350°F oven for 15 to 20 minutes.

For the Jalapeno/Cilantro Crema:

Ingredients:

  • 1/4 cup store-bought pickled sliced jalapenos
  • 1/4 cup pickled jalapeno brine
  • 1/2 cup coriander leaves, roughly chopped
  • 1/4 of a small white onion, roughly chopped
  • 2-3 Tablespoons sour cream
  • salt to taste

Directions:

Put all of the ingredients into a food processor and pulse until desired consistency is reached.

Enjoy!

Bacon Wrapped Hot Dogs with Jalapeno/Cilantro Crema on Buttery Buns brought to you by: Runcible Eats (http://www.leaandjay.com )


Caprese Quinoa Bake

July 15, 2014

IMG_7999

Swampy summer is in full swing here in Virginia. Some folks were talking about a polar vortex showing up to cool things off a bit, but it must have taken a detour because it definitely has not whirled itself anywhere near here yet! It is Oppressive out there! I think my friend’s little girl described it best when she stepped outside and said “Feels like dog breath in my face.” Yup. That is pretty much it. So big heavy meals aren’t particularly appealing to me now. Light and fresh is what is called for and I think I’ve found just the thing. This Caprese Quinoa Bake with its roasted cherry tomatoes, mozzarella cheese, fresh basil and balsamic vinegar drizzle practically screams summer. The good things about summer that is…not the dog breath things. I must admit, I’m a new comer to Quinoa (pronounced KEEN-wah). Sure I’ve seen it around and heard folks raving about it and could see it was quite the fad. But I was afraid it might be like kale (I. Hate. Kale.). You know, supposedly really good for you,but something you had to literally had to choke down, like cod liver oil. I avoided it and figured if I waited long enough, it would disappear from the group consciousness. But feeling a bit adventurous one day and desperately trying to find a new recipe for Meatless Monday, I decided to give it a go and I was quite pleasantly surprized by its fluffy texture and light and nutty taste. I really like it. Like I might like it more than rice. And come to find out, it not only tastes great but it is also really good for you. It has been grown in the Andes region as far back as 3,000 – 4,000 years ago. Technically it is not a grain, but a seed and is a closely related to spinach. This super food is gluten-free and protein packed, high in fiber, phosphorus and magnesium, a good source of calcium and has high levels of antioxidants and omega 3’s. Yay Quinoa! It is very easy to prepare and quite adaptable to a variety of dishes (quite a few more of which will be showing up here soon…what can I say? I’m smitten!) One thing you do want to remember is to rinse it before cooking. Quinoa naturally has a bitter coating on it. Most brands you purchase in the stores claim to be pre-washed, but just to be sure, place it in a fine mesh strainer and give it a 30 second shower before cooking.

IMG_8006

I can tell you not only will this dish be in high rotation this summer, but with all of it’s sweet, savoury fresh flavours, I think it will make it into the cooler months as well. It was a very satisfying meatless Monday main dish, would be equally brilliant as a side dish or if you found yourself catering for some serious carnivores it would also be quite tasty with the addition of some italian sausage or pancetta. (You definitely want to stay on the good side of those carnivores in my opinion. And it’s a bad idea to let them go hungry!) So don’t fear the Quinoa, embrace it. I’ve totally drank the kool aid and I’m not looking back!

IMG_8027

Caprese Quinoa Bake

  • Servings: 6-8
  • Difficulty: easy
  • Print

recipe from: Domesticate Me

Ingredients:

  • 1¼ cups uncooked quinoa, rinsed and drained
  • 2 cups petite Roma or cherry tomatoes, halved
  • 2 tablespoons extra virgin olive oil, divided
  • Kosher salt
  • Fresh ground pepper
  • 2 small shallots, minced
  • 3 cloves garlic, minced
  • ¼ cup packed basil leaves, thinly sliced
  • 4 ounces fresh part-skim mozzarella cheese, grated (about 1 cup of grated cheese)
  • 8 ounces fresh part-skim mozzarella cheese, sliced into 1/4–inch rounds
  • 2 beefsteak tomatoes, sliced into ¼-inch rounds
  • ¼ cup balsamic vinegar

Ingredients:

Pre-heat your oven to 400°F.
In a small pot, bring the quinoa and 1¾ cups plus 2 tablespoons water to a boil. Lower to a simmer and cook, covered, for 15 minutes until all of the water has been absorbed. Let the quinoa rest, covered, for 10 minutes. Fluff with a fork.
While the quinoa is cooking, place the halved tomatoes on a foil-lined baking sheet. Drizzle with 1 tablespoon olive oil and season with salt and fresh ground pepper. Transfer to the oven and roast for 10 minutes until they’re tender and the skins have started to burst.
Heat 1 tablespoon olive oil in a medium pan over medium heat. When hot, add the minced shallots and garlic. Cook for 2-3 minutes until the shallots have become translucent and the garlic is fragrant.
In a large bowl combine the quinoa, roasted tomatoes, cooked shallots and garlic, and basil. Stir in the grated mozzarella and season with salt and fresh ground pepper to taste.
Transfer the quinoa mixture to a large skillet and smooth the top. (A round, square or rectangular baking dish is also just fine.)
Starting in the center, overlap slices of tomatoes and mozzarella in a small circle. Make a second circle of overlapping tomatoes and mozzarella, covering the surface of the quinoa. (If you’re using a square or rectangular dish, just make two lines of overlapping tomatoes and mozzarella and call it a day.)
Cover the skillet loosely with foil and bake for 10 minutes. Remove the foil and bake for another 20 minutes until the cheese is bubbling and lightly browned.
While your quinoa bake is in the oven, place the balsamic vinegar in a small saucepan. Bring to a gentle boil and cook for 3-5 minutes until the vinegar becomes syrupy. Remove from the heat and set aside.
Sprinkle your quinoa bake with freshly sliced basil and drizzle with the balsamic reduction. Serve immediately.

Enjoy!

Caprese Quinoa Bake brought to you by: Runcible Eats (http://www.leaandjay.com )


Fluffernutter Parfaits topped with Candied Bacon and Mini Chocolate Chips

July 11, 2014

IMG_7934

Lord Have Mercy! Would you look at these irresistible little jars of veritable bliss! Silky Peanut Butter Mousse covered in fluffy marshmallow frosting and then topped with chopped candied bacon and all bundled up in an adorable and very portable little mason jar. Are. You. Kidding. Me. And…guess what guys? These little temptations are completely gluten and dairy free! What the what?!!

IMG_7978

So I just told you all about that unbelievable delectable Flourless Double Chocolate Cake that I made for the get-together my friend, who is gluten-free, was hosting. Turns out that cake was not only easy to make but was really delicious. It almost made me think for a second I could give up glutens (who am I kidding…truth be told I only thought about it for a quick moment what with my bread obsession.) Anyhoo…I was riding high on my gluten-free chocolate cake victory, but I might have done my celebratory dance (yes…I do have one) a bit too soon. Turns out my friend’s family is also dairy-free. That cake almost fit the double whammy gluten/dairy free bill. I had replaced the butter in it with coconut oil, so the cake was good to go. However, that chocolate ganache glaze had some cream in it. Wha-wha-wha…dairy-free failure! Not being one to turn away from a challenge, I set out to make a second dessert for the gathering that would be both gluten and dairy-free. Happily I found the recipe for these Fluffernutter Parfaits and they were just perfect, not only gluten and dairy-free but also wonderfully addictive. And did I mention they are topped with candied bacon?!! You just can’t go wrong with bacon.

IMG_7967

Now, I’ve got to let you in on a secret…I put some of the Fluffernutter Parfait on top of my Flourless Chocolate Cake and it was just nothing short of salty sweet perfection. Yup…I doubt I will ever make one of these desserts, without whipping up the other to go along with it. Deep, dark, rich chocolate and creamy, salty peanut butter. Get in my belly! Let the celebratory dancing begin in earnest!!!

IMG_7939

Fluffernutter Parfaits topped with Candied Bacon and Mini Chocolate Chips

  • Servings: four 1/2 pint jars
  • Difficulty: easy
  • Print

recipe from: The Bacon Princess

Ingredients:

For the Peanut Butter Mousse:

  • 1/2 can coconut cream, chilled
  • 4-5 tablespoons peanut butter
  • 3-4 tablespoons maple syrup
  • 2-3 tablespoons coconut oil, solid

For the Candied Bacon:

  • 3 slices bacon
  • 2-3 tablespoons brown sugar

For the Marshmallow topping:

  • 2 egg whites
  • 3 tablespoons brown sugar
  • 2 dashes cream of tartar
  • 1 teaspoon vanilla

Mini Chocolate Chips for topping

Directions:

In the bowl of your standing mixer, whip chilled coconut cream for about one minute.
Add peanut butter, maple syrup, and one tablespoon of coconut oil at a time, continuing to mix for about one more minute.
Once all ingredients are fully incorporated, portion out into individual pint jars for serving, remembering to leave room for the marshmallow topping. Place in the fridge to set.
Dice bacon and add to a medium-sized frying pan over low heat.
Cook on low for about 5 minutes.
When the bacon is almost done cooking, drain as much grease as you can and add the brown sugar.
Cook for 1-2 more minutes, or until sugar has been melted and bubbles up a bit.
Remove bacon to a plate lined with parchment paper, so the caramelized bacon doesn’t stick.
Let cool until you’re ready to garnish.
Fill a small saucepan with an inch or two of water, and bring to a boil.
In the bowl of your standing mixer or another bowl that fits inside the saucepan, add the egg whites, brown sugar, and cream of tartar.
Place the bowl over the saucepan of boiling water, making sure the bowl and water are not in direct contact.
Stir vigorously until all the sugar has been absorbed into the egg white. Make sure you start stirring immediately or you will end up with scrambled eggs!
Remove from stove and immediately bring to standing mixer.
Whip on high for about 3-4 minutes, or until mixture stands in stiff peaks.
Add marshmallow on top of mousse, using a piping bag if necessary.
Garnish with chopped candied bacon and mini chocolate chips.

Enjoy!

Fluffernutter Parfaits topped with Candied Bacon and Mini Chocolate Chips is brought to you by: Runcible Eats (http://www.leaandjay.com )


Flourless Double Chocolate Cake

July 8, 2014

IMG_7894

All you gluten-free folks out there lookie what I got here…a luscious Double Chocolate Cake with nary a gluten to be found! And it doesn’t only look pretty…no indeed, this cake delivers on taste as well. Bittersweet chocolate chips and Dutch Process cocoa are combined in the cake which is then topped with a bittersweet chocolate ganache glaze. The result is an incredible rich and deliciously decadent knockout of a dessert. And since this recipe is flour free, that means gluten-free folks can indulge without hesitation.

IMG_7900

Now you may be wondering how it is that I’ve suddenly come to be posting gluten-free recipes. I mean if you have followed my blog at all, you’ve surely noticed that the Runcible Kitchen is quite far from gluten-free…more like glutens-galore! (my husband says “It’s gluten-tootin!”) Recently I was fortunate enough to be invited over to a friend’s house for a little birthday celebration. I offered to bring the desserts and it wasn’t until after I’d offered that I remembered she was following a gluten-free diet for her Celiac Disease. She graciously told me not to worry about trying to make a gluten-free dessert, but I decided that it would be a great opportunity to find a delicious go-to gluten-free treat to keep in my recipe arsenal. Thank goodness for the folks over at King Arthur Flour, not only do I exclusively use their flours in all of my baking, but their website is chock-full of fabulous recipes and I was able to find this one in no time flat. This Double Chocolate Cake was really a winner. And I don’t mean that in a “oh, it was pretty good for a gluten-free cake” kind of a way. I mean this lush cake is really delectable. Glutens be damned! We don’t need no stinking glutens! Success!!!

IMG_7886

Flourless Double Chocolate Cake

  • Servings: 10-12
  • Difficulty: easy
  • Print

recipe slightly adapted from: King Arthur Flour

Ingredients:

For the Cake:

  • 1 cup semisweet or bittersweet chocolate chips
  • 1/2 cup (8 tablespoons) unsalted butter or substitute in 1/2 cup coconut oil for a dairy-free cake
  • 3/4 cup granulated sugar
  • 1/4 teaspoon salt
  • 1 to 2 teaspoons espresso powder, optional
  • 1 teaspoon Vanilla extract, optional
  • 3 large eggs
  • 1/2 cup unsweetened cocoa powder, Dutch-Process cocoa preferred

For the Glaze:

  • 1 cup semisweet or bittersweet chocolate chips
  • 1/2 cup heavy cream

To decorate:

Candy Stars, or Fresh berries or Toasted Almond slices -your choice!


Instructions:

Preheat the oven to 375°F. Lightly grease an 8″ round cake pan; cut a piece of parchment or waxed paper to fit, grease it, and lay it in the bottom of the pan.

To make the cake: Put the chocolate and butter in a microwave-safe bowl, and heat until the butter is melted and the chips are soft. Stir until the chips melt, reheating briefly if necessary. You can also do this over a burner set at very low heat. Transfer the melted chocolate/butter to a mixing bowl.

Stir in the sugar, salt, espresso powder, and vanilla. Espresso enhances chocolate’s flavor much as vanilla does; using 1 teaspoon will simply enhance the flavor, while 2 teaspoons will lend a hint of mocha to the cake.

Add the eggs, beating briefly until smooth. Add the cocoa powder, and mix just to combine.

Spoon the batter into the prepared pan.

Bake the cake for 25 minutes; the top will have formed a thin crust, and it should register at least 200°F on an instant-read thermometer inserted into its center.

Remove it from the oven, and cool it in the pan for 5 minutes.

Loosen the edges of the pan with a table knife or nylon spreader, and turn it out onto a serving plate. The top will now be on the bottom; that’s fine. Also, the edges will crumble a bit, which is also fine. Allow the cake to cool completely before glazing.

To make the glaze: Combine the chocolate and cream in a microwave-safe bowl, and heat until the cream is very hot, but not simmering. Remove from the microwave, and stir until the chocolate melts and the mixture is completely smooth.

Spoon the glaze over the cake, spreading it to drip over the sides a bit. Allow the glaze to set for several hours before serving the cake.

Enjoy!

Flourless Double Chocolate Cake brought to you by: Runcible Eats (http://www.leaandjay.com )


Jack Daniel’s Whiskey Mousse with Candied Bacon

July 3, 2014

IMG_8153

I know, I know….4th of July desserts are supposed to be all patriotic…all red white and blue and festooned with flags. With all the fresh strawberries and blueberries around this time of year, that is pretty easy. I mean I’ve done some fun some Independence Day classics in years past. There was my Strawberry, Blueberry and White Chocolate Mousse Tart for instance, so fresh and delicious and practically whistling Yankee Doodle Dandy!

IMG_7417

I started to go along that route again. But then I came across this recipe for Jack Daniel’s Whiskey Mousse with Candied Bacon and new I had found the dessert that folks attending my 4th of July festivities would be most excited by. Jack Daniel’s Old No. 7 Tennessee Sour Mash Whiskey is the highest selling American Whiskey in the World and has been distilled in good ole Lynchburg, Tennessee since 1866. Pretty good pedigree I’d say and definitely beloved among my crowd. So what could be better than the combination of the smooth smoky sweetness of that lovely elixer with rich, dark chocolate and heavy cream? But I won’t stop there, I will just continue… whipping it all up until it becomes a silky fluffy mousse which will then be topped with candied bacon! Have mercy!

IMG_8142

Let me tell you, folks will love these decadent little treats! A little bit of this dreamy concoction goes a long way, so I will serve mine in little chocolate dessert cups. I think it would also be fantastic if you were to serve it in rustic mason jars – but not the full pint size…Good Lord! Look more to a small 1/4 pint size or go with the whole whiskey theme and serve it in a shot glass. You can’t go wrong with this luscious indulgence. Get folks in just the right mood to celebrate Independence Day and whip up a tray of these boozy treats today!

IMG_8149

Jack Daniel's Whiskey Mousse with Candied Bacon

  • Servings: 4 Cups
  • Difficulty: easy
  • Print

source: Sweet Society

Ingredients:

For the Whiskey Mousse:

  • 4 oz (113g) semisweet or bittersweet chocolate
  • 2 Tablespoons (28g) unsalted butter
  • 2 Tablespoons (30g) coffee
  • 2 Tablespoons (28g) Jack Daniel’s Whiskey
  • 2 eggs (100g) separated
  • 4 Tablespoons (50g) granulated sugar
  • pinch of salt
  • 1/2 cup (120g) heavy whipping cream plus a bit extra to whip up as a topping if you choose
For the Candied Bacon:
  • 3 slices bacon
  • 2-3 tablespoons brown sugar

For Serving:

Directions:
 Fill a saucepan with an inch or so of water and bring to a simmer.

Use a double boiler, or place a heatproof bowl over the simmering water (making sure the bowl does not touch the water) and melt the chocolate, butter, and coffee together.
Remove from heat and stir in whiskey. Set this bowl aside.In a separate heatproof bowl, whisk the two egg yolks with 2 tbsp of sugar over the pan of simmering water.You will continue to whisk this mixture until it becomes foamy (cooking it just slightly).When foamy, whisk the egg-yolk mixture into the chocolate bowl. Set aside.With a stand mixer, or hand mixer, beat the egg whites with a pinch of salt, gradually adding 2 tbsp of sugar, until stiff peaks form.Fold the stiff egg whites gently into the chocolate/egg yolk mixture.Lastly, whip up the heavy cream until soft peaks form and then fold this into the chocolate mixture from the previous step.Pipe or spoon whiskey mousse into chocolate dessert cups, 4 oz. mason jars or shot glasses. Place into refrigerator to set while you are preparing candied bacon.
Line a plate with a sheet of parchment paper. In frying pan or on griddle, cook bacon until nearly done. Drain as much bacon grease from the pan as possible. Sprinkle brown sugar over bacon and let it cook until it melts and begins to bubble up. Remove bacon to parchment lined plate and let cool completely. Chop candied bacon into bite sized pieces.
When ready to serve, top whiskey mousse cups with a bit of whipped cream and candied bacon.
Enjoy!
Jack Daniel’s Whiskey Mousse brought to you by: Runcible Eats (http://www.leaandjay.com )


Lentil Sloppy Joes

July 1, 2014

IMG_8108

Yes indeed, the 4th of July is drawing ever closer and I’m sure you are finalizing the plans for all of your festivities for the day. But when you were planning out your menu, did you have a vegetarian option in mind? If not, perhaps you might be willing to consider these Lentil Sloppy Joes.

IMG_8039

This vegetarian rendition of that childhood favourite will have your guests jumping for joy. Hearty, spicy, and somewhat remniscent of baked beans, I’m telling you folks won’t be missing the meat at all. Now your hard core carnivores might disagree, but I’m sure you’ll have them sorted with some ribs, pulled pork, hot dogs or burgers. Meanwhile, the meatless crowd will be delighted while tucking in to these filling and very satisfying, protein packed sandwiches. The fresh avocado is wonderful as a topper adding both great flavour and texture.

IMG_8048


And if you are serving that lovely Carolina Style Pulled Pork I blogged about last week, you might have some coleslaw around, which would likely also be quite tasty perched atop this vegetarian creation. And while these are great in a summer cookout setting, they are so easy to make and delicious to boot, I’m sure we will be seeing them year round in our house!

IMG_8067


Lentil Sloppy Joes

  • Servings: 4-6
  • Difficulty: easy
  • Print

recipe slightly adapted from: Veggies By Candlelight

Ingredients:

  • 1 cup uncooked lentils (brown or green) .. soaked a few hours (or overnight) .. drained & rinsed
  • 4 cups Smithwick’s Ale (** if not using beer .. water,vegetable or beef broth are great options)
  • 1 Tbsp olive oil
  • 1 medium yellow onion, diced small
  • 1 red pepper, diced small
  • 2 cloves garlic, minced
  • 2 Tablespoons chili powder
  • 8 oz can tomato sauce
  • ¼ cup tomato paste
  • 2 Tablespoons maple syrup (if you prefer a sweeter sauce add one more tablespoon)
  • 1 Tablespoon yellow mustard
  • ½ 
teaspoon sea salt
  • ½ 
teaspoon black pepper (or to taste – we like it peppery so I added 1/2 teaspoon cayenne pepper as well)
  • Toppings of choice (Tabasco, pickles, onions, sauerkraut, coleslaw, avocado slices, etc .. )

Directions:

Put the lentils in a small sauce pot and pour in 4 cups beer or cooking liquid of your choice. Cover and bring to a boil. Once boiling, lower heat and simmer for about 20 minutes, until lentils are soft. Drain and set aside.
About 10 minutes before the lentils are done boiling, preheat a medium sized sauce pan over medium heat. Saute the onion and pepper in the oil, until softened.
Add the garlic and saute a minute more.
Add the cooked lentils, and the the rest of the spices (except the maple syrup & mustard). Stir gently until just combined.
Add the tomato sauce and tomato paste. Cook for about 10 minutes.
Add the maple syrup and mustard and heat through.
Turn the heat off and let sit for about 10 minutes, so that the flavors can meld.
Enjoy!

Lentil Sloppy Joes brought to you by: Runcible Eats (http://www.leaandjay.com )