Fireball Cider Cocktail

October 31, 2016

img_5168

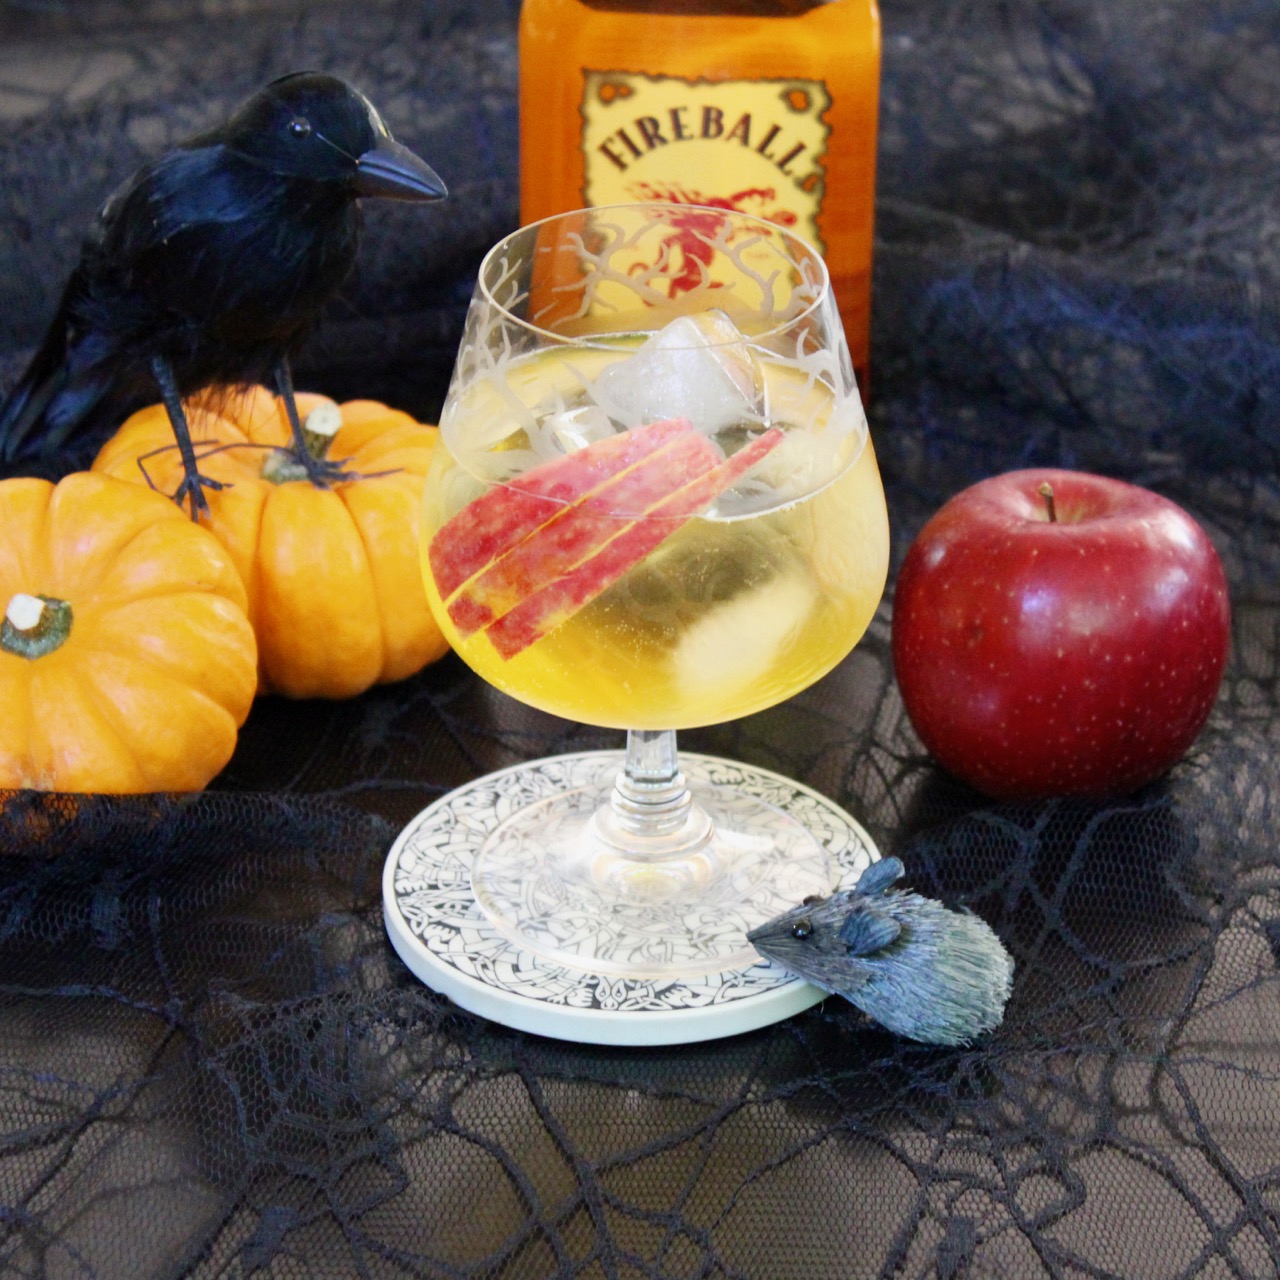
Happy Halloween ya’ll! I’m sitting here with cocktail in hand and candy at the ready! I thought you might also like to enjoy a lovely cocktail that is just bursting with Fall/Halloween flavors – The Fireball Cider Cocktail.

img_5176

It is made with Fireball Cinnamon Whiskey and hard apple cider with a few slices of apples thrown in cuz you want to make sure you’re eating healthy and all… It is delicious and packs quite a punch! You can serve it over ice or if it is going to be a really chilly Halloween where you are, this cocktail also tastes great when served warm. You know…think mulled wine…’cept better, with a fiery cinnamon punch to delight the taste buds. Have one or two (or so…) of these tipples to keep you warm on your wanders. Happy Hauntings!

img_5142

Fireball Cider Cocktail

  • Servings: one cocktail
  • Difficulty: easy
  • Print

recipe from: What’s Cooking America

Ingredients:

  • Ice Cubes (approximately 4 or 5 ice cubes)
  • 2 ounces Fireball Cinnamon Whiskey
  • 3 ounces hard apple cider
  • Apple slices

Directions:

Fill a glass (highball glass or white wine glass) 1/4 full with ice cubes.  You want to chill the drink and not water it down.  Pour in the Fireball Cinnamon Whiskey and then top with the apple cider. (If you chose to enjoy this drink warm, heat the cider and just before you are ready to serve, stir in the Fireball Cinnamon Whiskey. If you heat the whiskey too long you risk evaporating all of that lovely alcohol…)

Gently stir until mixed.  Garnish with apple slices.

Enjoy & Happy Halloween!

Fireball Cider Cocktails brought to you by: Runcible Eats (www.leaandjay.com)


White Chocolate Mummy Pretzels

October 27, 2016


img_5094

Oh ho ho! It’s getting close to my favorite holiday! No not Thanksgiving – not that I’m not thankful or anything…I am. But….I’m talking about Halloween! Whats not to like? You get to dress weird, drink booze and eat candy for dinner. In fact all of that fun stuff is encouraged. That is my kind of holiday! These White Chocolate Mummy Pretzels will be a welcome addition to all of your Halloween festivities. Quite tasty and maybe a bit more on the cute than scary side of things, they will prove to be very popular with all of the ghosts and ghouls your encounter on All Hallow’s Eve.

img_5106

Dogs can have white chocolate right?

Halloween actually has Celtic origins. Our modern Halloween celebrations are derived from the Celtic holiday of Samhain. Samhain was Celtic New Year. It was a harvest festival which marked the dying of the sun-god and a turning to the colder, dormant half of the year. On this night, the Celts believed the veil between the worlds of the living and the dead was at its lowest point. The dead could more easily travel back over to our side, and if we weren’t careful, we could accidentally wander over in to their world and be trapped-a good reason to stay close to home and bonfires, no doubt! This belief likely gave rise to our Halloween legends of ghosts, ghouls and witches wandering about on this night in particular. Oh and I shouldn’t forget mummies. Yup they’ll be about too.

img_5080

These treats are very easy to make. Just melt your chocolate in a double boiler. Use a spoon to pour chocolate over 3/4 of the pretzel rod. Tap the rod lightly against the side of the bowl to shake off any excess chocolate and then just add the eyes and bandages. I actually made it a bit harder on myself because I was convinced that I didn’t want to eat those candy eyeballs which come oh so conveniently in a pack from the store. No, I decided it would be a good idea to use and upside down white chocolate chip for the white of the mummy’s eyes and then add a mini M&M for the iris bit. Well, that required me to whittle the pointy bit off of 40 chocolate chips so that they would sit flat on the mummy’s face, then stick the M&M to the chip with a bit more melted chocolate and finally to draw the pupils onto the M&M with an edible marker. Yeah….store bought candy eyeballs would have probably worked just fine! Oh well, live and learn. And you can benefit with the knowledge of my travails. Though the M&M eyes are pretty cute, you gotta admit…

img_5101

White Chocolate Mummy Pretzels

  • Servings: 18 - 20 Mummy Pretzels
  • Difficulty: easy
  • Print

recipe from: Lets Dish Recipes

Ingredients:

  • 18-20 pretzel rods
  • 12 ounces white melting chocolate (such as Ghirardelli)
  • 40 white chocolate chips*
  • 40 mini M&Ms*

Directions:

Melt chocolate according to package directions. Dip pretzel rods into white chocolate, or use a spoon to coat, covering about 2/3 of the pretzel. Gently tap pretzel rod on the side of the bowl to remove excess chocolate.

Place two candy eyeballs on each pretzel rod (if they slip off, let the chocolate set for about a minute first). Place on waxed paper to set. Repeat with remaining pretzels. Or if you want to spend a bit more time fussing over them, place white chocolate chips upside down on the mummies for the whites of their eyes. You will likely need to whittle the pointy bit off of the top of the chip so that it sits flat.

Carefully spoon remaining chocolate into a pastry bag, zip-top bag or squeeze bottle. If using a bag, snip of a small corner. Drizzle white chocolate over the pretzels to form bandages, being careful not to cover the eyes, to resemble a mummy. If using mini M&M’s for eyes, squeeze one drop of chocolate on each M&M and stick it onto the white chocolate chips you placed earlier. Use an edible marker to add the pupil of each eye in the center of the M&Ms. Let white chocolate set completely before serving.

Enjoy!

*You can just use store bought candy eyeballs if you prefer.

White Chocolate Mummy Pretzels brought to you by: Runcible Eats (www.leaandjay.com)

Links to Useful Kitchen Tools & Ingredients for White Chocolate Mummy Pretzels:

Wilton Candy Eyeballs

Ghirardelli White Chocolate Melting Wafers

Still looking for additional spooky Halloween treats for your festivities? Take a look at some of my past Halloween offerings.

Yeasted Irish Barmbrack Bread (traditional Halloween/Samhain)

IMG_3482

Irish Tea Barmbrack with a Whiskey Honey Glaze (traditional Halloween/Samhain)

IMG_3499

Soul Cakes (Traditional Halloween/ Samhain)

IMG_8703

Halloween Cookies & Cream Owl Cupcakes

IMG_3534

Mini Mummy Brownie Bite Cupcakes

IMG_0006


Salty Bacon Bourbon Peanut Butter Cookies

October 14, 2016

img_4855

Sorry…Did someone say Bacon…Bourbon and Peanut Butter in one little cookie? And it is salted! Whaaaat?!! Can you do that? Yes indeed you can and that is just what I did here. These naughty boozy little cookies are completely amazing. With gooey peanut butter, smoky bacon, rich chocolate and silky smooth bourbon (Knob Creek is our favorite) all enhanced with a perfect sprinkling of flaky sea salt, how could they be anything other than oh so decadent and sinfully delicious! Wonderful with a glass of milk or maybe with another shot of bourbon for an indulgent nightcap.

img_4857

These cookies would be perfect for tailgating, a very welcome treat for any adult trick-or-treaters you might encounter and certainly keep these in mind when those Super Bowl parties fire up!

img_4845

Salty Bacon Bourbon Peanut Butter Cookies

  • Servings: 24 cookies
  • Difficulty: easy
  • Print

recipe slightly adapted from: The Endless Meal

Ingredients:

  • 1¼ cups all-purpose flour
  • ¼ teaspoon baking soda
  • ¼ teaspoon baking powder
  • ⅛ teaspoon ground cinnamon
  • ¼ teaspoon salt
  • 6 strips of bacon
  • 4 tablespoons unsalted butter, at room temperature
  • ½ cup natural peanut butter
  • ½ cup granulated sugar
  • ½ cup packed light brown sugar
  • 1 large egg
  • 2 tablespoons bourbon
  • ⅓ cup bittersweet or semisweet chocolate chips
  • Maldon Sea Salt for Sprinkling over top

Directions:

Preheat the oven to 350°F.

Combine the flour, baking soda, baking powder, cinnamon and salt in a large bowl. Whisk together.

Cook the bacon until crisp. Transfer to a paper towel lined plate. Reserve 2 tablespoons of the drippings and set aside to cool. Once cool, crumble the bacon, remove (eat) any chewy bits.

Beat the butter and reserved bacon drippings in a large bowl with a mixer on until smooth, about 1 minute. Beat in the peanut butter until combined, about 1 minute. Add the granulated and light brown sugar and mix until creamy, about 4 minutes. Add the egg and bourbon and beat until light and fluffy, about two more minutes.

Add the flour mixture in 2 additions, scraping down the bowl as needed, until just combined.

Stir in the crumbled bacon and chocolate chips

Form the dough into 1″ balls and place on a parchment lined cookie sheet. Sprinkle Maldon flaky sea salt over the dough balls. Place cookie sheet in refrigerator and let cookie dough rest overnight. If you are rushed for time, you can simply let the cookies chill in the fridge for 30 minutes, though I think an overnight rest results in a more flavorful cookie.*

Once you are ready to bake. Place cookie dough balls on a parchment lined baking tray 2″ apart. Bake for about 8 minutes for chewy cookies, 10 for crispier cookies.

Let the cookies cool 2 minutes on the baking sheets, then transfer to a rack to cool completely.

Enjoy!

* You can also freeze the cookie dough balls at this point. Once the dough is frozen you can remove it from the baking tray and store in a ziplock bag. When you are ready to treat yourself to a cookie or two (or so…) remove from freezer and bake as directed above, but add two minutes to the overall baking time.

Salty Bacon Bourbon Peanut Butter Cookies brought to you by: Runcible Eats (www.leaandjay.com)


Zucchini Tots

October 11, 2016

img_5036

Wait….wait! I’ve got another delicious zucchini recipe to share before zucchini season is over. Zucchini Tots! Crispy on the outside and oh so tender on the inside, whether you serve them as a side, appetizer or the main event, these little nuggets are unbelievably addictive. The husband says he likes them better than regular Tater Tots. Now me…I don’t think I can go that far. Nothing against these zucchini tots, which are spectacular, but I love me some potatoes. Don’t really care how you make ’em…mashed, baked, scalloped – but fried can’t be beat. I think I’d categorize these little zucchini gems as a totally different thing. I probably should have called them zucchini bites. That being said, I certainly feel more virtuous having eaten Zucchini Tots rather than Tater Tots, so there is that.

img_5047

Another great thing about these tots is that they are really easy and pretty quick to make. Just be sure you squeeze as much water out of the zucchini as you can before mixing it in with the other ingredients so that you can achieve ultimate crispiness. You see I love the crispy bit, that’s why I rolled these tots in a bit more panko before baking them. But you can skip the panko roll step if you aren’t that into crispy or simply can’t be bothered. No matter what, these Zucchini Tots will still knock your socks off – guaranteed!

img_5050

Zucchini Tots

  • Servings: 20 tots
  • Difficulty: easy
  • Print

recipe slightly adapted from: The Wimpy Vegetarian

Ingredients:

  • 2 -3 small zucchini, shredded (you should have about 2 cups worth)
  • 2 large eggs
  • ¼ cup small-diced yellow onion
  • ⅓ cup grated Asiago Cheese (feel free to use Parmesan, mozzarella, or even cheddar)
  • ¼ cup Panko (bread crumbs) plus 1 cup additional for coating tots
  • 8 oz. ricotta cheese
  • ½ teaspoon dried oregano
  • ½ teaspoon dried basil
  • ½ teaspoon kosher salt (or to taste)
  • ¼ teaspoon garlic powder

Directions:

Preheat the oven to 400˚ F, and line a baking sheet with parchment paper. Don’t use foil – the tots will stick to it like super-glue. Trust me. Place 1 cup of panko in shallow bowl and set aside.

Combine all of the ingredients together in a medium bowl using a large metal spoon.

Using a medium cookie scoop, scoop the zucchini mixture into mounds. Drop zucchini mixture into the middle of the panko bowl. Gently roll to cover will Panko and gently shape into a tater tot shape. Arrange on the parchment lined baking sheet.

Bake for 12 minutes, gently flip over, and bake for another 8-10 minutes, or until lightly browned.

Serve warm.

Enjoy!

Zucchini Tots brought to you by: Runcible Eats (www.leaandjay.com)

Links to Useful Kitchen Tools & Ingredients for Zucchini Tots:

Cuisinart Pro-Classic Food Processor

OXO Good Grips Medium Cookie Scoop


Caramelized Banana Upside Down Cake

October 5, 2016

img_4976

Who doesn’t like the heavenly combination of bananas and caramel? Well this gorgeous Caramelized Banana Upside Down Cake is blanketed with them! It is like Bananas Foster in cake form. So you know the topping is to die for, but the cake is pretty spectacular itself. It is incredibly moist and tender and would be delicious all on its own. But it isn’t alone at all. No indeed. It is topped with all of those sticky, buttery caramelized bananas. Sheer perfection I tell you!

img_4962

I made this cake for the Husband. I’ve told you how he just loves all fruit desserts. Well he definitely has a particular soft spot for bananas, so I knew he’d be over the moon for this cake. Lucky for me, it is very easy to whip together because I think it will end up being in high rotation on the dessert roster around here. I came across the recipe on the Broma Bakery blog, but did adapt it a bit. I added some spices and a bunch of rum because…well because how could I resist the delicious combo of bananas and rum? Yeah, I couldn’t. A little booze seems to make anything better, and this cake is no exception. A slice is lovely served solo but a scoop of ice cream or a dollop of whip cream never goes unwelcome.

img_4980

The cake is easy to make and comes together quickly. In a little over an hour you can have it on the table. My my my….irresistible looks and heavenly taste – you can’t go wrong with this treat. So if you have some unclaimed bananas hanging around, you know what to do!

img_4964

Caramelized Banana Upside Down Cake

  • Servings: one 9
  • Difficulty: easy
  • Print

recipe adapted from: Broma Bakery

Ingredients:

For the Caramelized topping:

  • 6 Tablespoons butter
  • 3/4 cup brown sugar
  • 1/2 teaspoon vanilla bean paste
  • 2 Tablespoons Dark Rum
  • 2 – 3 bananas, sliced

For the Cake:

  • 1 banana, mashed
  • 3 Tablespoons butter, melted
  • 1 egg, room temperature
  • 1/3 cup buttermilk
  • 1 Tablespoon Rum
  • 1/2 cup sugar
  • 1 teaspoon vanilla bean paste
  • 2 teaspoons baking powder
  • 1 teaspoon salt
  • 1/2 teaspoon cinnamon
  • 1/2 teaspoon freshly ground nutmeg
  • 1 cup all-purpose flour

Directions:

Preheat oven to 350° F. Grease a 9″ springform pan with butter. Line with parchment paper and butter the parchment paper as well. Line a baking sheet with aluminum foil or parchment and place springform pan on it.

Place the butter brown sugar and vanilla bean paste in a small sauce pan. Heat over low heat until the butter melts. Mix together well. Remove from heat and stir in the rum. Pour the sugar mixture into the bottom of the prepared  springform pan and spread it around evenly. Place the sliced bananas on top of the brown sugar in a circular pattern.

In a medium bowl, mix the baking powder, salt, cinnamon, nutmeg and flour. Set aside.

In the bowl of a stand mixer, place the mashed banana, melted butter, egg, buttermilk, rum, sugar and vanilla bean paste. Mix until combined.

Add the flour mixture to the banana/ buttermilk/ rum mixture and stir until just combined.

Spread the batter evenly over the top of the brown sugar & sliced bananas in the springform pan.

Place in the oven and bake for 40 minutes, or until the top has started to turn golden brown along the edges.

Remove from the oven and allow cake to cool on a wire rack for 10 – 15 minutes. Invert cake onto serving platter.

Serve with vanilla ice cream or perhaps a little whipped cream!

Enjoy!

Caramelized Banana Upside Down Cake brought to you by: Runcible Eats (www.leaandjay.com)

Links to Useful Kitchen Tools & Ingredients for Caramelized Banana Upside Down Cake:

Kitchen Aid Artisan Stand Mixer

Nielsen Massey Madagascar Bourbon Pure Vanilla Bean Paste

Kitchen Aid Classic 9″ Springform Pan

9″ Parchment Paper Liners