Sponge Cake with Cranberry Curd

February 14, 2020

IMG_8990

Happy Valentine’s Day! This year I made my Valentine this gorgeous light & airy sponge cake which is layered with cranberry curd and frosted with a delicate whipped cream. The Husband (who also happens to be my Valentine… come on! You know that isn’t always the case with all married folks out there….) generally doesn’t like any chocolatey super sweet sugar bombs that seem to be all the rage for this holiday.  Which is totally unlike me. That is exactly what I would want. Truth be told…in a the shape of a cupcake if all were going my way. Just saying…He, on the other hand, prefers fruit forward desserts such as this lovely Cashew Crusted Blackberry & Lime Tart:

IMG_1684

Or these Luscious Lemon Squares,

IMG_0490

And then there was that Poached Pear Tart with Lemony Cream.

IMG_9833

You see…being a good wife, I make him thing that I know he will enjoy the most. I do not bake cupcakes for him on Valentine’s Day…generally that is. You see one year I did manage to get away with it. He loves a good Gin & Tonic so I made him Pink Grapefruit Gin & Tonic Cupcakes:

img_5546

Pretty sly huh? This year I decided on this cake because of that Cranberry Curd. He does love cranberries. He raves about my Boozy Orange Cranberry Sauce which shows up at Thanksgiving every year.

IMG_6604

And was thrilled when I took some of that leftover Cranberry Sauce and made the cranberry butter to go on these Popovers:

IMG_6703

So I figured this cake was a pretty good bet. And luckily I was right!

IMG_9007

The sponge, being full of whipped egg whites, had a very delicate crumb and was light and fluffy. The cranberry curd was amazing – buttery and velvety with just the perfect amount of tartness to balance the sweet.

IMG_9020

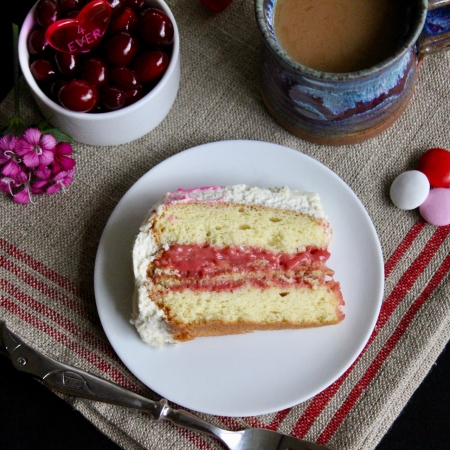
The one piece of advice I would give, having made the cake, is that if I were to make it again, I would forego slicing the cakes in half to make four layers. I would simply spread about 1/2 cup of the curd between the two layers of cake and be done with it. The cake is wonderfully delicate and the curd very heavy. I am not very good at splitting cake layers in half and I think the thinner delicate cake layers had a hard time holding up to the heavy curd. Not to mention, I wouldn’t mind having a bit of that curd left over to spread over toast and scones. Just saying… If you are great with splitting cake layers in half and want that impressive four layer appearance – proceed with the recipe as noted. However, if you might be a bit more like me….well….. you know what I’m saying!

IMG_8989

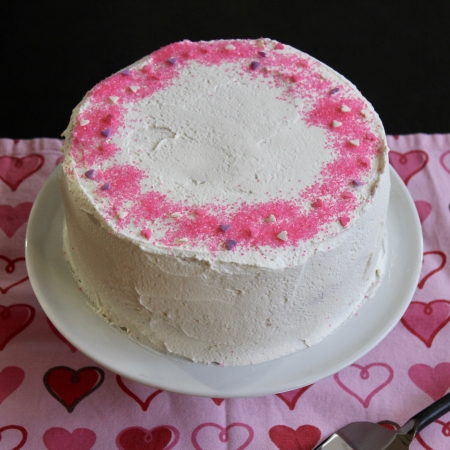
This cake would look great on your Thanksgiving or Christmas table as well, when fresh cranberries are plentiful. But believe me, it would be welcome by all year round. I must say, both the Husband and myself were well pleased with it! Happy Valentines Day!

IMG_9017

Sponge Cake with Cranberry Curd

  • Servings: one 8
  • Difficulty: easy - but several steps - perhaps make over a couple of days
  • Print

recipe from: King Arthur Flour

Ingredients:

For the curd:

  • 3 cups (298g/ 10 1/2 oz) fresh or frozen cranberries
  • 1 cup (198g/7 oz) granulated sugar
  • juice and grated rind (zest) of 1 orange
  • 1/8 teaspoon salt
  • 1 small sprig fresh rosemary, optional
  • 6 tablespoons (85g/3 oz) unsalted butter
  • 2 large eggs
  • 3 large egg yolks

For the Cake:

  • 6 large eggs, separated, at room temperature
  • 1 cup (198g/ 7 oz.) superfine sugar, divided
  • 2 teaspoons vanilla extract
  • 1/4 teaspoon salt
  • 1 cup (120g/4 1/4 oz) unbleached cake flour

For the Whipped Cream Frosting:

  • 2 cups (454 g/16 oz.) heavy cream
  • 1/4 cup (28g/1 oz) confectioners’ sugar
  • 1 teaspoon vanilla extract

For the Sugared Cranberries:

  • 3/4 cup (149g/5 1/4) granulated sugar
  • 1/2 cup (113g/4 oz) water
  • 1/2 cup (50g/1 3/4 oz.) fresh or frozen cranberries
  • superfine sugar, for rolling

Directions:

To make the curd: Place the cranberries, sugar, orange juice and zest, salt, and rosemary (if using) in a medium saucepan and bring to a boil over medium heat. Cook, stirring occasionally, until the berries pop and start to break down, abut 10 minutes.

Remove from the heat, remove and discard the rosemary sprig, and purée with an immersion blender or in a food processor. Strain the purée into a clean medium saucepan.

Whisk in the butter, eggs, and egg yolks. Cook over medium-low heat, stirring constantly, until the mixture thickens and coats the back of a spoon.

Remove the curd from the heat and transfer it to a bowl. Cover with plastic wrap that touches the surface, and refrigerate until cold.

To make the cake: Preheat the oven to 350°F. Grease your choice of two 8″ (at least 2″ deep) or 9″ round pans. Line the bottoms with parchment, then butter and flour the parchment.

Combine the egg yolks and 3/4 cup of the sugar in a large bowl. Using an electric mixer, beat on medium-high speed until the mixture becomes pale and thick, 3 to 5 minutes. Stir in the vanilla and salt.

In a clean bowl with a clean whisk attachment, beat the egg whites until soft peaks form. Gradually add the remaining 1/4 cup sugar, beating on medium-high speed until the whites are stiff and glossy, about 2 minutes. Fold the yolk mixture, one third at a time, into the whites.

Sift the flour over the mixture and fold gently until incorporated.

Divide the batter evenly between the pans. Bake for 20 to 25 minutes, until the edges just begin to pull away from the pan and the center springs back when lightly touched.

Remove the cakes from the oven and let cool in the pans on a rack for 5 minutes. After 5 minutes turn the layers out of the pans, peel off the paper, and return to the rack to finish cooling right side up.

To make the whipped cream: In a large mixing bowl, beat the heavy cream with the confectioners’ sugar and vanilla until stiff peaks form.

To make the sugared cranberries: Combine the sugar and water in a small saucepan and bring to a boil, cooking until the sugar dissolves. Add the cranberries and return to a boil; simmer for 1 minute.

Remove from the heat and, with a slotted spoon, take the cranberries out of the syrup and roll them in superfine (Baker’s Special) sugar until coated. Place on a rack to dry.

To assemble: Split the cake layers horizontally (see my comments above… basically I would go with a simple two layer cake, spreading 1/2 cup of the curd between the layers and reserving the rest for scones or toast) and place half of one on a serving plate. Spread with 1/2 cup cranberry curd.

Place the other half of the layer on top and spread with another 1/2 cup of curd. Repeat with half of the second layer. Top with the remaining curd and cake, then frost the top and sides with whipped cream. Garnish with the sugared cranberries. (optional)

Store the cake, covered in the refrigerator, for up to four days. Freeze for longer storage.

Enjoy!

Sponge Cake with Cranberry Curd brought to you by: Runcible Eats (www.leaandjay.com)

Links for helpful Kitchen Tools & Ingredients for Sponge Cake with Cranberry Curd:

Kitchen Aid Artisan Stand Mixer

Oxo Good Grips Stainless Steel Food Scale

Wilton Cake Leveler


Malted Nutella & Biscoff Brownie Torte

February 5, 2020

IMG_8725

So I gotta ask….are there any Nutella fans out there? Cause let me tell you I love me some Nutella! I actually didn’t even know it existed until I was living in Ireland and my friend Theresa had a jar. I watched with amazement as she spread it over her toast. I was like “What! You can eat chocolate on toast!” I had no idea it was a thing. Yup, love at first bite. And Biscoff? Well I first encountered those little Biscoff cookies when an air host handed me a packet for a snack when I was on a flight. I loved them. At first I thought maybe it was just because I didn’t have very high expectations for any snack given out on a flight, but then they magically appeared in grocery stores and I found that I also enjoyed them when I wasn’t a captive audience, shoehorned into a tiny uncomfortable little seat.

IMG_8727

When I found out that there was a cookie butter version that I could spread on toast, I cannot tell you how excited I was! This amazing treat that I’m going to tell you about today features both Nutella and Biscoff – both the cookies and the cookie butter AND it is not only malted but it is also salted!!! GET. OUT!!! So without further ado (insert drum roll here) – I present the magnificent Malted Nutella & Biscoff Brownie Torte! Just look at this big boy!

IMG_8798

This treat has got it all going on – Three – that’s right I said THREE – layers of oooey, gooey chocolatey brownies interspersed with malted Nutella & Biscoff-y goodness, all frosted with salted Biscoff frosting, further adorned with malted milk balls

IMG_8712

and Biscoff cookie crumbs

IMG_8807 and finally lightly sprinkled with Maldon sea salt flakes. Are you drooling yet? You should be!

IMG_8799

IMG_8741

It is not by chance that I’m blogging a recipe which features Nutella today. Today February 5th is World Nutella Day. This celebration of all things Nutella was started in 2007 by Sara at Ms. Adventures in Italy and Michelle at Bleeding Espresso as a day to celebrate, get creative with and most importantly, to EAT Nutella.

World_Nutella_Day_Final_m-300x207

A couple of years ago, the founders have transferred Nutella Day to Ferrero the companywho owns that most beloved spread. Take a peek at their Facebook page and see how folks are celebrating the day! I love Nutella so I usually try to participate with a Nutella laden recipe every year. One of my favorite Nutella creations was this Nutella, Double Chocolate & Banana Tart which was quite stunning if I do say so myself.

IMG_1065

Last year I gave you this gorgeous Nutella Star Bread:

IMG_7484

And there was the amazing Nutella Chocolate Chip Babka:

img_5446

And for quite a few years I was on a cookie streak. I made some Nutella Sea Salt Stuffies:

IMG_3782

And there were these irresistible Salted Peanut Butter & Nutella Sandwich Cookies – sweet salty bliss I tell you!

IMG_1115

I was still loving the salty / sweet thing when I blogged about  Salted & Malted Nutella Caramel Chocolate Chip Cookies. These cookies feature silky, decadent Nutella, creamy caramel, nostalgic malted goodness and rich chocolate chips, all rolled up together in a crunchy chewy salted cookie.

IMG_5106

Yeah quite obviously I have a malted, as well as a sweet salty flavor obsession. So it is easy to see why I chose this year’s Nutella Day offering: Malted Nutella & Biscoff Brownie Torte. This is undeniably one impressive looking cake!

IMG_8708

Needless to say, this decadent treat is truly rich. So slice it thinly and serve with whipped cream and maybe a tall glass of milk. There will be enough to feed an army I tell you!

IMG_8748

Although there are several steps, this amazing creation comes together quite easily. You can make up the various components over several days and then put them all together rather quickly right before whatever gathering at which you hoping to amaze folks with your baking prowess. So what are you waiting for? Step one – eat some Nutella. Step two –  eat even more Nutella while making this jaw-dropping indulgence! And have a Happy Nutella Day!

IMG_8776

Malted Nutella & Biscoff Brownie Torte

  • Servings: 0ne 8
  • Difficulty: easy - but several steps
  • Print

recipe from: Heather Baird of Sprinkle Bakes

Ingredients:

For the Brownie Layers;

  • 1 1/2 cups butter
  • 6 ounces unsweetened baker’s chocolate, chopped
  • 3 cups granulated sugar
  • 5 large eggs
  • 1 1/2 teaspoons vanilla extract
  • 2 cups all-purpose flour, sifted
  • 3/4 teaspoon salt
  • 1/2 tsp. baking soda

For the Malted Nutella & Biscoff Layers:

  • 6 cups powdered sugar, divided
  • 1 cup (about 9 oz.) Biscoff spread
  • 1 cup (about 9 oz.) Nutella spread
  • 1/2 cup malted milk powder
  • 1/2 cup butter, melted, divided
  • 1/4 cup heavy cream, divided

For the Salted Biscoff Frosting:

  • 1 cup unsalted butter, softened
  • 1 cup (about 9 oz.) Biscoff spread
  • 3 cups powdered sugar
  • 2-3 tablespoons milk or cream
  • 3/4 teaspoon fine grain sea salt

For the Nutella Frosting:

  • 1/2 cup butter, softened
  • 1 cup (about 9 oz.) Nutella spread
  • 1 cup powdered sugar, sifted
  • 1-2 tablespoons milk or cream

For Assembly:

  • 15 chocolate malt balls
  • 6 Biscoff cookies, pulverized
  • Maldon flake salt for garnish

Directions:

For the Brownie Layers:

Preheat the oven to 350°F.
In a medium saucepan over medium-low heat, melt butter and chocolate; stir until smooth. Transfer to a large bowl and whisk in sugar. Add eggs, one at a time, whisking well after each addition. Whisk in vanilla, flour, salt and baking soda.
Pour into three greased and floured 9-inch (or 8″) round baking pans. Bake for 23-25 minutes. Cool for 10 minutes in the pans; remove from pans to a wire rack to cool completely. Wrap in plastic wrap or store in air-tight containers until needed.

For the Malted Nutella & Biscoff Layers:

Line two round 9-inch (or 8″) pans with plastic wrap (the same ones used to make the brownie layers, if possible).

Biscoff Layer: Mix together 3 cups of the powdered sugar, 1 cup Biscoff and 4 tablespoons melted butter in a standing mixer fitted with the paddle attachment. Mixture will be crumbly. Add 2 to 3 tablespoons of cream 1 tablespoon at a time until the mixture becomes consistent workable dough. It should not be crumbly or stick to your fingers. The mixture should hold together easily when a small amount is squeezed tight in the palm of your hand. Press the dough evenly into one of the lined pans. Cover and chill for 30 minutes.

Malted Nutella Layer: Mix together 1 cup Nutella, malted milk and remaining 4 tablespoons melted butter in a standing mixer fitted with the paddle attachment. Add the 3 cups of confectioner’s sugar slowly. About 1/4 cup at a time, mixing until each addition is incorporated before adding the next. Mixture will be crumbly. Add 2 to 3 tablespoons of cream 1 tablespoon at a time until the mixture becomes consistent workable dough. It should not be crumbly or stick to your fingers. The mixture should hold together easily when a small amount is squeezed tight in the palm of your hand. Press the dough evenly into the remaining lined pan. Cover and chill for 30 minutes.

For the Salted Biscoff Frosting: Combine the butter and Biscoff in the bowl of an electric mixer fitted with the whip attachment. Beat until fluffy. Add the powdered sugar slowly, about 1/4 cup at a time, mixing until each addition is incorporated before adding the next. Add cream 1 tablespoon at a time until the mixture is thick and fluffy; add the salt and whip again. Scrape down the bowl and beat for 2 minutes longer, or until the salt is well dispersed throughout the batter.

For the Nutella Frosting: Beat the butter and Nutella in the bowl of an electric mixer fitted with the whip attachment. Beat until fluffy. Add the powdered sugar slowly – no more than 1/4 cup at a time, mixing until it is incorporated before adding the next 1/4 cup. Add cream 1 tablespoon at a time, if needed. Transfer the frosting to a large piping bag fitted with a large closed star piping tip.

For the Assembly: Place a brownie layer on a serving plate or cake stand. Turn out the Nutella candy layer on top of the brownie; top with another brownie layer. Turn out the Biscoff layer onto the brownie layer and top with the final brownie layer. Frost the entire cake with the salted Biscoff frosting, using an offset spatula to swirl the icing. Pipe 12 to 14 rosettes of Nutella frosting on the top edge of the cake. Garnish each with a malt ball. Place the cake on a baking sheet and gently toss pulverized cookies onto the bottom edge of the cake, allowing the excess to fall onto the baking sheet. Finally garnish the top of the cake with Maldon flake salt.

Store the cake covered at room temperature

Enjoy!

Links for helpful Kitchen Tools & Ingredients for Malted Nutella & Biscoff Brownie Torte:

Kitchen Aid Artisan Stand Mixer

Biscoff Cookie Butter Spread

Biscoff Cookies

Nutella Spread

Maldon Sea Salt Flakes

Premium Dark Chocolate Malt Balls – these look great, but truth be told I used Whoppers on my cake.

Sea Salt Sweet by Heather Baird – The recipe for Malted Nutella & Biscoff Brownie Torte is from the Sprinkle Bakes blog by Heather Baird. If you love that salty/sweet flavor combination like I do, you will love Heather’s “Sea Salt Sweet” cookbook. This book is a treasure trove of recipes for the salty sweet lover!


Fruit Filled Morning Buns

February 1, 2020

IMG_8700

Here it is…February already. And tomorrow, my favourite varmint, Punxsutawney Phil, will be stepping out of his burrow at Gobbler’s Knob and letting everyone know if there will be 6 more weeks of winter or if instead Spring is on the way. Now I think I can say with a fair amount of confidence, and much to my dismay, Spring is already here. There has really been no Winter to speak of this year. Total snow free zone! Given that, I must say I’m hoping that the little Punxsutawney critter sees his shadow!

1-2-1ED9-25-ExplorePAHistory-a0n1g5-a_349

One extraordinary rodent!

Phil & all the folks up in Punxsutawney aren’t the only ones celebrating now. February 1st, which falls half way between Winter Solstice and Spring Equinox, also marks the festivals of Imbolc, St. Brigid’s Day and Candlemas, all of which are associated with fertility, fire, purification and weather divination. Quite an auspicious time of year! I’m very happy to be marking an event today as well. February 1st just happens to be the 9th year anniversary of  the my cooking blog! Yup… Nine years ago today I posted my first recipe. It was for Cream Tea Scones with Currants.

IMG_4970

I’ve done an anniversary post nearly every year since.  One of my favorite recipes that I shared was: Model Bakery’s English Muffins:

IMG_3611

Some of my other anniversary edition recipes are the completely decadent  Banana Rum Muffins:

IMG_0395

That jaw-dropping, over the top Crack Pie:

IMG_0908

And who can forget that magical “caviar of the South” –  Pasture’s Pimento Cheese:

img_5289

Last year, I shared a recipe for English Muffin Toasting Bread, which is ridiculously easy to make and superb for toasting – just like a craggy English Muffin – but without all the work.

img_7261

This year’s recipe, Fruit Filled Morning Buns, wasn’t as easy a recipe to pull off, but oh my stars was it worth it!

IMG_8664

These delightful little devils are made with a yeasty dough, layered with butter, caramelized sugar, cinnamon and gooey chocolatey raspberry jam! And as if that weren’t enough, as soon as you pop them out of the oven you roll them in a bit more sugar. Breakfast bliss I tell you!

IMG_8630

I should say here that you can use whatever your favorite preserves happen to be or even leave the jam part out all together. I had just made up a batch of scrumptious chocolate raspberry jam for Christmas, so I decided to go with that. I chose to spread a thin layer of jam over the dough before rolling it up, however you can also just spread the butter/sugar mixture over the dough and add a dollop of jam on top of the bun prior to baking.

IMG_8691

These treats were definitely worth the effort, but there was without a doubt, effort going on. You see, these buns are made with Baker’s Croissant Dough. This type of dough is a yeasted laminated dough. Basically you mix up a yeasted dough, roll it out and place a layer of butter on top of it. You then enclose the butter within the dough and proceed to roll it out and fold it over and over again. This creates a dough which has multiple alternating layers of dough and butter. The butter evaporates when baked and that is what forms all those lovely flaky layers in a croissant or in this case – a morning bun.

IMG_8651

I guess this doesn’t sound terribly difficult, but there are quite a few steps involved, a lot of rolling out dough and an overnight refrigeration to complete before you can even begin to assemble the morning buns.

IMG_8635

Again – totally worth it. Labor of love and all that stuff. No regrets. But I do want you to know what you’re getting into and allow enough time.

IMG_8642


And some great news is that the recipe for the Baker’s Croissant Dough is double what you need for the Morning Buns. So you can freeze the other half and be ahead of the game next time whether you’re making more Morning Buns or trying your hand at homemade croissants! That time saver for next time is most definitely a “win”!

IMG_8679


But not to get ahead of myself talking about the next thing you are going to bake. Stay in the moment – which will be oh so memorable once these little gems come out of the oven and you’ve had your first nibble. Crispy on the outside, soft, tender and flaky on the inside with an enchanting caramelized chewy bottom. Just Brilliant! Happy Blog-a-versary to me!

IMG_8693

Fruit Filled Morning Buns

  • Servings: 2 Dozen Buns
  • Difficulty: moderate - need to make laminated yeast dough, which requires overnight rest before you can begin to assemble morning buns which require 1 - 1 1/2 hr. rise
  • Print

recipe from: King Arthur Flour – Morning Buns & Bakers Croissant Dough

Ingredients:

For the Pastry:

  • 1/2 recipe Baker’s Croissant Dough (recipe detailed below)

For the Filling:

  • 1/4 cup (50g) granulated sugar plus more for coating the pan
  • 1 tablespoon viennese cinnamon
  • 1 teaspoon grated orange rind (zest)
  • 4 tablespoons (57g) unsalted butter, melted
  • 1/4 cup (53g) packed brown sugar
  • 1/2 cup (170g) fruit preserves, of your choice, optional

Directions:

Generously butter the wells of a 12-cup muffin pan. Spoon a teaspoon of granulated sugar into each of the wells, then tap the pan in all directions to coat the insides. Turn the pan over and lightly tap out any excess.

To make the filling: Combine the sugars, cinnamon, and orange zest, stirring well with a fork to distribute the zest.

To assemble: Roll the dough to an 18″ x 8″ rectangle.

Brush the rectangle with melted butter. Spread a thin layer of jam over the dough if you are using. Sprinkle the dough generously with the sugar mixture and go over it lightly with a rolling pin to press it into the butter/jam. Roll the dough up from the long edge into a tight cylinder. Cut into 1 1/2″ slices. Place the slices, cut side up, in the wells of the prepared pan.

Let the buns rise for 1 to 1 1/2 hours in a room no warmer than 75°F (any warmer and the butter may begin to leak out). The buns should increase to one and a half to two times their original size. Toward the end of the rising time, preheat the oven to 375°F.

If desired, just before baking, butter the back of a spoon and press down on the center of the buns. Place 2 teaspoons of the preserves in the indentation.

Place the pan on a parchment-lined baking sheet and bake for 40 to 45 minutes, until the buns are deep golden brown.

Place a cooling rack over a piece of parchment. Remove the buns from the oven and immediately (and carefully) transfer them out of the pan onto the rack. If desired, roll the warm buns in granulated sugar and sprinkle the tops once more. Let cool slightly and eat warm or at room temperature.

Store, lightly covered, at room temperature for up to two days; freeze for longer storage.

Baker’s Croissants Dough

Ingredients:

For the dough:

  • 2 large eggs + enough warm water to make 2 cups (454g) of liquid
  • 1/4 cup (50g) sugar, divided
  • 5 1/2 to 6 cups (659g to 723g) All purpose Flour
  • 2 1/4 teaspoon instant yeast
  • 2 tablespoons (28g) butter, melted
  • 1/2 cup (71g) Bakers Special Dry Milk or nonfat dry milk, optional
  • 1 scant tablespoon salt
  • 1 teaspoon vanilla extract (optional; for sweet pastry)

For the Butter:

  • 1 7/8 cups (425g) unsalted butter, cool to the touch
  • 3/4 teaspoon salt
  • 1/2 cup (60g) All purpose flour

Directions:

For the dough: Put the eggs and water in a large mixing bowl. Add 1 tablespoon of the sugar, 3 cups (362g) of the flour, and the yeast. Mix until well blended; set aside to let the sponge work.

For the butter: Cut the butter into 1˝ chunks and combine with the salt and flour at low speed in a stand mixer just until smooth, with no lumps. Be careful not to beat too much; you don’t want to incorporate any air.

Spread the butter on a piece of plastic wrap and shape into an 8˝ square. Wrap and refrigerate for 30 minutes.

Finish the dough: Add the melted butter to the sponge. Whisk together the remaining sugar, 2 1/2 cups (298g) of the flour, the dry milk, and salt and add to the sponge. Mix until the dough forms. Knead for 5 minutes; touch the dough lightly with your finger. If it’s still sticky, add the remaining flour 2 tablespoons at a time until the dough is the desired consistency. Once the dough is smooth and elastic, pat it into a 9˝ square, then wrap and refrigerate for 30 minutes.

Laminate the dough: Remove the chilled dough from the refrigerator and gently roll it to a 12″ square.

Unwrap the butter square and place it in the center of the dough at a 45° angle, so it looks like a diamond in a square. Pull the corners of the dough into the center of the butter diamond. Moisten the edges with a little water and pinch the seams together well to enclose the butter. Dust the top with flour and turn the packet over.

Tap the dough all over with a rolling pin, encouraging it into a rectangular shape. Once it’s pliable, roll it to a 20˝ x 10˝ rectangle, picking it up and dusting lightly with flour as needed.

When you’ve reached the proper size, use a dry brush to sweep off any excess flour and fold the dough in thirds, like a business letter. Take care to keep the edges straight and line them up directly over each other. If the dough slides around, use a little water at the corners to tack them in place. This is your first turn.

Rotate the dough out so it looks like a book about to be opened. Roll the dough out once more to 20˝ x 10˝ and fold it as before. This is the second turn. Wrap the dough and refrigerate it for 30 minutes to allow the gluten in the dough to relax.

Give the dough two more turns after its rest, then wrap the dough well and refrigerate for at least 1 hour or overnight before using. You can also freeze the dough at this point.

Enjoy!

Fruit Filled Morning Buns brought to you by: Runcible Eats (www.leaandjay.com)

Useful links for Kitchen Tools & Ingredients for Fruit Filled Morning Buns:

Oxo Good Grips Stainless Steel Food Scale

Kitchen Aid Artisan Series 5 Qt. Stand Mixer

SAF Instant Yeast

Thermapen Instant Read Thermometer by Thermoworks

Whole Milk Powder or here from King Arthur

Dough Rolling Mat

Wilton 12 – well Cupcake/Muffin Pan