Mimosa Butter Sweetheart Cookies

February 12, 2021

So are ya’ll thinking about Valentine’s Day yet? I was way ahead of the game this year, that is for me anyway! May I present my Valentine’s Day treats – Mimosa Butter Sweetheart Cookies! What we got here is a crisp and light butter cookie which has been jazzed up with the addition of some champagne, orange juice and the perfect dollop of decadent chocolate raspberry jam. These little devils are addictive! And if you make them, it forces you to open a bottle of champagne and once it is open…you absolutely have to finish it. Hurray! Mimosas all around!

The Husband, who conveniently also happens to be my Valentine, generally doesn’t like any chocolatey super sweet sugar bombs that seem to be all the rage for this holiday.  Which is totally unlike me. That is exactly what I would want. Truth be told…in a the shape of a cupcake if all were going my way. Just saying…He, on the other hand, prefers fruit forward desserts such as this lovely Cashew Crusted Blackberry & Lime Tart:

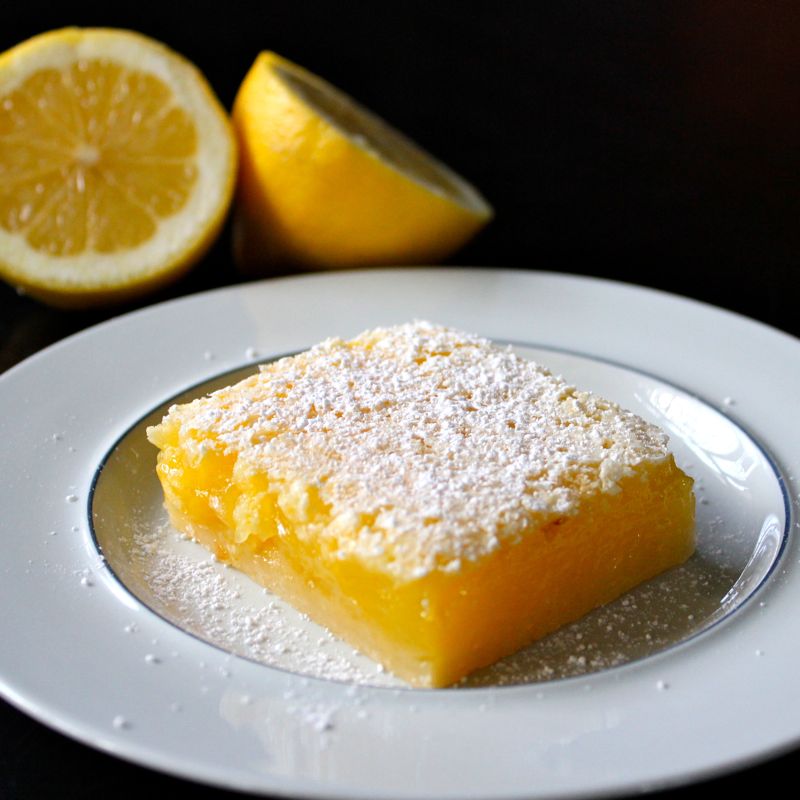
Or these Luscious Lemon Squares,

And then there was that Poached Pear Tart with Lemony Cream.

One year, I was even clever enough to combine what he loves, a good Gin & Tonic, and what I love, cupcakes by making  Pink Grapefruit Gin & Tonic Cupcakes:

This year’s offering, Mimosa Butter Sweetheart Cookies, was pretty sly on my part as well. I really like cookies and was able to not only add some of his favorite jam into the mix with these, but was also able to get some champagne on deck.

The Husband and I do love our champagne! Though truth be told, when we first started dating, he told me he didn’t like champagne. I tell you, it stopped me in my tracks! I was pondering whether or not it was a deal breaker. Turns out, he had only ever had cheap champagne. When he got a taste of the good stuff, he realized his mistake. Whew! What a relief!

So Happy Valentine’s Day everyone! Crack open a bottle of champagne (the good stuff) and whip up a batch of these delightful little Valentine’s Day nibbles. Rich and buttery, crisp and citrus-y with just the right amount of chocolate raspberry zing, they go great with a cup of tea or a glass of the bubbly! You won’t be sorry!

Mimosa Butter Sweetheart Cookies

  • Servings: approximately 3 dozen
  • Difficulty: easy
  • Print

recipe from: Taste of Home: Mimosa Butter Cookies + inspiration from their Sweetheart Cookies

Ingredients:

  • 1 cup unsalted butter, softened
  • 1-1/4 cups confectioners’ sugar
  • 2 teaspoons grated orange zest
  • 1 teaspoon salt
  • 1/4 cup orange juice
  • 1/4 cup champagne
  • 2-1/2 cups all-purpose flour
  • 3 – 4 Tablespoons of Jam ( I used homemade Chocolate Raspberry Jam)

Directions:

Preheat oven to 350°. In a large bowl, cream butter, confectioner’s sugar, orange zest and salt until light and fluffy, 5-7 minutes.

Mix juice and champagne together.

Add flour to creamed mixture alternately with juice mixture, beating until just combined after each addition.

Transfer cookie dough to a pastry bag fitted with a star tip. Pipe 2-in. circles, 2 in. apart onto parchment-lined baking sheet.

Using the rounded end of a spoon or spatula, make small indentations in the center of each cookie.

Fill with about 1/8 teaspoon of your favorite jam.

Bake until edges are just starting to brown, 10-12 minutes. Cool on pan 5 minutes. Remove to wire racks to cool.

Enjoy!

Links for helpful Kitchen Tools & Ingredients for Mimosa Butter Sweetheart Cookies:

Kitchen Aid Artisan Stand Mixer

Ateco Disposable Decorating Bags

Prepworks Pocket Zester


Homemade Banana Filled Toaster Tarts with Nutella Frosting

February 5, 2021

Whoa! Homemade Banana Toaster Tarts with Nutella Frosting? Get out! Yet here they are. Fresh from the oven. And although I look back fondly on those legendary store-bought breakfast pastries of my youth – this has got them beaten hands down! The crust is buttery and flaky perfection. Not anything like I remember from childhood. And I stuffed all of that gorgeous crust full of this amazing Banana Jam. That’s right…Banana. Jam. I had no idea Banana Jam even existed! But it does and I am so delighted with it.

And as if that wasn’t enough, these little darlings are heavily drizzled with a luscious Nutella frosting. O.M.G. So I gotta ask….are there any Nutella fans out there? Cause let me tell you I love me some Nutella! I actually didn’t even know it existed until I was living in Ireland and my friend Theresa had a jar. I watched with amazement as she spread it over her toast. I was like “What! You can eat chocolate on toast!” I had no idea it was a thing. Yup, love at first bite. And putting two great tastes like Banana & Nutella together is a no brainer for sure.

It is not by chance that I’m blogging a recipe which features Nutella today. Today February 5th is World Nutella Day. This celebration of all things Nutella was started in 2007 by Sara at Ms. Adventures in Italy and Michelle at Bleeding Espresso as a day to celebrate, get creative with and most importantly, to EAT Nutella.

A couple of years ago, the founders have transferred Nutella Day to Ferrero the companywho owns that most beloved spread. Take a peek at their Facebook page and see how folks are celebrating the day! I love Nutella so I usually try to participate with a Nutella laden recipe every year. One of my favorite Nutella creations was this Nutella, Double Chocolate & Banana Tart which was quite stunning if I do say so myself.

Last year I baked this big ole Malted Nutella & Biscoff Brownie Torte 

Then there was this gorgeous Nutella Star Bread:

And some amazing Nutella Chocolate Chip Babka:

And I don’t want to forget these irresistible Salted Peanut Butter & Nutella Sandwich Cookies – sweet salty bliss I tell you!

But let me get back to my featured recipe today: Banana Filled Toaster Tarts with Nutella Frosting. The Husband and I were pretty much rendered speechless at first bite.OMG! Seriously – you will be in Pop Tart heaven! The pastry is to die for. It just melts in your mouth. The ooey-gooey Banana Jam is completely out of this world and that Nutella Drizzle is just sheer perfection! I especially love that this Nutella frosting is a bit like royal frosting, in that it sets up after a few hours. So you can actually stack these Toaster Tarts for storage – as if you will have any left to store after your first bite!

This recipe is pretty easy to make. It does have a lot of steps, but they are worth it. I have included a link at the end of the recipe for an informative video by King Arthur Flour featuring Chef Joanne Chang of Flour Bakery. I highly recommend that you watch it before making the pastry crust. She demonstrates the frissage technique which will prevent you from overworking the dough and will result in those lovely flaky layers of pastry.

I also love this recipe because it is very customizable. Switch up the filling to cinnamon sugar or use any of your favorite jams if banana isn’t your thing. Let your imagination run wild! Whatever you choose, it will undoubtedly elevate the meager Pop Tart. Now don’t get me wrong, I certainly ate my fair share of Pop Tarts when I was a kid. I loved the cinnamon sugar variety and of course the Chocolate Fudge Frosted ones. The Husband and I even currently have a box of Pop Tarts on the top shelf in one of the kitchen cabinets. Though truth be told, they’ve been there untouched for about 12 years now. We call them the Apocalypse Tarts or Pop Tarts of Doom, because it would take that sort of a situation for us to be at all interested in eating them. I guess it is somewhat comforting to know that they are there. But believe me, I predict my Home-made version will not last through the day!

Come to think about it, those tarts from our childhood were not actually very tasty at all, by our grown self’s standards. The crust was kind of cardboard-y and the frosting a tad on the plastic side. Yet you can’t help but look back on them fondly. So these homemade Toaster Tarts will with their tender buttery crust, decadent banana filling and indulgent Nutella topping will put you completely over the moon. Time to enjoy some absolutely deliciously elevated childhood nostalgia. Happy Nutella Day everyone!

Homemade Banana Toaster Tarts with Nutella Frosting

  • Servings: 9
  • Difficulty: easy
  • Print

recipe slightly adapted from: King Arthur Flour Nutella Frosting from: Sally’s Baking Addiction

Ingredients:

For the Crust:

  • 2 cups (241 grams) All purpose Flour
  • 1 tablespoon (11 grams) sugar
  • 1 teaspoon salt
  • 16 tablespoons (227 grams) unsalted butter, cold, cut into pats
  • 1 large egg
  • 2 tablespoons (28 grams) milk

For the Filling:

  • 8 ounces of Banana Jam (info on where to buy it in links below or substitute in the jam of your choosing)
  • 1 Tablespoon Corn Starch
  • 1 Tablespoon Cold Water

Alternative Filling:

  • 1/2 cup (106g) brown sugar, packed
  • 4 teaspoons all purpose flour
  • 1 1/2 teaspoons cinnamon

1 egg, beaten – to brush over pastry before filling

For the Frosting:

  • 1 cups (120 grams) confectioners’ sugar
  • 2 Tablespoons + 2 teaspoons (50 grams) Nutella
  • 2 Tablespoons (30 ml) heavy cream or milk
  • 1 teaspoon pure vanilla extract
  • pinch salt

Directions:

For the dough:

Whisk together the flour, sugar, and salt. Work in the butter until the mixture holds together when you squeeze it, with pecan-sized lumps of butter still visible. Mix the egg and milk, and add it to the dough, mixing just until everything is cohesive.

Divide the dough in half. Shape each half into a rough 3″ x 5″ rectangle, smoothing the edges. Wrap in plastic or waxed paper, and refrigerate for 30 minutes; this will relax the gluten and firm up the dough a bit, making it easier to roll. You can also refrigerate the dough for up to 2 days; let it rest for 15 to 20 minutes at room temperature before you roll it out.

For the Filling:

Combine 3/4 cup (8 ounces) Banana jam (or jam of your choice) with 1 tablespoon cornstarch mixed with 1 tablespoon cold water. Bring the mixture to a boil and simmer, stirring, for 2 minutes. Remove from the heat, and set aside to cool. Use to fill the pastry tarts.

For the cinnamon sugar filling:

Whisk together the brown sugar, flour, and cinnamon.

Assembling the pastries:

Place one piece of the dough on a generously floured work surface, and roll it into a rectangle about 1/8″ thick, large enough that you can trim it to an even 9″ x 12″. Trim off the edges and set aside to use later. Place the 9″ x 12″ rectangle of dough aside as well on a parchment lined baking sheet.

Press the edge of a ruler into the dough you’ve just rolled, to gently score it in thirds lengthwise and width-wise; you’ll see nine 3″ x 4″ rectangles.

Beat the egg, and brush it over the entire surface of the dough. Place a heaping tablespoon of filling into the center of each marked rectangle. I used a cookie scoop to do this.

Roll the second piece of dough and trim, just as you did the first. Score it as yo did the first peice. Place it evenly over the first piece of dough and filling. Then, using your fingertips or a chopstick to press firmly around each pocket of filling, sealing the dough well on all sides.

Cut the dough evenly as you scored it, between the filling mounds to make nine tarts. Press the cut edges with your fingers to seal, then press with a fork or chopstick to seal again.

Gently place the tarts on a lightly greased or parchment-lined baking sheet. Prick the top of each tart multiple times with a fork; you want to make sure steam can escape, or the tarts will become billowy pillows rather than flat toaster pastries. Refrigerate them, uncovered, for 30 minutes. (if you are making the cinnamon sugar tarts you can sprinkle the tops lightly with the cinnamon sugar filling prior to refrigerating).

Preheat your oven to 350°F.

Remove the tarts from the fridge. Brush remaining egg wash over the tops of the tarts. Bake them for 30 to 35 minutes, until they’re a light golden brown. Remove them from the oven, and allow them to cool on the pan.

While the tarts are cooling, make the Nutella Frosting. In the bowl of a stand mixer, fitted with the whisk attachment, beat all of the ingredients together on medium speed until creamy and smooth. Place frosting in piping bag.

Once toaster tarts are completely cool, pipe drizzles of frosting over the top. The Nutella frosting will set at room temperature after 3 -4 hours. If you would like it to set sooner, just pop them into the fridge.

Enjoy!

Fun tip: Don’t throw the dough trimmings away! Instead, sprinkle them with cinnamon-sugar. While the tarts are chilling in the fridge, bake these trimmings for 13 -15 minutes, until they are golden brown. They make a delicious snack!

Here is that great video of Chef Joanne Chang making Toaster Tarts.

Links for helpful Kitchen Tools & Ingredients for Homemade Banana Filled Toaster Tarts with Nutella Frosting:

Kitchen Aid Artisan Stand Mixer

Oxo Good Grips Stainless Steel Food Scale

Cuisinart Pro-Classic Food Processor

Oxo Multipurpose Scraper

Dough Rolling Mat

Pastry Wheel

OXO Good Grips Medium Cookie Scoop

Nutella Spread

Eat This Yum – Banana Jam – This jam is so delicious! The family owned & operated company in Pennsylvania makes natural small batch jams and marmalades. Don’t miss out on their Bacon Jam as well. And with each jar sold they contribute 5% to local volunteer fire fighters!


Ground Beef Chili with Chocolate & Peanut Butter

February 1, 2021

So did I get your attention with that recipe title? I mean “Chili” will always make me look. We love chili around here. But when followed by Chocolate…hmmm that struck me as a bit strange. But then the wheels completely fell of my cart when I saw peanut butter. Peanut Butter?!!! Really?!!! Yup. Totally serious. Peanut. Butter. I could not wait to cook up a pot. And I’m very happy to share the recipe with you today. It is absolutely delicious! The mixture of spices and chocolate give it such a depth of flavor, a real richness and umami. And that peanut butter acts not only as a thickener, but also gives the most silky creamy texture. Comfort food perfection on a cold snowy day!

Today is February 1st. This particular day lies half way between Winter Solstice and the Spring Equinox. It is St. Brigid’s Day. Brigid is one of Ireland’s patron saints. According to Irish hagiography, she was an early Christian nun & abbess who preformed many miracles. She also shares the name with an important Celtic goddess which suggests that the early church might have adopted the legends of the goddess and transformed them into the Christian persona. Interesting huh? I don’t know how many of you folks out there remembered to put a scarf out last night. You see on St. Brigid’s Eve you should always place a scarf or other piece of fabric outside.

When Brigid passes over the land that night she will bless it. You then can fetch it back inside the next day and thanks to Brigid, it has the power to protect and heal headaches, sore throats and fevers throughout the coming year! What with all the Covid still rampaging around, I wasn’t going to take any chances. My little scarf was frozen solid this morning, but is happily thawing away now, freshly imbued with healing powers. Today also marks the festivals of Imbolc and Candlemas, both of which are associated with fertility, fire, purification and weather divination. And tomorrow, my favourite varmint, Punxsutawney Phil, will be stepping out of his burrow at Gobbler’s Knob and letting everyone know if there will be 6 more weeks of winter or if instead Spring is on the way.

One extraordinary rodent!

Right up until yesterday, much to my dismay, we really had not had any winter at all. But I woke up to snow yesterday! It snowed all day, all night and it is still snowing as I write this. Hooray! So if good ole Phil sees his shadow and we get more winter I’m fine, but even if he says Spring is coming, I will have at least had a tiny taste of winter. So this is quite an auspicious time of year! I’m very happy to be marking an event today as well. February 1st just happens to be the 10th year anniversary of  the my cooking blog! Yup… Ten years ago today I posted my first recipe. It was for Cream Tea Scones with Currants.

I’ve managed to do an anniversary post nearly every year since. Pretty impressive considering how slack I can be. Last year I posted about these scrumptious Morning Buns!

One of my favorite recipes that I shared with you on an anniversary was: Model Bakery’s English Muffins:

Then there were those decadent  Banana Rum Muffins:

That jaw-dropping, over the top Crack Pie:

And who can forget that magical “caviar of the South” – Pasture’s Pimento Cheese. Keep this one in mind for the Super Bowl!

And speaking of the Big Game, today’s Ground Beef Chili with Chocolate & Peanut Butter would certainly be a most welcome addition to your game day spread. You can even play a fun game with folks where you make them try to guess what the secret ingredients are in the chili. The whole time I was making it, I hid the recipe from The Husband. I just called it the “odd chili” with some mysterious ingredients. He did pretty well with his guesses. He got the chocolate pretty quickly. Not that it tastes like chocolate. It doesn’t. But he got that it was a dark richness to the dish. And although he did not guess peanut butter, he did comment on how creamy it was.

Although you can eat this chili on the day you make it, I usually try to allow it to sit in the fridge for a day or two after I make it. I find that the extra chill time allows the flavors to really blend and meld. I guess I always knew chocolate & peanut butter were two great tastes that taste great together. I mean Reese Cups have been telling us so for years. However, I would never have considered smashing a Reese Cup up and stirring it into my chili. But there you have it! So. Dang. Good.

Ground Beef Chili with Chocolate & Peanut Butter

  • Servings: 4 - 6
  • Difficulty: easy
  • Print

recipe from: Aaron Hutcherson via New York Times Cooking

Ingredients:

  • 2 tablespoons vegetable oil
  • 1 medium yellow onion, diced (about 8 ounces)
  • 2 teaspoons kosher salt, plus more as needed
  • 3 canned chiles in adobo, finely chopped
  • 1 tablespoon unsweetened cocoa powder
  • 2 teaspoons smoked paprika
  • 2 teaspoons ancho chile powder
  • 1 1/2 teaspoons dried oregano, preferably Mexican
  • 1 1/2 teaspoons ground cumin
  • 1/2 teaspoon ground cinnamon
  • 1/4 teaspoon ground allspice
  • 1/4 teaspoon cayenne (optional – we like it hot!)
  • 2 pounds ground beef or ground dark turkey
  • 1 (15-ounce) can petite diced tomatoes
  • 1 cup stout beer (I suggest Guinness…)
  • 1 cup unsalted or low-sodium beef stock or chicken stock
  • 2 (15-ounce) cans pinto beans, rinsed
  • 4 ounces good dark chocolate, chopped
  • 2 tablespoons smooth peanut butter
  • fresh lime juice ( 1 – 2 Tablespoons – optional)
  • Any combination of tortilla chips, shredded cheese, sour cream, fresh cilantro and diced avocado, for garnish (optional)

Directions:

Heat oil in a large pot over medium heat. Add onion and salt and sautée until the onion starts to become translucent, about 5 minutes.

Add Chiles, cocoa powder and spices. Stir to mix ingredients together and cook for 1 – 2 minutes, just until the spices become fragrant.

Add ground meat and cook until cooked through, 5 – 7 minutes.

Add tomatoes and their juices, beer and stock to the pot and bring to a boil over high heat. Reduce the temperature to a simmer and cook for 15 to 20 minutes until the flavors meld.

Reduce heat to low and stir in the beans, chocolate and peanut butter. Stir until the chocolate has melted and the peanut butter is completely integrated. Season to taste with salt and pepper. If you think it is too sweet, you can add a bit of freshly squeezed lime juice.

Serve with tortilla chips, cheese, avocado, sour cream, fresh cilantro or perhaps white onion. Whatever toppings you prefer. I always make up a batch of Skillet Cornbread as well when I serve chili.

Enjoy!

Useful links for Kitchen Tools & Ingredients for Ground Beef Chili with Chocolate & Peanut Butter:

Oxo Good Grips Stainless Steel Food Scale

Le Creuset Enameled Cast Iron Dutch Oven

Chili in Adobo Sauce

Crafty Celts – Love that spoon in the chili pics above? You can get one for yourself at Crafty Celts where you will find handcrafted historically inspired bronze and silver jewelry, as well as gorgeous silverware. You might recognize some of their jewelry as it was featured in the Vikings television show.