Toffee Almond Sandies

December 28, 2011

O.k., O.k……I’m sure you are all sick to death of cookies by this point. I know I went way overboard on the cookie making front, I say staring at a tower of cookies in tins and bags, which if it were to fall would surely crush me. If you suddenly hear no more from me, at least you’ll know what it was that likely did me in! I guess the way it got so out of control is that I have certain cookies that I like to bake every Christmas. But every year I see some new cookie recipes that look fantastic. I can’t not make the old favourites, so I just keep adding more and more to the list. This year I came across this Toffee Almond Sandie recipe on one of my new favourite blogs Once Upon A Chef, I and just must share it with everyone it was so scrumptious! I know I’ve mentioned this blog before. Jennifer, a professionally trained chef and the author of this blog, was my source for the Roasted Green Beans with Garlic, Pine Nuts and Parmigiano-Reggiano which I blogged about back in November. I served that dish as a side on Thanksgiving and loved it so much that I just rolled it out again for Christmas Dinner! I’ve also made several other dishes from her blog and they have all been just to die for! I am now a loyal follower, I assure you. So if you haven’t yet, take a peek at her site!

Back to the cookies. These little Toffee Almond Sandies were such a big hit and are forever added to my growing favourite Christmas Cookies (or any other time of year for that matter!). They look fairly plain, kind of rustic and home-y, but oh my stars, when you take one bite, you’ll be hooked. They are crunchy from the sparkly sugar-coating ( I used Demerara sugar), crispy and nutty from the chopped almonds, a bit chewy from the lovely toffee bits(I used Heath toffee chips-found in your grocer’s aisle along with the chocolate chips) and all of the delicious bits mentioned above are nestled in among a delicious sweet shortbread. Quite a pleasant surprize!

Really stellar I must say. Don’t wait until next Christmas to try these out. Serve them for New Year’s Eve. Bet they’d go great with some Champagne!

Toffee Almond Sandies

recipe from Once Upon a Chef

yield: 9 dozen cookies (I halved it!)

Ingredients:

  • 3½ cups all-purpose flour
  • 1 cup whole wheat flour
  • 1 teaspoon baking soda
  • 1 teaspoon cream of tartar
  • 1 teaspoon salt
  • 1 cup (2 sticks) unsalted butter, softened
  • 1 cup sugar
  • 1 cup Confectioners’ sugar
  • 1 cup vegetable oil
  • 2 large eggs
  • 1 teaspoon almond extract
  • 2 cups chopped almonds
  • 6 oz (about 1 heaping cup) English toffee bits*
  • Additional sugar

Directions:

Set racks in middle of oven and preheat to 350 degrees. Line two baking sheets with parchment paper.

Combine all-purpose flour, whole wheat flour, baking soda, cream of tartar and salt in a medium bowl; mix well.

In the bowl of a mixer fitted with paddle attachment, cream butter, sugar and Confectioners’ sugar until well combined, about 1-2 minutes. Scrape down sides of bowl with spatula, then add oil, eggs and almond extract; mix well. Add dry ingredients and mix slowly to combine. Stir in almonds and toffee bits.

Shape dough into 1-inch balls, roll in sugar, then place about 2″ apart on prepared baking sheets and flatten with a fork. Bake, rotating sheets halfway through cooking, for 14-17 minutes or until lightly browned. Let cookies cool on baking sheets for a few minutes, then transfer to wire rack to cool completely. Store in airtight container.

Enjoy!


Biscoff Crunch White Chocolate Chip Cookies

December 22, 2011

Alright…I know your first questions are “What is Biscoff?” “Is that a spelling error?” No it isn’t. Biscoff are delicious cookies originally made by the Lotus Bakery in Belgium in 1932. Overseas they are referred to as Speculoos Biscuits (Biscuit=cookie in European speak) These cookies are really delicious and have a caramelized cinnamony taste. You may have eaten one if you’ve flown anywhere recently, because many airlines have been serving them as a snack since 1984. Now they are being sold in the United States. I have seen them in my local Giant and Safeway stores. You can check out the Biscoff website to find out which grocery chain sells them in your state, or there is always good old Amazon if you can’t seem to find them anywhere. And believe me, you should try to find them. They are fabulous all on their own, especially with a nice cup of tea or coffee. But when they are crunched up in a cookie with white chocolate chips, they will just put you over the moon! These cookies really are that fantastic! Just so you know, you will need two sleeves of these cookies to make this recipe, so when you find them, stock up! Santa may be getting one or two Biscoff Crunch White Chocolate Chip Cookies, if he is lucky. We might just gobble them all up before Christmas Eve. I’m sure you noticed my pup lurking around in the background of my pics! It will definitely be touch and go. I’ll keep you posted…

Biscoff Crunch White Chocolate Chip Cookies

recipe from Picky Palate

yield: 3 dozen cookies

Ingredients:

  • 2 sticks unsalted butter, softened
  • 1 cup granulated sugar
  • 1 cup packed light brown sugar
  • 2 large eggs
  • 1 tablespoon pure vanilla extract
  • 3 cups all-purpose flour
  • 20 finely ground Biscoff Cookies
  • 1 teaspoon baking soda
  • 3/4 teaspoon kosher salt
  • 20 crushed Biscoff Cookies (coarsely chopped for an added crunch)
  • 2 cups white chocolate chips

Directions:

Preheat oven to 350 degrees F. and line a large baking sheet with a silpat liner or parchment paper.

In a stand or electric mixer, cream the butter and sugars until light and creamy. Add eggs then vanilla until well combined.

In a large bowl add the flour, ground Biscoff Cookies, baking soda and salt. Mix to combine then slowly add to wet ingredients until just combined. Add coarsely chopped Biscoff cookies and white chips until just combined.

With a medium cookies scoop, scoop dough onto prepared baking sheet about 1 inch apart. Bake for 12-15 minutes until edges start to turn golden brown. Remove and let cool for 5 minutes before transferring to cooling rack.

Enjoy!


Pretzel M&M Oatmeal Cookies

December 20, 2011

I’m in full Christmas baking mode right now, and that for the most part, that means cookies. I am planning on doing some bread baking, including a Chocolate Rum Raisin Babka ala Peter Reinhart, some mini apple and pear pies and a couple of candy treats, but really I’m going to be doing quite a few cookies, which I happen to love just slightly less than cupcakes. Luckily I have some folks in mind who will be recieving them as prezzies, otherwise Jay and I might not be able to fit through the door at the end of the Holiday Season. I guess that is part of what happened to good old Santa. Just think of all the fantastic cookies he gets to sample on his jaunt around the world on Christmas Eve. And you know people put their best cookies out for him, lest a yucky cookie cost them some fabulous presents. After all their hard work, slaving away in the kitchen, it would be rude if he didn’t eat them. Sounds like a really awesome gig until you think about the size of that big red coat he is sporting. Hmmm…Well, I certainly don’t want to dwell on calories at this time of the year. It’s a celebration, so eat up! We will worry about it come January 2012.

First up on my cookie baking front are these Pretzel M&M Oatmeal Cookies. These are awesome for so many reasons! To start with, you’ve got a lovely, moist and chewy oatmeal cookie. But then, you add some Pretzel M&M’s to the mix, which provide chocolatey, crunchy, salty goodness to it. I’ve mentioned before, I am a total sucker for that salty sweet combination and this cookie has it going on! I used Holiday M&Ms to give them that Christmas vibe. I’m sure Santa will not be disappointed!

Pretzel M&M Oatmeal Cookies

recipe from Baker’s Royale

yield: 3 1/2 dozen-ish

Ingredients:

  • ¾ cup unsalted butter
  • ¼ cup cream cheese, softened
  • 1 egg
  • ½ cup sugar
  • ½ cup dark brown sugar
  • 11/2 teaspoon baking soda
  • ¼ teaspoon salt
  • 1 ¼ cup flour
  • 1 ½ cup quick cooking oats
  • 1 9.90oz Bag of Pretzel M&Ms

Directions:

Preheat oven to 350° F. Line a cookie sheet with parchment paper or a Silpat.

Melt and heat butter until it is brown and nutty. Set aside to cool slightly.

Place softened cream cheese, egg, sugar, dark brown sugar, baking soda and salt in a mixing bowl fitted with a paddle attachment and mix on medium until mixture is fully combined and shiny, about 1-2 minutes. Add browned butter and mix to combine. Turn off mixer.

Place flour and quick cooking oats in a bowl and whisk to combine. Use a sturdy spatula or wooden spoon to fold flour mixture into wet mixture and mix to combine.

Place Pretzel M&M’s in plastic ziplock bag. Using a meat tenderizer or rolling-pin, roughly crush them. Add to cookie dough and fold to combine.

Scoop one heaping tablespoon of cookie dough onto parchment lined baked sheet. Bake at 350 degrees F for 10-12 minutes or until bottoms of cookies are golden brown.

Enjoy!


Peanut Butter Cup Blondies

December 15, 2011

Hmmm…another band rehearsal. I needed to figure out what fantastically yummy snack I would have ready to energize them as they worked through their set list. I decided that I was in the mood to bake brownies or some sort of bar type dessert. I may have mentioned that I love Reese’s Peanut Butter Cups and I just happened to have a bag of the new Reese’s Cup Minis sitting right on the counter. (Don’t know how they got there….) And then I remembered that Karly from Buns in My Oven (one of my all time favourite blogs) had blogged about this exact treat some time back. Everything I have ever made from Karly’s site has been off-the-hook delicious! I quickly checked her site. Just as I thought, it looked awesome…a peanut butter base filled with chocolate chips, chopped up Reese’s cups and as if that wasn’t enough, there’s a whole Reese’s mini squished into the top!

That’s what I’m talking about folks! I mean, sure, I was making these treats for the band but I would likely need to taste test one or two or maybe five or so, just to make sure they were acceptable. I wouldn’t want to serve anything not up to snuff. Yup, these Peanut Butter Cup Blondies were the ticket! So I got busy baking. The only thing I changed in her recipe was that I baked these lovely little treats in a mini muffin pan whereas she baked them in a 9×13 pan. I did change the name a bit too, she called them Peanut Butter Brownies and I christened these gems “blondies”.

The results? AWESOME! Moist, peanut buttery, chocolatey bliss! Not only did the band scarf them down, but I’d wager Santa would be delighted to find a few of these waiting for him when he comes down the chimney. Make some today!

Peanut Butter Cup Blondies

recipe slightly adapted from Buns in My Oven (Karly baked them in a 9×13 pan and I made mini muffin sized treats)

yield: 34 mini muffin sized blondies

Ingredients:

  • 1 1/3 cups packed brown sugar
  • 1/4 cup butter, melted
  • 1/2 cup creamy peanut butter
  • 1 tsp vanilla
  • 3 eggs
  • 1 1/2 cups all-purpose flour
  • 3/4 tsp baking powder
  • 1/4 tsp baking soda
  • 1/2 tsp salt
  • 36 mini peanut butter cups (Reese’s are the best!)
  • 1/2 cup milk chocolate chips

Directions:

Pre-heat oven to 350 degrees. Line mini-muffin pan with mini cupcake papers.

In the bowl of a stand mixer, beat together sugar, peanut butter, butter, vanilla, and eggs until well blended. Mix in flour, baking powder, baking soda, and salt.

Cut 12 peanut butter cups into quarters and gently stir into blondie batter along with the chocolate chips. Use small cookie dough scoop to fill each muffin well. Place in oven for 12-15 minutes, or until a tester comes out clean.

Remove from oven and immediately press remaining peanut butter cups into the top of each blondie. Allow to cool before serving.

Enjoy!


S’mores Brownies

December 12, 2011

Everyone loves S’mores. They just make folks happy. I noticed this when everyone scarfed down my S’mores Stuffed Cookies before I knew what was happening. One of my husband’s bands was coming around for rehearsal one evening and I wanted to make them something to snack on. As I was going through my list of possible sweet creations with my husband, the second I mentioned S’mores Brownies, he stopped me. No need to mention any other treats, he was sold on the S’mores. I’m glad I listened to him. These S’mores Brownies were just fantastic. The Fudge Brownie Recipe from King Arthur flour makes a very moist, decadently chocolaty brownie that still has some rise to it so that it is a cross between a fudge-like and a cake-like brownie. They never disappoint all on their own. But when I added some crunchy graham cracker to the batter ( I actually used cinnamon grahams, but feel free to use plain grahams) and topped the whole pan with gooey, toasted brown mini marshmallows, they were just to die for!

One important note. This brownie recipe calls for Dutch Process Cocoa Powder. I’ve come across many recipes that call for this type of cocoa powder before and, silly me, I just thought it was regular old unsweetened cocoa powder. Well, guess what? It isn’t. For some reason, this time I decided to look up Dutch Process Cocoa powder. Boy was I surprized. According to the Joy of Baking article of cocoa powders, Dutch Process Cocoa powder is “…treated with an alkali to neutralize its acids. Because it is neutral and does not react with baking soda, it must be used in recipes calling for baking powder, unless there are other acidic ingredients in sufficient quantities used. It has a reddish-brown color, mild flavor, and is easy to dissolve in liquids. Its delicate flavor makes it ideal in baked goods like European cakes and pastries where its subtle flavor complements other ingredients. Droste, Lindt, Valrhona, Poulain and Pernigotti are some popular brands.” Whereas “Natural Unsweetened Cocoa Powder tastes very bitter and gives a deep chocolate flavor to baked goods. Its intense flavor makes it well suited for use in brownies, cookies and some chocolate cakes. When natural cocoa (an acid) is used in recipes calling for baking soda (an alkali), it creates a leavening action that causes the batter to rise when placed in the oven. Popular brands are Hershey’s, Ghirardelli, and Scharffen Berger.” Hmmm…so my baked goods which had needed Dutch Process Cocoa but got natural unsweetened cocoa due to my oversight have probally not risen as much as they ought to of because my cocoa powder has been cancelling out the baking powder. The good news is don’t fret if you only have unsweetened cocoa powder in the house and you really want to make these brownies. You don’t have to run out to the store in your jammies. (maybe it’s just me who sits around looking at recipes in her jammies….) You can use the cocoa powder you have on hand, according to Whats Cooking America, just add 1/8 teaspoon of baking soda for each 3 Tablespoons of unsweetened cocoa in the recipe. For example, in this recipe I added 3/4 teaspoon of baking soda to the cocoa. My brownies rose like a champ! No problem. And I leave this recipe much wiser about cocoa powder. They aren’t all the same and if a recipe says Dutch-Process Cocoa powder, it isn’t a suggestion!

But back to the S’mores Brownies…once again, they were awesome! Wonderfully moist and chocolatey, with a bit of graham cracker crunch, followed by that gooey marshmallow topping. I think next time I make these fellows, and yes, I’m sure there will be a “next time” I will use the big marshmallows on top, rather than the minis and maybe add some tiny squares of hershey chocolate bars on top as well, just to visually give it that traditional S’mores vibe. So why not get campfire nostalgic today and give these a try. You won’t regret it!

S’mores Brownies

yield: 24 brownies – depending on how you slice them 🙂

Ingredients:

  • 1 cup (2 sticks) unsalted butter
  • 2 1/4 cups sugar
  • 4 large eggs
  • 1 1/4 cups Dutch Process cocoa powder
  • 1 teaspoon salt
  • 1 teaspoon baking powder
  • 1 teaspoon espresso powder
  • 1 tablespoon vanilla extract
  • 1 1/2 cups All-purpose flour (I recommend King Arthur unbleached all-purpose flour)
  • 2 cups chocolate chips – I used mini chips, but regular size would be fine
  • 1 cup of roughly crumbled graham crackers
  • 12 big marshmallows or a couple handfuls of mini marshmallows

Directions:

Preheat the oven to 350°F. Lightly grease a 9″ x 13″ pan

In a medium-sized microwave-safe bowl, or in a saucepan set over low heat, melt the butter, then add the sugar and stir to combine. Or simply combine the butter and sugar, and heat, stirring, until the butter is melted. Continue to heat (or microwave) briefly, just until the mixture is hot (about 110°F to 120°F), but not bubbling; it’ll become shiny looking as you stir it. Heating the mixture to this point will dissolve more of the sugar, which will yield a shiny top crust on your brownies.

While the sugar heats a second time, crack the 4 eggs into a bowl, and beat them with the cocoa, salt, baking powder, espresso powder, and vanilla till smooth.

Add the hot butter/sugar mixture, stirring until smooth.

Add the flour and chips, again stirring until smooth. Note: If you want the chips to remain intact in the baked brownies, rather than melting in, let the batter cool in the bowl for about 20 minutes before stirring in the chips.

Stir in the graham cracker pieces.

Spoon the batter into a lightly greased 9″ x 13″ pan.

Place the 12 large marshmallows or scatter the mini marshmallows over the batter.

Bake for 30-35 minutes until cake tester or toothpick inserted into the center of the pan comes out clean or with just a few moist crumbs sticking to it.

Recipe for Fudge Brownies from King Arthur Flour (the only flour I use!)

S’mores Idea from Sugar Cooking


Texas Beef Chili

December 8, 2011

On a rainy, damp, cold day what is better than a big, warm bowl of spicy chili? You may ask what makes this chili particularly Texan. I definitely did. Apparently folks from the Lone Star state absolutely do not use beans or tomatoes in their chili. Chili, for Texans, is all about the beef, (being big chunks of steak, not ground beef) and the chili spices. This chili definitely had some heat to it, but Ancho chiles are fairly mild, so I did add a bit of cayenne pepper into the mix, cause we like it hot! This hearty chili was perfect for us, spicy and chock full of incredibly tender and flavourful steak. It cooks for 1 1/2 – 2 hours to achieve its level of yumminess, so make sure you have plenty of time to let it simmer. Patience is a virtue, so I’m told. I served this Texas Beef Chili with some spicy cornbread ebelskivers, but warmed tortillas would also be great. Guess those Texans really do know their chili!

Texas Beef Chili

recipe slightly adapted from Williams-Sonoma “Comfort Food” by Rick Rodgers

serves: 8

Ingredients:

  • 1 1/2 teaspoon ground cumin
  • 1/4 Cup Ancho Chili Powder
  • 1 Tablespoon Spanish Paprika
  • 2 Teaspoons Dried Oregano
  • 4 lbs. Boneless Beef Chuck Roast
  • Kosher Salt and Freshly Ground Black Pepper
  • 3 Tablespoons Olive Oil
  • 1 Large Yellow Onion, chopped
  • 1 Jalapeño pepper, seeds and ribs removed, chopped
  • 1 large Red Bell Pepper, seeded and chopped
  • 4 cloves Garlic, chopped
  • 1 1/2 Cups Lager Beer
  • 1 Cup Beef Stock
  • 2 Tablespoons yellow Cornmeal

For Serving:

Shredded Cheddar Cheese, chopped red onion, sour cream, minced jalapeño peppers

Directions:

Place cumin powder, ancho chile powder, paprika, and oregano in bowl. Mix well and set aside.

Cut the beef into 1/2 inch cubes. Season with salt and pepper. In a Dutch oven, heat 2 tablespoons of the oil over medium-high heat. In batches to avoid crowding, add the beef cubes and cook, turning occasionally, until browned, about 5 minutes per batch. Transfer to a plate.

Add the remaining 1 Tablespoon of oil to the pot. Add the onion, jalapeño, bell pepper, and garlic and reduce the heat to medium. Cover and cook, stirring occasionally, until the onion softens, about 5 minutes. Uncover, add the spice mixture, and stir well for 30 seconds. Stir in the beer and stock. Return the beef to the pot, cover, and reduce the heat to low. Simmer until the beef is fork-tender, 1 1/2 – 2 hours.

Remove the chili from the heat and let stand for 5 minutes. Skim off any fat that rises to the surface. Return the pot to medium heat and ring to a simmer. Transfer about 1/2 cup of the cooking liquid to a small bowl, add the cornmeal, and whisk well. Stir into the chili and cook until lightly thickened, about 1 minutes. Season with salt and pepper. Spoon the chili into warmed bowls and serve hot, with bowls of Cheddar, onions, sour cream, and jalapeños on the side for sprinkling on top.

serves: 8


Roasted Green Beans with Garlic, Pine Nuts & Parmigiano-Reggiano

December 5, 2011

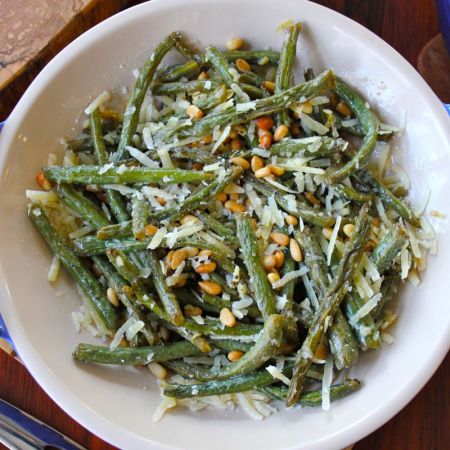
I made this Green Bean side dish for my first ever, cooked all by myself, Thanksgiving Dinner and I just had to tell everyone about it because it was absolutely awesome! (To get the full effect of this statement you need to raise your voice a bit when you reach the word “awesome” while singing it in a kind of operatic style…just a suggestion). I’m planning on making it again for our Christmas Dinner and thought some other folks might like to as well, so I’m sharing it. My husband and I actually considered making the good old Green Bean Casserole for Thanksgiving. You know the one, with the cream of mushroom soup, crispy fried onions and maybe a bazillion calories? Don’t get me wrong, that one is yummy and you shouldn’t be counting calories on Thanksgiving anyway. But we were already planning to have mashed potatoes and gravy, and stuffing and a decadent Jack Daniel’s Caramel Apple pie, served with ice cream of course! So we thought that this recipe would be quite refreshing and lighten the dinner up, ever so slightly.This recipe did just that. The green beans are crispy, and so flavourful with the garlic, lemon juice and savoury Parmigiano-Reggiano cheese. The toasted pine nuts add a great crunchy texture to the dish. Although it was very easy to make, it looked quite impressive on the table. Really fantastic!

So where did I find this winning recipe? A friend of mine had recommended  that I take a look at a food blog that a friend of his publishes. So I took a peek and just loved it! It is called Once Upon a Chef. You must go and take a look for yourself. Jennifer, who publishes the blog, is a professionally trained chef who has given up the fancy restaurant gigs for the time being and is now enjoying cooking at home for her family. On her site you will find delicious gourmet recipes that will please both grown-ups as well as kids. Contrary to what you might think about recipes from a professional chef, ie. they’ll be fussy and full of obscure ingredients, her recipes are simple to cook, yet will make folks think you slaved over the dish all day! You’ll also find great cooking tips (see the pine nut info. listed below) and gorgeous photography. It is really very inspiring, so check it out! And plan to make this Roasted Green Beans with Garlic, Pine Nuts & Parmigiano-Reggiano dish for dinner. You won’t regret it!

Roasted Green Beans with Garlic, Lemon, Pine Nuts & Parmigiano-Reggiano

recipe from Once Upon a Chef

serves 6-8

Ingredients:

  • ⅓ cup pine nuts*
  • 2 pounds fresh green beans, stem ends trimmed
  • 10 cloves garlic, peeled and thinly sliced lengthwise (a medium clove should yield 4 slices)
  • 6 tablespoons extra-virgin olive oil
  • 1½ tablespoons lemon zest (you’ll need two lemons)
  • 1½ teaspoons kosher salt
  • ½ teaspoon freshly ground black pepper
  • ¼ teaspoon sugar
  • 1½ tablespoons freshly squeezed lemon juice
  • 6 tablespoons coarsely grated Parmigiano-Reggiano

Directions:

Set oven rack in middle position and preheat oven to 450°F. Line a rimmed baking sheet with heavy-duty aluminum foil.
In a small dry skillet over medium heat, toast the pine nuts until golden. Watch carefully and stir frequently as they can burn quickly! Immediately transfer to small bowl (don’t leave them in hot pan as they will continue to cook). Set aside.
Put the green beans in a large bowl. Add sliced garlic, olive oil, 1 tablespoon of the lemon zest, kosher salt, pepper and sugar and toss well. Transfer mixture to prepared baking sheet (don’t leave any flavor behind: use a rubber spatula to scrape all of the oil and seasoning out of the bowl and onto the beans).

Roast beans and garlic for 15 minutes. Stir with a spatula to promote even cooking, then continue roasting until the beans are tender throughout, about 10 minutes more. The beans should be fully cooked, with some lightly browned but not shriveled.

Add lemon juice, Parmigiano-Reggiano, remaining lemon zest and pine nuts to beans and toss well.  Taste and adjust seasoning with salt, pepper and lemon juice if necessary. Transfer to serving platter and serve hot or room temperature.

*Always check the origin of pine nuts and be sure to buy the Italian variety. Certain pine nuts, particularly those from China, can cause a bitter aftertaste that can last for days — very unpleasant!


Jack Daniel’s Caramel Apple Pie

December 1, 2011

Jack and I have been at it again! I just can’t seem to stay away from Mr. Daniels. Especially when it comes to baking! This time I saw a recipe for a Southern Comfort Caramel Apple Pie at Pink Parley’s site. It looked fantastic and seemed to be getting rave reviews. I decided I just had to make it for Thanksgiving, but it needed to be with Jack Daniels rather than Southern Comfort. Nothing against Southern Comfort, I’m sure it is great. However, Jack and I have an established relationship and all seems to be better when he makes an appearance. So off I went!

To be honest, I really am not a big pie fan in general. I like apple pies, since apple is a favourite fruit. I like pecan pies. But it pretty much stops there. Blueberry pie? Peach pie? Cherry pie? I just have to say “Errr…Thanks, but no.” My husband on the other hand, loves fruit desserts as I may have mentioned. I knew this pie with not only a fruity filling but also a good helping of bourbon could not go wrong.

I had never actually made an apple pie before. I have done rustic tarts and the like, but this was my first pie. I must say, I’m very happy my first attempt was such a great success. This pie is every bit as delicious as the various rave reviews had declared. The apples had a lovely firm texture. The cinnamony caramel bourbon sauce in which they rested was to die for! And if that wasn’t enough, then there is the topping. It is a streusel sort of topping usually found on fruit crisps or crumbles. Gives the pie a nice buttery, crunchy finish. Fantastic pie altogether. You really must give it a try!

Jack Daniels Caramel Apple Pie

recipe slightly adapted (I switch Southern Comfort for Jack Daniels) from Pink Parsley. Full original recipe found on 20-Something Cupcakes.

Basic Pie Crust:

  • 2 cups all-purpose flour
  • 1/2 teaspoon salt
  • 2 tablespoons sugar
  • 2/3 cup (10-2/3 tablespoons) chilled unsalted butter
  • 4 to 5 tablespoons ice water

In your food processor, combine flour, salt, and sugar. Cut butter into 1/2-inch cubes. Add butter to flour mixture and pulse several times until mixture looks crumbly, with bits of dough the size of peas. Add 4 tablespoons ice water, 1 tablespoon at a time, pulsing a few times after each addition. After final addition, dough should begin to clump together in a ball. Gently mold dough into a disk, cover in plastic wrap, and refrigerate for at least 1 hour.

Transfer unwrapped dough to a lightly floured surface. Roll into a 1/8-inch-thick circle large enough to cover bottom and sides of a 9-inch-diameter deep-dish pie pan; do not use a regular (shallow) pan. Transfer dough to pie pan, crimping edges with your fingers or a fork. Prick bottom with a fork.

Topping:

  • 1/2 cup pecan halves
  • 1/3 cup sugar
  • 3 tablespoons firmly packed dark-brown sugar
  • 1/2 teaspoon cinnamon
  • 1/4 teaspoon salt
  • 1/3 cup all-purpose flour
  • 2/3 cup (5-1/3 tablespoons) chilled unsalted butter

Preheat oven to 350 degrees. Arrange pecans on a baking sheet in a single layer and toast until a rich brown, 7 to 9 minutes. Coarsely chop nuts and set aside.

In a food processor fitted with a metal blade, process sugars, cinnamon, salt, and flour for about 1 minute. Cut butter into small pieces and add to sugar-flour mixture. Pulse 10 to 15 times until mixture is crumbly. Remove from processor and stir in pecans. Refrigerate topping, covered, until ready to use.

Apple Filling:

  • 5 to 6 medium-sized tart apples, such as Braeburn, Cortland, or Winesap ( I used 3 granny smith/3 honey crisp)
  • 1/2 cup (1 stick) unsalted butter
  • 3 tablespoons cinnamon
  • 1 cup sugar
  • 3/4 cup Jack Daniels bourbon
  • 1/2 cup whipping cream

Increase oven temperature to 375 degrees. Peel, core, and cut apples into 1/4-inch-thick slices. Melt butter in a large skillet over medium-high heat. When butter starts to foam, add apples and sauté for 5 to 8 minutes. In a small bowl stir together cinnamon and sugar; sprinkle on apples, and stir to combine. Simmer apples over medium-low heat for about 1 minute longer. Remove apples from skillet with a slotted spoon, leaving as much of butter-sugar mixture in skillet as possible. Transfer apples to a baking sheet and arrange in a single layer until ready to use. (If heaped in a pile, they will become soggy.)

Pour Jack Daniels into butter-sugar mixture in skillet. Simmer mixture over medium heat until alcohol burns off, at least 5 minutes (sniff mixture at close range; if it burns your nostrils, the vapors are still burning off). Add cream and continue simmering until mixture is quite thick but still pourable, 5 to 10 minutes. Return apples to skillet and stir to coat.

Pour apples and cream mixture into unbaked piecrust (do not fill to more than 1/2 inch below top of crust) and sprinkle evenly with topping. Place pie pan on baking sheet to guard against a caramel filling bubble over. Bake until filling is bubbling and topping is brown, 50 to 60 minutes.

Enjoy!