Spicy Summer Tex-Mex Quinoa Salad

September 30, 2015

IMG_3170

Wow! Last Wednesday was the first day of Fall and apparently for once the weather in the good old State of Virginia agrees with the calendar. Temperatures around here have been just glorious. The humidity has chilled out and the days are warm but the nights are just starting to get a bit of chill to them. I for one could not be happier, though it did seem a bit sudden. Usually summer lingers on around here for quite some time. I won’t say anything more about it though because I don’t want to speak too soon and “word” it. (Yup…I sure did word it. I wrote the last sentence about the great Fall weather over the weekend. On Monday the temperature crept back up to 80°, and was accompanied by remarkable Virginia swamp-like humidity. I knew it was too good to be true!)  I’ll just say, here’s one more great summer recipe which should carry over nicely into Fall…Spicy Summer Tex-Mex Quinoa Salad.

IMG_3168

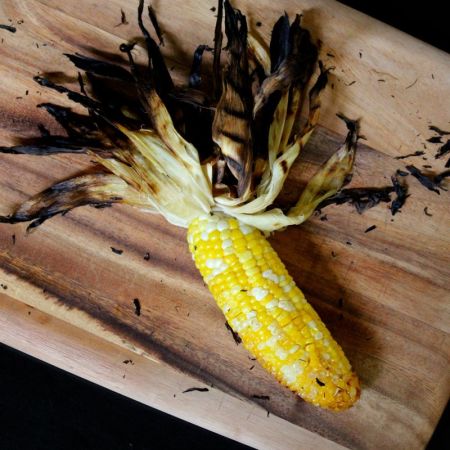
This salad can be served room temperature or even chilled if the mercury starts to creep up again. And it has a bit of a spicy kick to warm you up a bit if the chillier temperatures persist. If you have any leftover Spicy Grilled Corn from those Zucchini, Spicy Grilled Corn & Cheese Pancakes that I told you about a couple of weeks ago, this is a great way to put it to good use! The husband and I usually enjoy this dish on Meatless Mondays, and I serve it over a bed of lettuce. It gives it a taco salad-y kind of vibe. Another option, if you were feeling a bit more carnivorous, would be to add in some spicy chicken or grilled steak. And although we love it as a main dish, it would also be great as a side next to a big old burrito, taco or enchilada. So there you have it… all the healthful benefits of quinoa and all the fresh spicy tastes of summer. What a winner!

IMG_3183

Spicy Summer Tex-Mex Quinoa Salad

  • Servings: 4
  • Difficulty: easy
  • Print

recipe adapted from: Once Upon a Chef

Ingredients:

  • 2 tablespoons extra virgin olive oil
  • 1/2 cup chopped red onion
  • 2 cloves garlic, finely diced
  • 1 teaspoon cumin
  • 1/2 teaspoon chili powder
  • 1/4 teaspoon cayenne pepper
  • 1 cup pre-washed quinoa (if not washed, follow package instructions for rinsing)
  • 1-2/3 cups low sodium vegetable broth
  • 1 teaspoon salt, divided
  • 1 pint cherry tomatoes, halved or 1 cup chopped tomatoes, from 2 medium tomatoes
  • 1-1/4 cups Spicy Grilled Corn – recipe to follow (can use canned corn if you don’t have fresh)
  • 1 can (15 oz.) black beans, rinsed
  • 2 scallions, white and green parts, finely sliced
  • 1 small jalapeño pepper, seeded and finely chopped
  • 1/2 cup chopped fresh cilantro
  • 2 tablespoons lime juice, from 1 large lime
  • 1 avocado, cut into bite-sized chunks
  • Cotija cheese, crumbled
  • shredded iceberg lettuce (to serve Quinoa Salad over – if you desire)

Directions:

Heat 1 tablespoon of the olive oil in a medium sauce pan over medium-low heat. Add the onions and cook, stirring frequently, until soft and translucent, about 5 minutes. Add the garlic and cook for another minutes or so. Add the spices to the onion/garlic mixture and stir to combine

Add the quinoa to the onion/spice mixture and continue cooking, stirring constantly, for 3-4 minutes. Add the vegetable broth and stir in 1/2 teaspoon salt. Turn the heat up to high and bring to a boil. Cover the pan tightly with a lid, turn the heat down to low and simmer for 17-20 minutes, or until liquid is absorbed and quinoa is cooked. Transfer the cooked quinoa to a mixing bowl and chill in the refrigerator.

When the quinoa is cool, add the remaining tablespoon of olive oil, tomatoes, Spicy Grilled Corn, black beans, scallions, jalapeno, cilantro, remaining 1/2 teaspoon salt and lime juice. Taste and adjust seasoning if necessary. Right before serving, scatter the avocado chunks and Cotija Cheese over top.

Spicy Grilled Corn

Ingredients:

  • 3-4 ears of fresh corn in husk
  • 2 tablespoons olive oil
  • 2 tablespoons fresh lime juice
  • 2 cloves of garlic, finely chopped
  • 3/4 tsp Kosher salt
  • 1 tsp light brown sugar
  • ¼ tsp chili powder

Directions:

Combine olive oil, lime juice, garlic, salt, brown sugar and chili powder in small bowl and whisk together.
Preheat grill.
Peel back the corn husks, discarding all but a couple inner layers. Remove corn silk, then baste with dressing, and recover corn with remaining husk.
Grill on med-high for 20-25 minutes, turning 3-4 times during cooking time.
Remove the corn from grill and allow to cool a few minutes. Once it has cooled enough to handle, cut off stem end, place the flat cut end on bottom of large bowl, and use a corn zipper to strip the kernels from the cob. Or if you don’t have a zipper, run a small sharp knife down the length of the cob, slicing off kernels.

Enjoy!

Spicy Summer Tex-Mex Quinoa Salad brought to you by: Runcible Eats (www.leaandjay.com)


Milk Bar’s Cornflake Chocolate Chip Marshmallow Cookies

September 23, 2015

IMG_2928

I think I have actually reached cookie nirvana. I mean I like cookies…pretty much never met one that I turned my nose up at. But these cookies…oh my god!!! They’ve got it all. Crunchy and chewy, sweet and salty, chock full of gooey marshmallows and shot through with little tidbits of chocolate and crispy Cornflake Crunch (oh…I’ll talk about that Cornflake Crunch bit of the recipe in just a sec…). These cookies will take you back to those lovely slow saturday mornings when you were a kid and just sat around with a bowl of cereal, zoning out on cartoons. They’re a bit like a s’more…’cept totally different. Unique I tell you. And irresistible! I could not stop eating them. Rather addictive you might say. Perhaps it is not surprizing then that the recipe comes from Chef Christina Tosi’s Momofuku Milk Bar cook book. She is the amazing chef responsible for Crack Pie, which I tried my hand at awhile ago. And since these cookies have a name which is very descriptive, yet a mouthful to get out, I’ve taken to calling them “Cookie Crack” which I feel is pretty dang accurate!

IMG_2964

Now I will tell you right away, these cookies have gained a reputation amongst the online food bloggers as being quite finicky. So I was verrrrrrrry careful to follow chef Tosi’s instructions to a T and didn’t really have any problems. The only thing I actually changed was the size of the cookie – chef Tosi recommends scooping out 1/3 cup cookie dough per cookie which gives you a complete monster cookie. Cool perhaps and exactly what you might want if you are buying one in a cafe, but I wanted a smaller around the house sized cookie so I went with a 1 tablespoon sized scoop. I also reduced the baking temperature to 350°F and the time to 12 minutes. The original recipe calls for 375° for 18 minutes, which would have set off all the fire alarms between here and New York if I had attempted that for my smaller sized cookies. I will say though, once you reach the baking stage, you need to watch these cookies like a hawk. I’m serious. Don’t start trying to do some other chores in another room, don’t get caught up face booking or twittering. Mind the cookies! They seem to have a knack at going from “oh it’s slightly golden, I’ll give it a few more minutes” to ” good lord where is the fire extinguisher” in no time at all! Remember also that you need to let the cookies cool a bit on the baking sheet before transferring them to a cooling rack and they will continue to cook a bit while sitting on that hot sheet, so maybe take them out of the oven just a bit before you would say they were perfectly done.

IMG_2935

I should at this point also give you a few bits of advice concerning Milk Bar Recipes that may be helpful. You should just know going into it that all of Chef Tosi’s recipes are like those Russian Matryoshka dolls, there is always one or two recipes to be found inside the final recipe. So with these cookies, you will first need to make up a batch of Cornflake Crunch which you will then crumble up and add into the cookie dough. But let me stop here for just a second to tell you about the glory of that Cornflake Crunch…It is a big part of what makes these cookies so awesome. Crunchy, sweet and salty joy! The recipe will actually yield more Crunch than you need to make the cookies, which is a good thing because it is dang near impossible to stop eating it, like straight off of the cookie sheet. With what I did manage to save I have used to top ice cream, have sprinkled it over yogurt and oatmeal as well as used it to gussy up a tried and true classic dessert (stand by for that recipe in the not too distant future 😉 ). Trust me, you will not be sad that there is a little bit extra Cornflake Crunch.

IMG_3289

The next thing I should mention is that although Chef Tosi does provide both european style weight measurements in grams as well as american style cup measurements for all of her recipes, you really need to go with the weight measurements. Now don’t get me wrong, I have always admired the cooks who could just play loose and fast with all the ingredients and still have delicious morsels spill forth from their kitchens. However, those folks won’t do well with a Milk Bar recipe. Precision is what is required here and my scooped cup of flour, I can almost guarantee you will be different from the next persons. So bite the bullet and get out there and buy a good old scale. Once you get the hang of it you won’t dream of going back! Measurements are not the only bit you need to focus on either. There are some techniques which must be executed exactly as well in order to enjoy success. The first is creaming  the butter. Chef Tosi insists on a ten minute creaming process. She goes into great detail explaining why in the cookbook, which if you haven’t bought yet, you just don’t know what you’re missing out on! But suffice it to say, she considers the creaming step the most important one in making a Milk Bar cookie.

IMG_2930

Also important with these cookies is the chilling time. When she says chill the dough for one hour, she is serious. Do not bake these cookies at room temperature, because you will be so sorry. I actually chilled my cookie dough overnight, just to be sure! So there you have it! All of my cautionary advice for making these delicious Cornflake-Chocolate Chip-Marshmallow Cookies. It’s really not that difficult and for all that focus and concentration you will be rewarded with a batch of unbelievably tasty cookies. Chewy and crunchy, covered with pools of gooey bubbly marshmallow, and flaked with chocolate. Cookie Crack extraordinaire! Get baking!!!

IMG_2969

Milk Bar's Cornflake Chocolate Chip Marshmallow Cookies

  • Difficulty: easy - but several steps and remember to allow for chill time in the fridge. Please read above blog for tips and hints for success.
  • Print

recipe slightly adapted from: Momofuku Milk Bar cookbook

Ingredients:

  • 225 gram (16 tablespoons/2 sticks) butter, at room temperature
  • 250 grams (1 1/4 cup) granulated sugar
  • 150 grams (2/3 cup) tightly packed light brown sugar
  • 1 egg
  • 2 grams (1/2 teaspoon) vanilla extract
  • 240 grams (1 1/2 Cup) flour
  • 2 grams (1/2 teaspoon) baking powder
  • 1.5 grams (1/4 teaspoon) baking soda
  • 5 grams (1 1/4 teaspoon) kosher salt
  • 270 grams (3 cups) Cornflake Crunch (recipe to follow)
  • 125 grams (2/3 cup) mini chocolate chips
  • 65 grams (1 1/4 cup) mini marshmallows

Directions:

Combine the butter and sugars in the bowl of a standard mixer fitted with the paddle attachment and cream together on medium-high for 2 to 3 minutes. Scrape down the sides of the bowl, add the egg and vanilla, and beat for 7 to 8 minutes.

Reduce the mixer speed to low and add the flour, baking powder, baking soda and salt. Mix just until the dough comes together, no longer than 1 minute. (Do not walk away from the machine during this step or you will risk overmixing the dough.) Scrape down the sides of the bowl with a spatula.

Still on low-speed, paddle in the Cornflake Crunch and mini chocolate chips just until they’re incorporated, no more than 30 to 45 seconds. Paddle in the mini marshmallow just  until incorporated.

Using a 2 3/4 ounce (NSF #16) ice cream scoop (or a 1/3 cup measure) portion out the dough onto a parchment-lined sheet pan. This sized scoop will yield jumbo sized cookies. I prefer to use a 1 Tablespoon (NSF#40) cookie scoop. The cookies are still good sized (about 3 to 3 1/2″ across). Pat the tops of the cookie dough domes flat. Wrap the sheet pan tightly in plastic wrap and refrigerate for at least 1 hour, or up to 1 week. Do not bake your cookies from room temperature- they will not hold their shape!

Heat the oven to 350°F.

Arrange the chilled dough a minimum of 4 inches apart on parchment-or silpat lined sheet pans. Bake for 13 minutes. the cookies will puff, crackle and spread. At the 13 minutes mark, the cookies should be browned on the edges and just beginning to brown toward the center. Leave them in the oven for an additional minute or so if they aren’t and still seem pale and doughy on the surface.

Cool the cookies completely on the sheet pans before transferring to a plate or to an airtight container for storage. At room temperature, the cookies will keep fresh for 5 days; in the freezer they will keep for 1 month.

Cornflake Crunch

yield: 360 grams (4 cups)

Ingredients:

  • 170 grams (5 cups) cornflakes
  • 40 grams (1/2 cup) milk powder
  • 40 grams (3 Tablespoons) sugar
  • 4 grams (1 teaspoon) kosher salt
  • 130 grams (9 tablespoons) butter, melted

Directions:

Heat the oven to 275°F.

Pour the cornflakes in a medium bowl and crush them with your hands to one-quarter of their original size. Add the milk powder, sugar and salt and toss to mix. Add the butter and toss to coat. As you toss, the butter will act as glue, binding the dry ingredients to the cereal and creating small clusters.

Spread the clusters on a parchment or Silpat-lined sheet pan and bake for 20 minutes, at which point they should look toasted, smell buttery, and crunch gently when cooled slightly and chewed

 Cool the Cornflake Crunch completely before storing or using in a recipe. Stored in an airtight container at room temperature, the crunch will keep fresh for 1 week; in the fridge or freezer, it will keep for 1 month.

Enjoy!

Milk Bar’s Cornflake Chocolate Chip Marshmallow Cookies brought to you by: Runcible Eats (www.leaandjay.com)


Zucchini, Spicy Grilled Corn & Cheese Pancakes

September 16, 2015

IMG_3109

Keep the zucchini recipes coming? No problem! I’ve got a great one for you here – Zucchini, Spicy Grilled Corn & Cheese Pancakes! The husband says this may well be his favourite recipe of 2015. I must admit, I can see why. Moist, light and bursting with fresh summer garden goodness these savory pancakes are not only delicious warm from the frying pan, but are also great at room temperature or even cold right out of the fridge.

IMG_3106

One of the things I love about these pancakes besides the fresh zucchini is the bit of spice factor. You know us and our penchant for hot and spicy by now. So I’ve added a bit of Spicy Grilled Corn to the mix. The zesty lime/chili combo of spices and the grilled flavour adds so much to this dish. And of course when I added the cheese in, I went with a Habanero Jack Cheese. The great thing here is that if you don’t want to turn up the heat like we do, just use fresh corn and maybe go with the parmesan or cheddar cheese option. It’s all up to you and your taste buds. We’ve eaten these pancakes as a main course with a fresh salad on the side, as a side dish paired with some grilled chicken, re-heated them for a quick savory breakfast and snacked on them between meals. They would be amazing as a summer appetizer as well. Just make them silver dollar sized and top them with a little dollop of sour cream and fresh chives. That versatility, along with ease of preparation makes them a winner in my book! So if your garden runneth over with zucchini, griddle up some of these mouthwatering pancakes. Folks will swoon!

IMG_3097

Zucchini, Spicy Grilled Corn & Cheese Pancakes

  • Servings: 20 pancakes
  • Difficulty: easy
  • Print

recipe slightly adapted from: King Arthur Flour

Ingredients:

  • 4 large eggs, lightly beaten
  • 1/2 teaspoon freshly ground black pepper or coarse black pepper
  • 1/4 cup olive oil or vegetable oil
  • 2/3 cup chopped chives or scallions; about 1 bunch scallions, trimmed and chopped
  • 2 teaspoons salt, to taste
  • 1/4 teaspoon cayenne pepper
  • 1 Tablespoon fresh basil, chopped
  • 1 Tablespoon fresh oregano, chopped
  • 4 cups coarsely grated zucchini; about one 10″ zucchini
  • 1 cup spicy grilled corn (recipe to follow, you can use regular corn if you can’t be bothered to grill corn – but I think the grilled corn option is the way to go!)
  • 1 3/4 cups all-purpose flour
  • 1 cup freshly grated Parmesan, Cheddar, Monterey Jack or Spicy Habanero Jack cheese.
  • sour cream & fresh chives for serving

Directions:

Preheat a griddle or frying pan over medium-high heat; if you have an electric griddle, set the heat to 400°F.

Beat the eggs with the oil, salt, and pepper until thoroughly combined.

Add the herbs, spices, scallions, zucchini, corn and cheese, stirring to combine.

Stir in the flour.

Grease the hot griddle lightly. Drop the batter in 1/4 cupfuls onto the griddle; a muffin scoop works well here. If necessary, spread the cakes to about 3 1/2″ to 4″ diameter.

Cook the cakes for 3 minutes, or until they’re brown on the bottom, and bubbles have appeared on their tops. The top surface will appear somewhat dry and set.

Flip the cakes, and cook them for about3 to 4 minutes on the second side, or until they’re as moist/cooked as you like when you break one open.

Repeat until you’ve used all of the batter.

Serve warm, at room temperature, or cold; with butter and grated cheese, or without. Store any leftovers, tightly wrapped, in the refrigerator. Reheat in a toaster or toaster oven, if desired.

IMG_3808

Spicy Grilled Corn

This recipe will likely yield more than the 1 cup you need for the zucchini pancakes. But having extra Spicy Grilled Corn around is not a problem! You can eat it cold, straight from the fridge, sprinkle it over salads or warm it up for a side dish.

Ingredients:

  • 3-4 ears of fresh corn in husk
  • 2 tablespoons olive oil
  • 2 tablespoons fresh lime juice
  • 2 cloves of garlic, finely chopped
  • 3/4 tsp Kosher salt
  • 1 tsp light brown sugar
  • ¼ tsp chili powder

Directions:

Combine olive oil, lime juice, garlic, salt, brown sugar and chili powder in small bowl and whisk together.
Preheat grill.
Peel back the corn husks, discarding all but a couple inner layers. Remove corn silk, then baste with dressing, and recover corn with remaining husk.
Grill on med-high for 20-25 minutes, turning 3-4 times during cooking time.
Remove the corn from grill and allow to cool a few minutes. Once it has cooled enough to handle, cut off stem end, place the flat cut end on bottom of large bowl, and use a corn zipper to strip the kernels from the cob. Or if you don’t have a zipper, run a small sharp knife down the length of the cob, slicing off kernels.

Enjoy!

Zucchini, Spicy Grilled Corn & Cheese Pancakes brought to you by: Runcible Eats (www.leaandjay.com)


Zoodles with Spicy Tomato Butter Basil Sauce

September 9, 2015

IMG_3001

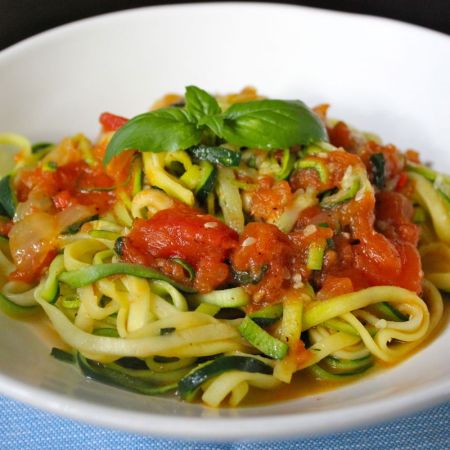
Since I just told you about those delicious Pad Thai Zoodles, I figure zucchini noodles might still be on your mind. So it would be the perfect time to share this Spicy Tomato Butter Basil sauce recipe with ya’ll. We’ve have been enjoying this amazing sauce over zoodles all summer long. The buttery sauce is just perfect over that fresh zucchini. But even if you’re not in to zucchini noodles

IMG_3135

– which I can’t imagine because they are sooo yummy – this rich decadent tomato sauce is equally to die for over regular old pasta.

IMG_3007

I bet a lot of you folks have bunches of ripe tomatoes that need to be put to good use and this recipe is just the thing for that. But if you are in a bit of a hurry and don’t want to make things totally from scratch, you can substitute in two 28 oz. cans of diced tomatoes (I love the San Marzano ones)  in lieu of the garden fresh option. Always tasty, no matter which way you go. And you’ll have quite a bit of this sauce. Generally the husband and I get two to three meals out of a batch of it. So if you don’t fancy having it for dinner twice in a week, the good news is that it freezes very well.

IMG_3016

Fresh and flavourful, lush and velvety, you just can’t go wrong with this Spicy Tomato Butter Basil Sauce. Serve it over zoodles for a light, summer garden vibe and when you need some cold weather comfort, it will be just the winter warmer you need served over a big bowl of pasta.

IMG_3011

Zoodles with Spicy Tomato Butter Basil Sauce

  • Servings: 3 cups sauce - enough for 2 -4 servings zoodles
  • Difficulty: easy
  • Print

recipe for Spicy Tomato Butter Sauce with Basil slightly adapted from: Once Upon a Chef

Ingredients:

For the Zoodles:

  • 5 medium zucchini
  • 3 Tablespoons of olive oil

For the Spicy Tomato Butter Sauce with Basil:

  • 4 pounds plum tomatoes (or two 28-ounce can diced plum tomatoes)
  • 5 tablespoons unsalted butter
  • 2 tablespoons olive oil
  • 2 medium yellow onions, peeled and cut in half
  • garlic cloves, peeled and smashed
  • 1 red pepper, finely diced
  • 1-1/4 teaspoons salt
  • 1 teaspoon sugar (you may not need this if your tomatoes are very sweet)
  • 2 tablespoons chopped fresh basil
  • freshly grated parmesan cheese – to serve

Directions:

If using fresh tomatoes: Using a sharp knife, cut an 1/4-inch deep X on one end of each tomato. Then, place scored tomatoes into a pot of boiling water and cook until you see the skin starting to wrinkle and split, 1-3 minutes, then lift the tomatoes out with the slotted spoon and plunge them into a bowl of ice cold water. Peel the skin off of the tomatoes and cut into 1/2-inch chunks. (Cut off and discard the cores at this point.)

Place the diced tomatoes and all of their juices into a large saucepan. Add the butter, olive oil, onions, garlic, red pepper, salt and sugar and bring to a gentle boil. Reduce the heat to low and simmer, uncovered, for 75-90 minutes, stirring occasionally, or until the sauce is no longer watery. Remove and discard the onions and any large chunks of garlic (the garlic should have mostly dissolved into the sauce). Personally, I like onions and at this point these onions are sooooo tasty, I couldn’t bear to throw them away. So I chopped one of the onions up and added it back into the sauce. Taste and adjust seasoning if necessary. Add basil right before serving.

Cut the zucchini into noodles by using a vegetable spiralizer tool. Cut zucchini noodles to a manageable fork twirling length – about 10 – 12″. Toss zoodles with a bit of salt and set aside for 15 – 30 minutes so that they can release some of their moisture. Drain zoodles. Add olive oil to frying pan and heat over medium heat. Add zucchini noodles and cook for 2-3 minutes or until tender. Take care not to overcook the zoodles. They are better slightly crunchy. Turn the heat off and let the zucchini noodles sit for about 5 minutes to allow as much moisture as possible to release from the noodles. Drain excess water away.

Add your desired amount of spicy tomato butter sauce to zoodles and toss to coat. Serve topped with freshly grated parmesan.

Enjoy!

Zoodles with Spicy Tomato Sauce with Basil brought to you by: Runcible Temps (www.leaandjay.com)


Pad Thai Zoodles

September 2, 2015

IMG_2974

So remember how a couple of weeks ago I told you all about those delicious Zucchini Fritters with Feta and Dill? I mentioned then that I would have a lot of zucchini recipes headed your way. Well look out… here they come! I’m starting this whole zucchini round-up off with this fantastic recipe for Pad Thai Zoodles. “Zoodles?”, you might ask. Yup….turns out you can make noodles out of zucchini…hence Zoodles!

IMG_3135

Now I’m not going to tell you that you’ll be completely fooled and think you are actually eating pasta. You won’t. However, zoodles are absolutely delicious. We’ve been obsessed with them around here this summer and have literally eaten oodles of zoodles at this point. I had been seeing them talked up on the internet for a while, but didn’t actually have any type of spiralizing tool that I could use to cut said zoodles. Then I happened to be shopping at a Bed Bath & Beyond or some such store and saw this “Veggetti” tool. It was pretty cheap and claimed it was easy to use, so I decided to give it a whirl before investing in a higher dollar spiralizer.

IMG_3124

I mean what if we didn’t even like zucchini noodles? Hah! The husband and I are just wondering where they’ve been all our lives! So we’ve been gobbling them up with all sorts of different sauces etc. And these Pad Thai Zoodles are definitely one of our favourite zucchini noodle creations thus far. Again…we aren’t really fooled into thinking we’re eating actual Pad Thai, but this twist on that traditional dish is wonderful. Gluten free, low carb, light and summer-y, with just the right amount of spice and no pasta coma to deal with post dinner. We enjoyed ours on Meatless Monday, but you could add any protein to the dish that you like – perhaps some shrimp or chicken for instance.

IMG_2988

But before I set you off and running to make up a batch of zoodles, I should give you a couple of words of advice. The spiralizers will cut really long zucchini noodles, which I found a bit difficult to work with. So now I will cut the noodles once they reach about 10 – 12 inches, which I have found to be the perfect fork twirling length. Once I have all my zoodles cut, I sprinkle a bit of salt over them and let them sit for about 15 – 30 minutes, tossing them occasionally. They will release quite a bit of water! Drain that water away and then let them sit again for a bit after you have sautéed them. Drain that water away before you mix with any sauces.

IMG_3131

Believe me, you too will be wondering where zoodles have been all your life once you get a taste of these spicy Pad Thai Zoodles. And you’ll be feeling oh so virtuous for being so healthy and eating up your veggies. Get to spiralizing some zucchini today!

IMG_2978

Pad Thai Zoodles

  • Servings: 2
  • Difficulty: easy
  • Print

recipe slightly adapted from: White on Rice Couple

Ingredients:

  • 5 medium zucchini
  • 2 Tablespoons (30ml) olive oil, divided
  • 3 large cloves garlic, minced or crushed
  • 1/2 red bell pepper, seeded and sliced thin
  • 3 green onions, sliced
  • 1 large egg
  • about 2 cups (480ml) bean sprouts
  • 1/3 cup (80ml) roasted peanuts, chopped
  • 1/4 cup chopped cilantro (optional)
  • fresh hot red pepper slices for serving (optional)
  • Few lime wedges for serving (optional)

For the Sauce:

  • 2 Tablespoons (30ml) rice vinegar or distilled white vinegar
  • 2 Tablespoons (30ml) fish sauce or to taste
  • 3 Tablespoons (45ml) ketchup
  • 1 teaspoon (5ml) packed brown sugar
  • 1/2 teaspoon cayenne pepper or 1 small red chili, sliced
  • 1 teaspoon chili garlic sauce, or to taste

Directions:

Begin by making the Pad Thai Sauce. Combine vinegar, fish sauce, ketchup, brown sugar, cayenne pepper and chili garlic sauce together in a small bowl. Whisk to blend. Set aside.

Cut zucchini into noodles by using a vegetable spiralizer. The noodles will be quite long. Cut to a more manageable length – about 10 -12″. Toss zucchini with a little salt and set aside for 15-20 minutes to allow it to release some liquid. Drain liquid.

Heat a large frying pan over medium high heat. Add 1 Tablespoon of the olive oil. Add zucchini noodles and cook for 2 -3 minutes or until the zucchini is tender. Depending on the size of the pan, you may need to work in batches. Take care to not overcook the zucchini. You don’t want it to go all mushy – it should remain slightly crunchy.

Remove the zoodles to a bowl and let them rest for about 5 minutes to release as much liquid as possible.

Wipe the frying pan clean. Add remaining olive oil and heat over medium high. Add garlic to the pan and cook until soft. Add bell pepper and green onions. Again, cook until tender.

Push veggies to the side and add egg to the pan, working to quickly scramble and chop into small pieces.

Drain liquid from resting zucchini noodles and add them back to the pan with the vegetable/egg mixture. Add the sauce and toss to combine. Cook for 1 -2 minutes until the noodles are warmed. Stir in the bean sprouts and remove from heat.

Top Zoodle Pad Thai with roasted peanuts and fresh cilantro. Serve with lime wedges.

Enjoy!

Pad Thai Zoodles brought to you by: Runcible Eats (www.leaandjay.com)