Halloween Cookies & Cream Owl Cupcakes

October 31, 2015

IMG_3534

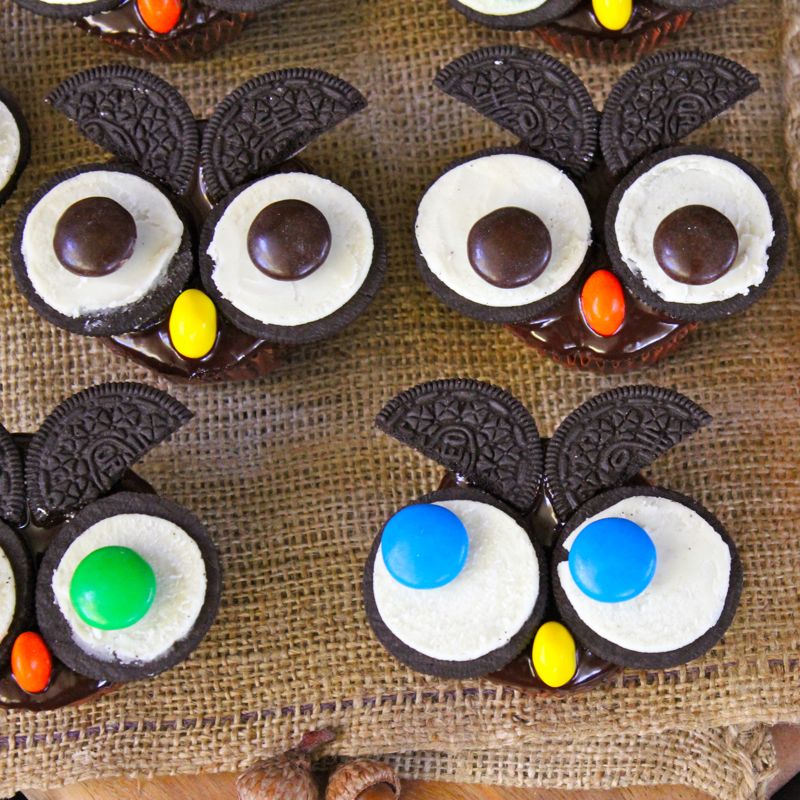
Happy Halloween! And just look what I’ve got here…h’OWL’oween Cupcakes! Or I guess you could call them OreOwls! Sorry, I couldn’t resist. But really, aren’t these Cookies & Cream Owl Cupcakes adorable!

IMG_3540

Almost too cute to eat…but who am I kidding?!! I love cupcakes. So believe me they only got a very short pass before I gobbled them up! Last Halloween I baked up a batch of Mini Mummy Brownie Bite Cupcakes that were pretty fantastic. Just look at these tiny terrors!

IMG_0006

But back to these little owls… They are so easy to make that you could still get a batch done before this evenings festivities. Or maybe you could make them for Thanksgiving. They definitely have an autumn vibe.

IMG_3535


IMG_3537

I give you a recipe for some very moist and chocolatey Cookies & Cream Cupcakes, but if you’re in a rush you could just make a box mix and fold some crushed Oreo cookies into the batter before baking. The chocolate ganache frosting is super easy to make. I dipped the cupcakes rather than actually frosting them. To be honest, the most difficult part of these cupcakes were trying to separate the cookies so that all of the white frosting cream remained on one cookie. Cutting the frosting-less Oreo to make the owl’s tufts was a bit challenging as well, but a few choice words later and Voila! Owl nirvana achieved! Happy Hauntings!

IMG_3530

Halloween Cookies & Cream Owl Cupcakes

  • Servings: 14 -16 cupcakes
  • Difficulty: easy
  • Print

recipe slightly adapted from: Once Upon a Chef (cupcakes) and Arctic Garden Studio (ganache)

Ingredients:

  • 3 ounces unsweetened chocolate, broken into small pieces
  • 1 cups all-purpose flour, spooned into measuring cup and leveled-off
  • 1/2 tablespoon instant coffee granules (optional, to enhance chocolate flavor)
  • 1/2 teaspoon baking soda
  • 1/4 teaspoon salt
  • 1 stick (1/2 cup) unsalted butter, softened
  • 1/2 cup granulated sugar
  • 1/2 cup packed light brown sugar
  • large eggs, at room temperature
  • 1/2 teaspoon vanilla extract
  • 1/2 cup buttermilk
  • 1 cup chopped Oreos
  • 28 -32 Oreo cookies for decorating
  • 28 – 32 brown, blue or green plain chocolate M&M’s (I used Mega M&M’s but regular sized are fine)
  • 14 – 16 yellow or orange white chocolate M&M’s (or plain chocolate M&M’s if you prefer)

For the Frosting:

  • 1/2 cup heavy cream
  • 5 ounces bittersweet chocolate, finely chopped
  • 1-2 tablespoons corn syrup

Directions:

Prep Work: Count out 28 -32 Oreo cookies. Divide these cookies in half and attempt to keep all of the cream on one of the cookies. Using a small icing spatula helps. If you end up crack a few cookies, don’t despair – you can crumble them even further and use them in the cupcakes. Once you have the cookies successfully separated, cut 14 -16 of the non-icing side Oreos in half to make the owl tufts. 

Preheat oven to 350° F and line two 12-cup muffin tins.

Place the chocolate in a microwave-safe bowl and cook in the microwave in 20-second intervals, stirring in between, until about 3/4 of the way melted. Stir, allowing the residual heat in the bowl to melt the remaining chocolate completely. (If necessary, place the chocolate back in microwave for a few seconds.) Set aside to cool.

In a large bowl, whisk together the flour, instant coffee (if using), baking soda and salt until well combined.

In the bowl of an electric mixer, cream the butter and sugars until light and fluffy, about 3 minutes. Scrape down the sides of the bowl with a rubber spatula. Add the eggs one at a time, scraping the bowl and beating well after each addition. Beat in the vanilla and lukewarm chocolate.

Add the dry ingredients in three separate additions, alternating with the buttermilk. Fold in the crushed Oreo cookies.

Spoon the batter into the prepared muffin cups until about 3/4 full (I think it’s easiest to use an ice cream scooper with a wire scraper). Bake for 20-25 minutes, or until the tops look dry and a toothpick inserted into the center of a cupcake comes out clean. Cool in the pan for about 15 minutes, then transfer to a rack to cool completely.

For the frosting: Heat heavy cream and chocolate over medium low heat stirring constantly until chocolate has melted. Stir in corn syrup. Let ganache cool for about 10 minutes before assembling cupcakes.

Cupcake Assembly:

First complete the owl “ore-eyes” (the Oreo halves with the icing). Place brown, green or blue M&M’s into the inner edge of the white part of each owl eye. Press down gently (if you push too hard you will crack the cookie) to stick M&M to the cream filling. Or if it seems like it doesn’t want to stick, a little bit of ganache to the bottom of the M&M to “glue” it in place.

Now for the cupcakes. Dip each cupcake in the ganache so that the top is frosted. Place eyes just slightly below the center of the cupcake, this will make sure you have enough room for the tufts. Then place the tufts above the eyes. Add a sideways orange or yellow M&M for the nose. Repeat with each cupcake until complete.

Enjoy!

*These cupcakes are best on the day that they are made as far as looks go. The Oreo tufts do get moist on the following day and tend to break off easily if you are trying to transport cupcakes.

Halloween Cookies & Cream Owl Cupcakes brought to you by: Runcible Eats. (www.leaandjay.com)


Irish Tea Barmbrack with a Whiskey Honey Butter Glaze (Non yeasted version) Battle of the Bracks -Part 2

October 28, 2015

IMG_3499

Here we go! Day two of the Battle of the Bracks. Today we are considering Irish Tea Barmbrack with a Whiskey Honey Butter Glaze. (Yup…I said “Whiskey Honey Butter”….don’t know about you, but that alone sounds like the stuff of dreams!) As I mentioned yesterday in my post about Irish Barmbrack Bread, Barmbrack is a tradition Halloween Treat in Ireland. And it is rather appropriate that we look to Ireland for Halloween goodies, since Halloween actually has Celtic origins. Our modern Halloween celebrations are derived from the Celtic holiday of Samhain. Samhain was Celtic New Year. It was a harvest festival which marked the dying of the sun-god and a turning to the colder, dormant half of the year. On this night, the Celts believed the veil between the worlds of the living and the dead was at its lowest point. The dead could more easily travel back over to our side, and if we weren’t careful, we could accidentally wander over in to their world and be trapped-a good reason to stay close to home and bonfires, no doubt! This belief likely gave rise to our Halloween legends of ghosts, ghouls and witches wandering about on this night in particular. Roaming spirits aside, Halloween was also a time for divination and that is where Barmbrack came in. This bread was actually used in an ancient fortune telling ritual. When a loaf of this bread was baked, several different trinkets or charms which had been wrapped in parchment paper were added into the bread. When the bread was sliced and handed out, your future was foretold by whatever bit you found in your portion. A wedding ring meant you’d be married within the year, a pea meant that you would not, a coin signified wealth, whereas a piece of rag meant a lean year, a thimble predicted a spinster and button meant bachelorhood was in your future. Feel free to add whatever trinkets you prefer to your bread. Most commercial loaves baked today only contain one ring.

IMG_3521

Now that the history lesson has ended, it must be time for the Brack review. I found this Irish Tea Barmbrack to be quite a charmer! (har har). It will definitely make you change your mind about fruit cakes without a doubt. It is really dense, boozy and bursting with fruit. And that Whiskey Honey Butter Glaze? Pure ambrosia I tell you! One taste and you will be hooked! And if all that wasn’t good enough, this bread is a one bowl wonder. You do have to remember to start the fruit soaking in the tea/whiskey bath the night before, but after that you just add all the ingredients to the soaking bowl, mix ’em up and pour them in the baking tin. Super easy!!! Which is just what I need right now because my house is still somewhere midst deconstruction/construction. Kind of has that perfect urban decay/ Halloween vibe come to think of it. Bottom line – the husband and I really like both Bracks and were it not for that Whiskey Honey Butter Glaze the yeasted version would have won easily. But well that amazing glaze is there for consideration. This has led us straight down the road to indecision! Not that I’m complaining at all since I now have two tasty loaves of bread that I can just keep sampling under the guise of trying to decide between them. So I’ll leave the judging up to you. If you have an opinion – yeasted vs. non – I’d love to hear from you in the Battle of the Bracks!

IMG_3500

Irish Tea Barmbrack with a Whiskey Honey Butter Glaze

  • Servings: 1 5x9 Loaf of Bread
  • Difficulty: Very Easy!
  • Print

recipe slightly adapted from: Edible Ireland 

You can use whatever fruit you would like in this bread, ie. all raisins, or substitute in some mixed candied peel, cranberries or glacé cherries if you prefer. Also if you would rather not use any whiskey in your bread (glad you can’t see the look of horror on my face right now…) you can soak the fruit in 1 1/4 cup tea and just leave it out of the glaze.

Ingredients:

For the bread:

  • 100 g (3/4 cup) raisins
  • 100 g (3/4 cup) sultanas
  • 100 g (3/4 cup) currants
  • 50 g (1/4 cup) chopped dates
  • zest of 1 lemon
  • 250 ml (1 cup) hot, strong black tea
  • 50 ml (1/4 cup) Irish Whiskey
  • 1 egg, lightly beaten
  • 225 g (1 3/4 cups) self-raising flour
  • 200 g (1 1/4 cup) light brown sugar
  • 1 level teaspoon mixed spice

For the Glaze:

  • 1/4 cup unsalted butter
  • 2 Tablespoons water
  • 1/4 cup honey
  • 1/4 cup granulated sugar
  • 1/4 cup Irish Whiskey
  • 1/4 teaspoon salt

Directions:

Put the raisins, sultanas, currants, dates in a large bowl, one that’s big enough to accommodate all the ingredients later on. Pour over the tea and whiskey and allow the fruit to soak for at least 30 minutes or even overnight. (overnight is better!)

When you’re ready to bake, preheat the oven to 350°F (180°C). Line a 1 lb (5″x 9″) loaf tin with parchment paper or spray with non-stick baking spray.

Add in the lemon zest, beaten egg, flour, sugar and mixed spice to the fruit and tea mixture. Stir well until everything is just combined. Pour the batter into the prepared loaf tin. Bake for about 1- 1 1/2 hours or until a toothpick comes out clean.

Place tin on wire rack to cool while you prepare glaze.

Place all glaze ingredients in sauce pan and heat over low heat. Bring to a boil and allow to boil for several minutes until it reduces slightly. Set aside to cool until warm.

Remove the warm bread from the baking tin and place on parchment paper. Once glaze has cooled to warm, paint bread all over with glaze in several passes, allowing time for it to be absorbed before adding the next wash.

Enjoy!

Irish Barmbrack with a Whiskey Honey Butter Glaze brought to you by: Runcible Eats (www.leaandjay.com)


Irish Barmbrack Bread (Yeasted version) – Part I of the Battle of the Bracks!

October 27, 2015

IMG_3482

I can’t believe it! Halloween is nearly upon us!!! Now don’t get me wrong, I love Halloween and am happy to see it here. It is pretty much my favourite holiday. I mean what’s there not to like…dressing up in funny clothes, partaking in a few tricks and treats, eating tons of candy and washing it down with even more booze. Woohoo! Bring me more holidays like that! It just kind of crept up on me….which is exactly what you’d expect from Halloween I guess. Today I thought I’d share a recipe for a Halloween treat that is traditionally eaten in Ireland – Barmbrack or as it is also known Báirín Breac. Breac means “speckled” which this bread definitely is, being shot through with whiskey and tea soaked raisins, sultanas and cranberries. Báirín can either be the word for “loaf” which would make sense since that would make its name be “speckled loaf” in English. However, I’ve also come across the theory that Barm is derived from the word “beorma”, which refers to a fermented liquor which would have been used back in the day to rise the cake.

IMG_3456

Barmbrack is a bit sweeter than your average sandwich bread but it is not as rich as a cake. It was traditionally baked up on Halloween as part of an ancient fortune-telling ritual. Yup. Several different trinkets or charms (perhaps the origin of that “lucky charm” bit…) were wrapped in parchment paper and baked  into the bread. When the bread was sliced and handed out, your future was foretold by whatever bit you found in your portion. A wedding ring meant you’d be married within the year, a pea meant that you would not, a coin signified wealth, whereas a piece of rag meant a lean year, a thimble predicted a spinster and button meant bachelorhood was in your future. I chose not to include any trinkets in my bread. I’m a bit wary of any divination. Even a fortune cookie gives me pause. But feel free to partake as you will! Many Bracks sold commercially today still include a ring, though none of the other lucky charms.

IMG_3466

When I set out to make Barmbrack, I quickly discovered that there were two different types of the bread to be found, a yeasted version and a non-yeasted version which was more like a tea bread. I couldn’t decide which one I should do, so I chose to do both and hold a sort of “Battle of the Bracks” to see which one we preferred. Today I’m going to give you the yeasted version and make sure you check back tomorrow, because I’ll be telling you all about the tea bread version. I found the yeasted Barmbrack to be delicious – light, airy, slightly sweet and spicy (in a nutmeg/cinnamon/clove kind of way – not my usual set your tongue alight kind of way.) It was lovely still warm from the oven, but even better I think when toasted and slathered in butter! Now the downside to this bread is that being a yeast bread, there is a bit of a time commitment here. Both Bracks require that the fruit be soaked in a whiskey/tea mixture overnight. But this loaf also requires 2 rising times as well as all of the kneading that is necessary to incorporate the fruit. Now I would say it was totally worth all the effort. But you should keep in mind that pretty much every yeast bread out there makes me swoon and upon the first bite I forget how much work went into making it. And although this bread is usually served as a Halloween treat, I’m sure no one would be sorry to see it turn up on the table any time of the year. And with its Irish pedigree, it might even make a lovely addition to your St. Patrick’s Day table. Make sure you check back in tomorrow to hear all about the challenger in this Battle of the Bracks – Irish Tea Barmbrack with a Whiskey Butter Honey Glaze!

IMG_3487

Irish Barmbrack Bread

  • Servings: 1 large loaf
  • Difficulty: fairly easy - but keep in mind there is an overnight soak for the fruit as well as two rising times for the dough
  • Print

recipe adapted from: Seasons and Suppers

Ingredients:

  • 1/2 cup raisins
  • 1/2 cup sultanas
  • 1/2 cup cranberries
  • 2 cups strong brewed black tea
  • 1/4 cup Irish Whiskey
  • 4 1/2 – 5 1/2 cups all-purpose flour
  • 1 teaspoon grated nutmeg
  • 1 teaspoon cinnamon
  • 1/4 teaspoon cloves
  • 1/2 teaspoon fine sea salt
  • 1/4 cup brown sugar
  • 2 1/4 teaspoon dry active or instant yeast
  • 6 Tablespoons cold butter, cut into small pieces
  • zest of one lemon
  • 1 cup milk
  • 1 large egg, beaten
  • milk and Demerara sugar for brushing over the top

Directions:

Brew 2 cups of hot tea and allow to cool to lukewarm. Stir in 1/4 cup Irish Whiskey. Place the fruit in a medium glass bowl and pour tea/whiskey mixture over it. Stir and cover bowl with plastic wrap. Leave to soak on the counter overnight.

In a large bowl or the bowl of a stand mixer using the paddle attachment, combine 4 cups of the flour, spices, salt, sugar, and instant yeast. With a pastry cutter or your fingers (or with the paddle attachment on your mixer), work in the butter in to the flour until it resembles coarse crumbs. (If you are using dry active yeast, rather than instant yeast, add it to the lukewarm milk – which will be detailed in the following step – and allow it to  proof for 5 minutes before adding it to the dough.)

Meanwhile, in a saucepan over medium heat warm the milk to 110° F – 115°F. Beat the egg into the milk and then stir into the dry ingredients. Mix well with a wooden spoon or switch to the kneading hook on a stand mixer. Knead by hand or with the kneading hook until dough starts to come together and pull away from the sides of the bowl (adding more flour in small increments, as necessary).

Drain the raisins and add to the dough. I know this sounds pretty easy, but this is likely the most difficult bit of this recipe! Don’t lose heart though, all of that fruit will eventually get mixed in. Sprinkling a bit of flour over the well drained fruit does make it a bit easier to incorporate it.  Work the fruit in, adding a bit more flour as necessary, until you have a smooth dough that is not sticky.

Remove dough to a large greased bowl. Cover with plastic wrap and allow to rise until doubled in size.

Grease an 8-inch cast-iron skillet or baking pan and pre-heat oven to 400° F.

Turn risen dough out on to a floured surface. Press lightly to de-gas, then form in to a round by pinching the dough underneath. Place dough round in to prepared pan. Cover with a clean tea towel and allow to rise until puffy, about 30 minutes more.

Brush top of bread with milk or cream and sprinkle with Demerara sugar.

Bake in pre-heated oven for 20 minutes, then check the bread. If it is nicely browned, cover top loosely with a piece of tinfoil, then continue cooking for an additional 20 minutes or so, or until an internal temperature of about 195°F about 40 – 50 minutes total. Let cool completely before cutting into slices.

Enjoy!

Irish Barmbrack Bread Brought to you by: Runcible Eats (www.leaandjay.com)


Vietnamese Shredded Chicken Salad

October 23, 2015

IMG_3432

The weather around here recently has been pretty wonky. Like it has a split personality or something. Seriously…I was pretty sure we were doing the Fall thing around here and the next thing I knew was the mercury shot up to 80°F only to plunge down to 43°F the following evening! What the what! And it wasn’t done there. Nope…it plunged down to scarcely above freezing. Had me scrambling to get the plants inside. But now we’re back up into the mid-70’s. It is a wonder my head hasn’t totally exploded. Not to mention, while all that roller coaster weather nonsense is happening, I’m in the midst of a big house renovation. Nothing like walking through a fog of dry wall dust every day! But the good news is that I will finally have a master bathroom again. Ours burned up about 1 1/2 years ago now. (Time for my own little Public Service Announcement: If your bathroom exhaust fan was made prior to 1990 – it does not have a thermal fuse in it, which means if the bearings seize up, the fan can become so hot that it can catch the surrounding insulation on fire!) Our reaction? The husband and I just nailed up some plywood, boarded that thing up and have been using the guest bath down the hall ever since! Pretty pathetic huh? We just couldn’t decide what we kind of renovation we wanted to do. Oh well – we did finally get it together and in a few weeks I’ll be soaking in my glorious new bath tub! But in the meantime, this place is a complete shambles! So I’m going to share a wonderful recipe with you today which not only comes together quickly and easily with minimal preparation but also tastes fantastic and refreshing. Vietnamese Shredded Chicken Salad.

IMG_3443

This delicious dish comes from one of my favourite blogs Once Upon a Chef. Every recipe of Jenn’s that I’ve ever made has been a winner. And this was no exception! So if you’re having a rather hectic day, this salad, which is just bursting with fresh Asian flavors, is just what you need to help you deliciously reign in some of that chaos.

IMG_3428

Vietnamese Shredded Chicken Salad

  • Servings: 2-3
  • Difficulty: easy
  • Print

recipe from: Once Upon a Chef

Ingredients:

For the Salad:

  • 2 heaping cups cooked shredded chicken, from one store-bought rotisserie chicken
  • 4 cups shredded napa cabbage
  • scallions, thinly sliced
  • 1 cup grated or matchstick carrots
  • red bell pepper, sliced into bite-sized pieces
  • 1/2 cup roughly chopped fresh mint
  • 1/2 cup roughly chopped fresh cilantro
  • 1 -2 thai red peppers, chopped (optional: add if you like it spicy!)
  • 1/2 cup chopped peanuts

For the Dressing:

  • 1/4 cup fresh lime juice, from about 3 limes
  • 2 teaspoons Sriracha sauce
  • cloves garlic, minced
  • 2 tablespoons sugar
  • 3 tablespoons fish sauce (preferably a brand imported from Thailand or Vietnam)
  • 3 tablespoons vegetable oil

Directions:

In a large salad bowl, combine all of the salad ingredients except for the peanuts. In a separate bowl, combine all of the ingredients for the dressing; whisk until the sugar is dissolved. Right before serving, toss the dressing with the salad. Transfer to a serving bowl and garnish with the peanuts. Serve cold.

Enjoy!

Vietnamese Shredded Chicken Salad brought to you by: Runcible Eats (www.leaandjay.com)


Rice Krispie Crack Bars

October 7, 2015

IMG_3193

Good old Rice Krispie Treats. You know what I’m talking about. That undeniably pleasing confection made by blending marshmallows and puffed rice cereal that has stood the test of time. A tray of these simple, classic dessert bars will make you immediately nostalgic for your childhood. Though I must admit, I think I’ve actually eaten far more of these as an adult than I did as a child. They are a dessert that is in high rotation around this household. Thank heavens that they are really fast and easy to make and lets face it, downright delicious! All crispy and gooey…we’re big fans of the gooey bites around here, so I usually add more mini marshmallows to the mix right before turning it out into the pan. It’s true that one can find a lot of recipes out there which have little variations on the original Rice Krispie treat recipe. And I pretty much love them all. A particular favourite  of mine is adding a little bit of Biscoff cookie butter into the mix. But I think I’ve upped the ante here with these Rice Krispie Cornflake Crack Bars. I may have indeed achieved Rice Krispie Treat nirvana.

IMG_3208

So what we’ve got here is the classic Rice Krispie Treat (with a few extra marshmallows added like I normally do…) but it is crowned with a layer of Cornflake Crunch! I’ve been obsessed with Cornflake Crunch ever since I made those Cornflake Chocolate Chip Marshmallow Cookies from the Momofuku Milk Bar cookbook. In that recipe, Chef Tosi calls for adding Cornflake Crunch to the cookie dough and it is a large part of what makes them so irresistible. Luckily the recipe she provides makes more Cornflake Crunch than you need for the cookies. Which is a good thing for me because I can’t stop eating it. I’ve been putting it on my oatmeal, yogurt, ice cream and I may have even been seen lurking around the fridge late at night with tell-tale cornflake crumbs on my jammies. Addictive I tell you!

IMG_3280

So considering my recent Cornflake Crunch fascination, it should come as no surprize that they found their way onto a Rice Krispie Treat in my kitchen. Voila! Rice Krispie Crack Bars were born!

IMG_3202

Let me tell you, Cornflake Crunch just takes these treats over the top. You’ve still got the delight of the crispy/gooey thing going on, but now you’ve also got that glorious crunchy/sweet/salty/buttery bliss of the Cornflake Crunch added into the mix. Absolutely brilliant! One bite and you’ll be hooked.

IMG_3194

Rice Krispie Cornflake Crack Bars

  • Servings: 9 -12 depending on how you slice 'em
  • Difficulty: easy
  • Print

Ingredients:

  • 3 Tablespoons butter
  • 1 10 oz. package of mini marshmallows + 1 cup, divided
  • 6 cups Rice Krispies Cereal
  • 1/3 cup Cornflake Crunch (recipe to follow)

Directions:

In large saucepan melt butter over low heat. Once butter has completely melted, add 10 oz. bag of mini marshmallows and stir to coat with melted butter. Keep pan on heat, stirring marshmallows frequently until completely melted. Remove from heat. 

Add Rice Krispies cereal. Stir until well coated. Add one cup of reserved mini marshmallows and stir until equally distributed.

Using buttered spatula or wax paper evenly press mixture into  a buttered 9 x 9 x 2-inch pan. Working quickly before mixture has cooled, press Cornflake Crunch evenly into top of treats. Allow to cool and then cut into desired sized squares. 

Cornflake Crunch

recipe from: Momofuku Milk Bar Cookbook

yield: 360 grams (4 cups)

Ingredients:

  • 170 grams (5 cups) cornflakes
  • 40 grams (1/2 cup) milk powder
  • 40 grams (3 Tablespoons) sugar
  • 4 grams (1 teaspoon) kosher salt
  • 130 grams (9 tablespoons) butter, melted

Directions:

Heat the oven to 275°F.

Pour the cornflakes in a medium bowl and crush them with your hands to one-quarter of their original size. Add the milk powder, sugar and salt and toss to mix. Add the butter and toss to coat. As you toss, the butter will act as glue, binding the dry ingredients to the cereal and creating small clusters.

Spread the clusters on a parchment or Silpat-lined sheet pan and bake for 20 minutes, at which point they should look toasted, smell buttery, and crunch gently when cooled slightly and chewed

Cool the Cornflake Crunch completely before storing or using in a recipe. Stored in an airtight container at room temperature, the crunch will keep fresh for 1 week; in the fridge or freezer, it will keep for 1 month.

Enjoy!

Rice Krispie Crack Bars brought to you by: Runcible Eats (www.leaandjay.com)