Today I’m going to share with you a delicious recipe for Kjötsúpa – Icelandic Lamb Soup. Kjötsúpa actually means “meat soup”, but in Iceland the meat will almost always be lamb.

The Husband absolutely loves to get a bowl of this when we visit Iceland. So I really wanted to try to find an authentic recipe that would taste a close as possible as I could get it to the soup we enjoy there. And the happy news is that this recipe, along with a secret ingredient I will tell you about a bit later, has done the trick!

Annnnd…I also want to tell you all about a trip to Iceland that the Husband and I took with our parents in tow back in September 2018. You see? I am making progress writing up travel posts on the backlog of trips we have taken. What with the quarantine grounding us, I will soon be caught up and maybe then can actually post about eagerly awaited upcoming trips in a more timely fashion. (Hope springs eternal…) Anyhoo…Iceland has opened its borders to tourists from the Schengen area, EU/EEA, EFTA and UK Nationals, on June 15th, and plans at this point, to open to most countries from outside of the Schengen area on July 1st. Originally this was to include folks from the U.S. Much to my dismay, it looks like the US will now be excluded since Covid-19 cases are still on the increase here. Now be aware, Iceland has not just thrown their borders open willy-nilly. They have done a magnificent job managing Covid-19 for their citizens and are not just throwing caution to the wind at this point. So be aware that until further notice, anyone arriving in Iceland, with a few exceptions, will need to fill out a pre-registration form BEFORE they jump on a plane. You can find this form, along with official Icelandic government information on Covid 19, here. Basically folks arriving at Keflavik airport will either need to go immediately into 2 week quarantine, or will be required to have a PCR test done. The results of the test will be available 3 -5 hours later. And you will be encouraged to download the contract tracing app Rakning C-19 to your phone as well. After you have successfully navigated the safety measures which the Icelandic government has put in place to protect its citizens and visitors alike, this blog might be of some help to you with your planning for the rest of your adventures in the country. Make sure you take a look at all of the travel links I have listed at the end of this post and if you are still looking for further inspiration, you can also take a look at previous travel posts I have done on Iceland.

By September 2018, the Husband and I had visited Iceland eight times (as of this writing, we have visited the country eleven times and are eagerly monitoring the Icelandic governments Covid-19 travel guidelines, so that we can get back for or twelfth trip). Our parents had heard all about it from us and were eager to experience it themselves. Seeing the Northern Lights was on the Father-in-law’s bucket list. So we decided to play tour guides and show them around. You read a lot about planning kid friendly holidays/vacations, but not so much about parent friendly ones. The Husband and I usually incorporate a lot of hiking and outdoor activities in our travels. But we knew that would not really be appropriate or quite frankly of interest to the Parents, whose ages range from mid 70’s to early 80’s. They would want a more sightseeing type of itinerary. We only had one week to work with, so we did not feel that a rushed driving around the entire ring road would be a good experience for them. We know that the South Coast of Iceland is gorgeous, has lots to offer and is easily accessible from the airport. This seemed like an ideal spot to take the parents. And although we have been there many times ourselves, we can never get enough of any part of Iceland, so off we went. We chose to go early in the month of September because the weather is still (hopefully – you never know with Iceland) good, it is dark enough for Northern Lights at night and there was not likely to be any snow or ice where we were visiting (a couple of the parents do have some mobility issues).

We flew with Icelandair, rented a big SUV from Blue Car Rental and set out for the South Coast. The Lava Centre in Hvolsvöllur was our first stop. The Lava Centre sits squarely between five of Iceland’s greatest volcanos. This new award winning attraction provides a multimedia interactive experience on Iceland’s formation, earthquakes and its many volcanos. Great introduction to the country!

Then we headed off to our hotel. We had booked with Hótel Rangá for our first two nights. Back in December 2012 as well as December 2013, the Husband and I had stayed with them for four wonderful nights in their Antarctica Suite.

Antarctica Suite at Hotel Rangá
We had told the Parents all about it. And the Mom had seen it on one of those Housewives shows, so she was very intrigued.
 Hótel Rangá is the only 4 star resort in South Iceland. This lovely boutique hotel is situated rather remotely next to the East Rangá river, somewhat near the small town of Hella. This remote location, far from city lights make it an ideal place to view the Northern Lights should they make an appearance. Being well aware that many of their guests are keenly interested in viewing this natural wonder, the hotel offers a service where you can sign up to be notified if the lights do show up.

Amazing Northern Lights we saw at Hotel Rangá on our first visit in December 2012.
The quirky decor is reminiscent of a hunting lodge


and there are several geothermal hot tubs available if you need a good soak.


This was the perfect place to stay at the beginning of our journey. Everyone was very tired after the overnight flight and the folks at Rangá, friendly and charming as always, had us relax in their plush upstairs lounge, while our rooms were readied. They were even able to get us in a bit early.

Another great reason to stay at Rangá is their amazing restaurant which serves modern Nordic cuisine with and emphasis on locally sourced ingredients.


The next day, after partaking in their extensive Champagne buffet breakfast, we piled into the car to check out the Golden Circle. First stop: Geysir! As if you hadn’t guessed, Geysir is a geyser. In fact it is from Geysir that we get the word geyser. Geysa is an old Norse verb meaning “to gush”. Geysir doesn’t actually erupt very regularly at this point. However, Strokkur, another geyser nearby, is very predictable, erupting every 5 -7 minutes.
Then onto to Gullfoss or the Golden Waterfall. One of Iceland’s most iconic waterfalls, the water cascades down over several levels.

The Husband wasn’t about to pass up the chance for a bowl of Kjötsúpa at the Gullfoss Kaffi, which is located inside the visitor center. Now I usually wouldn’t recommend dining in a touristy shop, but I gotta admit – you should get a bowl of Kjötsúpa here. We had enjoyed it on a previous visit and knew it was really tasty. Trust me!


Then on to Þingvellir National Park . This World UNESCO site is gorgeous!

And lucky us, we did have a small glimpse of those elusive Northern Lights that evening.

The third day we headed east towards the lovely village of Vík, taking in Seljalandfoss waterfall along the way.

The weather was not too bad that day, and the Husband and I have all of the waterproof kit at this point, so we did walk behind it. The Parents decided to sit that one out.

Magestic Skógafoss was next on the itinerary.

Continuing eastwards, our next stop was at Sólheimajökull, a glacial tongue of Mýrdalsjökull. We didn’t go for a glacial hike while there, but just took in views.

Then onto Dyrhólaey

and Vík í Mýdral’s (often just known as Vík) black sand beach.

According to legend, those large basalt columns, or sea stacks that you see right off the coast are trolls which didn’t make it back inside before sunrise and were subsequently turned into stone.

We had definitely seen a lot on our first three days in Iceland. To see all the live action take a peek at the video below. And stay tuned to see what we get up to on day four!
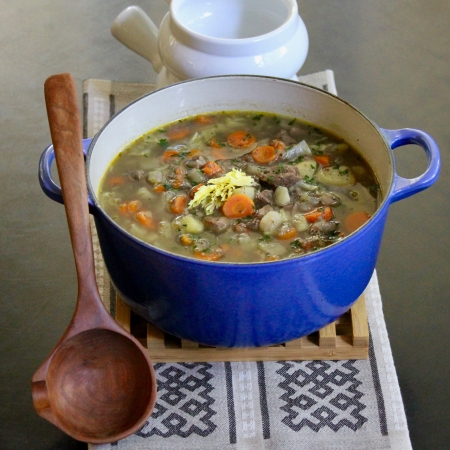
But wait – don’t go! I have yet to tell you about today’s featured recipe. Kjötsúpa is a vey traditional soup and each Icelandic family likely has their own version of it. Some folks have been known to thicken the soup with rice or oatmeal, but this version remains very soup-like in consistency. Homey and very comforting, it is just the thing to warm you on any chilly day.

As I mentioned, I am quite pleased with this recipe because it tastes very similar to the Kjötsúpa we have enjoyed in Iceland. I think this is due in no small part to a secret ingredient, which gives it such an authentic flavor.

I will keep it a secret no longer – Icelandic Soup Herbs. This is a mixture of arctic thyme, birch leaves, bilberry and juniper. You can find this in pretty much any grocery store in Iceland and I’ve included a link at the bottom where you can purchase it online. It will truly make a big difference. So, what are you waiting for? Make up a big pot of this Kjötsúpa to fortify you while you plan your Icelandic adventure!

Kjötsúpa - Islandic Lamb Soup
recipe from: Icelandic Food & Cookery by Nanna Rögnvaldardóttir
Ingredients:
- 2 pounds lamb on the bone
- 2 teaspoons salt
- 1/2 teaspoon freshly ground black pepper
- 1 onion or leek, chopped
- 1 -2 Tablespoons soup herbs (see note that follows)
- 1 pound rutabaga (or turnips), peeled and chopped
- 1/2 pound carrots, peeled and sliced
- 1/2 pound potatoes, peeled and chopped
- 1 cup green cabbage, roughly chopped
Directions:
Trim excess fat from the meat. Place it in a large dutch oven. Add 6 cups water and salt. Slowly bring to a boil. Add pepper, soup herbsand onions. Continue to simmer for 45 minutes.
Add all of the vegetables, except for the cabbage, to the pot and continue to simmer for 15 more minutes.
Add the cabbage and simmer until all of the vegetable are fork tender.
Remove the meat from the soup. Separate out the bones and chop the meat into bite sized pieces. Add back to the soup.
Taste and adjust seasoning as necessary.
You can serve this soup immediately, however we usually let soup sit overnight to develop the flavors. If you so choose to rest the soup, let it cool and then put in refrigerator overnight. Another great thing about letting the soup rest in the fridge overnight is that it is easy to skim off any excess fat, as it solidifies on top. Reheat soup and garnish with fresh parsley, chives or chopped celery leaves.
*Icelandic soup herbs are a mixture of thyme, birch leaves, bilberry and juniper. I have included a link where you can purchase it online. That is if you don’t remember to pick so up while you are visiting Iceland. Good substitutions are thyme, parsley, bay leaves.
Enjoy!
Links for Helpful Kitchen Tools & Ingredients for Kjotsupa:
Icelandic Food & Cookery by Nanna Rögnvaldardóttir – great cookbook!
Urta Villikrydd (wild herbs) – Soup herbs I mentioned above. This link is for a site called Nammi which sells all sorts of Icelandic products. Nammi also sells another brand of soup herbs (Sûpujurtir), but I have not tried it.
Links for Planning a Parent Friendly vacation in Iceland:
Covid-19 Information: Please make sure you familiarize yourself with all of the Icelandic Government’s travel requirements BEFORE you head out. All of the official information can be found here.
Travel Planning Guide:
I Heart Reykjavik– An invaluable resource for all things Iceland! I Heart Reykjavik is a small, family run company that offers you personalized service. Planning a holiday can certainly be stressful which has become even more so with rapidly changing safety requirements due to Covid 19. I Heart Reykjavik is keeping up to date with all of the government guidelines and can provide guidance here. Additionally, they can help you plan a fantastic vacation to Iceland in a couple of ways. You can browse and book tours directly on their website. The advantage here is that I Heart Reykjavik has vetted all of the companies on their carefully curated list. Often they have even gone out on the tours and you can read a review of their experience on their blog. Their recommendations can save you a ton of time pouring over tours and reviews online and let you know which company you can best trust with your money . Another advantage is that if you book all of your tours through them and then a unforeseen change due to the weather or some sort of thing, I Heart Reykjavik can suggest changes to your itinerary and assist you with rebooking. And speaking of itineraries, if you are the type of person who likes to plan out everything yourself, I Heart Reykjavik can still be of assistance. They offer an Itinerary Review service, where they can take a look at your upcoming plans and make sure everything makes sense – such as if you have allowed enough travel time. They can give you feedback concerning accommodation and alert you if there is a must see in the area you are visiting which has not found it’s way into your plans. They are truly an invaluable resource!
Getting There: Icelandair! We love Icelandair and have always had great experience with them. Take advantage of their Stopover program on your next flight to Europe.
Car Rental: Blue Car Rental: We ALWAYS rent our car from Blue Car Rental. Friendly Icelandic company, well maintained, newer, quality vehicles – they’ve never let us down and at this point we have rented from them on six different visits and have had excellent experiences every time. The price they quote on their website has all of the insurance included so there are no surprizes when you show up at their rental desk. Highly recommend!
Accommodation:
Hótel Rangá – Gorgeous 4 star boutique hotel, decorated in a rustic hunting lodge or ski resort style. It is located out in the country (hence no light pollution), about two hours from Reykjavik. Hotel Rangá caters to folks hoping to get a glimpse of the Northern Lights and will give you a wake up call should you desire if the elusive lights do make an appearance. The rooms range from cozy standards to quirky spacious suites. Expansive breakfast buffet. Comfortable laid back lounges. Relaxing geothermal hot tubs, private observatory with telescopes for sky gazing and an on site restaurant serving up delicious modern Nordic cuisine. All of that with a friendly, helpful & welcoming staff. Highly recommended.
Destinations:
The Lava Centre: Located in Hvolsvöllur, The Lava Centre sits squarely between five of Iceland’s greatest volcanos. This new award winning attraction provides a multimedia interactive experience on Iceland’s formation, earthquakes and its many volcanos. Great introduction to the country!
The Golden Circle: This popular tour route usually begins Reykjavik, loops around for 140 miles to include three stunning locations: Þingvellir National Park, Geysir Geothermal Area & Gullfoss Waterfall and then ends up back in Reykjavik. It generally takes 3 1/2 hours to complete the drive and that is without stopping at all, which I don’t know why anyone would want to do that. So, it is definitely an all day activity when you factor in stops along the way. Many tour companies offer Golden Circle tours. If you are interested in driving it yourself, take a look at I Heart Reykjavik’s Guide. Here you will find answers to many of the questions you might have as well as a google driving map which not only includes the three main areas of interests, but also restaurants along the way, and other attractions which you might want to add to your itinerary.
Geysir Geothermal Area – See the original Geysir as well as Strokkur and other geothermal attractions.
Þingvellir National Park– Unesco World Heritage Site. First Icelandic Parliament, or Alþingi, was held here in the year 930 AD. It is also the place where you can see the rift between the Eurasian and the North American tectonic plates. You can literally walk between the continents.
Gullfoss – Stunning multi level waterfall located on Hvítá river in south Iceland. Gull means “Gold” in Icelandic and Foss means “waterfall” – hence Golden Falls. One of Iceland’s most iconic waterfalls.
Seljalandfoss – A beautiful waterfall located just off of Route 1 on the South Coast. If the weather is good and you don’t mind getting a bit wet, you can walk behind this waterfall.
Skógafoss – Another beautiful waterfall located just off of Route1 on the South Coast. Due to the amount of spray from the falls, if the sun is out you will likely see a rainbow in front of it.
Sólheimajökull– A glacial tongue of Mýrdalsjökull located just off Route 1 on the South Coast of Iceland.
Reynisfjara Black Sand Beach– Famous picturesque black sand beach located near the village of Vík. Please be careful at this beach. The waves and rip currents are quite powerful. There are sneaker waves which can seemingly come out of nowhere and travel much further up the beach than expected, knocking you off your feet and potentially pulling you out to the freezing sea. Never turn your back to the waves. Unfortunately there have been several fatalities at this beach.
Dyrhólaey Peninsula – Stunning views of Iceland’s south coast and over to Reynisfjara Beach.


 Posted by liadh1


 This bread is lovely and soft, but sturdy enough to hold up to any sandwich. Wonderful for grilled cheese and delightful when simply toasted and slathered with butter.
 And speaking of butter – these Butterflake Rolls are the bomb! To make them you roll the dough out, brush melted butter all over the surface, cut it into strips, stack them and then bake them in muffin tins. Just look at all those lovely flaky buttery layers just waiting to be pulled apart!


 Also it is not only easy to make, but also can be made ahead of time. Yup – an icebox cake keeps very well in the icebox. And while it’s chilling in there, those Chocolate Wafers are becoming soft and wonderfully spongy. It is as if you baked the thinest cake layers. But the good news is that you had to do nothing of the sort.


