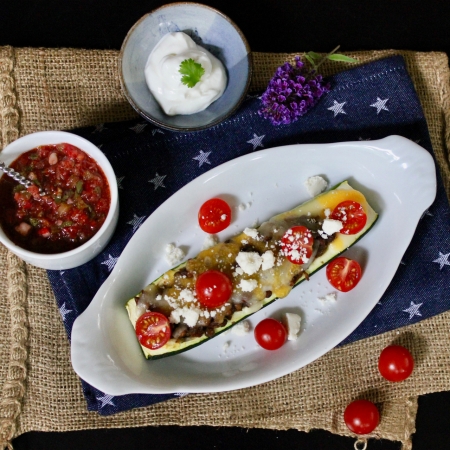
I’m going to take a bit of a break from bread recipes today and tell you all about these Zucchini Boats filled with Spicy Lager Lentils! If you are a fan of spicy, Tex-mex cuisine, you need to add this recipe to your repertoire.
The Husband and I absolutely love zucchini. Can’t get enough of the stuff, which is a bit strange because neither of us liked it one little bit when we were kids. Now I want to eat it all the time. One of our absolute favorite sides are these Zucchini Spicy Grilled Corn & Cheese Pancakes:
And zucchini adds moisture as well as flavor to my favorite Banana Bread recipe:
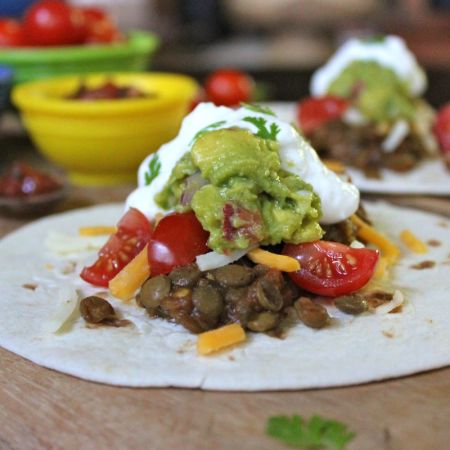
So yeah, we are all about zucchini here. Stuffing a few of them with some spiced up lager lentils seemed like a great idea. And boy was it ever! I first told you about these lentils when we made tacos with them. Absolutely delish!
Now we’ve got those same spicy lentils wrapped with zucchini, rather than a tortilla. This is great news if you are trying to cut back on carbs. And you still get to top these Zucchini Boats with all the same fun toppings you would put on a taco.
Another win is that these little boats are perfect for a Meatless Monday! I swear you won’t miss that meat at all.
Later this summer, when you are absolutely swimming in zucchini, you will be so happy that I shared this idea with you. And the recipe is easily customizable, so if you are a hardcore carnivore – go ahead and add some meat. Turns out there really aren’t any rules. So have fun creating your own version of these Zucchini Boats today! (but I gotta say…these Spicy Lager Lentils are pretty amazing…)
Heat 1 tablespoon of oil in a large frying pan or dutch oven over medium high heat. Add the onion and cook for 4-5 minutes until translucent. Add the garlic and tin of green chilis, cook for another minute or two. Add the spice mixture and cook, stirring frequently. You don’t want to burn the spices just crank up the flavor by cooking them.
Add the lentils, salsa and 6 ounces of the beer and stir to combine. Let cook for 2-3 minutes. Using a potato masher or fork, gently mash the lentils until the mixture reaches the consistency you are happy with. Cook another few minutes until hot. If the lentils start to dry out, add another glug or two of the lager. ( If you haven’t slurped it down…cooking is hard & thirsty work!)
Preheat the oven to 375° F. Line a large sheet pan with parchment paper.
Slice the zucchini in half lengthwise. Use a small spoon to dredge out a channel for the spicy lentils to sit in. Don’t remove too much of the zucchini. Take care to leave at least 1/4″ flesh in the zucchini. Just remove the center seeds and discard.
Place the zucchini on the prepared baking sheet.
Fill the prepared zucchini boats with the spicy lentils. Sprinkle shredded Mexican style spicy cheese over the tops.
Bake for 30 – 40 minutes until the zucchini are fork tender.
Remove from oven. Add any additional toppers you would like.
Enjoy!
Zucchini Boats filled with Spicy Lager Lentils brought to you by: Runcible Eats (www.leaandjay.com)
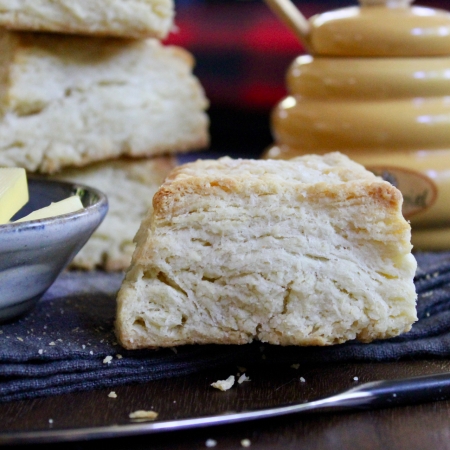
I have been all about bread recently…Skillet Cornbread and then, most recently, Buttery Potato Burger Buns. And guess what? I must be on a roll (ha! pun intended), but I’m going to stay the course today and share a recipe with you for Buttermilk Biscuits. And not any ole buttermilk biscuits, but these golden delicious darlings happen to be Bon Appétit’s Best Buttermilk Biscuits!
Now I must admit the Husband and I do love our buttermilk biscuits and have always been on the lookout for the “best” recipe. I took a look back at my catalog of past recipes and found four different ones for the elusive best buttermilk biscuit. There were the Buttermilk Biscuits that I baked for my Spicy Pork & Chorizo Breakfast Biscuits
And finally those Buttermilk Biscuits that I baked to go with my Nashville Hot Chicken
That is a lot of Buttermilk Biscuits, no? So what makes these biscuits Bon Appétit’s best? And perhaps more importantly are they our best? Well, there does not seem to be any secret ingredient to be found in this recipe – it’s flour, butter, buttermilk, baking powder and soda, a little salt and sugar. Nope, it isn’t the ingredients. It is all about the technique. You need to use cold butter. You need to work quickly and have a very light touch. Overworking the dough will result in tough biscuits. Nobody wants that. Tender, fluffy & flaky are what we are going for!
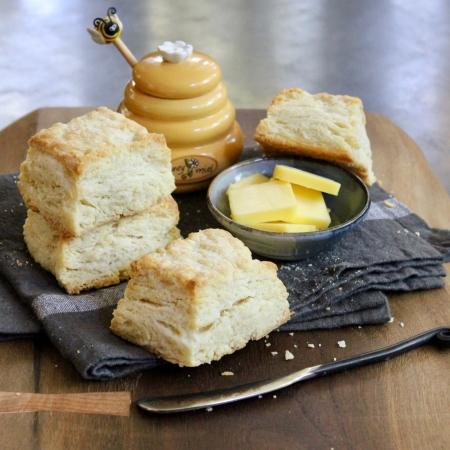
As you are mixing these biscuits up, you are probably going to think that the recipe is too dry. Resist the urge to add any more buttermilk. Just continue to lightly work that shaggy, craggy, crumbly dough as best you can into a square that is 1″ tall. As the dough sits it will continue to hydrate. Believe me. I was skeptical as I was doing it, but it really does work! Another trick that makes these biscuits so irresistible is the stacking of the dough. This ends up creating layers of thin sheets of butter. Kind of like that laminated dough I told you about when I made these Spinach Croissants
It is these little butter rivers running through the dough that expand upon baking to create this lovely tall layers.
Final tip – when you cut the dough into biscuits, use a sharp blade and push your blade straight down to cut. Do not saw back and forth. This will help to give you biscuits the tallest rise possible.
And perhaps the best thing about this recipe for me is that you can make up a big batch of biscuits ahead of time and freeze them. Then when you get a hankering for a biscuit, be it for breakfast with some egg and sausage or even country ham, or slathered with butter and drizzled with honey or maybe to go along with your Sunday dinner, just grab however many you want out of the freezer and pop them right into a hot oven. A mere 20 -25 minutes later these exquisite golden tall flaky biscuits will be ready. Now you can’t beat that! But back to that question “Are these Buttermilk Biscuits our best?” Hmmm…these are definitely up there! They were so buttery & golden and rose so high with lots of flaky layers, but I’m not sure the quest is over. Certainly the continued pursuit will lead to even more biscuit sampling, which is always a good thing in my book!
3 1/2 cups all purpose flour, plus more for surface
1 cup (2 sticks) chilled unsalted butter, cut into 1/2″ pieces, plus more melted for brushing over the tops
1 cup chilled buttermilk
Directions:
Preheat oven to 425° F. Pulse baking powder, salt, sugar, baking soda, and 3½ cups flour in a food processor to combine. Add chilled butter and pulse until largest pieces of butter are the size of a pea. Transfer to a large bowl and gradually drizzle buttermilk over top, tossing with a fork as you go to incorporate. Knead mixture a few times in bowl until a shaggy dough forms (mixture will look a little dry), then turn out onto a clean surface and pat into a 1″-thick square.
Using a knife or bench scraper, cut dough into 4 pieces. Stack pieces on top of one another, sandwiching any loose dry bits of dough between layers, and press down to flatten. Lift up dough with bench scraper and dust surface with flour. Roll dough into a 1″-thick rectangle and trim a thin border around sides of dough to create clean edges. Cut into a 4×3 grid to make 12 biscuits (don’t reroll scraps). Transfer to a parchment-lined baking sheet, spacing 2″ apart; freeze 10 minutes.
Brush tops of biscuits with melted butter and sprinkle with flaky sea salt if you desire and place in oven. Reduce oven temperature to 400° and bake biscuits until deep golden brown on bottom and golden on top, 20–25 minutes.
Do Ahead: Biscuits (unbaked) can be made 1 month ahead. Freeze, uncovered, on baking sheet until solid, then transfer to a resealable plastic bag. Do not thaw before baking, but add a few minutes to baking time.
Enjoy!
Links for Helpful Kitchen Tools & Ingredients for Bon Appétit’s Best Buttermilk Biscuits:
So let me get this right…last weekend we had a freeze/frost warning which had all the gardeners out there scrambling and me cooking up a pot of chili. Today, just six short days later, it is forecasted to be 86° F (that is 30°C)!?! That is insanity from the weather. Kind of goes along with the surealness of this Covid-19 crisis. I am definitely not pleased about either one. However, I know that a lot of folks out there will be happy to see this what I will call “hot” weather. They will be firing up their grills. And I’ve got a great Burger Bun recipe for you just in time: Buttery Potato Burger Buns!
Apparently pandemics bring out the bread baking in everyone out there. Folks have bought up all the flour, all the yeast. Hopefully you’ve managed to score some. Besides regular all purpose flour, this recipe does also call for potato flour, which I know is an ingredient that you might not have on hand. Don’t despair, you can just sub in some instant potato flakes and you’re good. Also, don’t worry if you don’t have a hamburger bun pan, you can make due with a parchment lined baking sheet.These buns are so amazing! I could not have been anymore pleased with them. If you’ve ever had a Martin’s Potato Roll – they are like that ‘cept better! I didn’t have any fresh hamburger meat in the house when the whole lockdown thing started, but we had some burger patties in the freezer. Believe me, these buns stole the show! I can’t wait until the day, you know a year or so from now (just kidding! I hope…) when I can actually get some ingredients that will be worthy to put between these fantastic, tender, buttery buns. In the meantime, I’m thrilled that these Buttery Potato Burger Buns are the thing that truly make us look forward to our quaran-burger dinners.
1/4 cup (43grams) Potato flour or 1/2 cup (43grams) dried potato flakes
1/4 cup (35grams) nonfat dry milk
2 Tablespoons (25grams) sugar
1 1/4 teaspoons salt
2 teaspoons instant yeast
4 Tablespoons (57grams) unsalted butter
1 cup (227grams) lukewarm water (95° F)
Directions:
Combine all of the dough ingredients and mix and knead them — by hand, mixer, or bread machine — to make a soft dough.
Place the dough in a lightly greased bowl, cover, and let rise in a warm place for 1 hour, or until it’s almost doubled in bulk.
Turn the dough onto a lightly greased surface, gently deflate it, and divide it into 6 pieces. Roll each piece into a ball.
Place the balls into the greased cups of a hamburger bun pan, flattening gently. Or place them on a lightly greased or parchment-lined baking sheet, leaving about 2″ to 3″ between them; flatten gently.
Cover and let rise until the buns have doubled in size, 60 to 90 minutes. Towards the end of the rising time, preheat the oven to 350°F.
Bake the buns for 15 to 20 minutes, or until they’re light golden brown.
Remove them from the oven, and brush them with melted butter, if desired.
Transfer the buns to a rack to cool. Store buns, well-wrapped, at room temperature for several days; freeze for longer storage.
Enjoy!
Buttery Potato Burger Buns brought to you by: RuncibleEats (www.leaandjay.com)
Links for Helpful Kitchen Tools & Ingredients for Buttery Potato Burger Buns:
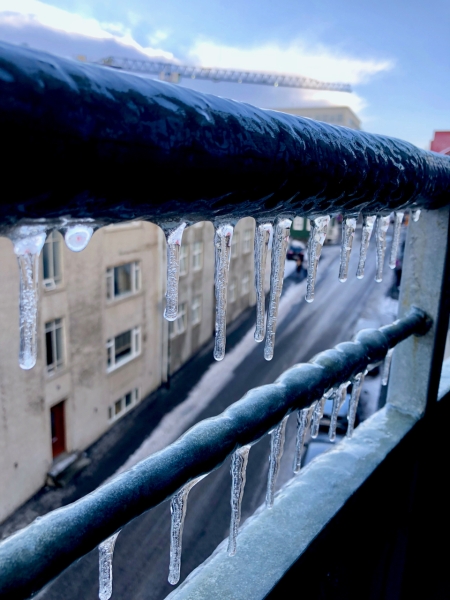
So Winter hasn’t given up yet around here! Over the past weekend there were frost warnings and forecasts of snow out in the mountains. Not that I’m complaining…I’d rather keep things on the cool side rather than move right into the hot, muggy unpleasantness that is often a Virginia summer. With the chilly weather, I decided to make up a big ole pot of chili, White Chicken Chili to be exact. And what goes better with chili? A big ole pint of beer? Well, yes. Beer is good. But how about a big ole hunk of cornbread slathered with butter! Now you’re talking!
The Husband and I love cornbread. And I’ve posted quite a few recipes in the past. But I gotta say – I think we’ve found a new favorite: Skillet Cornbread. This cornbread has it all! It is moist. It is buttery. It has crispy crunchy edges. And it is not too sweet. A little brown sugar and a bit of honey gives it just the right amount of sweetness.
I’ve always thought that Northern Cornbread was sweeter than Southern Cornbread. When I did a bit of snooping around online, I found out that I had stumbled into a raging debate. A lot of folks out there have some definite ideas about that topic and can get downright prickly over it with statements such as “If God had wanted sugar in cornbread he would have called it cake”. Hmmm…
There is no doubt that cornbread is associated with the South. This is likely due to the fact that cornbread was the bread that was eaten there daily from colonial times up to the 20th Century. As it turns out, corn was the South’s main crop. Wheat tended not to do so well in the heat & humidity there. So although I know Buttermilk Biscuits are also considered a Southern thing, in the past they were only baked for special occasions or maybe for Sunday dinner. Folk’s daily bread was cornbread.
I was fascinated to discover that back in the day, the type of corn predominantly grown in the South was a white corn. This corn was left in the fields to ripen completely and then taken to a water mill to be stone ground. Eventually, with industrialization, these stone mills were replaced by steel roller mills. This type of mill took away much of the corn kernel and thereby the flavor. Furthermore, these roller mills preferred to use unripened yellow corn, which was not as sweet. In order to get that sweet flavor back in their cornbread, guess what folks added – you got it, sugar.
So, this recipe does have a little bit of sugar in it, but not so much sugar that you are going to be thinking you are eating a cake. But I think the thing that really makes this cornbread so spectacular is that it is cooked in a blazing hot cast iron skillet. Pouring the batter into that hot skillet sears the edges and caramelizes the sugar in the batter to give you that scrumptiously crunchy crust, while keeping the middle nice and tender and moist.
Yum, yum and yum! Whether you’re from the North, or the South or any other place, you are going to agree, this is some super tasty, buttery delicious cornbread! Pull out your cast iron skillets and bake a batch of this cornbread today!
1/2 cup (115grams) unsalted butter, melted and slightly cooled
1/3 cup (67grams) packed light brown sugar
2 Tablespoons (30ml) honey
1 large egg, at room temperature
1 cup (240ml) buttermilk, at room temperature
2 Tablespoons minced jalapeño peppers (optional – you could also throw in some cheese or bacon or even dried cranberries – or leave it plain, your choice)
2 Tablespoons salted butter, melted
Maldon flaky sea salt to sprinkle over top
Directions:
Preheat oven to 400°F (204°C). Grease a 9″-10″ cast iron skillet. Set aside.
Whisk the cornmeal, flour, baking powder, baking soda, and salt together in a large bowl. Set aside. In a medium bowl, whisk the melted butter, brown sugar, and honey together until completely smooth and thick. Then, whisk in the egg until combined. Finally, add in the buttermilk and mix to combine. Pour the wet ingredients into the dry ingredients. Add the jalapeños if you are using them and whisk until just combined. Take care not to over mix, or beat the batter or the cornbread will be tough.
Pour batter into prepared baking pan. Bake for 20 minutes or until golden brown on top and the center is cooked through. Use a toothpick to test. Edges should be crispy at this point.
Paint melted butter over the top of the cornbread and sprinkle with a bit of flaky Maldon sea salt.
Allow to slightly cool before slicing and serving. Serve cornbread with butter, honey, jam, or whatever you like.
Wrap leftovers up tightly and store at room temperature for up to 1 week.
Enjoy!
Skillet Cornbread brought to you today by Runcible Eats (www.leaandjay.com)
Links for Helpful Kitchen Tools & Ingredients for Skillet Cornbread:
Today I would like to share this Icelandic recipe for Kanilterta with you. This delicious treat boasts four layers of cinnamon spiced buttery cake separated by sweet vanilla whipped cream & topped with silky decadent chocolate. I even bet you have all the ingredients necessary to make it in your pantry right now.
Oh, and I also want to tell you all about our visit to Iceland for an amazing Ice Cave adventure back in February 2018.
Now I know when folks are planning a get away in February they might be dreaming of a sunny Caribbean island or something. Iceland might not be the country that comes to mind. However, anyone who knows me, or has read my blog at all knows the Husband and I are not beach people at all. We much prefer the colder climes and absolutely love Iceland at anytime of the year. We had taken a trip to Scotland to go to Up Helly Aa– Europe’s largest Viking fire festival, which takes place at the end of January. So we decided to take advantage of Icelandair’s Stopover offer. You see, if you fly to any of their destinations you can add an up to a 7 day stopover in Iceland at no charge! So it was a no brainer for us. We actually ended up spending one night in Iceland on the way to Scotland and then spent an additional 6 nights on the way back to Virginia.
And in addition to Icelander’s fantastic Stopover offer, on certain flights they also offer the option to “Class Up” from economy seats to Saga Premium. So, how it works is 10 days prior to an eligible flight, you will receive an email asking if you would like to place a bid. You are then able to decide the amount you are willing to pay, in addition to the cost of your original ticket, to have a Saga class seat.
You should keep in mind that it is per seat. So if you bid $200 and there are two of you on the ticket, then you have actually bid $400. And this is per segment of the flight. So if you have a roundtrip flight, you would be bidding on the flight over as well as the flight back. If your bid is not accepted, nothing changes with your original ticket. You still have the same seats. However if your bid is accepted, you will find yourself in Saga Class. We made a bid and it was accepted!
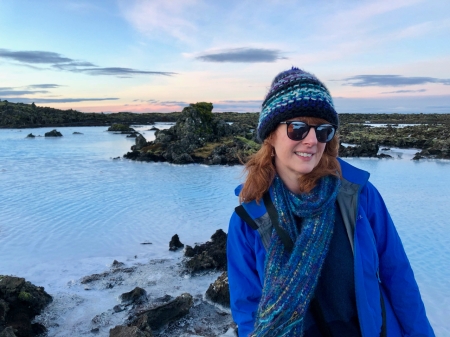
Our flight arrived in Iceland around 6:30 am and we were not headed on to Scotland until 7 am the next morning. So we chose to stay close to the airport rather than to travel into Reykjavik. Tired after our overnight flight, we checked into the Silica Hotel at the famous Blue Lagoon.
The Blue Lagoon is located near the town of Grindavik and is only about a 15 – 20 minute drive from the airport. The Silica Hotel is only about a 3 minute drive, or a short stroll through the beautiful green moss covered lava fields, from the Blue Lagoon. Needless to say, we arrived well before our check-in time, but were able to take advantage of their abundant breakfast buffet while we waited for our room. Since the hotel was not very busy, being February and all, they were able to get us into our room a bit early.
View from our room at The Silica Hotel
After some shut eye, we took a stroll over to the Blue Lagoon
Strolling through the lava fields
to enjoy a delicious dinner at the Lava Restaurant.
We did not spend any time in the actual lagoon at the Blue Lagoon on this trip. We have several times in the past and truly enjoy it and do recommend it, even if it is a bit touristy. There is a reason why folks love it! And I should mention that when you book a room at the Silica Hotel, premium entrance to the Blue Lagoon is included. That is really quite a perk, especially in the summer time. The Blue Lagoon has become so popular at this point, it is unlikely that you could gain entrance without booking in advance. But there is also even another perk to staying at the Silica Hotel – they have their own private lagoon for folks staying with them! How awesome is that!!!
Now there isn’t a swim up bar, like there is in the main Blue Lagoon, however you can place a drink order with one of the Silica employees and they will deliver it to you while you soak in the Silica Lagoon. The Husband and I loved this little private oasis. Not crowded at all, very quiet. We spent quite a while relaxing and unwinding here on the first night of our trip!
After all of our adventures in Scotland, we arrived back in Iceland and taxied into Reykjavik. We had been dreaming of visiting an Ice Cave for sometime and February was the perfect time to go on an Ice Cave adventure. You see, it needs to be cold to safely visit an Ice Cave, so most of these tours take place from October – March. February was just perfect! So I booked a two day tour, which would take us and a small number of other guests (no more than 8) out along the South Coast, stopping to visit Seljalandfoss & Skógafoss Waterfalls, the Reynisfjara Black Sand beach, and Fjaðrárgljúfur Canyon. Then we would spend the night at the tour group’s cottage, have a traditional Icelandic dinner and enjoy the Northern Lights if possible. The second day we would visit the Diamond Beach, Jökulsárlón, walk on a glacier, go to an Ice Cave and then be back in Reykjavik by around 21:00 – 22:00. Two full days without a doubt! Even though we had seen a lot of the South Coast, we were happy to see it again. And even happier to sit back and let some other folks do the driving. On the day our tour began it was raining. And I don’t mean just a little drizzly, just spitting a bit…I mean all out, cats and dogs, RAINING! Sure, it will let up soon I thought…HA! If anything it intensified throughout the day! But we didn’t let it stop us! We had all our waterproof gear at the ready.
Drenched at Seljalandfoss.
Soggy at Skógafoss
Soaked before the Basalt columns at Reynisfjara Beach
Drowned at Fjaðrárgljúfur Canyon
We arrived in a big water-logged heap at the cottage, which was quite charming and thankfully warm.
The tour company had prepared a lovely Icelandic lamb dinner for us. But first they wanted us to try an Icelandic national delicacy – Hákarl, which translates to rotten or putrefied shark. Yup, you read that right. You see Greenlands shark meat is actually poisonous when fresh due to its high levels of urea and trimethylamine oxide. However after it is buried in sand and pressed down by stones, hung to dry for weeks and then cured for a month or so more, it is just fine! Usually eating a bit is followed quickly by taking a shot of Brennivín – an Icelandic liquor also known as Black Death. The Husband is allergic to seafood, so he got a pass on the putrefied shark and merely concentrate on the shots of Death. Lucky me, I got to sample both. Hmmmm… Rotten Shark & Black Death…what could go wrong?
So how did it taste? Well, the smell was worse than the taste. The taste wasn’t great, but probably not the worst thing ever, though I certainly have not found myself craving either. Needless to say, the Northern Lights did not make an appearance that night. Or if they did , the heavy cloud cover and pouring rain obscured them. But, good news, when we woke in the morning the rain had decided to move on. It was cold and windy, but all things considered and knowing what it was like just the day before, not too bad for February in Iceland. We ate breakfast and then set out for the day. First stop, Diamond Beach & Jökulsárlón.
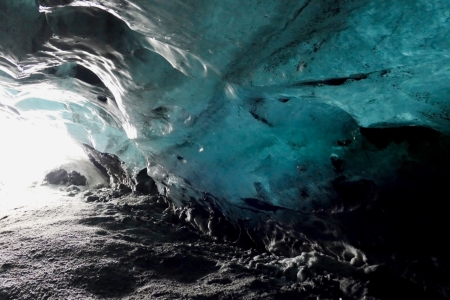
And finally, the time had arrived! We met up with some local ice cave guides, boarded their modified 4X4 and set off on a very bumpy ride towards Vatnajokull to explore an ice cave!
Ice caves in Iceland are formed from beneath by the canals of water which run under the glaciers. In the summer these caves are often filled with water and impassible, but with the coming of cold water they freeze and voila – ICE CAVE! Incredibly otherworldly and stunningly beautiful – I’ll just let my pictures do the talking:
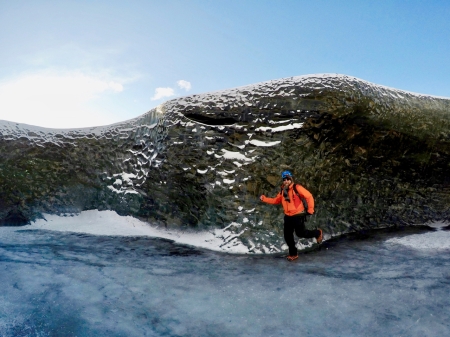
We not only got to see a traditional ice cave, but after a short walk across the glacier, we got to see a convertible type of ice cave – you know…one with the roof off. Really, it was more like a fissure in the glacier. Also, incredibly beautiful.
And the great news is that new caves form every year, so you could likely go again and again and it would always be different!
Alas, it was time to head back to Reykjavik. We stopped for a short look see at Svínafellsjökull (the glacier where the scenes from North of the Wall in Game of Thrones were filmed), but then got right on the road.
I had been monitoring the weather on my phone throughout the day and was worried about a storm that was moving in. Sure enough, the weather soon turned bad. We thought rain was a problem, but not so much. What we ended up with on the way back to the city was much worse – very windy and driving snow. There was little visibility, multiple cars had gone off the road and driving was treacherous!
When we finally arrived in Hveragerði at the foot of the Hellisheidi Mountain Pass, the one that we needed to take to get back into Reykjavik…yeah, that one…we found that it was impassable and closed.
We sat and waited to see if a plow might make it across the mountain somehow, but after about an hour and some consulting with other stuck tour drivers as well as the police, we realized that we were going to have to go around. Yeah….go around a mountain! Thus turning what should have been about a 40 minute drive over the pass into a 2 hour + blizzard driving odyssey! But I gotta give it to our driver. He was awesome. Calm and confident. We finally showed up back in the city around 2 am! Let me tell you, that was the point where we were really glad we weren’t the ones doing the driving, but rather were in the expert hands of a driver who was experienced driving in Iceland’s tricky, ever-changing winter weather. Although this two day Ice Cave trip turned out a little different than we might have imagined, we ended up having a fantastic time and quite an adventure!
The rest of our time in Iceland we spent relaxing in Reykjavik. We stayed in an AirBnB which was in a great location and had a lovely view.
We went shopping and wandered about town
took in the street art
stopped for coffee at Reykjavik Roasters,
visited our favorite restaurants like Íslenski Barinn and Snaps,
enjoyed a kanilsnúðar or two from Brauð & Co.
and stopped by our favorite bars
and of course, ate a hot dog or two or so…
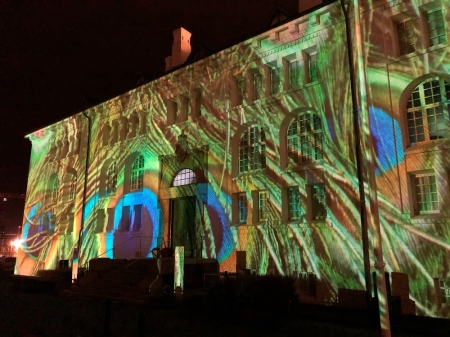
We were lucky that the Winter Lights Festival was taking place while we were there. This festival is an annual February event in Reykjavik which celebrates both the Winter world and the growing sunlight after a long period of darkness. Every night during the festival various buildings throughout the city have light installations. You can get a map and stroll through the city to see them all.
And we got even more snow, which made me a very, very happy camper. So yeah, February is a great time to visit Iceland! To see all the action as it happened, take a look at this video:
But oh yeah, I was supposed to tell you about his Kanilterta. This traditional Icelandic cake was often baked around the Christmas holidays and served with hot chocolate on Christmas Day. However, in recent years it has lost some of its popularity, being seen as rather old fashioned. Old fashioned it may be, and perhaps not very polished or fancy looking, but it is truly delicious!
I know I’ve told you before that the Husband doesn’t really like sweet desserts. Well, he absolutely LOVED this cake. Has asked for multiple slices!
The layers are more like a cookie or soft shortbread than a traditional layer cake. They are incredibly buttery and decadent. The vanilla whipped cream between the layers serves to light each bite.The top layer of silky dark chocolate is absolutely amazing. Where has this cake been all of my life?!!
Wonderfully rich and buttery with warm cinnamon and chocolate notes, this Kanilterta is absolutely irresistible! It is welcome all year round in our house. Once you give it a whirl, I’ll bet you’ll be hooked too!
In the bowl of a stand mixer, mix butter and sugar until pale and fluffy. Add eggs one at a time, mixing until incorporated.
In a separate bowl, sift the flour and cinnamon together. Add flour mixture to the butter mixture. Mix until just combined.
Butter four to six 8″ round cake pans and line with parchment. Divide the dough equally between the pans and spread it out into an even layer. Or, if you do not have the round pans, you can draw 4 – 6 circles measuring 8″ in diameter on parchment paper and bake on a cookie sheet.
Bake each layer for 12 -15 minutes or until set. I baked four layers. If you are making six layers, the baking time will likely be closer to 8 – 10 minutes. Allow to cool completely on wire rack.
Whip cream until it starts to thicken. Add confectioners sugar, cream of tartar and vanilla bean paste and continue to whip until stiff peaks form. Spread whipped cream mixture evenly between each layer of the cake, leaving the top layer bare.
Place layered cake in refrigerator or freezer briefly while you prepare chocolate for the top layer. Melt chocolate and butter over low heat.
Once chocolate has cooled to room temperature, spread chocolate over the top layer of the cake.
Enjoy!
Kanilterta brought to you today by: Runcible Eats (www.leaandjay.com)
Links for Helpful Kitchen Tools & Ingredients for Kanilterta:
Valhrona French Chocolate Pearls – This is what I used to decorate the top of the cake. It is a crispy bit of cereal coated in dark chocolate. This link if for a much, much bigger bag than you would need for just this dessert, but I wanted to let you know what I had used.
Links for Planning your vacation in February in Iceland:
Getting There: Icelandair! We love Icelandair and have always had great experience with them. Take advantage of their Stopover program on your next flight to Europe.
Accommodation:
Silica Hotel at Blue Lagoon: Lovely hotel with its own private lagoon for guests. Extensive breakfast buffet and very close to Keflavik Airport as well as (of course) the Blue Lagoon.
Once in Reykjavik, we stayed in an AirBnB on this visit. Planet Apartments were the folks who managed the unit we stayed in. They have several lovely apartments with great views of the sea. Very friendly & helpful folks to work with.
Car Rental– We did not actually rent a car this time, but relied on taxis. When we do rent a car, here is the company we love:
Blue Car Rental: We ALWAYS rent our car from Blue Car Rental. Friendly Icelandic company, well maintained, newer, quality vehicles – they’ve never let us down and at this point we have rented from them on six different visits and have had excellent experiences every time. The price they quote on their website has all of the insurance included so there are no surprizes when you show up at their rental desk. Highly recommend!
Tours: So visiting an Ice Cave was a lot of fun. We definitely recommend it. I did want to take this time though to impart some advice. Visiting an ice cave is weather dependent in a couple of ways. First of all you need to visit between the months of November – March, when the weather is cold enough that the caves are more stable. Second of all, weather in Iceland is unpredictable. Tours are often cancelled in the winter, so you need to try to remain flexible and go into it knowing your tour might be cancelled due to the weather. That being said, you have to consider how you will be getting to the ice cave. Some of the best caves are located in Vatnjökull, which is about a 5+ hour drive from Reykjavik. You could drive yourself out that way to meet up with a tour – a lot leave from Jökulsárlón. However, keep in mind you will be driving in Iceland during the Winter, so you might end up having to deal with less than favorable to downright dangerous winter driving conditions. Rather than driving yourself, you could book a tour which leaves from Reykjavik and let a local do the driving, like we did. A word of caution here – although they do offer day tours out to Jökulsárlón, I do not recommend them. You will spend at least 10 hours driving – so that is a long day in a car. And keep in mind, the days have less daylight hours at this time of year, so most of it will be in the dark. I think a two or three day tour is a better option. I bet you think that the two day Ice Cave & South Shore tour that we took looked like a lot of fun. It really was and I would have recommended the tour company that we used with out hesitation. The problem is that they sadly ended up going bankrupt in 2019. However, I know a lot of other tour groups out there do similar tours to this one. Which brings me to my actual recommendation here: I Heart Reykjavik! If you are familiar with my past recommendations for Iceland, you will be familiar with this company. We have gone on a couple of walking tours of Reykjavik with them which were fantastic! It was as if you had a local friend there who was able to give you the inside tip on the best restaurants, pubs and shops while telling you all about the city. And I also follow their blog, which offers just a ton of useful advice and tips for your visit.
I Heart Reykjavik– An invaluable resource for all things Iceland! I Heart Reykjavik is a small, family run company that offers you personalized service. They can help you plan a fantastic vacation to Iceland in a couple of ways. You can browse and book tours directly on their website. The advantage here is that I Heart Reykjavik has vetted all of the companies on their carefully curated list. Often they have even gone out on the tours and you can read a review of their experience on their blog. Their recommendations can save you a ton of time pouring over tours and reviews online and let you know which company you can best trust with your money . Another advantage is that if you book all of your tours through them and then a unforeseen change due to the weather or some sort of thing, I Heart Reykjavik can suggest changes to your itinerary and assist you with rebooking. And speaking of itineraries, if you are the type of person who likes to plan out everything yourself, I Heart Reykjavik can still be of assistance. They offer an Itinerary Review service, where they can take a look at your upcoming plans and make sure everything makes sense – such as if you have allowed enough travel time. They can give you feedback concerning accommodation and alert you if there is a must see in the area you are visiting which has not found it’s way into your plans. They are truly an invaluable resource!
Here is a link to an excellent, informative blog post I Heart Reykjavik wrote about visiting Ice Caves just last year. They can help you find the best tried & tested company to take you on an Ice Cave Adventure, according to your individual needs.
Destinations:
Seljalandfoss – A beautiful waterfall located just off of Route 1 on the South Coast. If the weather is good and you don’t mind getting a bit wet, you can walk behind this waterfall.
Skógafoss – Another beautiful waterfall located just off of Route1 on the South Coast. Due to the amount of spray from the falls, if the sun is out you will likely see a rainbow in front of it.
Reynisfjara Black Sand Beach– Famous picturesque black sand beach located near the village of Vík. Please be careful at this beach. The waves and rip currents are quite powerful. There are sneaker waves which can seemingly come out of nowhere and travel much further up the beach than expected, knocking you off your feet and potentially pulling you out to the freezing sea. Never turn your back to the waves. Unfortunately there have been several fatalities at this beach.
Fjaðrárgljúfur Canyon – Stunning canyon located near the village of Kirkjubæjarklaustur in South Iceland. In Season 8 of Game of Thrones you can see the Dragons fly through this snow covered canyon. The vegetation in the canyon suffered from the amount of tourists and it was closed until June 2019, to allow it to recover.
Svínafellsjökull– An outlet glacier of Vatnajökull located in Skaftafell Nature Reserve. Game of Thrones filmed many of season 7’s North of the Wall scenes here.
Jökulsárlón – is a large lake which was formed by a glacier (glacial lagoon). It is located in southeast Iceland, on the edge of Vatnajökull National Park. Bits of the Vatnajökull glacier break off (calve) into the lake, forming icebergs. These icebergs float around until they melt enough to fit through the narrow opening of the lake and drift out into the ocean.
Diamond Beach– A black sand beach near Jökulsárlón often peppered with icebergs which have calved from the glacier, traveled out to the ocean and then washed back up on the beach.
Restaurant/Bars:
Íslenski Barinn– Love, love, love! Delicious food & local brews in a comfortable, cozy setting.
Kaldi Bar Fun & hip Bar featuring beers from the Kaldi Brewery
Brauð & Company– Bakes my most favorite in the world kanilsnúðar!
Snaps Bistro– Laid back, French style bistro, serving up delicious cocktails and amazing breakfast, brunch, lunch and dinners. A favorite with locals and tourists a like.
Misc:
Þjóðlegt með kaffinu – Besides being a Facebook page, there is also a cookbook penned by Jón Símonía Bjarnadóttir & Gudfinna Hreidarsdóttir. It is available in English, Danish & German. You can purchase it when you visit Iceland or contact them at icelandiccakes@google.com
The Reykjavik Grapevine: A witty English language Icelandic magazine. Great read whether or not you’re planning a visit! And if you are planning a visit make sure to check out their annual “Best of” edition where they give you a curated list of the best of everything to be found in the country!
Icelandic Meteorologic Office – Great for checking the weather before you go and essential while you are visiting – especially if you are visiting in the Winter! They also have an app you can have on your phone which I definitely recommend. The weather in Iceland can change suddenly. Be prepared!
Woohoo! It’s Cinco de Mayo! And we’re still on lockdown! No drinking margaritas in the cantina for the Husband and I. Nope – looks like it might have to be shots of tequila on the couch. I guess we better get some food on the stomach if that’s the way it’s gonna go today. And I have just the thing: Spicy Taco Egg Cups!
These little firecrackers pack quite a punch! At least they do when I make ’em, ’cause we do love our spicy food. But don’t despair if you don’t – you can tame them down accordingly. Just don’t use any cayenne and use a very mild salsa. They will still have tons of flavor, just not as much of the “burns so good-ness” that we love.
While I’ve got you here I’d like to take the opportunity to remind you of some other great recipes that would be perfect for today such as my favorite Guacamole (there is a secret ingredient in it!)
But let me get back to these little Taco Egg Cups. Here is another fantastic piece of information – they can actually be pretty low in calories if you concerned with the Covid 19 pounds that I’ve mentioned gaining while in quarantine. Just use lean ground beef and reduced fat cheese. There you have it, low calorie (around 100 -ish per cup) and tasty! They come together pretty quickly as well. So while you’re making a batch of these, have your quarantine buddy fire up the blender for some frozen Margaritas. Nine in the a.m. isn’t too early to start with the festivities is it? Cinco de Mayo will turn out just fine at home after all!
Today is May 1st or May Day as it is known. Now when I say “May Day”, I am not referring to the more modern, political International Worker’s Day type thing. Or the distress call – though given the state of the world currently, I can understand why you might have thought I was calling for help. No, I am talking about the ancient festival of Spring that is/was celebrated throughout many countries. For my part, I’m going to celebrate with this Beltaine Spiced Honey Cake.
You might be familiar with May Day celebrations held in England. There, a May Queen is crowned and you will likely see Morris Dancers and folks dancing around a Maypole. Today I am looking back in time to Irish traditions.
In Ireland the day is known as Lá Beltaine, which roughly means “the day of the fires of Bel” – Bel being a Celtic God. Halfway between the Spring and the Summer solstice, Beltaine celebrates the arrival of summer and the fertility of the coming year. Yellow flowers such as primrose, rowan, hawthorn, gorse , hazel and marsh marigolds were placed at windows and over doorways. A Maybush, often a hawthorn tree, was decorated with flowers, ribbon and bright shells and sacred wells were visited to pray for health.
Photo from Facebook Page May Day – Bealtaine
This was also the time in Ireland, back in the day, when cattle were driven to their summer pastures. And quite significantly it was believed that the veil between our world and the world unseen was very thin. It was more likely that you might encounter fairies or other supernatural beings out and about at this time. That notion made folks very nervous. So lots of the Beltaine traditions were done to protect oneself, livestock and crops from any mischief or ill will. Bonfires were lit throughout the country. It was believed that flames, smoke and ashes have protective properties. Livestock were driven between the fires and people walked between them as well, Indeed they sometimes even leap over them. All fires in the house were extinguished and then relit from the communal Beltaine bonfire.
The festival was associated with fertility, not only of the land, but also the people. Just think about that Maypole…yup, symbol of fertility. In order to have a more youthful and beautiful complexion, women would wash their face in dew, preferably gathered from beneath a hawthorn tree at dawn on May 1st. I have been trying to do this for years here in Virginia, but I don’t have a hawthorn tree. I have a crab apple, which is in the hawthorn family, so that is my go to. Unfortunately, I’m not really an early riser, so the dew is almost nearly all burned off by the time I schlep on out of the house. Furthermore, I’m often quite suspicious of any wetness I do find under the tree. Anybody out there have any idea what washing your face in fox or cat urine accomplishes? But I digress…
Maybe I should make the effort to get out of bed earlier this year…
Interestingly enough, I had originally considered doing a recipe for little fried honey cakes. I found an article online (so you know it had to be true…) that said they were made for Beltaine and left out as a gift for the fairies the night before. I really did not want to fry any dough, since that would not only use up all my oil (pandemic quarantine concerns….) but would also make my house smell like a chipper. So I reached out to some friends in Ireland to ask if they knew of any traditional Beltaine recipes. They did not, but were horrified to hear that anyone would consider leaving treats out for the fairies. As far as they are concerned, doing anything whatsoever to draw any sort of attention from the fairies was to say, at the very least, quite foolish. Having recently read The Call by Peadar O’Guilin (creepy and somewhat terrifying, Hunger Games-esque modern Irish fairy story – have you read it? You should!) I can definitely see the wisdom in that line of thought!
So I arrived on the idea of baking, not frying, a honey cake. Honey has long been associated with Beltaine. Not surprising since it is considered to have aphrodisiac qualities and is often associated with fertility. So I figured a honey cake would be a great match for the holiday.
Truth be told, this recipe is from Smitten Kitchen. Deb calls it the Majestic & Moist Honey Cake and she baked it for Rosh Hashannah – Jewish New Year. In Jewish tradition, honey symbolizes excitement for a sweet New Year. Hey given what 2020 has dished out so far, a “Sweet New Year” sounds really good right about now! Can we just hit reset and have a do over sans deadly pandemic?
This Beltaine Spiced Honey Cake is quite tasty., filled with spices and incredibly moist with crispy chewy delicious caramelized crust. I used Irish Whiskey in the mix for my Beltaine nod to Ireland. This recipe does make quite a lot of cake. Although I baked it in cutesy little beehive pans, you should probably consider doing a big ole bundt! Happy Beltaine ya’ll!
1/4 cup (60 ml) Irish whiskey (I think Jack Daniels would work well too)
Directions:
Preheat oven to 350°F. Generously grease pan(s) with non-stick cooking spray. For tube or angel food pans, line the bottom with lightly greased parchment paper, cut to fit.
In the bowl of a stand mixer, whisk together the flour, baking powder, baking soda, salt, cinnamon, cloves, nutmeg and allspice. Make a well in the center, and add oil, honey, white sugar, brown sugars, eggs, vanilla, coffee or tea, orange juice and rye or whiskey, if using. (If you measure your oil before the honey, it will be easier to get all of the honey out.)
Mix on slow speed, stir together well to make a thick, well-blended batter, making sure that no ingredients are stuck to the bottom.
Spoon batter into prepared pan(s). Place cake pan(s) on two baking sheets, stacked together (this will ensure the cakes bake properly with the bottom baking faster than the cake interior and top).
Bake until cake tests done, that is, it springs back when you gently touch the cake center. For angel and tube cake pans, this will take 60 to 75 minutes, loaf cakes, about 45 to 55 minutes. For sheet style cakes, baking time is 40 to 45 minutes.
Let cake stand fifteen minutes before removing from pan.
Enjoy!
Beltaine Spiced Honey Cake brought to you by: Runcible Eats (www.leaandjay.com)
Useful links for Kitchen Tools & Ingredients for Beltaine Spiced Honey Cake:
Nordic Ware Bee Hive Cakelet Pan – This is the pan I used for the cakes in my pictures. However, this pan only makes 6 cakes at a time and they are pretty small. With the amount of batter this recipe makes you will be baking these for hours with just the one pan! You might also want to use a bundt pan or 9″x13″ pan in addition to this pan.
The Call by Peadar O’Guilin – creepy modern day Irish fairy store I mentioned above. Technically you do not need this to make the Beltaine Spiced Honey Cake, but it really is a good read if you like scary fairy stories, Hunger Game, Game of Thrones type things.
The Smitten Kitchen Cookbook by Deb Perelman – This recipe is not actually in the book, but I have never been disappointed in a Smitten Kitchen recipe, so you might want to get a copy!


 Posted by liadh1


 So let me get this right…last weekend we had a freeze/frost warning which had all the gardeners out there scrambling and me cooking up a pot of chili. Today, just six short days later, it is forecasted to be 86° F (that is 30°C)!?! That is insanity from the weather. Kind of goes along with the surealness of this Covid-19 crisis. I am definitely not pleased about either one. However, I know that a lot of folks out there will be happy to see this what I will call “hot” weather. They will be firing up their grills. And I’ve got a great Burger Bun recipe for you just in time: Buttery Potato Burger Buns!
 Apparently pandemics bring out the bread baking in everyone out there. Folks have bought up all the flour, all the yeast. Hopefully you’ve managed to score some. Besides regular all purpose flour, this recipe does also call for potato flour, which I know is an ingredient that you might not have on hand. Don’t despair, you can just sub in some instant potato flakes and you’re good. Also, don’t worry if you don’t have a hamburger bun pan, you can make due with a parchment lined baking sheet.
 These buns are so amazing! I could not have been anymore pleased with them. If you’ve ever had a Martin’s Potato Roll – they are like that ‘cept better! I didn’t have any fresh hamburger meat in the house when the whole lockdown thing started, but we had some burger patties in the freezer. Believe me, these buns stole the show! I can’t wait until the day, you know a year or so from now (just kidding! I hope…) when I can actually get some ingredients that will be worthy to put between these fantastic, tender, buttery buns. In the meantime, I’m thrilled that these Buttery Potato Burger Buns are the thing that truly make us look forward to our quaran-burger dinners.
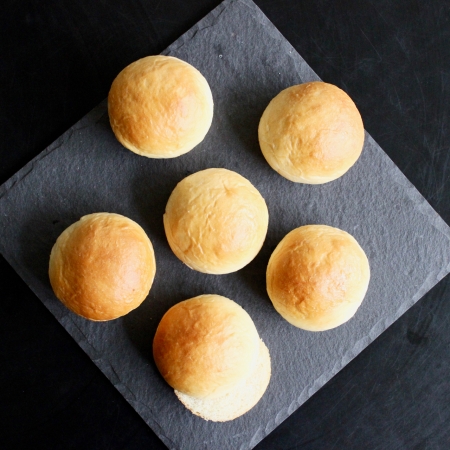


")


 The layers are more like a cookie or soft shortbread than a traditional layer cake. They are incredibly buttery and decadent. The vanilla whipped cream between the layers serves to light each bite.
 Wonderfully rich and buttery with warm cinnamon and chocolate notes, this Kanilterta is absolutely irresistible! It is welcome all year round in our house. Once you give it a whirl, I’ll bet you’ll be hooked too!


 In Ireland the day is known as Lá Beltaine, which roughly means “the day of the fires of Bel” – Bel being a Celtic God. Halfway between the Spring and the Summer solstice, Beltaine celebrates the arrival of summer and the fertility of the coming year. Yellow flowers such as primrose, rowan, hawthorn, gorse , hazel and marsh marigolds were placed at windows and over doorways. A Maybush, often a hawthorn tree, was decorated with flowers, ribbon and bright shells and sacred wells were visited to pray for health.


