Fluffy Buttermilk Biscuits

December 16, 2014

IMG_0749

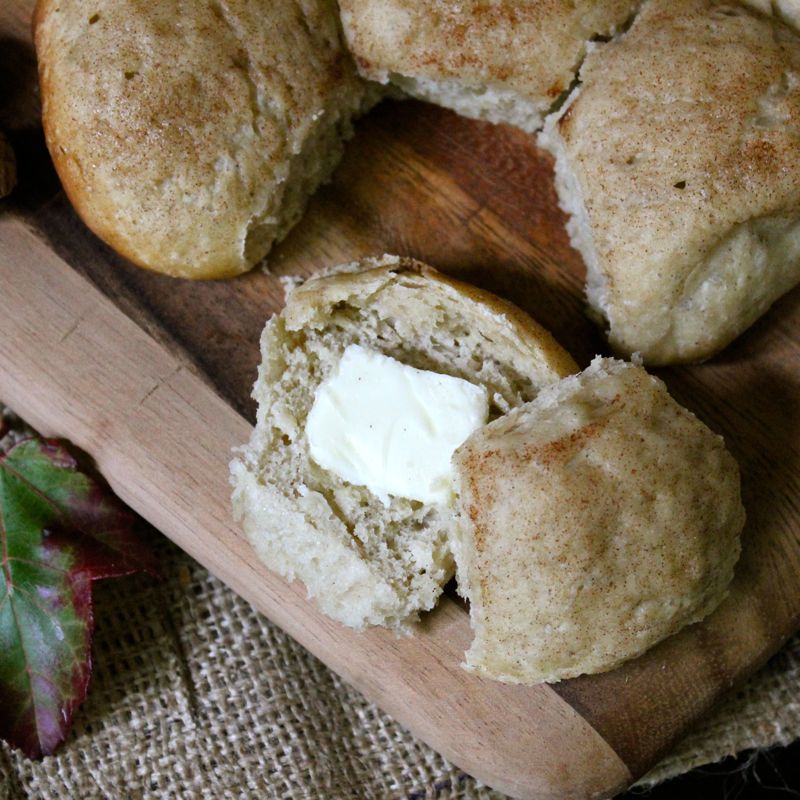
Hmmm…I really seem to be on a roll with the bread recipes lately. And here I go with yet another, Fluffy Buttermilk Biscuits! I am very excited to share this recipe with you because not only is it very quick and easy but it also yields up some of the best buttermilk biscuits I have ever eaten. And it is not only me who is saying so, but also the husband, who happens to be a bit of a biscuit connoisseur. He whole-heartedly agrees. These biscuits are rich and buttery with a tender, moist crumb and a golden crisp crust.

IMG_0708

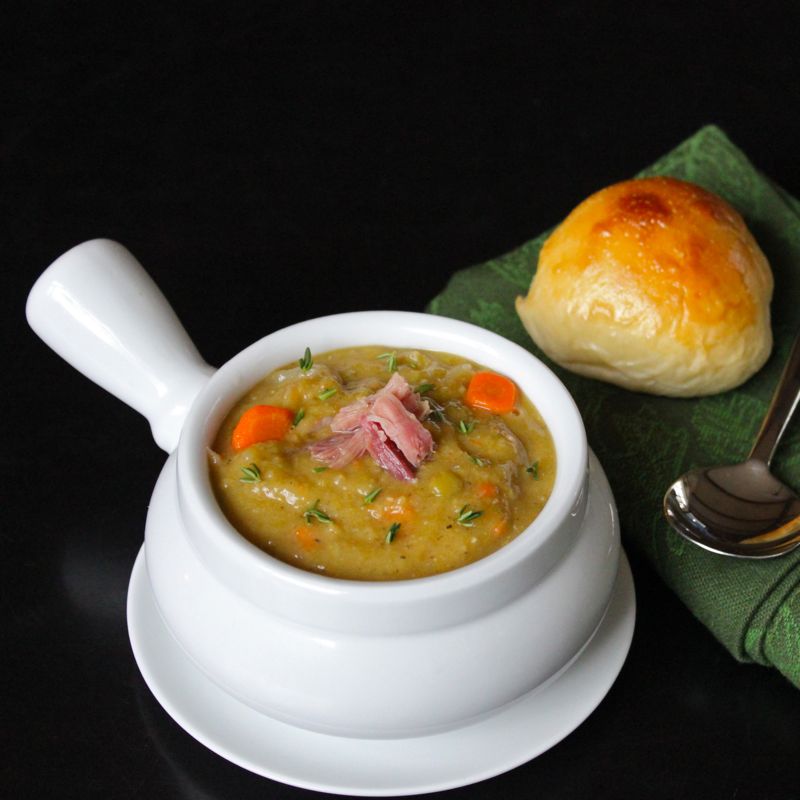
I often make these biscuits in a mini size and serve them as appetizers (perfect for all of the Holiday parties happening now), topped with a bit of country ham, Bourbon Bacon Jam or Drunken Granny Apple Butter. But I have also made them into full-sized biscuits, great along side a bowl of soup or when stuffed with sausage, eggs, cheese and hash browns (what?…) for an awesome, eye-opening breakfast biscuit.

IMG_0856

Now there are a few tricks you should keep in mind when making biscuits. The best flour to use is a low gluten flour, like cake flour. But I know not everyone has cake flour on hand and part of the beauty of this biscuit recipe is that it can be whipped up quickly. So by cutting a little corn starch into all-purpose flour that you undoubtedly have in supply, you can achieve the same high rise and tender crumb as a cake flour biscuit. The cream cheese addition to these biscuits not only gives them an extra richness but also encourages rise and flakiness. And always remember when you cut out biscuits, push the cutter straight through the dough. Do not twist. Twisting will inhibit biscuit rise.

IMG_0752

So with a few tricks of the trade, you can have these fluffy, buttery golden beauties on your table in about 30 minutes. It’s a good thing that you can make these up so quickly because I guarantee you folks will go wild (otherwise known as “biscuit frenzy”) and you will find these biscuits gone before you know it.

IMG_0840

Fluffy Buttermilk Biscuits

  • Servings: 12 regular sized or 48 -50 appetizers sized biscuits
  • Difficulty: easy
  • Print

recipe slightly adapted from: Once Upon a Chef

Ingredients:

  • 2 cups all-purpose flour
  • 1/4 cup cornstarch
  • 1 Tablespoon baking powder
  • 1/4 teaspoon baking soda
  • 1 Tablespoon sugar
  • 1 1/4 teaspoons salt
  • 1/2 cup (1 stick) cold unsalted butter, cut into 1/2″ chunks
  • 2 Tablespoons cream cheese
  • 3/4 cup cold buttermilk

Directions:

Preheat the oven to 425° F. Line a baking sheet with parchment paper.

In the bowl of a food processor, combine the flour, cornstarch, baking powder, baking soda, sugar and salt. Pulse a few times to mix.

Add the butter and pulse until the mixture resembles coarse sand. Add the cream cheese and pulse a few times until incorporated with a few pea-sized pieces of cream cheese intact. Transfer mixture to a mixing bowl.

Add the buttermilk and stir with a spoon until dough comes together into a craggy mass. Do not over mix.

Turn the dough out onto a lightly floured work surface. Dust the top of the dough with a bit more flour and bring together gently into a loose ball. Pat the dough into a 3/4 ” thick rectangle.

Using a sharp knife, cut the dough into thirds. Stack the pieces on top of one another and pat out into a 3/4″ thick rectangle again, flouring the surface lightly as needed to prevent the dough from sticking.

Cut the dough into thirds again. Stack the pieces on top of one another and pat into a 1/2″ thick circle if you are making appetizer biscuits, a 1/2″ thick rectangle if you are making regular biscuits.

Dust a 1 1/4″ biscuit cutter with flour and cut out as many appetizer biscuits as you can. Gather up the scraps, pat into a circle again and continue cutting out biscuits until no dough remains. Or if you are making full-sized biscuits, dust the blade of a sharp knife with flour and cut the dough into twelve even squares.

Transfer dough to the prepared baking sheet and bake for 12 – 15 minutes, until the biscuits are lightly golden on top and a deeper brown on the bottom.

Enjoy!

Fluffy Buttermilk Biscuits brought to you by: Runcible Eats (www.leaandjay.com)


Slow Cooker Split Pea Soup with Ham

December 12, 2014

IMG_0647

It may not technically be winter yet, but I think old man Winter is definitely stirring. It has not only been hovering around freezing here, but is has also been wet and windy as well. Yup, you get chilled to the bone the second you peek your head out of the door. This kind of weather just begs that you to have a big old pot of soup simmering away on the stove…say like this Split Pea with Ham Soup. Thick, rich and hearty, it is comfort food at it’s finest.

IMG_0682

I was inspired to make up a batch of this soup when I found myself with a ham bone after the Thanksgiving festivities. I don’t know about most of you folks, but we can’t manage to have Thanksgiving with just turkey. Nope…there has got to be ham as well. (and oysters since I grew up on an island…). I used to just toss that ham bone out without a second thought. But now I know that was really a mistake. The ham bone gives this soup such an amazing flavour and to be honest contributed quite a bit of meat. I thought we had pretty much picked it clean, but after it spend many hours simmering away, meat was just falling off of that bone. Which brings me to the other fantastic thing about this soup. It is incredibly easy to prepare. I just put all of the ingredients in the crock pot in the morning and eight hours later, after a wee bit of immersion blending, dinner was served!

IMG_0669

No fuss, no muss, and a big payoff. The husband says it is the best Split Pea Soup he has ever tasted. So there you have it. Christmas is right around the corner. If you find yourself with a ham bone left over, you’ll know just what to do!

IMG_0699

Slow Cooker Split Pea Soup with Ham

  • Servings: 4 - 6
  • Difficulty: easy
  • Print

recipe slightly adapted from: Garnish With Lemon

Ingredients:

  • 1 (16-ounce) package dried split peas, rinsed
  • 5 carrots, peeled and sliced
  • 1 medium onion, chopped
  • 3 stalks celery, chopped
  • 2 garlic cloves, minced
  • 1 bay leaf
  • 1/2 Tablespoon fresh thyme leaves
  • 1/4 teaspoon red pepper flakes
  • ½ tablespoon salt
  • ½ teaspoon black pepper
  • 6 cups chicken broth
  • 1 leftover ham bone (or 3 ham hocks – 1 1/2 lbs. Store bought ham hocks don’t have a lot of meat left on them, though they provide a lot of flavour. If you want a meaty soup you might need to supplement it with a little extra ham.)

Directions:

Place all of the ingredients in the slow cooker; gently stir. Cover and cook on low for 8 hours. Or if you are short on time, cook on high for 4 hours.

Remove the bay leaf from the soup and discard. Remove ham bone from soup and pull remaining meat from the bone. It should fall off quite easily. Set meat aside.

At this point, you can either remove a few cups of the soup, puree in the blender and return to the slow cooker or use your immersion blender for 10 seconds to puree the soup slightly. Stir the reserved ham back into the soup and serve warm.

Enjoy!

Slow Cooker Split Pea Soup with Ham brought to you by: Runcible Eats (www.leaandjay.com)


Apple Butter Yeast Rolls

December 9, 2014

IMG_4529

Just when you thought you had escaped my parade of apple recipes… Kapow!…I smack you with another one. And this one even goes along with the bread kick that I’ve been on this Fall. Hey, it is technically still Fall and although Christmas is not far off, I am not ready to start thinking about it yet. Though I am sad to say that I have been hearing Christmas music in all of the stores since way before Thanksgiving even arrived. I don’t think it had the store’s intended effect on me. I was not filled with the Christmas spirit and  inspired to shop. Instead, in a distinctly Grinch like fashion, I became very irritated and with clenched teeth, left the store as quickly as I could manage.

IMG_4530

But enough of my issues, let’s move on to happier topics, like these adorable little Apple Butter Yeast Rolls. I originally saw them over at the Spicy Perspective blog and  was very excited about them for several reasons. Firstly because Apple Butter was the star ingredient. I do love Apple Butter! And second because they are yeast rolls. I’ve already let you in on my bread obsession. But the thing that really caught my attention is that they were cooked in a crock pot. That’s right, slow cooker Yeast Rolls. Whaaaat??? I was incredibly intrigued. Sommer, from the Spicy Perspective, claimed that she loved to bake bread in this manner because she seems to have been cursed with always burning the bread that she tries to bake in the oven, whereas a slow cooker was just slow enough that she was able to dodge the curse. I don’t really seem to have been afflicted with this curse. My thing is that I can’t cook rice. My husband is the rice cooking pro. His rice is always perfect, very fluffy and tender. Mine, no matter how carefully I measure out the ingredients, comes out as a big gummy blob. Yuck! We are able to work around this though. I simply always get him to make the rice and everyone is much happier!

IMG_4527

Anyhoo…..Bread burning curses aside, I could see how it could be very convenient to cook bread in a slow cooker. Like during the Holidays for instance. I only have one oven and sometimes it can be quite tricky figuring out which dish will go in a which time. I couldn’t wait to try this slow cooker technique. So I whipped up the dough and formed the two separate batches of 12. Here is where the experimental part of my baking day took place. I baked one batch in the crock pot and one in the oven. Let me just say, both versions yielded delicious moist apple-y delights! And although the crock pot version definitely worked, I preferred the oven baked batch. The crock pot rolls were very moist and tender due to the steaming action of the crock pot, however they looked a bit anemic and didn’t have that same satisfying crunch of the outer crust that their oven-baked cousins had.

IMG_4567

That being said, the crock pot rolls were indeed tasty and if you were scarce on oven space when cooking your next feast, this method of bread baking is great to know. And I got two batches of Apple Butter Yeast Rolls which I was able to scarf down in the name of science. Now I declare that a win!

IMG_4548

Apple Butter Yeast Rolls

  • Servings: 24 rolls
  • Difficulty: easy
  • Print

recipe slightly adapted from: A Spicy Perspective

Ingredients:

  • 2 1/4 teaspoons dry active yeast (1 packet)
  • 1/2 cup warm water (98 – 105°F)
  • 3 Tablespoons sugar
  • 1/2 cup apple butter (if you are feeling industrious, make up a batch of my Drunken Granny Apple Butter, or grab a jar from your local farmer’s market)
  • 1 egg
  • 1 1/2 teaspoon salt
  • 4 cups bread flour
  • 2 Tablespoons melted butter
  • 2 Tablespoons Brown Sugar or Cinnamon/ Sugar mix (add 2 teaspoons cinnamon to 1/4 cup of granulated sugar)

Directions:

Using an electric mixer with a bread hook, place the warm water and sugar in the mixing bowl. Sprinkle the yeast over the water and let it foam for 10 minutes.

Then turn on the mixer and add the apple butter, egg and salt. Slowly add the flour. Once all the flour is in the bowl, add the melted butter. “Knead” the dough with the bread hook for 5-8 minutes.

The dough will be smooth, but very tacky. Dump it out onto a floured work surface. Using a floured knife, cut the dough into 4 quarters. Then cut each quarter into 6 equal pieces, to make 24 small dough segments.

Turn the ends of each dough segment under to create little balls.

At this point, you must decide whether you want to try the crock pot method or traditional oven baking method. If you would like to try the crock pot version, place a large piece of parchment paper in a 6 quart slow cooker, and press down. Arrange 12 dough balls in the slow cooker. Then carefully lift the parchment paper out, and repeat with the remaining dough balls and another piece of parchment, creating two separate batches. Place the lid on the crockpot and cover the additional dough balls on the counter, with plastic wrap. Allow them to rise for 1 hour at room temperature. *At this point the dough balls could be put in the fridge for up to a week, until ready to bake.

Gently brush melted butter over the rolls and sprinkle them with a little brown sugar or cinnamon sugar mix. Turn the slow cooker on high and “bake” for 60-90 minutes, depending on your crockpot. To test, touch the top of the rolls. If they feel slightly firm and are no longer tacky, the rolls are ready. Repeat with the second batch of dough balls. Each batch will cook for 60-90 minutes, 3 hrs total.

If you would rather go with the oven method, preheat the oven to 450°F. Allow rolls to rise for 1 hour, covered on parchment covered baking sheets. When ready to bake, gently brush melted butter over the rolls and sprinkle them with a little brown sugar or cinnamon sugar mix. Place trays in the oven for 10 minutes, then rotate the sheets and turn the temperature down to 400°F for about 8 more minutes, until they are golden brown. Let cool on wire racks.

Enjoy!

Apple Butter Yeast Rolls brought to you by: Runcible Eats (www.leaandjay.com)


Smoky Bacon Cream Biscuit Dressing

December 5, 2014

IMG_0610

Smoky Bacon Cream Biscuit Dressing. That’s right, what I’m talking about is a dressing in which Cream Biscuits are used in place of the run of the mill bread crumbs (croutons). You know, those decadent little gems I just mentioned in my last post? Although they are absolutely delicious on their own, truth be told I baked that batch up solely to use in this dressing.

IMG_0591

Now I might have had to have taken up a shotgun to stand guard over them for the two days leading up to Thanksgiving, but it was worth my vigilance to be able to make this essential Holiday dressing! ( By the way – Does anyone else have an issue with the term “dressing”. I really want to call this “stuffing”, but as I understand it, unless you actually stuff it into the bird, it is not stuffing. If it is cooked in a separate dish, it is dressing. Doesn’t sound right to me and I guess no one mentioned it to those folks over at Stove Top. 🙂 )

IMG_0621

Now the Cream Biscuits aren’t the only fantastic thing about this dressing.  As you might have guessed from the title, there is also a bunch (1 lbs. worth) of crispy smoky bacon thrown into the mix. Along with some lovely mushrooms and fresh herbs. So savory, so moist… It is, without a doubt, the best dressing I have ever tasted.

IMG_0616

At this point, I don’t know what the husband would do were we to have a Thanksgiving without it. Then I got to thinking, dressing isn’t only served at Thanksgiving and this dressing would certainly be welcome at any holiday meal (or any meal full stop for that matter). There are a lot of folks out there that serve turkey or goose for their Christmas Feast, so I thought I should go ahead and share this tasty recipe. Not to mention, Thanksgiving will surely turn up again next year and  you will be ready to go. I assure you, no matter when you happen to make this Smoky Bacon Cream Biscuit stuffing dressing, it will steal the show!

IMG_0600

Smoky Bacon Cream Biscuit Dressing

  • Servings: 8-10
  • Difficulty: easy
  • Print

recipe slightly adapted from: Williams Sonoma

Ingredients:

  • Twelve 4-inch cream biscuits, cut into 1 1/2-inch cubes
  • 1 lb. smoky bacon
  • 2 yellow onions, diced
  • 5 celery stalks, diced
  • 8 oz. white button mushrooms, brushed clean and sliced
  • 1/4 cup chopped fresh flat-leaf parsley
  • 2 Tablespoons chopped fresh sage
  • 2 Tablespoons chopped fresh thyme
  • Salt and freshly ground pepper, to taste
  • 4 to 4 1/2 cups chicken stock

Directions:

Position a rack in the lower third of an oven and preheat to 350°F.

Spread the biscuits out on a baking sheet. Toast in the oven until lightly browned, 25 to 30 minutes. Set aside. Increase the oven temperature to 375°F.

Cook the bacon until crisp, 7 to 9 minutes. Transfer to paper towels to drain. Chop or crumble into 1″ pieces.

Pour off all but 3 Tablespoons of the fat from the pan. Set the pan over medium heat and add the onions. Cook, stirring occasionally, until the onions are soft and lightly browned, about 10 minutes. Add the celery, mushrooms, parsley, sage and thyme and cook until the celery is soft, about 5 minutes. Transfer the onion mixture to a large bowl. Add the bacon to the bowl and season with salt and pepper. Add the biscuits and 4 cups of the stock and stir gently to combine. (try not to break up the biscuit chunks) Let rest for 5 – 10 minutes or so and then add more stock if you think it looks too dry.

Transfer the dressing to a baking dish and cover with aluminum foil. Bake for 30 minutes, then remove the foil and bake until the dressing is lightly browned, about 20 minutes more.

Enjoy!

Smoky Bacon Cream Biscuit Dressing brought to you by: Runcible Eats (www.leaandjay.com)


Cream Biscuits

December 2, 2014

IMG_0470

So while I’ve got ya’ll thinking of baking bread after my last post about those Heavenly West Virginia Dinner Rolls, I thought I’d mention another bread recipe I love to make around the holidays, Cream Biscuits. Mind you not the cookie type of biscuit, but the bread-y type of biscuit as in Buttermilk Biscuits, but made with heavy cream instead of buttermilk. These little gems are fabulous for so many reasons. They are incredibly quick and easy to make. The only thing I could think of that would be easier is buying one of those “just add water” box mixes. And then I guess there is the old skipping the baking all together and just buying some store-bought biscuits. But let’s just assume that you want to make your own biscuits, this is super-duper easy yet delivers big time on indulgently comforting taste.

IMG_0475

All you need to whip up a batch of these besides the ingredients are a bowl, spoon and a baking sheet (I’m assuming you have an oven…) No special tools needed. If you can stir a spoon around, you can make these biscuits. No rising times involved. There’s not even any rolling and cutting of the dough. You can simply drop these by the spoonful right onto the baking sheet. And as far as ingredients go, there are only 5 little old ingredients needed. Well I guess I should say six because you definitely want to brush these biscuits quite generously with some melted butter. I’m telling you, you will not believe how deliciously rich and decadent these biscuits are. And even though it only takes a few minutes to whip up a fresh batch, you can even make them up ahead of time and quick freeze them.  Just drop them onto the baking tray and place them, tray and all in your freezer. Once the biscuits have frozen, take them off of the tray and put them in heavy-duty freezer Ziplock bags. When you find that you have a hankerin for some of these biscuits, just pop them frozen right onto a baking tray, brush them with butter and bake as you normally would. It might take a couple of extra minutes if you are baking from frozen, but still that is quite a time saver. Homemade biscuits in a flash!

IMG_0490

Folks will be amazed at how quickly you can conjure up some mouth-watering biscuits that are light, moist and flaky with a satisfyingly crunchy edge. Only we will know how truly easy peasy it was to get there!

IMG_0481

Cream Biscuits

  • Servings: 12 - 14 biscuits
  • Difficulty: easy
  • Print

recipe slightly adapted from: Williams Sonoma

Ingredients:

  • 2 1/2 cups all-purpose flour
  • 1 Tablespoon baking powder
  • 1 teaspoon salt
  • 2 Tablespoons sugar
  • 2 1/2 cups heavy cream
  • 3 Tablespoons melted butter, for brushing over biscuits

Directions:

Preheat an oven to 425°F.

In a bowl, stir together the flour, baking powder, salt and sugar. Add the cream and stir until no lumps remain. Remember not to over mix the dough. Stir until ingredients are just combined.

For each biscuit, drop 1/4 cup batter onto a parchment lined baking sheet, spacing the biscuits about 1 inch apart. Brush melted butter over the tops of the biscuits.

Bake until the tops of the biscuits are pale golden and the bottoms are golden brown, 15 to 18 minutes.

Enjoy!

*If you would like to make a bit more work for yourself or you just can’t stand the free-form look of drop biscuits, you can roll and cut them. You will need to generously flour your work surface as well as the top of the dough. Remember to handle the dough as little as possible or you will end up with tough biscuits. Roll or pat the dough to a thickness of about 3/4″. Using a sharp cookie or biscuit cutter, cut into rounds. Remember, resist the urge to twist your cutter. Twisting will cause your biscuits not to rise as high as you might like. Place on parchment lined baking sheet and proceed as noted above.

Cream Biscuits brought to you by: Runcible Eats (www.leaandjay.com)