Mini Mummy Brownie Bite Cupcakes

October 31, 2014

IMG_0006

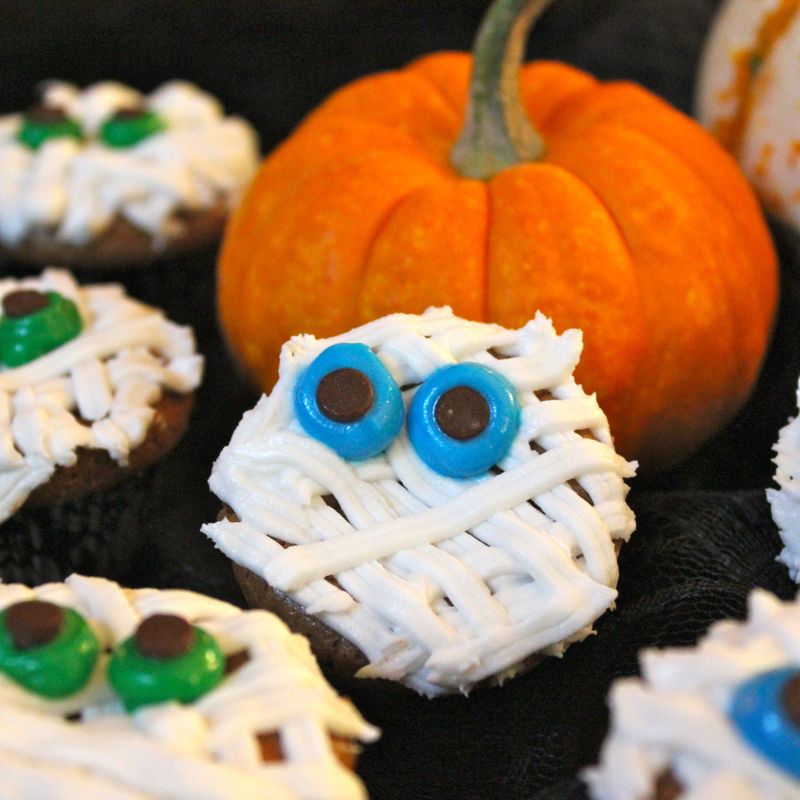
Are you my Mummy? Ha! I couldn’t resist! Happy Halloween ya’ll! I thought I’d celebrate with some adorable Mini Mummy Brownie Bite Cupcakes. These little devils are actually pint-sized rich and chewy brownies chock full of mini chocolate chips and all wrapped up in Vanilla Buttercream “bandages”. Spooky in an adorable sort of way and definitely delicious!

IMG_0005

I really love Halloween! I think it might actually be my favourite holiday. I know last year I was lamenting that the husband and I have not attended a proper Halloween party since 2010 and I am sad to say that we have no Halloween plans yet again this year, Booo! (Ha! get it….”boo”) aside from these delightful little Mummy Cupcakes, that is. I have actually made quite a few fantastic Halloween treats in years past. Probably my all time favourite was the Soul Cake.

IMG_8684

It might just be the historian in me that makes me love it so much, because truth be told, unlike most sugar laden, tooth-achingly sweet candies found in abundance on Halloween, these little cake like cookies are only mildly sweet. There is not a speck of chocolate to be found in them, only a few currants top the cakes arranged in a cross pattern. What can I say, sometimes less is more. Here is a little bit from my Soul Cake blog post which talks about the origins of Halloween and the Soul Cake connection.

Our modern Halloween celebrations are derived from the Celtic holiday of Samhain. Samhain was Celtic New Year. It was a harvest festival which marked the dying of the sun-god and a turning to the colder, dormant half of the year. On this night, the Celts believed the veil between the worlds of the living and the dead was at its lowest point. The dead could more easily travel back over to our side, and if we weren’t careful, we could accidentally wander over in to their world and be trapped-a good reason to stay close to home and bonfires, no doubt! This belief likely gave rise to our Halloween legends of ghosts, ghouls and witches wandering about on this night in particular. As Christian beliefs took hold, Samhain celebrations became re-branded as All Soul’s Eve. By the eighth century beggars, rather than the spirits from the other world, would travel door to door on this night. In exchange for their prayers for the family’s departed, they were given a small cake, known as a Soul Cake.

IMG_8703

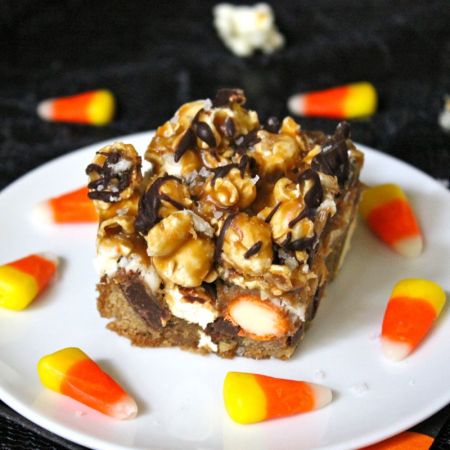
Last year I did some very tasty Cookies & Cream Salted Caramel Popcorn Bars.

IMG_4625

But enough reminiscing. Lets talk about these awesome tiny terrors from this year, the Mini Mummy Brownie Bites.

IMG_9989

They are actually very easy to make from scratch. In fact I would recommend making up the brownie bites the day before you need them and then making the frosting and decorating them the next day. I chose to go with the smaller brownie bites baked in a mini cupcake tin. I find mini bite sized things go over much better at a party. And they are super cute….And that you can eat more than one and not feel any guilt about it… after all, they’re just a wee little tiny bit of a thing. But you could also go for full size manly mummy cupcakes baked in a regular cupcake tin. Whatever you prefer. This is a very versatile recipe. Indeed, if you are really pressed for time, you could even throw the recipe to the wind and whip up a box of brownie mix and use some store-bought frosting for decorating. Likely no one but you and I will know and I’m not talking!

IMG_9968

Happy Hauntings!

IMG_9993

Mini Mummy Brownie Bite Cupcakes

  • Servings: 48 - 52 Mini Mummies or 18 Big Kahuna Mummies
  • Difficulty: easy to ridiculously easy
  • Print

Recipe from: A Baker’s Field Guide to Cupcakes by Dede Wilson

Ingredients:

For the Brownie Cupcakes:

  • 8 ounces semisweet or bittersweet chocolate, finely chopped
  • 1 cup (2 sticks) unsalted butter, at room temperature, cut into squares
  • 2 cups firmly packed light brown sugar
  • 4 large eggs
  • 2 teaspoons vanilla extract
  • 1/4 teaspoon salt
  • 1 cup all-purpose flour
  • 3/4 cup mini chocolate chips ( if you are making the big mummy cupcakes you could use regular sized chips)

For the Vanilla Buttercream:

  • 1/2 cup (1 stick) unsalted butter, at room temperature, cut into small pieces
  • 4 cups confectioners’ sugar; plus an additional 1/2 cup if necessary
  • 1/4 cup milk, at room temperature
  • 1 teaspoon vanilla extract

To Decorate:

  • 96 mini chocolate chips to form the pupils of the eyes (36 regular chips if you are making big mummies)
  • food coloring to tint the buttercream for the eyes
  • round piping tip
  • Ateco or Wilton tip #47 (basketweave tip – use the smooth side rather than the ridged side, for bandages or wraps)

Directions:

Preheat oven to 350° F. Place paper liners in all wells of cupcake tins

Melt chocolate and butter together in top of large double boiler or in large bowl in microwave; stir until smooth and combined, then cool to lukewarm.

Whisk in brown sugar until well blended. then whisk in eggs one at a time, allowing each one to become incorporated before adding the next one. Whisk in vanilla extract and salt. Add flour and mini chocolate chips, if using, at the same time and fold in until no streaks of flour remain.

Divide batter evenly among cupcake wells. Bake for about 20 – 25 minutes, or until a toothpick inserted in the center shows moist crumbs. The tops will be dry and crackled in appearance.

Cool pans on racks for 5 minutes, then remove cupcakes to cooling racks to cool completely.

Make the frosting. In a large bowl of a stand mixer, beat butter until creamy. Add 1 cup of confectioners’ sugar gradually. I usually do about 1 -2 tablespoons at a time, waiting for each addition to be incorporated before adding the next tablespoons. Scrape down the bowl as needed. Add 1 more cup of sugar slowly and then half of the milk. Beat until smooth and creamy. Add 1 more cup of sugar, again slowly, then add the remaining milk. Beat well and scrape down the sides of the bowl. Gradually add the final cup of sugar and the vanilla extract. Beat on high speed until very light and creamy. Evaluate the texture of the icing. If too soft, add remaining sugar until desired texture is reached.

To Assemble the Mummies:

Place cupcakes on clean work surface. Place frosting in a pastry bag fitted with tip #47. Pipe frosting onto cupcake to form mummy’s bandages or wraps. (Make sure you reserve a bit of frosting to tint for the eyes).

Tint remaining frosting whatever color you prefer for the mummy’s spooky glowing eyes: red, yellow, green or blue all work well. Fit another pastry bag with a round tip and pipe eyes onto each mummy cupcake. Insert chocolate morsels, tip side down, in the center of the eyes.

Enjoy!

Mini Mummy Brownie Bite Cupcakes brought to you by: Runcible Eats (www.leaandjay.com)


Scotchmallow Cupcakes

October 23, 2014

IMG_9690

Scotchmallow Cupcakes! That’s right…you heard me. Stop the presses now because I’m telling you that I have managed to create a Scotchmallow Cupcake! So ya’ll better listen up because this delightful little pastry boasts a moist vanilla cake which has been filled with the most decadent Salted Caramel Sauce, frosted with a fluffy Marshmallow Meringue and dipped in a divine Tipsy Dark Chocolate Ganache. If you aren’t instantly smitten, I just don’t know what it will take.

IMG_9591

A few of you folks out there who have apparently been living a secluded life out under a rock in some meadow may not know where that Scotchmallow part of the name comes from. (Ha! Who am I kidding? The husband and I just found out about them last year!) Some might have expected a butterscotch kind of vibe. But no…no butterscotch here. Scotchmallows are one of the most popular treats at See’s Candies, a SanFrancisco based confectioner. These little bites of heaven consist of a delicious layer of creamy caramel covered by a layer of honey marshmallow which is then enrobed in rich dark chocolate.

IMG_9668

One taste and I guarenteed you will be hooked for life! (I’ll let you in on a little secret…even if you don’t have a See’s store near you and aren’t planning a visit to the Bay area, you can order Scotchmallows by the box at the See’s Website. Or even order a box on good old Amazon. If you have Amazon Prime you could be scarfing these little devils down before you know it! You can curse thank me later 🙂 )Even the husband, who is usually inexplicably indifferent to chocolatey treats, never turns one away. Without a doubt, they are a bit of an obsession in this household. So I had been dreaming of a culinary creation that would be combination of two things I loved, cupcakes and Scotchmallows, for quite some time. At first I just thought of making a cupcake with a Scotchmallow Candy perched on top. But that would’ve been a bit too easy. And then I made up that stunning batch of Salted Caramel bliss the other day and thought hmmm…

IMG_9604

Before I knew it, I had conjured up this masterpiece. These cupcakes are nothing short of divine! But don’t take my word for it, whip up a batch today. Let the addiction begin!

IMG_9584

Scotchmallow Cupcakes

  • Servings: 12 cupcakes
  • Difficulty: easy
  • Print

Ingredients:

For the Cupcakes:

  • 1 3/4 Cups all-purpose flour
  • 2 teaspoons baking powder
  • 1/4 teaspoon salt
  • 3 large egg whites
  • 3/4 Cup buttermilk
  • 1/2 cup (8 tablespoons, 1 stick) unsalted butter
  • 3/4 cup granulated sugar
  • 1 teaspoon vanilla bean paste (can substitute vanilla extract)

For the Salted Caramel Filling:

For the Marshmallow Frosting:

  • 4 egg whites
  • 1 cup sugar
  • 1/4 teaspoon cream of tartar
  • 1 teaspoon vanilla extract

For the Tipsy Dipping Chocolate:

  • 8 ounces bittersweet or semisweet chocolate, chopped
  • 1/2 cup heavy cream
  • 1 tablespoon plus 1 teaspoon light corn syrup
  • 4 tablespoons Marshmallow Vodka

Directions:

Prepare Salted Caramel Sauce. Set aside to cool.

Preheat oven to 350º F. Line wells of 12 cup cupcake pan with paper liners.

Whisk flour, baking powder and salt together. Set aside.

Whisk egg white and buttermilk together in small bowl. Set aside.

In bowl of a stand mixer with paddle attachment beat butter until pale and creamy. Slowly add the granulated sugar, scraping down the bowl as needed and continuing to beat until mixture is light and fluffy. Add vanilla paste and beat until combined. Add the flour mixture in 4 additions alternating with the buttermilk/egg mixture, beating only until just combined.

Using 1/4 cup scoop, divide batter evenly among cupcake wells. Bake for 20 minutes, or until a toothpick inserted shows a few moist crumbs.

Cool cupcake tin on wire rack for 5 minutes and then remove cupcakes from pan to finishing cooling on rack.

Once cupcakes are cool, using a cupcake corer or apple corer, cut the centers out of the cooled cupcakes, cutting down 2/3 of the way through the cakes. Take care not to cut all the way through the cake. Fill hollowed out section with salted caramel sauce. You can do this with a spoon, or a piping bag. 

Prepare marshmallow frosting. Place egg whites, sugar, and cream of tartar in the heatproof bowl of an electric mixer. Set over a saucepan with simmering water. Whisk constantly until sugar is dissolved and whites are warm to the touch, 3 to 4 minutes.

Transfer bowl to electric mixer fitted with the whisk attachment, and beat, starting on low-speed, gradually increasing to high, until stiff, glossy peaks form, 5 to 7 minutes. Add vanilla, and mix until combined.

 Place frosting into pastry bag fitted with a decorative tip. I use a large round tip. Pipe frosting over the top of cupcakes.
Place cupcakes into refrigerator to chill prior to dipping in the Chocolate Dipping Sauce.
Prepare the Tipsy Chocolate Dipping Sauce. Melt the chocolate with the cream and corn syrup in a small saucepan over low heat, stirring until smooth. Remove from the heat and stir in the Marshmallow Vodka. Set aside to cool.

Dip the tops of the frosted cupcakes in the glaze right to the edge of the cupcake paper, let excess glaze drip off before turning upright. 
Let cool, right side up, until the glaze is firm.
Store cupcakes in the refrigerator, remove and bring to room temperature (about 30 minutes) before serving. This recipe makes more glaze than you need, but a deeper amount of chocolate in the pan makes it easier to dunk the tops of the cupcakes. Store remaining glaze in the refrigerator, it will form a delicious tipsy ganache that can be used later as an ice cream topping. Or a quick pick me up eaten by the spoonful when no body is looking. 🙂
Enjoy!
Scotchmallow Cupcakes brought to you by: Runcible Eats (www.leaandjay.com)


Perfect Salted Caramel Sauce

October 15, 2014

IMG_9567

Perfect Salted Caramel Sauce! Are you listening? I said…Perfect Salted Caramel Sauce!!! I don’t know about you, but I can’t get enough of the stuff. If you’ve never had it before, which I can’t imagine since it seems to be all the rage, it is luscious buttery caramel which has been spiked with delicate fleur de sel. Sweet/salty bliss I tell you. Veritable liquid gold! When a humble apple slice is dipped in it, it is suddenly elevated to gourmet treat. Drizzle it over ice cream with the same results. In fact, it seriously enhances almost anything it comes in contact with, be it cake, brownies, cookies or pies. It is hard to believe that 4 simple ingredients can produce such a magical concoction, but somehow they do. And with this recipe, you can make up a batch of Perfect Salted Caramel Sauce at home in about 10 – 20 minutes. Indeed I was able to make up a batch of Salted Caramel Sauce that was complete perfection on the very first try!

IMG_9527

I don’t know if you have tried making caramel sauce in your kitchen or not. Most folks say it is pretty easy as long as you keep a close watch of the pan as the sugar caramelizes. I know that, and I have tried to keep an eagle eye on it but…. it has not come easy for me to say the least. I remember a couple of years ago I wanted to make these Apple Pie Salted Caramel Cupcakes for the husband’s birthday.

IMG_8259

After much travail, I was finally able to get them done, but they literally took all day. Thankfully I was able to finish them two minutes before midnight, so technically they were done on his actual birthday, but talk about being exhausted. And really there was nothing terribly difficult about that particular cupcake recipe. Except that salted caramel…I failed making it 4 or 5 times. Perhaps that is why I am so completely psyched about making this Perfect Caramel Sauce perfectly on the first try. (If you feel inspired to make those terribly tasty and gorgeous looking Fall cupcakes, you might just want to sub in this Caramel Sauce recipe.The one I have listed in the Apple Pie Cupcake recipe was the one that finally worked for me on that day. I had tried several different ones.) I had made it before successfully, but not that day. Salted Caramel is strange and elusive that way. I think you just aren’t meant to make it on certain days. It is simply not in your stars. You should just accept it and move on. But I am pretty stubborn…so of course I never handle a caramel failure in such a zen manner. I panic and freak out! Which is silly. I mean you pretty much know if the caramel has failed early on, so worse case scenario you’ve wasted a cup of sugar and a bit of time. No big deal right? Well that’s what logical me says. The real me gets a bit nervous the night before I have planned to make some salted caramel. I should perhaps avoid salted caramel dishes…but that’s not going to happen. It is so irresistible. But I think I’ve got it this time. This recipe yielded up a big old batch of Perfect Salted Caramel Sauce on this very first try! I can not tell you how happy I was. So don’t be scared! You can do this. Say whatever prayers you need, check your astrological charts, complete any superstitious kitchen rituals you hold, whisper the appropriate incantation and then take a deep breath and calmly and patiently brew up this most exquisite Perfect Salted Caramel Sauce today. Folks will be completely enchanted!

IMG_9556

Perfect Salted Caramel Sauce

  • Difficulty: I won't lie...challenging!
  • Print

recipe from: Brown Eyed Baker

*The Brown Eyed Baker has great step by step photos on her site. Please have a peek before you take the plunge!

Ingredients:

  • 2 cups granulated sugar
  • 12 tablespoons unsalted butter, at room temperature, cut into pieces
  • 1 cup heavy cream, at room temperature
  • 1 tablespoon fleur de sel (or any other flaky sea salt)

Directions:

Add the sugar in an even layer over the bottom of a heavy saucepan, with a capacity of at least 2 or 3 quarts. Heat the sugar over medium-high heat, whisking it as it begins to melt. You’ll see that the sugar will begin to form clumps, but that’s okay. Just keep whisking and as it continues to cook, they will melt back down. Stop whisking once all of the sugar has melted, and swirl the pan occasionally while the sugar cooks.

Continue cooking until the sugar has reached a deep amber color. It should look almost a reddish-brown, and have a slight toasted aroma. This is the point where caramel can go from perfect to burnt in a matter of seconds, so keep a close eye. If you are using an instant-read thermometer, cook the sugar until it reaches 350 degrees F.

As soon as the caramel reaches 350 degrees, add the butter all at once. Be careful, as the caramel will bubble up when the butter is added. Whisk the butter into the caramel until it is completely melted.

Remove the pan from the heat and slowly pour the cream into the caramel. Again, be careful because the mixture will once again bubble up ferociously. Whisk until all of the cream has been incorporated and you have a smooth sauce. Add the fleur de sel and whisk to incorporate.

Set the sauce aside to cool for 10 to 15 minutes and then pour into your favorite glass jar and let cool to room temperature. You can refrigerate the sauce for up to 2 weeks. You’ll want to warm the sauce up before using.

Enjoy!

Perfect Salted Caramel Sauce brought to you by: Runcible Eats (www.leaandjay.com)


Beer Sausage Gravy

October 10, 2014

IMG_9496

So did you ever have one of those weeks? You know the thing. That day where you wake up late and then the Starbucks dude gets your order really wrong leaving you with a cup of really expensive yet undrinkable liquid that you just stare at whilst you sit in the biggest traffic jam since cars were invented as the needle on your gas gauges sinks ever lower past E. Yup one of those days…times 5!!! I swear without going into detail, or calling specific folks out (I’m ever so tempted…), every day of that week kept getting slightly more irritating than the previous for both the husband and myself. Yup, it wasn’t just one of us who was suffering a misalignment of the stars, both of us were. So I knew that once the weekend arrived (and boy did it ever take its sweet time showing up) I would have to start it off with some seriously delicious comfort food to give us both a much-needed attitude adjustment. For those of you who have been following me, you know I just told you about some Maple Bacon Biscuits which could stop you dead in your tracks. Those were actually just the first part in operation “forget the past week ever existed”. This week was soo annoying that biscuits, not even those little treasures, couldn’t perk us up all on their own. So what was a girl to do? Well, I reached for the booze of course. A big old bottle of beer to be specific. And the bit I didn’t chug right away (I sure did…morning time be damned. It had to be after 5 some where…), I poured into the unbelievable creamy spicy batch of Sausage Gravy that I was cooking up to grace those lovely biscuits. Biscuits & Gravy.

IMG_9490

Wait….Maple Bacon Biscuits & Beer Sausage Gravy! Yup…that was the kind of dreadful week we had, only a combo of pork products, biscuits, gravy & beer could take its sting away. And you know…it pretty much worked. At least we cared less about it all during the time it took us to savour every delicious bite. I think we may have even licked our plates clean! So if you’re ever in need of some serious stick to your ribs, down home style comfort food, look no further. You’ll be feeling right in no time with a big old plate of Biscuits with Beer Sausage Gravy.

IMG_9502

Beer Sausage Gravy

  • Servings: 6 - 8
  • Difficulty: easy
  • Print

recipe slightly adapted from: The Owl with the Goblet

Ingredients:

  • 1 pound country-style sausage
  • 1 tablespoon butter
  • 1/3 cup flour
  • 1/2 cup beer
  • 3 1/2 cups milk ( at least 2% or whole)
  • 1 teaspoon “extra special sausage gravy seasoning”  (recipe listed below)
  • 3 -4 sprigs of fresh thyme (leaves only)
  • 1 teaspoon salt
  • 1 teaspoon black pepper
  • 1 pinch red  pepper flakes

For Serving:

  • 8 -9 Biscuits of your choice  ( I seriously recommend those Maple Bacon Biscuits I just told you about)

Directions:

Place a large frying pan on the stove over medium high heat.  Add sausage and cook until browned. With a slotted spoon, remove sausage from the pan and set aside.  Keep grease in the pan and add the butter and allow it to melts. Slowly add the flour, stirring the whole time until a smooth paste forms. Increase heat to high, add beer slowly, whisking continuously.  Continue whisking and add milk.  Keep stirring until all lumps are gone.  Continue cooking over high heat and bring gravy to a boil. This will thicken it up a bit.

Reduce heat to low and add fresh thyme, seasoning, salt, pepper, and red pepper flakes (if desired for a kick).  Taste gravy and season with more salt or pepper if needed. Add sausage back to pan and stir until well incorporated. Keep warm over low heat and serve over or on the side of the biscuits.

Extra-Special Gravy Seasoning

Ingredients:

  • 1 teaspoon oregano
  • 1 teaspoon sage
  • 1 teaspoon rosemary
  • 1 teaspoon roasted garlic powder

Directions:

Mix all of the spices together. Store excess spice for use the next time you need a little biscuits and gravy comfort!

Enjoy!

Beer Sausage Gravy brought to you by: Runcible Eats (https://leaandjay.com)


Maple Bacon Biscuits

October 7, 2014

IMG_9481

Maple Bacon Biscuits. Yup….probably don’t need to say anything else. I could just leave it right there, because I know I’ve already got the attention of all the biscuit lovers out there. (These are American biscuits…not the cookie variety but the big old buttery layered bready type).  The husband loves biscuits, especially breakfast biscuits piled high with eggs, sausage and hash browns.

The puppy is a biscuit fan as well!

The puppy is a biscuit fan as well!

I tell you if someone whispers the word biscuit within a five-mile radius, his ears will perk up. I’m pretty sure that’s how it is with all the biscuit-y type folks out there. And then to stick the word bacon in front of it? I’ve likely got the attention of 99% of the population at this point. Bacon makes everything taste better. Must be why nearly everyone loves it. And those folks who don’t…you might want to keep an eye on them. Definitely find them a bit suspect. And then to bring maple flavour into the mix too….What you end up with is sweet/savoury flaky perfection!

IMG_9466

I found the recipe for these Maple Bacon Biscuits in Deb Perlman’s Smitten Kitchen Cookbook, which I absolutely love. They were very easy to make. Sometimes recipes for biscuits can get a bit fussy and obsessive, trying to get just one more micro-fraction of an inch more rise. No worries here, easy recipe with great results, which comes together quickly. The thing that takes the longest is waiting for that grease to set up I would imagine. You see, this biscuit recipe calls for a mixture of butter and cold bacon grease and instructs folks to put the grease from the bacon they just fried in the freezer to quickly solidify that fat. I just had to laugh. I have a ready supply of bacon grease in my fridge at all times. (Hey! Don’t make that face! At least I keep it in the fridge. My grandma always had it just sitting out on the ledge behind the stove.) I always save the grease when I fry up a batch of bacon. We fry all sorts of things in it later. Gives it a great salty, bacony flavour. Ever had an egg fried in bacon grease? YUM! I’ve included the instructions for readying the grease for these biscuits, but you might want to keep the bit you don’t use in the fridge for later. Don’t say no one ever told you… But back to these biscuits. They are amazing, all tender and flaky, slightly sweet  and salty and peppered with bits of bacon. Eat one hot right out of the oven, slathered with butter and your weekend will be off to a grand start indeed!

IMG_9457

Maple Bacon Biscuits

  • Servings: 9 Biscuits
  • Difficulty: yield
  • Print

recipe slightly adapted from: Smitten Kitchen Cookbook

Ingredients:

  • 4 slices bacon
  • 1/4 cup (60 ml) maple syrup
  • 1 1/2 Cups (190 grams) all-purpose flour
  • 2 teaspoons baking powder
  • 1/2 teaspoon baking soda
  • 1/2 teaspoon salt
  • 4 Tablespoons Unsalted Butter, chilled, chopped into small chunks
  • 2 Tablespoons cold bacon grease
  • 1/4 cup (60 ml) buttermilk

Directions:

Fry bacon until it is crisp. Remove the bacon from the pan and drain it on a few stacked paper towels. Pour the bacon fat into a glass measuring cup so that you can see how much you have. Place your measuring cup in the freezer and freeze until fat is solid.

Chop the bacon into small bits, and place it in a small dish. Pour the maple syrup over the bacon and stir; then set the mixture aside.

Remove the solidified bacon fat from the freezer. Preheat your oven to 450 º F. Line a baking sheet with parchment paper. Mix the four, baking powder, baking soda and salt in the bowl of a food processor. Scatter the butter and bacon fat over the top of flour mixture. Pulse until flour takes on a coarse meal appearance.

Place flour/butter mixture in bowl. Add the bacon/maple syrup mixture as well as the buttermilk. Blend together with a rubber spatula until dough forms. Knead just a couple of times, taking care to handle the dough as little as necessary. Pat the dough out to a 1″ thickness on a well floured surface. Using a 2″ cutter, cut biscuits, taking care not to twist cutter, but pushing straight down and then lifting. Arrange the biscuits on a parchment lined baking sheet. Place baking sheet in oven and immediately turn heat down to 425º F. Bake for 12 to 14 minutes, until they are puffed and golden.

Serve warm slathered in butter and jam. Or maybe with something else terribly naughty and delish! Stay tuned to next posting to find out what it is!

Enjoy!

Maple Bacon Biscuits brought to you by: Runcible Eats (http://www.leaandjay.com )


Boozy Banana Crumb Cake

October 3, 2014

IMG_4655

You know, it is true what they say, that sometimes less is more. I mean, I’ve definitely told you how I love to make fancy pants birthday cakes for folks. And I think you might have seen some of the cupcakes I’ve fussed over in the past. Well, sometimes it is just not necessary to go through all that. Sometimes folks just want a simple little bit of crumb cake to quietly enjoy with their morning cup of tea (or coffee as the case might be…) And I think I’ve found the perfect recipe for that in this Boozy Banana Crumb Cake.

IMG_4686

Now when I said “simple” bit of crumb cake, you didn’t think that I meant that it wouldn’t be flavourful and delicious did you? This crumb cake has all of the usual moist buttery goodness of your traditional crumb cake, but also has the fabulous addition of banana flavour added into the mix.

IMG_4699

And not just plain old mashed up bananas, which don’t get me wrong, those are great. But to really enhance the flavour of the bananas and just put them way over the top, they have been caramelized under the broiler with brown sugar and rum. Yup…RUM. Rum on the bananas and rum in the cake! Just the thing to give you that extra little something to get you going in the morning huh? And being a crumb cake, this cake is topped with big buttery crumbles of cinnamon and brown sugar topped with a dusting of powdered sugar.

IMG_4640

So there you have it, no layers, no fluffy frosting, no fancy candy toppers. Quick and easy to make. Perfect for breakfast, mid morning snacks or with a scoop of ice cream added, a pleasing dessert. Simple home baking at its best!

IMG_4634

Boozy Banana Crumb Cake

  • Servings: 12 pieces - depending on how you slice it
  • Difficulty: easy
  • Print

recipe from: Ambrosia

Ingredients:

For the Bananas:

  • 3 medium ripe bananas
  • 2 tablespoons brown sugar 
  • 2 tablespoons rum (or more, if you want… and you know you do!)

For the Cake:

  • 1 1/2 cups all-purpose flour
  • 1/2 cup sugar
  • 2 1/2 teaspoons baking powder
  • 1/2 teaspoon salt
  • 1 egg, at room temperature
  • 1/2 cup milk
  • 2 teaspoons vanilla extract
  • 1 teaspoon cinnamon
  • 1 1/2 teaspoons rum

For the Crumb Topping

  • 1 cup packed brown sugar
  • 2 1/2 cups flour
  • 1 1/2 teaspoons cinnamon 
  • 1 cup (2 sticks) butter, melted and cooled

powdered sugar, for dusting

Directions:

Line a small baking sheet or dish with aluminum foil (for the sake of easy cleanup). Peel your bananas and arrange them on the baking sheet.  Prick them a couple of times all over with a fork. Brush the bananas with 2 tablespoons of rum (or more…), and sprinkle 2 tablespoons of brown sugar on top.  Turn your broiler on high, and broil the bananas until the sugar begins to bubble and the bananas begin to burn slightly, about 7 minutes.  Keep an eye on them! Remove the bananas from the oven and allow them to cool slightly.  Dump the bananas into a bowl, making sure to scrape all that burnt sugary rum mixture into the bowl as well.  Mash the bananas with a fork.  

Preheat the oven to 325ºF, and position a rack in the middle of the oven.  Spray a 9×13″ pan with baking spray.

In a bowl, whisk together the 1 1/2 cups of  flour, sugar, baking powder, cinnamon and salt.  Set aside. In a separate bowl, whisk together the mashed bananas, egg, milk, vanilla extract, and rum. Add the dry ingredients to the wet ingredients, mixing just until the batter comes together.

Pour the batter into the prepared cake pan, and set aside.  To prepare the crumb topping, in a bowl, combine the 2 1/2 cups of flour with the brown sugar, and cinnamon. Add the melted butter to the flour mixture, and stir the mixture together until large crumbs form. Sprinkle the crumbs evenly over the prepared cake batter.  Bake the cake until a toothpick inserted into the cake comes out clean, about 25 minutes.  

Rotate the pan at least once during the baking time.  Remove the cake from the oven, and allow it to cool completely on a wire rack before dusting the cake with powdered sugar, and cutting it into squares.

Enjoy!

Boozy Banana Crumb Cake brought to you by: Runcible Eats (http://www.leaandjay.com )