Caramelized Leek, Basil & Black Pepper Biscuits

February 28, 2013

IMG_9417

I’m so excited today! For a couple of reasons actually. The first of which is that I’m able to give you the recipe for these Caramelized Leek, Basil & Black Pepper Biscuits. These delicious little morsels have been in heavy rotation in my house this winter. They are amazing with soups and stews, are a superb savoury breakfast biscuit when stuffed full of scrambled egg, cheese and bacon. Not to mention, they hold up fine all on their own with or without a pat of butter. I’ve wanted to share this winner of a recipe with you for some time, but have never been able to snap a quick picture of them. Nope. We literally gobble them up that fast. But this last time, I did manage to click a shot or two before nothing more than a crumb or two remained to indicate they had ever been there at all. These biscuits have it all going on! Their buttery, flaky layers rise oh so high. The savoury flavours of the caramelized leeks, basil and black pepper combine to really grab your attention. You know you’re not dealing with just any run of the mill biscuit. (not that I’ve really ever met a biscuit I didn’t like…), these fellows are special. My husband is quite partial to them because of the leeks. He LOVES leeks. And I’ve actually got quite a few recipes headed your way in which leeks feature prominently.

IMG_9404

Which brings me to the next reason for my somewhat excited state today. Tomorrow is March 1st and every year on March 1st I endeavour to post one Irish influenced recipe a day up to March 17th, St. Patrick’s Day! This undertaking is quite a feat for me, I’m not a once a day blogger type person. I consider myself very accomplished if I manage to get two blogs in per week. (I know all you daily bloggers are rolling your eyes about now. I give you props. Can’t imagine how you do it.)Soooo…..wish me the luck of the Irish as I psyche myself up for this blog-a-thon once again! Here are a few of my favourite recipes from last year’s St. Patrick’s Day extravaganza:

Bailey's Irish Creme & Pistachio Fudge

Bailey’s Irish Creme & Pistachio Fudge

Irish Whiskey Cake with a Butter Whiskey Glaze

Irish Whiskey Cake with a Butter Whiskey Glaze

Guinness Chocolate Chip Cookies

Guinness Chocolate Chip Cookies

IMG_1254

Guinness Beef Stew

IMG_1769

Irish Beer & Cheese Chicken Pot Pies

And that was just a few of the St. Patrick’s Day food gems I whipped up. If you’d like to see all seventeen from last year, click on “Runcible Eats/ Recipes” in my top navigation bar and scroll down to St. Patrick’s Day. There you’ll find all sorts of Irish-y dishes from the past two years. And don’t forget to check in with me every day starting tomorrow through March 17th for this year’s additions. I’ve got a lot of mouth-watering recipes all queued up for the show. As I mentioned, leeks will be putting in an appearance, as will meat pies, sweet pies, various treats with Guinness and Bailey’s and Jameson...Oh My! Keep tuned and you will be totally set for making your own delicious St. Patrick’s Day feast! Not to mention, it will be interesting to see if I can actually pull off seventeen days of dishes in a row. That excitement I mentioned  before is perhaps more of the nervous, nail bite-y type that the happy, dance-y type. Though I will be dancing a jig on St. Patrick’s Day, regardless of the outcome, you can be sure. So raise a glass with me to “challenges”. It all starts tomorrow. In the meantime, make up a batch of these lovely Caramelized Leek, Basil & Black Pepper biscuits!

IMG_9397

Caramelized Leek, Basil & Black Pepper Biscuits

recipe from: Pastry Affair

yield: 10-12 biscuits

Ingredients:

  • 1 medium leek, finely sliced (about 1/2 cup)
  • 1 teaspoon olive oil
  • 2 cups (250 grams) all-purpose flour
  • 1 tablespoon baking powder
  • 1 teaspoon freshly ground black pepper
  • 1 teaspoon salt
  • 1/4 cup (4 tablespoons or 57 grams) cold butter
  • 2 tablespoons minced fresh basil, lightly packed
  • 1/2 cup (118 ml) heavy cream
  • 1/3 cup (78 ml) milk

Directions:

In a small frying pan, heat olive oil over medium heat and add the finely sliced leeks, sauteing until the leeks are golden in color and caramelized. Remove from pan and allow leeks to cool completely.

Preheat oven to 425°F (220° C).

In a large bowl, whisk together flour, baking powder, and salt. Cut in the butter until mixture resembles a coarse sand. Mix in the fresh minced basil and cooled leeks. Gradually pour in the heavy cream and milk, mixing until just combined.

Turn out dough on a lightly floured surface and bring together until it forms a ball. If you need to knead the dough to bring it together, do so but no more than 10-12 times. Flatten the dough ball into roughly a 1-inch thick square (or rectangle) and, using a knife dipped in flour, cut the dough into evenly sized squares. Place biscuits on a baking sheet and bake for 15-18 minutes, or until tops of biscuits are lightly browned.

Serve warm, with a pat of butter if desired.

Enjoy!


Chorizo & White Bean Stew

February 25, 2013

IMG_9361

I love this Chorizo and White Bean Stew! Hearty and spicy, it’s just the thing to warm you up this winter. I know that the old ground hog said winter was over, but I don’t think he consulted with Mother Nature on the subject before he made his announcement. It is still quite cold around here! So this stew is just perfect. Chock full of spinach, it tastes wonderfully fresh and has just got to be good for you. And it has beans in it! As I’ve mentioned, beans are a great healthy choice. My husband loves them and I’m starting to come around. I was definitely digging the cannellini beans in this dish. Not to mention that spicy chorizo sausage.

IMG_9387

Yuu-um! For those of you out there who aren’t big fans of spicy food, you can tone this recipe down by using a mild Italian sausage rather than the chorizo. Some other great things about this stew besides the yum factor, is that it not only takes no time to prepare but you also need dirty only one dish. The original recipe recommended you prepare it in a large skillet. I was more comfortable making it in a large Le Creuset Dutch Oven. By doing so, I didn’t have to worry if I had a large enough pan and was able to add a bit more broth to thin the consistency. Clean-up was a breeze. This Chorizo & White Bean Stew is an all-round winner!

IMG_9329

Chorizo and White Bean Stew

recipe from: Bon Appetit

yield: 4-6 servings

Ingredients:

  • 2 tablespoons olive oil, divided, plus more for drizzling
  • 1 pound fresh Mexican chorizo or Italian sausage links
  • 1 large onion, thinly sliced
  • 4 garlic cloves, finely chopped
  • 1 sprig thyme
  • 2 15-ounce cans cannellini (white kidney) beans, rinsed
  • 2 cups low-sodium chicken broth
  • Kosher salt, freshly ground pepper
  • 5 ounces baby spinach (about 10 cups)
  • Smoked paprika

Directions:

Heat 1 tablespoon oil in a dutch oven over medium heat. Add sausage and cook, turning occasionally, until browned and cooked through, 15-20 minutes. Transfer sausage to a plate.

Reduce heat to medium. Heat remaining 1 tablespoon oil in same pan. Add onion, garlic, and thyme sprig. Cook, stirring occasionally, until onion is softened, 5-8 minutes. Add beans and broth and cook, crushing a few beans with the back of a spoon to thicken sauce, until slightly thickened, 8-10 minutes. Season with salt and pepper. Add spinach by handfuls and cook just until wilted, about 2 minutes.

Slice chorizo and fold into stew; add water or chicken broth to thin, if desired. Divide stew among bowls; drizzle with oil and sprinkle with paprika.

Enjoy!


White Chocolate Toffee Blondies

February 21, 2013

IMG_9195

So the other night I set out to whip up a quick dessert, but wanted to do something different from my good old, easy quick dessert standby…the brownie. As it turned out, I didn’t stray far when I decided to go with a close cousin of said brownies…the blondie! Blondies get their sweet, caramel taste from brown sugar. Unlike the brownie, there is no chocolate in the batter. But all of you chocolate lovers out there need not despair, blondies are very customizable. Once you’ve mixed up the versatile blondie batter, you can throw in whatever extras you like to jazz things up. So go wild with the chocolate chips if you like! I decided to go with White chocolate and Toffee bits in these bars and was very pleased with my choice. These White Chocolate Toffee Blondies were thick and dense with both a gooey center and also a chewy outer edge. Yum, Yum, triple YUM!

IMG_9162

And they were very easy to make. You only need dirty one bowl. Not to mention, they were somewhat addictive. Folks just couldn’t leave them alone, coming back for seconds and thirds. It’s a good thing I cut them in such small squares…You know that way there’s fewer calories…no matter how many of those little devils you snatch up! At least I’m pretty sure that’s how it works…

IMG_9203

White Chocolate Toffee Blondies

recipe adapted from: the sweet mash

yield: 16 blondies 

Ingredients:

  • 2 sticks butter​
  • 2 cups packed brown sugar​
  • 2 eggs​
  • 1 tablespoon vanilla​
  • 2 cups all-purpose flour​
  • 2 teaspoons baking powder​
  • 1/2 teaspoon salt​
  • 3/4 cup toffee bits
  • 3/4 cup white chocolate chips​

Directions:

Preheat oven ​to 350° F. Spray an 8 x 8″ baking pan with cooking spray.

Melt butter in microwave. Stir in brown sugar and let cool for 3-5 minutes until it is warm, not hot.​

Stir in the eggs and vanilla. ​

Pour flour, baking powder, and salt over the butter mixture. Stir until just combined. ​

Fold in the toffee bits and white chocolate chips.​

Smooth into baking pan and bake for 45 minutes or until a knife inserted in the middle comes out with crumbs. ​If you feel the blondies are getting too dark, cover with aluminum foil.

Enjoy!


Mexican Lasagna

February 18, 2013

IMG_9113

Lasagna! With all of those meaty, saucy, cheesy layers, it’s just comfort food perfection! But sometimes you might be in the mood for something a wee bit spicier than good old Italian sausage can provide. Maybe you’ve got a hankering for a dish with a bit more south-of-the-border vibe? Well, look no further! You can get it all here when this classic Italian style dish gets a Mexican twist.

IMG_9082

In this delicious layered casserole, the usual lasagna noodles are replaced with flour tortillas, the ground beef is spiced up, and some black beans, corn, green chilis, cilantro and jalapeños join the party, or should I say fiesta.

IMG_9106

Not only does this crowd pleaser taste delicious with all of its spicy, zesty cheesy goodness, but it comes together in no time flat! I’m talking like 15-20 minutes of prep, followed by 15 minutes of baking time. Amazing! Convenient and Easy! Your family and friends will love you and sing your praises while gobbling it up. I would tell you how well left-overs freeze, except I know there won’t be any left-overs to freeze. At least there weren’t around here. Give this winner a try today!

IMG_9149

Mexican Lasagna

recipe adapted from: The Slow Roasted Italian

yield: 8

Ingredients:

  • 1.25 lb lean ground beef
  • 1/2 yellow onion, grated or finely chopped
  • 2 teaspoons smoked paprika
  • 1 teaspoon cumin
  • 1 Tablespoon chili powder
  • 1 teaspoon kosher salt
  • 1/2 teaspoon black pepper
  • 1 (14.5-oz) can diced tomatoes
  • 1 (15-oz) can black beans, drained and rinsed
  • 1 1/2 cups sweet corn
  • 1/4-1/2 cup chopped fresh cilantro and  2 tbsp more for garnish
  • 1 (4-oz) can fire roasted diced green chiles
  • 1 (14-oz) can enchilada sauce
  • 12 (8-in) large flour tortillas (or corn if you prefer)
  • 12 oz Mexican cheese blend

for garnish:

  • jalapeño slices
  • 2 scallions, finely chopped
  • 2 Tbsp chopped cilantro

serve with shredded lettuce, salsa and sour cream

Directions:

Preheat oven to 425°F. Spray 8×11″ baking pan with cooking spray.

In a large skillet, over medium high heat, drizzle olive oil. Add beef, onion, paprika, cumin, chili powder, salt and pepper to skillet. Brown beef for about 5-7 minutes. Add tomatoes, beans,corn and fresh cilantro. Stir to combine. Allow to cook while you begin preparing the baking pan.

Smooth 1/3 of the enchilada sauce over the bottom of prepared baking pan. Lay tortillas on the bottom of the pan, slightly overlapping until pan is covered (about 4 tortillas).

Spoon half of the beef mixture over top of the tortillas, spread evenly. Layer tortillas on top of beef mixture. Smooth 1/3 of the enchilada sauce over tortillas. Sprinkle ½ of the cheese on top. Scatter the green chiles over the cheese. Add the remaining beef mixture. Spread evenly. Layer tortillas on top of beef mixture. Cover with remaining enchilada sauce. Sprinkle remaining cheese on top of tortillas.

Bake for 10-15 minutes, until cheese is melted and lasagna is warmed through. Remove from oven and sprinkle with chopped scallions, jalapeños and cilantro.

Enjoy!


Poached Pear Tart with Lemony Cream

February 14, 2013

IMG_9900

The second I saw this Poached Pear Tart I knew that I had found the perfect Valentine’s Day dessert for the husband. I’ve already confided in you his “strange” preference for all fruit filled desserts over all decadent chocolatey offerings. I know….bizarro! But at least I’ve accepted and internalized this knowledge and can apply it when I’m trying to come up with a sweet indulgence made just for him.

IMG_9843

A Pear Tart would not be my Valentine’s choice, but I’m not baking for me. My husband knows what to get me (cupcakes!), so I will leave it to him. But back to this tart,  I could tell from his perspective this dessert has it going on! I mean, he absolutely LOVES tarts, anyone who knows him will tell you that about him without hesitation… (snicker, snicker) and this one has wine poached pears baked in lovely lemony cream! Seems like it was a recipe crafted just with him in mind. A perfect Valentine’s treat!

IMG_9884

IMG_0018

I must admit though, I really don’t like working with pears at all! It’s not that I don’t like them, I really do. It’s just that I can never tell if they are ripe or not. So I spend an eternity in the store, gently touching every pear on display, like some sort of pear whisperer, hoping that the mysterious fruit will take pity on me and push the ripe ones of themselves into my basket. Yet that has never happened, so I finally give up and just pick a few to cart home with me. Of course they are not the perfect ripe ones, so I try to accelerate the process by placing them in paper bags with other ripening fruit. Yeah. They remain rock hard until I turn my back for like 5 minutes and I come back to find them ripened into a pile of mush! Don’t know if that happens to you or not, but it sure happens to me. Though this time, I really wanted this dessert to work out for Valentine’s Day, so I held vigil by these little devils until they were ready! Yup. It’s true I love my husband that much. I braved the pears and actually won on this time!

IMG_9859

There are quite a few steps involved in making this tart, but the good news is that you can break them up over several days if necessary. I poached the pears and made the pastry on one day and then completed the recipe on the following day. Making this tart was definitely worth the time investment because it not only looks beautiful but tastes amazing. Refreshingly light.

IMG_9944

I served each slice with a scoop of simple vanilla ice cream drizzled with a scrumptious syrup reduction of the pear poaching liquid. And don’t forget the champagne of course! Happy Valentine’s Day!

IMG_9833

Poached Pear Tart with Lemony Cream

recipe from: Elra

yield: one 11″ tart

Ingredients:

For the pastry dough:

  • 1/2 cup + 2 tablespoons chilled unsalted butter, cut into pieces
  • 1  1/2 cup all-purpose flour
  • 1/2 cup confectioner sugar
  • a pinch of salt
  • 1 egg, lightly beaten
For the poached pears:
  • 3 ripe but still firm Bosch pears
  • 750 ml (1 bottle) good quality white wine of your preference
  • 1/2 cup sugar
  • vanilla bean, scraped
For the lemony cream:
  • 1/4 cup (30 g) sugar
  • 4 tablespoons (50 g) unsalted butter, softened
  • 1 large egg
  • 1/2 tsp vanilla extract
  • zest of 1 lemon
  • lemon juice from 1 lemon
  • 1/4 cup (50 g) all-purpose flour
  • 1/8 tsp baking powder
  • 1/4 tsp sea salt, optional

Confectioner’s sugar for dusting

Directions:
Peel, and cut the pear in half, using melon baller core and discard the seeds. Place them in a large pot,  pour in white wine, add sugar and vanilla bean. Place the pot over medium low heat, simmer until pears are slightly tender, about 30 to 40 minutes. Turn off the heat, cool completely in the liquid.
In the mean time, begin to make the pastry. Put all ingredients, except lightly beaten egg onto food processor. Pulse use 1 to 2 second pulse until most of the butter is the size of a peas. Add lightly beaten egg and pulse again until the dough just starting to form a small clump.
Transfer the dough onto a lightly floured work surface. Knead lightly a couple of times. Gather the dough into a disc, wrap in plastic. Refrigerate for at least  30 minutes.

Generously grease an 11-inch removable bottom tart pan with butter.

Roll out the pastry to fit the size of tart pan, transfer into the pan, and trim off the excess. Prick all over with fork, cover with plastic wrap, and place it back in the refrigerator for at least 20 minutes, or up to a day in advance.
On baking day, preheat oven to 375° F. Remove the pastry from refrigerator. Place a piece of parchment paper, or aluminum foil directly on top. Add dried beans, or pie chain, directly on top of paper of foil, then bake in the middle rack for 15 minutes. Remove pastry from oven, remove the paper, or foil including the beans. Quickly and lightly brush the pastry with egg white, this process will prevent the pastry from becoming soggy. Return pastry to the oven, continue to bake for another 10 minutes. Remove the pan from the oven and let it cool in the pan on a wire rack.
Turn the oven up to 400° F. Set the racks in the lower third and upper third of the oven.
Remove pears from their poaching liquid, blot dry with paper towel, and set them aside. Place reserved poaching liquid in small heavy bottomed saucepan and set over medium to medium high heat to reduce. This takes about 20 minutes or so and you will end up with 1/4 to 1/3 cup of syrup.
Using a hand whisk, large wooden spoon or stand mixer, beat together butter and sugar until pale and creamy, add egg, and vanilla extract, beat  to blend. Mix in lemon zest and lemon juice. Sift together flour, baking powder, and salt, add it to the cream mixture, and mix just enough to incorporate the ingredients. Using small spatula, spread the batter into the bottom and sides of the cooled tart shell. Arrange poached pears over the filling. Bake the tart on the lowest rack for 25 to 30 minutes. Take the tart out from the oven, sprinkle with 2 tablespoons granulated sugar, taking care not to get sugar on the pastry, which could cause it to burn. Return the tart to the oven, and place it on the top rack. Continue to bake for another 15 minutes, or until pears starts to caramelized, and the crust is dark browned. Remove the tart from the oven, and transfer it onto cooling rack to cool completely. Using a kitchen torch, lightly char the pears, to get that slightly burnt and rustic look on your tart. Right before serving, dust the tart with confectioner’s sugar. Serve with fresh whipped cream, vanilla ice cream or simply drizzled with the reduced pear poaching syrup.
Enjoy!

Lentil & Potato Pot Pies with Rosemary Biscuit Crust

February 8, 2013

IMG_8880

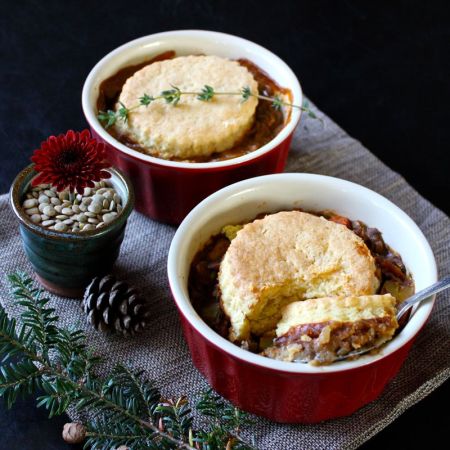
Mmmmmm. Pot pies! How perfectly warming and comforting on a cold winter’s day. And these pies are stuffed full of lentils and veggies. So you know they are good for you too. Topped with a flaky rosemary buttermilk biscuit, they’re just plain irresistible! Now those of you who know me might be saying….”Hey wait a minute! Is she speaking fondly of lentils? Aren’t lentils beans, her sworn enemy?!” Well, “enemy” might be a bit strong. I freely admit that I have had a somewhat troubled past with beans, which the adult me is working on mending. I know beans are really good for you and a much healthier protein choice than meat. I like black beans quite a bit and have recently tried some cannellini beans, which were very good.

IMG_8796

Strangely, I absolutely loved lentils at the very first bite. They are deee-lish! And I know I’ve mentioned that my husband has never met a bean he didn’t like. He is also a big fan of pot pies, in all their incarnations. So this dish is going to be in heavy rotation in this house. Just think, we get to sit around gobbling up pot pies and feeling virtuous about it! You can’t beat that!

IMG_8867

Lentil & Potato Pot Pies with Rosemary Biscuit Crust

recipe from: Life Currents

yield: 4 servings

Ingredients:

For the filling:

  • ½ cup brown lentils
  • 1/4 teaspoon salt
  • 1 tablespoon olive oil
  • 1 large onion, chopped
  • 2 carrots, cut into 1/4-inch-thick slices
  • 1 ½ teaspoons dried rosemary
  • ¼ teaspoon dried thyme
  • 1 large garlic clove, minced
  • 2 tablespoons all-purpose flour
  • 2 cups vegetable broth
  • 3 medium or 9 baby Yukon Gold potatoes, cut into 1/2-inch chunks
  • 4 teaspoons soy sauce
  • 1 tablespoon tomato paste

For the biscuits:

  • 1 cup plus 2 tablespoons all-purpose flour
  • 6 tablespoons yellow corn meal
  • 1 1/4 teaspoons baking powder
  • 1/2 teaspoon salt
  • 4 tablespoons chilled unsalted butter, diced
  • ½ cup buttermilk
  • 1 teaspoon dried rosemary

Directions:

For the filling:

Combine 3 cups cold water, lentils, and salt in a medium saucepan; bring to boil. Reduce heat, cover, and simmer until lentils are tender, 20 to 25 minutes. Drain, reserving 1 cup of the cooking liquid; set lentils and reserved liquid aside.

Heat oil in heavy large skillet over medium-high heat. Add onion, and cook until browned, about 20 minutes. Add carrot, rosemary, and thyme, and sauté 4 minutes. Add garlic, and sauté 30 seconds. Reduce heat to medium-low. Mix flour into vegetables; cook 1 minute. Add vegetable broth and reserved lentil cooking liquid.

Mix in potatoes, soy sauce, and tomato paste. Cover; simmer until potatoes are tender, stirring occasionally, 13 to 15 minutes. Add lentils; season with salt and pepper. Divide filling among four 2-cup ovenproof bowls.

Filling can be made 2 days ahead. Cover; chill. Bring to room temperature before continuing.

For the biscuits:

Preheat oven to 400° F. In a large bowl, mix together flour, cornmeal, baking powder, and salt. Add butter and rosemary, and blend with a pastry blender or fork until mixture resembles coarse meal. Add buttermilk, and mix with clean hands until dough forms moist clumps. Turn dough out onto lightly floured surface. Divide into 4 equal pieces; shape each into 2/3-inch-thick disk. Set rounds atop filling.

Bake pies on baking sheet until tester inserted into biscuit topping comes out clean, about 30 minutes.

Enjoy!


French Brownies

February 4, 2013

IMG_9048

All you brownie lovers, pay attention now! These French Brownies a la Dorie Greenspan are just perfect. Well, let me be more specific. If you love “cake like” brownies, these probably are not for you, so sorry for the interruption. You can move on now and go ahead about your business. But for those of you who prefer a nice, moist, fudge like brownie, look no further! These French darlins have a completely silky texture and decadent chocolate flavour. I love the addition of the rum soaked raisins. I never would have thought to add raisins to my brownies, but it works oh so well. Another amazing thing about these brownies is that they don’t taste too sweet. You know how the first bite of some brownies can send you into a full-on sugar conniption, they are just that tooth-achingly sweet? Not these. They have just the right amount of sweetness to leave you satisfied.

IMG_9043

So easy to make, I bet you could have a batch baked before you know it. And their appearance will give you and excuse to talk with an outrageously ridiculous french accent. Come on…you know what I’m talking about! I want to hear zee  “Sacre Bleu!” , “Ooh là là!”,  and “Mon Dieu!”, followed by that crazy French laugh “Hon, Hon, Hon!”, which I’ve heard does not actually occur in France, but we are being ridiculous here, so I say go for it! I want to hear outrageous accents like the French Knights were sporting in Monty Python’s Holy Grail. (I love that movie! To see a clip of the actual “French Taunting” click here.)

Taunting_French_knight

Well, there you have it (voilà)! What else can I say at this point but “Bon Appètit”!

IMG_9064

French Brownies

recipe from: Dorie Greenspan’s Baking From My Home to Yours

yield: 16 bars

Ingredients:

  • 1/2 cup all-purpose flour
  • 1/8 teaspoon salt
  • 1/8 teaspoon cinnamon
  • 1/3 cup raisins
  • 1 1/2 tablespoons water
  • 1 1/2 tablespoons dark rum
  • 6 ounces bittersweet chocolate, finely chopped
  • 1 1/2 sticks ( 12 tablespoons) unsalted butter, cut into 12 pieces, at room temperature
  • 3 large eggs
  • 1 cup sugar

Directions:

Center a rack in the oven and preheat oven to 300° F. Line a 8X8″ pan with foil, butter the foil and place the pan on a baking sheet.

Whisk the flour, salt and cinnamon together.

Put the raisins in a small saucepan with the water, bring to a boil over medium heat and cook until the water almost evaporates. Add the rum and let it warm for about 30 seconds, then turn off the heat, stand back and ignite the rum with a long match. Allow the flames to die down and set the raisins aside.

Put the chocolate in a heatproof bowl and set the bowl over a saucepan of simmering water. Stir occasionally until the chocolate melts. Remove the bowl from the saucepan and add the butter, stirring until it melts. Don’t let the butter/chocolate mixture to get very hot.

Working with a stand mixer fitted with the whisk attachment, beat the eggs and sugar until thick and pale, about 2 minutes. Reduce the mixer speed and pour in the chocolate-butter mixture, mixing only until it  is incorporated. You’ll have a thick, creamy batter. add the dry ingredients and mix at low speed for about 30 seconds-the dry ingredients won’t be completely incorporated. Then finish folding in the dry ingredients by hand with a rubber spatula. Fold in the raisins, along with any liquid remaining in the pan. Scrape the batter into the pan.

Bake for 50 to 60 minutes, or until the top is dry and crackled and a thin knife inserted into the center comes out clean. Transfer the pan to a rack and cool to warm or room temperature.

Carefully lift the brownies out of the pan, using the foil edges as handles, and transfer to a cutting board. Cut into 16 squares, each roughly 2 inches on a side, taking care not to cut through the foil.

Enjoy!