Bacon Chocolate Chip Cookies

May 30, 2011

That’s right! Bacon Chocolate Chip cookies!!! My husband had scheduled a band rehearsal a week or so ago. He plays in several different groups and the folks from this ensemble hadn’t been here to play in quite some time. I wanted to whip up some sort of treat for the guys. Jay assured me that the Bacon Chocolate Chip cookies were the way to go. He was right. They were a big hit! In fact, I think these chocolate chip cookies are the best I’ve ever had, without the bacon. When you add that great, savory, salty bacon flavour to the sweet, chocolaty cookie….watch out! Perfection!

Bacon Chocolate Chip Cookies

recipe from The Craving Chronicles

makes 52 cookies

Ingredients:

  • 2 cups minus 2 tablespoons (8 1/2 ounces) cake flour
  • 1 2/3 cups (8 1/2 ounces) all-purpose flour
  • 1 1/4 teaspoons baking soda
  • 1 1/2 teaspoons baking powder
  • 1 1/4 teaspoons coarse salt
  • 2 1/2 sticks (1 1/4 cups) unsalted butter, room temperature
  • 1 1/4 cups (10 ounces) light brown sugar
  • 1 cup plus 2 tablespoons (8 ounces) granulated sugar
  • 2 large eggs
  • 2 teaspoons natural vanilla extract
  • 2 1/4 cups bittersweet chocolate chips, at least 60 percent cacao content
  • 6 slices crisp cooked bacon, chopped

Directions

In a medium bowl, whisk together flours, baking soda, baking powder and salt. Set aside.

Using a mixer with paddle attachment, cream together butter and sugars until light and fluffy, about 5 minutes. Add eggs one at a time, incorporating completely after each addition. Add vanilla. Reduce mixer to lowest speed and carefully add flour mixture. Mix until just combined. Fold in chocolate chips by hand.

Cover dough with plastic wrap and refrigerate 24 – 36 hours, up to 72 hours.

When ready to bake, set dough out at room temperature. Preheat oven to 350°F. Line two baking sheets with Silpats or parchment paper.

When dough has warmed enough to be pliable but not too soft, fold in chopped bacon. Using a 1 tablespoon cookie scoop, measure cookies out on a baking sheet. Bake one sheet at a time, 15-20 minutes or until edges are starting to brown. Cool 2-3 minutes on baking sheet, then transfer to a wire rack to cool completely.


Back to New York-Finally!

May 27, 2011

Jay and I travelled up to New York a few weeks ago. Jay’s work is headquartered there and it had been quite some time since he’d stopped in. We were a bit nervous they’d forgotten what he looked like! To smooth his long absence over a bit, I made a batch of Oreo Stuffed Chocolate Chip cookies for him to take along with him into the office.

Oreo Stuffed Chocolate Chip cookies

We stayed at the Standard hotel as usual and as usual it was fantastic!

Standard King Room

While poor Jay slaved away at work, I strolled all around lower Manhattan. The weather was perfect. Once he finished up his day, we met back up and went out to Fig and Olive for a really wonderful dinner.

Truly it was great in every way. The food was delicious and for once, the atmosphere was great – beautiful decor, not crowded, not ear splittingly loud and no detectable attitude. Amazing! Jay and I have not had great dining history in New York in the past. One restaurant we visited previously had some of the best mexican food I’ve ever tasted, but was a nightmare of an experience – crowded (sitting butt-cheek to butt-cheek with strangers crowded- on the verge of a panic attack crowded – and loud to the point we even gave up trying to talk to each other, we just stared across the table at one another in disbelief. One other restaurant had made us wait for over an hour for very bland, yet very expensive dishes. How disappointing! So we were so incredibly happy to find Fig and Olive, which was such a breath of fresh air (another unique experience in NYC)! This restaurant serves Riviera and Coastal Cuisines from the South of France, Italy and Spain. You definitely feel the Mediterranean ambiance as soon as you walk into the restaurant -stucco walls, rosemary and olive trees throughout, lots of candles, olive oil and wine bottles. The restaurant was really quite spacious, but our table felt very warm and intimate. And let me say the food did not disappoint either. We started off with their crostini with three different toppings – mushroom artichoke truffle parmesan, eggplant basil and sundried tomato, and manchego fig spread and almond. They were all great but our favourite was the mushroom artichoke. Jay ordered Penne Funghi Tartufo with Grilled Chicken – cremini mushroom, parmesan, black truffle paste, fresh parsley and scallions with a white truffle olive oil. I had the Grilled Truffle Chicken Paillard – a free range chicken breast marinated with thyme and served with truffle mashed potato leek confit. We washed it all down with an Abruzzo Montepulciano wine. YUM!  Truly a spectacular dinner! I can’t believe we didn’t save room for dessert, but I have no doubt we will definitely be visiting this establishment again. Sorry I didn’t get any photos of the food. The candlelight contributed immensely to the mood but not so much towards any viewable food photography.

The next day, I dashed out to Chelsea Market first thing in the morning on a mission for coffee and some fabulous bread from Amy’s Bread in particular.

The mission was easily accomplished and I returned to the room with caffeine in hand as well a a mouth-wateringly delicious chocolate sourdough twist and a hunk of brioche toast. Sorry no photo of these item either, we ate them too quickly! What a wonderful bakery. It took amazing restraint on my part not to purchase one of everything they had. I’ve recently gotten very interested in trying to bake my own bread. I’ve been pouring over Peter Reinhart’s The Bread Baker’s Apprentice and scheming. Amy’s Bread in Chelsea market is fun because you can actually watch the bakers at work through these huge glass windows. I spent quite a bit of time gazing in the day before, so I knew I had to get over there for breakfast and get some of that awesome bread.

Bannetons Stacked-Up at Amy's

Before we left to catch the train we were able to grab a burger for lunch at the good old Standard Grill at the hotel. These burgers are the best! We always try to budget in some time for them!

The Standard Burger

All in all a great visit! Looking forward to the next.


Goat Cheese, Pancetta & Chive Stuffed Mushrooms

May 20, 2011

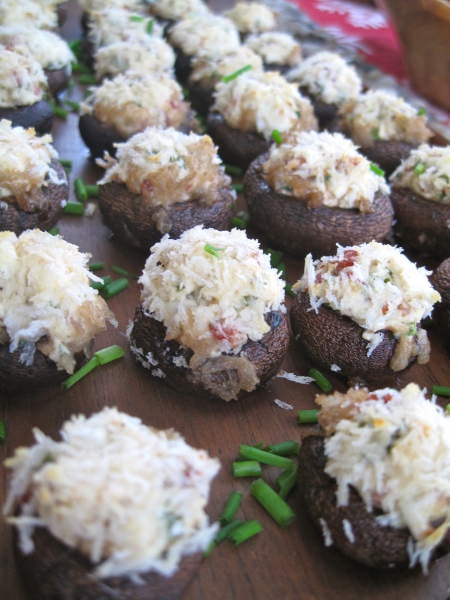
I made this delicious appetizer for a little gathering a while ago now. I kid you not when I say folks haven’t stopped asking for the recipe – sorry I’m just getting around to posting it now. 🙂 It was a huge hit! My husband, who has previously professed his dislike for mushrooms, was even enticed to try them. This was mostly due to his stronger love of goat cheese. He was an instant fan and is now reconsidering his relationship with mushrooms. Really…this recipe is that yummy. The combination of the creamy goat cheese, whipped up with the savory garlic and shallots, crispy, salty pancetta with the satisfying crunch of the panko topping in unforgettable.

Crispy Pancetta & Shallot/Garlic Mix

The recipe actually makes a good amount of this filling (enough for 60 mushrooms!), so you will likely have some left over, no matter how generous you are in stuffing the mushrooms. You will be very happy about these leftovers the morning after you whip these up. You can just reach in the fridge, grab that filling out and spread it over a freshly toasted crust of bread or a bagel. Have mercy! It is also great as a sandwich spread. You can prepare this filling two days prior to making your mushrooms – that is if you can resist gobbling it all up before you need it – and store it in the refrigerator. I found this recipe on one of my absolute favourite blogs, Spoon with Me. As I have mentioned before, make sure you take a look at her site. She has the most amazing photographs! And with this recipe, she explains a great way to wash mushrooms. Mushrooms will absorb a lot of water, so you don’t want to leave them soaking in it for too long. She recommends placing some salt in your hand, wetting the mushroom and then rubbing it in the salt. With this technique you manage to not only clean the mushroom, but also season it as well. So, what are you waiting for? Make this appetizer for your next gathering. Folks won’t stop talking about it!

Little tasty Gem!

Goat Cheese, Pancetta & Chive Stuffed Mushrooms

Recipe from Spoon With Me

Ingredients:

  • 1 1/2 lb to 2 lb crimini or Baby Bella Mushrooms
  • 1 package (8 0z) cream cheese (leave out of the fridge for 30 minutes to soften)
  • 1 log (6 oz) goat cheese (leave out of the fridge for 30 minutes to soften)
  • 3 oz thinly sliced pancetta (I found this already chopped at Harris Teeter. You can substitute in regular bacon)
  • 1/3 cup minced shallots
  • 3 cloves garlic, minced
  • 1 small bunch fresh chives, minced (about 1/4 cup) and extra for garnishing (if desired)
  • 1 cup panko (japanese breadcrumbs)
  • 1/4 tsp kosher salt
  • 1/4 tsp ground black pepper

Directions:

Preheat oven to 400˚F

Wash and season the Mushrooms by taking each wet mushroom, pouring some salt in your hand and rubbing it in the salt. This removes the dirt and also seasons the mushrooms. Rinse and dry the mushrooms, then remove to a large rimmed baking sheet.

In a medium bowl, mix cream cheese and goat cheese until combined. Set aside.

Heat a medium frying pan over medium-high heat.  Cook the pancetta until golden (about 1 1/2 to 2 minutes per side) until golden (the pancetta will crisp up as it cools).  Remove to paper towels.  When cool, crumble the pancetta and set aside.

In the same pan, saute the shallots in the pancetta drippings until softened (about 3 minutes).  Add garlic and cook for another minute.

In a medium bowl, mix the cream cheese and goat cheese until combined.  Add the crumbled pancetta, shallots and garlic, chives, salt and pepper.  Stir to combine.

Place panko in a small dish. Using a spoon, generously  fill each mushroom cap.  Dip the top of each mushroom in the panko, and then put back on the baking sheet.  Lightly spray the mushroom tops with olive or canola oil.

Bake the mushrooms in a 400˚ oven for 12-18 minutes, or until the tops are golden brown.


Rum Raisin Banana Bread

May 14, 2011

Oh Dear! It’s happened again! I’ve let two bananas go past their prime! What to do? I think a nice loaf of Rum Raisin Banana Bread is called for here! This banana bread is wonderfully moist. The rum soaked raisins provide a fantastic complementary flavour to each banana infused bite. One might begin to think I’m not as inattentive to the state of my bananas as I’m making out. Perhaps I’m doing this on purpose…..Hmmm…..I should probably think it over while enjoying a butter slathered slice of that bread!

Rum Raisin Banana Bread

Ingredients:

3/4 Cup Raisins

1/3 Cup Dark Rum

1/2 Cup butter, melted

1 Cup Sugar

2 Eggs

1 teaspoon Vanilla Extract

1 1/2 Cups All-purpose Flour

1 teaspoon baking soda

1/2 teaspoon salt

1/2 Cup Sour Cream

1/2 Cup Pecans, chopped

2 Bananas, sliced

Directions:

Preheat oven to 350°F (175° C). Grease a 9×5 bread pan.

Place raisins and rum in a saucepan. Bring to a boil. Remove from heat and let raisins sit and plump in rum mixture for about 1 hour.

Combine the four, baking soda and salt. Set aside. In a large bowl, mix together the melted butter and sugar. Add the eggs and vanilla and stir until mixed well. Slowly add the flour mixture and stir until batter is smooth.

Gently fold in the sour cream, bananas, pecans and rum raisin mixture.

Spread batter into the prepared loaf pan.

Bake at 350°F for 60 minutes or until a toothpick inserted into the loaf comes out clean. Cool bread in the pan for 10 minutes. Turn out onto wire rack to cool completely.


Oreo Truffles

May 7, 2011

Who doesn’t love Oreo Cookies? I don’t know a single soul. Indeed  if I did know someone who claimed they didn’t, I’d certainly be a little suspicious of them. Oreo cookies are great comfort food which likely evoke happy childhood memories (or maybe memories more recent – say, last night perhaps) of dunking them in an ice-cold glass of milk.

So I was sure I couldn’t go wrong with this recipe for Oreo Truffles. Not that I thought I should “guild the lily” by any means, but adding some cream cheese and a enfolding the whole thing in a blanket of delectable chocolate – I couldn’t resist!

Nor should you. Really. These Truffles are very easy to make. Toss the cookies into the food processor. Give it a whirr.

Oreo crumbles

Add the cream cheese. Pulse until blended. Roll the mixture into balls.

Truffle filling - waiting to chill

Chill and then dip into chocolate. The only bit of the whole process that requires some patience is the dipping the truffles into the chocolate bit. I used prepackaged melting chocolate by Baker’s. You just pop the package in the microwave until melted and then start dipping away. I guess the waiting for them to chill in the fridge before devouring them all was a bit difficult as well.

Everyone will think you slaved in the kitchen for hours to create these treats. Believe me,  folks will go absolutely wild for them. Soooooo delicious!

Oreo Truffles

Recipe from Someone Left the Cake Out in the Rain

Makes 36 Oreo Truffles

Ingredients:
1 package (16.6 oz) Oreo cookies – I used the Double Stuff variety 🙂
1 (8 oz) package cream cheese, softened
2 -(7 oz.) containers Baker’s Dipping Chocolate

Directions:

In the bowl of a food processor, pulse the Oreo cookies until they are coarsely chopped.  Add cream cheese and continue to pulse until they are well-combined.

Roll into 1-inch balls and place on a parchment paper lined baking sheet.

Refrigerate until firm, 4 hours, or optimally, overnight.

Melt chocolate according to package.  Dip balls into chocolate and place on waxed paper lined trays to harden.

Sprinkle with any sort of decoration you prefer before the chocolate begins to set up.

Chill and serve cold.