Fireball Cinnamon Apple Jelly

December 21, 2021

Ok ya’ll, here it is almost Christmas. But not yet, not yet! It certainly doesn’t feel like Christmas as far as the temperature goes. It has actually been pretty balmy recently. Maybe like early Fall or even Spring. So I’m going to take this opportunity to give you one last lovely Autumn recipe for this year – Fireball Cinnamon Apple Jelly. I am giving folks a jar of this for Christmas, so it is not like you can only eat this scrumptious jelly in the Fall. No indeed! It is fantastic all year round.

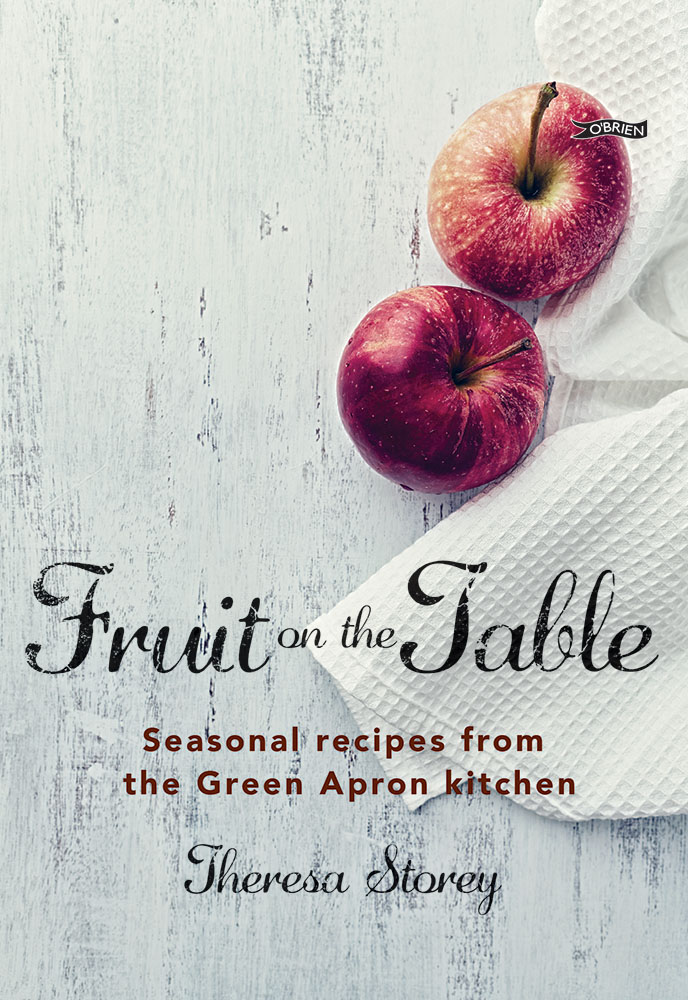
I adapted this recipe from my friend Theresa Storey’s cookbook Fruit on the Table: Seasonal recipes from the Green Apron kitchen.

Theresa runs The Green Apron, which is an artisan preserve and tea company located in Ireland. She grows much of the fruit and vegetables that she uses in her preserves at her family’s orchards at Derryclough and in the walled vegetable garden at her parents 18th Century castle, Glenwilliam.

In her best selling cookbook, Theresa follows the seasons and tells you how best to keep fruit on your table all year round. It is an absolute treasure trove, filled not only with her family recipes for jams, jellies and chutneys but it also runs the full gambit of meals, including recipes for cocktails, snacks , mains and going all the way through to desserts. And it doesn’t stop with the mouthwateringly delicious recipes, Fruit on the Table also gives you the low down on growing your own fruit, the ins and outs of preserving, tips on foraging as well as drying fruit.

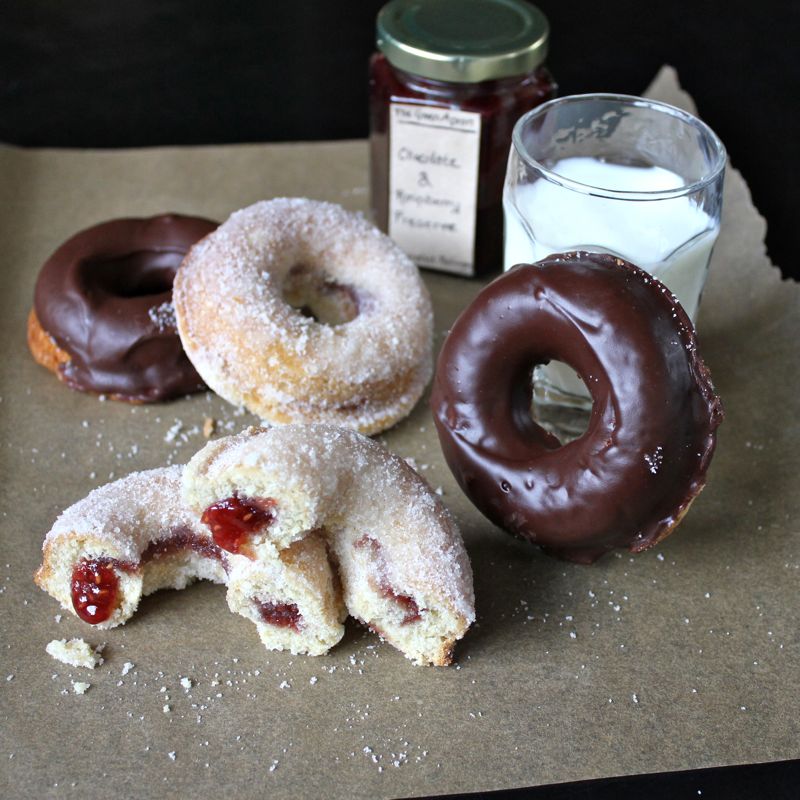
I have shared several recipes from her book over the years. Like this one for her Prize-winning Scones with Strawberry Jam and Clotted Cream.

I’m telling you, she does know her way around a jam jar! You will love her Cinnamon Apple Jelly too I wager. I’m the one who went and added that Fireball Cinnamon Whiskey into the mix. I couldn’t resist. You know me, if I can add booze to a recipe, I pretty much will.

I slather this jelly on toast, add a dollop atop my oatmeal or even swirl it into yogurt. Absolutely delish!

There are quite a few steps involved in this recipe, but I am telling you it is worth it! If you love that cinnamony apple flavor, you will be over the moon with this jelly! It’s like bottling up a little bit of autumn, you know…with some whiskey thrown in for good measure!

Fireball Cinnamon Apple Jelly

  • Servings: makes roughly 52 oz. - how every you would like to divide it between jars. Personally I think the little 4 oz jars are perfect for jelly.
  • Difficulty: easy
  • Print

recipe adapted from: Fruit on the Table: Seasonal recipes from the Green Apron kitchen by Theresa Storey

Ingredients:

  • 6 lb apples, washed (I used HoneyCrisps. Use your favorite, or a blend of sweet and tart varieties)
  • 2 cinnamon quills
  • 1/4 cup freshly squeezed lemon juice
  • 2 teaspoons cinnamon
  • 2 ounces Fireball cinnamon whiskey, plus a bit extra

Directions:

Place a saucer into the refrigerator to chill

Roughly chop the unpeeled and uncored apples and place them in a large preserving pan. Add enough water to just cover them.Throw in the two cinnamon quills.

Cook over medium hight heat for about 45 minutes or until the flesh has turned to pulp and the skin has started to disintegrate.

Remove the cinnamon quills and thrown away. Put the apple pulp in a clean rinsed jelly bag placed over a large bowl. Leave it to drain for at least an hour, but it would be better to leave it overnight.

Measure the juice. Pour it into a clean preserving pan with 450 grams (1 lb) of sugar for every 600 ml. of juice. Stir in the 1/4 cup of lemon juice. The mixture will appear cloudy, but once you add the sugar and begin heating, it will magically become clear.

Cook over high heat. It may take anywhere from 20 -40 minutes until it reaches the setting point.

Spoon a little of the boiling preserve onto the cold saucer. Let it cool and then push it with your finger. If it has reached setting point, the top of the blob of jelly will wrinkle.

Once it has reached setting point, remove from heat. Stir in the two teaspoons of cinnamon. Mix well. Then add 60 ml (2 fl oz) of Fireball Cinnamon Whiskey to the pan and stir to combine. It will bubble a bit but settle down quickly.

Pour into warm, sterilized jars to within 6 mm (1/4″) from the top. Splash a little bit of Fireball whiskey on the top of the jelly. Folks will love the whiff of boozy cinnamon goodness they get when they open a jar!

Wipe any drips off the rims of the jars to make sure there is a good seal between the jar and lid. A dampened paper towel works well for this. Place the lids on and seal.

If your plan is to scarf down all of this cinnamon apple jelly immediately, just put the lids on and place the jars in the refrigerator. If you would like to keep it for longer, screw rims onto jam jars. Using tongs, pick up the full jam jars and submerge them into a boiling water bath for 8 minutes.

After 8 minutes, remove the jars from the water bath and place them on the towel. As they cool, you should hear a ping type noise which tells you the jam jars are sealed. When you push down in the center of the top of the jar, there should be no click noise. Once the jars have cooled, make sure the rings are sealed tightly.

Enjoy!

Links for helpful kitchen tools & ingredients for Fireball Cinnamon Apple Jelly:

Fruit on the Table: Seasonal Recipes from the Green Apron Kitchen

OXO Good Grips Stainless Steel Food Scale

Kilner Stainless Steel Jam Pan

Ball Mason 4 oz quilted jelly jars

Canning Magnetic Lid Wand

Norpro 600 Jar Lifter

Ball Canning Funnel


St. Patrick’s Day Recipe Roundup!

March 10, 2021

Oh my goodness ya’ll…St. Patrick’s Day is only 7 days away. Tomorrow I will be starting my annual St. Patrick’s Day blog-a-thon. Yup, I’ll be sharing one lovely Irish-y recipe everyday with you, right up to the big day Wednesday March 17th! Now I think managing to publish one recipe daily for seven days straight is a pretty impressive feat. But, a few years ago I was completely mad and used to start on March 1st and do a new recipe each day until March 17th. That is why you can find over 100 delicious St. Patrick’s Day recipes on my blog. If you’d like to take a peek at my past St. Patrick’s Day posts, you can click Runcible Eat/Recipes up at the top navigation bar and scroll down to the St. Patrick’s Day category. That’s where you’ll find them! And stay tuned here for my latest additions this year. Today I thought I might inspire you with some of my favorite St. Patrick’s Day dishes from years past. We’ll start it off with some bread:

And here are some drool worthy mains:

I wouldn’t want to forget the sides:

And take a peek at these decadent desserts:

And last but not least…something to wash it all down with:

Is your mouth watering yet? Quite the galleries of goodies if I do say so myself. And there are many more recipes to be found on my blog as well as seven new ones starting tomorrow! Don’t miss out!

P.S. I tried to get links to the recipe added to the pictures, but with my limited skills, was unable to make it work. You can find links to the pictured recipes in the gallery captions. Sorry ’bout that!


Sponge Cake with Cranberry Curd

February 14, 2020

IMG_8990

Happy Valentine’s Day! This year I made my Valentine this gorgeous light & airy sponge cake which is layered with cranberry curd and frosted with a delicate whipped cream. The Husband (who also happens to be my Valentine… come on! You know that isn’t always the case with all married folks out there….) generally doesn’t like any chocolatey super sweet sugar bombs that seem to be all the rage for this holiday.  Which is totally unlike me. That is exactly what I would want. Truth be told…in a the shape of a cupcake if all were going my way. Just saying…He, on the other hand, prefers fruit forward desserts such as this lovely Cashew Crusted Blackberry & Lime Tart:

IMG_1684

Or these Luscious Lemon Squares,

IMG_0490

And then there was that Poached Pear Tart with Lemony Cream.

IMG_9833

You see…being a good wife, I make him thing that I know he will enjoy the most. I do not bake cupcakes for him on Valentine’s Day…generally that is. You see one year I did manage to get away with it. He loves a good Gin & Tonic so I made him Pink Grapefruit Gin & Tonic Cupcakes:

img_5546

Pretty sly huh? This year I decided on this cake because of that Cranberry Curd. He does love cranberries. He raves about my Boozy Orange Cranberry Sauce which shows up at Thanksgiving every year.

IMG_6604

And was thrilled when I took some of that leftover Cranberry Sauce and made the cranberry butter to go on these Popovers:

IMG_6703

So I figured this cake was a pretty good bet. And luckily I was right!

IMG_9007

The sponge, being full of whipped egg whites, had a very delicate crumb and was light and fluffy. The cranberry curd was amazing – buttery and velvety with just the perfect amount of tartness to balance the sweet.

IMG_9020

The one piece of advice I would give, having made the cake, is that if I were to make it again, I would forego slicing the cakes in half to make four layers. I would simply spread about 1/2 cup of the curd between the two layers of cake and be done with it. The cake is wonderfully delicate and the curd very heavy. I am not very good at splitting cake layers in half and I think the thinner delicate cake layers had a hard time holding up to the heavy curd. Not to mention, I wouldn’t mind having a bit of that curd left over to spread over toast and scones. Just saying… If you are great with splitting cake layers in half and want that impressive four layer appearance – proceed with the recipe as noted. However, if you might be a bit more like me….well….. you know what I’m saying!

IMG_8989

This cake would look great on your Thanksgiving or Christmas table as well, when fresh cranberries are plentiful. But believe me, it would be welcome by all year round. I must say, both the Husband and myself were well pleased with it! Happy Valentines Day!

IMG_9017

Sponge Cake with Cranberry Curd

  • Servings: one 8
  • Difficulty: easy - but several steps - perhaps make over a couple of days
  • Print

recipe from: King Arthur Flour

Ingredients:

For the curd:

  • 3 cups (298g/ 10 1/2 oz) fresh or frozen cranberries
  • 1 cup (198g/7 oz) granulated sugar
  • juice and grated rind (zest) of 1 orange
  • 1/8 teaspoon salt
  • 1 small sprig fresh rosemary, optional
  • 6 tablespoons (85g/3 oz) unsalted butter
  • 2 large eggs
  • 3 large egg yolks

For the Cake:

  • 6 large eggs, separated, at room temperature
  • 1 cup (198g/ 7 oz.) superfine sugar, divided
  • 2 teaspoons vanilla extract
  • 1/4 teaspoon salt
  • 1 cup (120g/4 1/4 oz) unbleached cake flour

For the Whipped Cream Frosting:

  • 2 cups (454 g/16 oz.) heavy cream
  • 1/4 cup (28g/1 oz) confectioners’ sugar
  • 1 teaspoon vanilla extract

For the Sugared Cranberries:

  • 3/4 cup (149g/5 1/4) granulated sugar
  • 1/2 cup (113g/4 oz) water
  • 1/2 cup (50g/1 3/4 oz.) fresh or frozen cranberries
  • superfine sugar, for rolling

Directions:

To make the curd: Place the cranberries, sugar, orange juice and zest, salt, and rosemary (if using) in a medium saucepan and bring to a boil over medium heat. Cook, stirring occasionally, until the berries pop and start to break down, abut 10 minutes.

Remove from the heat, remove and discard the rosemary sprig, and purée with an immersion blender or in a food processor. Strain the purée into a clean medium saucepan.

Whisk in the butter, eggs, and egg yolks. Cook over medium-low heat, stirring constantly, until the mixture thickens and coats the back of a spoon.

Remove the curd from the heat and transfer it to a bowl. Cover with plastic wrap that touches the surface, and refrigerate until cold.

To make the cake: Preheat the oven to 350°F. Grease your choice of two 8″ (at least 2″ deep) or 9″ round pans. Line the bottoms with parchment, then butter and flour the parchment.

Combine the egg yolks and 3/4 cup of the sugar in a large bowl. Using an electric mixer, beat on medium-high speed until the mixture becomes pale and thick, 3 to 5 minutes. Stir in the vanilla and salt.

In a clean bowl with a clean whisk attachment, beat the egg whites until soft peaks form. Gradually add the remaining 1/4 cup sugar, beating on medium-high speed until the whites are stiff and glossy, about 2 minutes. Fold the yolk mixture, one third at a time, into the whites.

Sift the flour over the mixture and fold gently until incorporated.

Divide the batter evenly between the pans. Bake for 20 to 25 minutes, until the edges just begin to pull away from the pan and the center springs back when lightly touched.

Remove the cakes from the oven and let cool in the pans on a rack for 5 minutes. After 5 minutes turn the layers out of the pans, peel off the paper, and return to the rack to finish cooling right side up.

To make the whipped cream: In a large mixing bowl, beat the heavy cream with the confectioners’ sugar and vanilla until stiff peaks form.

To make the sugared cranberries: Combine the sugar and water in a small saucepan and bring to a boil, cooking until the sugar dissolves. Add the cranberries and return to a boil; simmer for 1 minute.

Remove from the heat and, with a slotted spoon, take the cranberries out of the syrup and roll them in superfine (Baker’s Special) sugar until coated. Place on a rack to dry.

To assemble: Split the cake layers horizontally (see my comments above… basically I would go with a simple two layer cake, spreading 1/2 cup of the curd between the layers and reserving the rest for scones or toast) and place half of one on a serving plate. Spread with 1/2 cup cranberry curd.

Place the other half of the layer on top and spread with another 1/2 cup of curd. Repeat with half of the second layer. Top with the remaining curd and cake, then frost the top and sides with whipped cream. Garnish with the sugared cranberries. (optional)

Store the cake, covered in the refrigerator, for up to four days. Freeze for longer storage.

Enjoy!

Sponge Cake with Cranberry Curd brought to you by: Runcible Eats (www.leaandjay.com)

Links for helpful Kitchen Tools & Ingredients for Sponge Cake with Cranberry Curd:

Kitchen Aid Artisan Stand Mixer

Oxo Good Grips Stainless Steel Food Scale

Wilton Cake Leveler


Meyer Lemon Curd

March 13, 2019

IMG_7559

Who isn’t ready for a bit of sunshine after so many months of dreary, dark and soggy weather? Well, I’m not sure that I can order that up for you. Good ole Punxsutawney Phil, my favorite varmint, said that Spring was coming soon. But maybe in the meantime you can make due by whipping up a batch of golden bright Meyer Lemon Curd, which is veritable sunshine in a jar. I got the recipe for this Lemon Curd from one of my best friends, Theresa Storey. A couple of years ago, Theresa published her first cookbook where you can find the recipe for this Lemon Curd along with over 100 other delicious seasonal fruit recipes. It is called Fruit on the Table: Seasonal Recipes from the Green Apron Kitchen.

1

Theresa runs a business, The Green Apron, which is an artisan preserve company. Theresa grows much of the fruit and vegetables she uses in her preserves at her family’s orchards at Derryclough and in the walled vegetable garden at her parents 18th Century castle, Glenwilliam.

img_2809-e1463570050345-683x1024

Her award-winning preserves are made in small batches by traditional methods using locally sourced, organic produce where possible and without artificial preservatives, colours or setting agents. The Green Apron has won 12 Blas na hEireann Irish Food Awards, 7 International Great Taste awards and is listed not only in McKenna’s Guide, but also in Georgina Campbell’s Guide. The Green Apron is also now offering workshops on sustainable living, preserving and bee keeping.

book-cover-fruitonthetable

Theresa’s book, Fruit on the Table is a top 10 best-selling cookbook in Ireland , has won a Gourmond award there and has been selected to compete for an International Gourmond award. In her book, Theresa follows the seasons and tells you how best to keep fruit on your table all year round. It is an absolute treasure trove, filled not only with her family recipes for jams, jellies and chutneys but it also runs the full gambit of meals, including recipes for cocktails, snacks , mains and going all the way through to desserts. And it doesn’t stop with the mouthwateringly delicious recipes, Fruit on the Table also gives you the low down on growing your own fruit, the ins and outs of preserving, tips on foraging as well as drying fruit. I’m proud to be sharing these recipes from her book this year and I shared quite a few last year as well, but I’m telling you, they’re only the tip of the iceberg. You’ve just gotta get ahold of this essential cookbook. And if you find yourself in Limerick, you simply must stop by the Limerick Milk Market and pay the Green Apron shop a visit!

blas-silver-2014-pic-e1463574382426-1

Over the years, I’ve shared quite a few of her fantastic recipes with you. Last year I kicked off my St. Patrick’s Day blog-a-thon with her Prize-Winning Scones with Strawberry Jam & Clotted Cream.

IMG_6770

I told you about her Batley Cake

IMG_6087

which I filled with her deletable boozy Irish Whiskey Marmalade (also used to fill these tarts.

img_5780

And this year, I’ll be sharing her Lemon Curd recipe. Quite the game-changer, this quick & easy curd can be made in the microwave. You will have it ready in absolutely no time at all….well maybe 15 minutes or so.

IMG_7551

Theresa used regular lemons in her recipe. I was lucky enough to have some Meyer Lemons in hand, so I used them. Meyer Lemons, which originated in China, are a cross between a regular lemon and a Mandarin Orange. This results in a somewhat sweeter, really vibrant tasting lemon without the acidic aspect. They are a gorgeous golden-yellow colour, kind of like egg yolks and have a much thinner skin than regular lemons. Because they are smaller than regular lemons, I used 5, rather than three, to make this recipe.

IMG_7549

This delightfully sweet yet tart spread is delicious smeared on scones, swirled into your morning oatmeal or yogurt, or simply eaten by the spoonful! Brighten up your day with this reminder that the sun will soon reappear.

IMG_7554

Meyer Lemon Curd

  • Servings: 14 oz.
  • Difficulty: easy
  • Print

recipe from: Fruit on the Table: Seasonal Recipes from the Green Apron Kitchen by Theresa Storey

Ingredients:

  • 3 large lemons ( I used Meyer Lemons which are a bit smaller. I ended up using 5 Meyer lemons).
  • 110 grams (4 oz.) butter
  • 2 large eggs
  • 225 grams (8 oz.) sugar

Directions:

Wash the lemons and carefully grate the zest off all three. Juice two of the lemons and measure the juice. You want about 5 tablespoons. If you don’t have enough, juice the last one.

Put the butter in a small bowl and microwave on medium heat for a bout one minute until soft and starting to melt. remove from the microwave, stir to distribute the heat evenly and then set aside.

Whisk the eggs and sugar together in a large bowl until just combined. Add the lemon zest and juice and stir through.

Add the softened ed butter and whisk the whole lot together until combined

Place the bowl of curd mixture into the microwave and cook on medium heat for one minute. Take it out, give it a quick whisk and put in back in for another minute. Cook it in one minute burst on medium heat until thick enough to coat the back of a spoon. (It takes me about 5 minutes.) Beware of overcooking: it thickens as it coos.

Taste the curd. If it needs more lemon, add some more juice, one teaspoon at a time, until you are happy with the flavor, and then microwave ti for another minute to incorporate the newly added juice.

Now it is ready to eat, so pour it into warm sterilized jars, lid and seal. The curd will keep 3 weeks in the refrigerator.

Enjoy!

Meyer Lemon Curd brought to you by: Runcible Eats (www.leaandjay.com)

Links for helpful kitchen tools & ingredients for Quick & Easy Meyer Lemon Curd:

Fruit on the Table: Seasonal Recipes from the Green Apron Kitchen

OXO Good Grips Stainless Steel Food Scale

Ball Mason 4 oz quilted jelly jars

Canning Magnetic Lid Wand

Norpro 600 Jar Lifter

Ball Canning Funnel

Progressive Hand Grater/zester


Theresa’s Prize-Winning Scones with Strawberry Jam & Clotted Cream

March 12, 2018

IMG_6770

I can’t believe it! Here it is, March already. And St. Patrick’s Day is a mere 5 days away! That means it is time to start my annual St. Patrick’s Day blog-a-thon. In the days leading up to March 17th I will be sharing a delicious assortment of Irish-y recipes. I’ve been doing this for several years now, so I’ve collected 106 St. Patrick’s Days recipes at this point. Yup! I said over one hundred!!! And that doesn’t take into account all the delicious dishes coming your way this year. If you’d like to take a peek at my past St. Patrick’s Day posts, you can click Runcible Eat/Recipes up at the top navigation bar and scroll down to the St. Patrick’s Day category. That’s where you’ll find them! And stay tuned here for my latest additions. I am very excited to kick off this year’s series of Irish recipes with Theresa’s Prize-Winning Scones with Strawberry Jam & Clotted Cream.

IMG_6727

You may be thinking “Who’s Theresa?” – well let me tell you. Theresa is one of my best friends from college. She is amazing in the kitchen. I remember back when we were starving students, and practically surviving on buttered toast (and perhaps the occasional pint or two…), we had actually run out of sliced bread. I looked around the kitchen and quickly announced “We’ve got nothing to eat in there.” Theresa popped out to the kitchen and returned in no time with a big plate of warm fluffy lovely scones. Just like that! To me, who definitely was not of any use in the kitchen at that point (all my cooking skills developed post marriage) it was nothing short of magic! A couple of years ago, Theresa published her first cookbook where you can find the recipe for these scones and the strawberry jam along with over 100 other delicious seasonal fruit recipes. It is called Fruit on the Table: Seasonal Recipes from the Green Apron Kitchen.

1

Theresa runs a business, The Green Apron, which is an artisan preserve company. Theresa grows much of the fruit and vegetables she uses in her preserves at her family’s orchards at Derryclough and in the walled vegetable garden at her parents 18th Century castle, Glenwilliam.

img_2809-e1463570050345-683x1024

Her award-winning preserves are made in small batches by traditional methods using locally sourced, organic produce where possible and without artificial preservatives, colours or setting agents. The Green Apron has won 12 Blas na hEireann Irish Food Awards, 7 International Great Taste awards and is listed not only in McKenna’s Guide, but also in Georgina Campbell’s Guide. The Green Apron is also now offering workshops on sustainable living, preserving and bee keeping.

book-cover-fruitonthetable

Theresa’s book, Fruit on the Table is a top 10 best-selling cookbook in Ireland , has won a Gourmond award there and has been selected to compete for an International Gourmond award. In her book, Theresa follows the seasons and tells you how best to keep fruit on your table all year round. It is an absolute treasure trove, filled not only with her family recipes for jams, jellies and chutneys but it also runs the full gambit of meals, including recipes for cocktails, snacks , mains and going all the way through to desserts. And it doesn’t stop with the mouthwateringly delicious recipes, Fruit on the Table also gives you the low down on growing your own fruit, the ins and outs of preserving, tips on foraging as well as drying fruit. I’m proud to be sharing these recipes from her book this year and I shared quite a few last year as well, but I’m telling you, they’re only the tip of the iceberg. You’ve just gotta get ahold of this essential cookbook. And if you find yourself in Limerick, you simply must stop by the Limerick Milk Market and pay the Green Apron shop a visit!

blas-silver-2014-pic-e1463574382426-1

I’m sure you must now be inspired to make both these tender fluffy scones as well as the divine strawberry jam with which they are topped. Your first step will be making the scrumptious Strawberry Jam. You will end up with a bit more jam than you require to slather over these scones, but it is great to have on hand. It is very versatile and you can use it many other recipes…hint, hint – it might make an appearance again later this week. Strawberry Jam is my favorite and this jam, free of pectin, is just bursting with strawberry goodness.

IMG_6763

And scones…Well, I just love them. With the first bite of these little gems you will understand why they are prize-winning.

IMG_6736

And topped with strawberry jam and clotted cream…I am absolutely over the moon! The Husband loves scones with jam and clotted cream as well. In fact, his first experience with this delicacy was in Dublin, shortly after we were married. As he gobbled down every morsel, I just might have heard him murmur “Where have you been all of my life?!!” And I’m fairly certain he was referring to the scones rather than me.

IMG_6723

As it turns out it recently came to my attention that there is an etiquette to topping your scone. My friend Keela informed me that spreading your scone with the clotted cream first and then dolloping your jam on top is the Devon way, whereas jam first and cream second is the Cornish way. I checked for the Irish method with my friend Theresa and she said butter goes on the scone first the jam and then cream. No one she is aware of puts the cream on first. Hmmm….the good news here is that Scones with Strawberry Jam and Clotted Cream are pretty heavenly no matter which way the toppings go on. Make up a batch and see for yourself!

IMG_6729

Theresa's Prize-Winning Scones with Strawberry Jam & Clotted Cream

  • Servings: 18 dainty scones
  • Difficulty: easy
  • Print

recipe from: Fruit on the Table: Seasonal Recipes from the Green Apron Kitchen by Theresa Storey

Ingredients:

  • 2 eggs
  • 300 ml (1/2 pint) milk
  • 450 grams (1 lb.) all-purpose flour
  • 2 teaspoons baking powder
  • 1/2 teaspoon salt
  • 2 Tablespoons sugar
  • 110 grams (4 oz.) unsalted butter
  • strawberry jam (recipe to follow) and clotted cream for topping

Directions:

Preheat the oven to 200°C (400°F/Gas 6).

Beat the eggs in a measuring jug with enough milk to make 300 ml (1/2 pint) of liquid. You will have a little milk left over.

Put the dry ingredients in a bowl. Rub in the butter until the mixture resembles fine breadcrumbs. Add three-quarters of the liquid and mix well. If the mixture is too dry, add a bit more liquid or, if wet, add a bit more flour. You should have a soft dough that you can stick your finger through. (Don’t over-handle the dough or the scones will be tough.)

Roll out the dough on a floured surface to 2.5 cm (1 inch) thick and cut into the desired shape. I use a 5 – cm (2 inch) round cutter usually, but sometimes I cut the dough into squares or diamonds.

Place the scones on a lightly floured baking tray and then brush the top with the remaining egg and milk mixture. This gives them a nice shine and color when they are cooked.

Bake for 10 -15 minutes or until they are golden. Remove from the oven and leave to cool on a wire rack.

Spread with strawberry jam and clotted cream. You can even go crazy and slather the scone with a little butter first before adding the other goodness. The sky is the limit!

Variations:

Add the zest of one lemon to the dry ingredients; or 2 tablespoons of raisins or sultanas; or ground cinnamon and the juice and zest of one orange. For savory scones, leave out the sugar and add herbs or grated cheese.

Strawberry Jam

Ingredients: 

  • 2 kg (4 1/2 lb) Strawberries (hulled and halved if big)
  • Juice of 3 large lemons
  • 150 ml (1/4 pint) water
  • 2 kg (4 1/2 lb) sugar

Directions:

Place a saucer into the refrigerator to chill. You will use it to test the setting point later.

Put the strawberries, lemon juice and the water into a preserving pot and cook over low heat until the juice starts to run from the berries and they begin to soften. Remove the pot from the heat and put it onto a sturdy work surface.

Take a potato masher and squash the strawberries in the pot. You don’t want them completely puréed but you do want them broken up. Give it about six mashes.

Put the pot back onto the stove and continue to cook the fruit over a low heat until the strawberries are completely soft and the juice starts to darken in color.

Add the sugar, stir in well, and cook on a high heat, stirring occasionally, until the jam reaches settings point. Spoon a little of the boiling preserve onto the cold saucer. Let it cool and then push it with your finger. If it has reached setting point, the top of the blob of jam will wrinkle. You want strawberry jam to be barely set, because if you cook it for too long some of the flavor will be lost.

Pour into warm sterilized jars to within 6 mm (1/4 inch) of the top. Wipe any drips off the rims of the jars to make sure there is a good seal between the jar and lid. A dampened paper towel works well for this. Place lids on and seal.

Enjoy!

Theresa’s Prize-Winning Scones with Strawberry Jam & Clotted Cream brought to you by: Runcible Eats (www.leaandjay.com)

Links for helpful kitchen tools & ingredients for Theresa’s Prize-Winning Scones with Strawberry Jam & Clotted Cream:

Fruit on the Table: Seasonal Recipes from the Green Apron Kitchen

OXO Good Grips Stainless Steel Food Scale

Cuisinart Pro-Classic Food Processor

Kilner Stainless Steel Jam Pan

Ball Mason 4 oz quilted jelly jars

Canning Magnetic Lid Wand

Norpro 600 Jar Lifter

Ball Canning Funnel


Irish Whiskey MarmaladeTarts

March 1, 2017

img_5762I can’t believe it! Here it is, March already. And St. Patrick’s Day is a mere 17 days away! That means it is time to start my annual St. Patrick’s Day blog-a-thon. In the days leading up to March 17th I will be sharing a delicious assortment of Irish-y recipes. I’ve been doing this for several years now, so I’ve collected over 80 St. Patrick’s Days recipes at this point and that doesn’t take into account all the delicious dishes coming your way this year. If you’d like to take a peek at my past St. Patrick’s Day posts, you can click Runcible Eat/Recipes up at the top navigation bar and scroll down to the St. Patrick’s Day category. That’s where you’ll find them! And stay tuned here for my latest additions. I am very excited to kick off this year’s series of Irish recipes  with these fantastic Irish Whiskey Marmalade Tarts. Yup…what I’m talking about here is flaky, buttery shortcrust pastry which has been filled with a delicious homemade Irish Whiskey Marmalade laced batter. Sweet, bright  and citrus-y, it is like eating a burst of sunshine with every bite.

img_5781And I am so happy to tell you where you can find this recipe, as well as over one hundred other amazing seasonal fruit recipes. It can all be found in my good friend Theresa’s debut book: Fruit on the Table: Seasonal Recipes from the Green Apron Kitchen by Theresa Storey. Theresa and I met in college when she was finishing up her degree in botany. I can tell you first hand that she is an amazing cook, full stop. But fruit is by far her specialty.

1

After college, Theresa moved back to rural County Limerick and started her own business, The Green Apron, which is an artisan preserve company. Theresa grows much of the fruit and vegetables she uses in her preserves at her family’s orchards at Derryclough and in the walled vegetable garden at her parents 18th Century castle, Glenwilliam.

img_2809-e1463570050345-683x1024

Her award-winning preserves are made in small batches by traditional methods using locally sourced, organic produce where possible and without artificial preservatives, colours or setting agents. The Green Apron has won 12 Blas na hEireann Irish Food Awards, 7 International Great Taste awards and is listed not only in McKenna’s Guide, but also in Georgina Campbell’s Guide. The Green Apron is also now offering workshops on sustainable living, preserving and bee keeping.

book-cover-fruitonthetableTheresa’s book, Fruit on the Table is a top 10 best selling cookbook in Ireland , has won a Gourmond award there and has been selected to compete for an International Gourmond award. In her book, Theresa follows the seasons and tells you how best to keep fruit on your table all year round. It is an absolute treasure trove, filled not only with her family recipes for jams, jellies and chutneys but it also runs the full gambit of meals, including recipes for cocktails, snacks , mains and going all the way through to desserts. And it doesn’t stop with the mouthwateringly delicious recipes, Fruit on the Table also gives you the low down on growing your own fruit, the ins and outs of preserving, tips on foraging as well as drying fruit. I’m proud to be sharing several different recipes from her book this year, but I’m telling you, they’re only the tip of the iceberg. You’ve just gotta get ahold of this essential cookbook. And if you find yourself in Limerick, you simply must stop by the Limerick Milk Market and pay the Green Apron shop a visit!

blas-silver-2014-pic-e1463574382426-1

Now back to these yummy Irish Whiskey Marmalade tarts. My first task here was to make up a batch of the marmalade. This Irish Whiskey Marmalade is a three fruit marmalade consisting of grapefruit, oranges and lemons and a good glug of Irish Whiskey. It is one of The Green Apron’s best-selling jams and won a bronze Blas na h’Eireann in 2015.

img_5780

You will end up with much more of the marmalade than you require to make the tarts, but as you will see with some of my later posts, this marmalade is very versatile and you will be over the moon to have it around. Don’t forget to check back with me next week and see what else can be done with this scrumptious Irish Whiskey marmalade…besides eating it slathered over fresh-baked bread and scones. No brainer there…but believe me…there’s more!

img_5736

Now once you have that delectable boozy marmalade, the tarts come together in a flash and would be wonderful to have on hand on St. Patrick’s Day. Perfect with a cup of tea, these tarts are slightly sweet and wonderfully fragrant. Ordinary tea time will become extra special with these irrisistible Irish Whiskey Marmalade Tarts on the table!

img_5793

Irish Whiskey Marmalade Tarts

  • Servings: 12 Tarts, 5 pints of Marmalade
  • Print

recipe from: Fruit on the Table: Seasonal recipes from the Green Apron kitchen by Theresa Storey

For the Irish Whiskey Marmalade:

Ingredients:

  • 1 ruby grapefruit
  • 2 medium sweet oranges
  • 4 lemons
  • 3.4 l (6 pints) water
  • 2.7 kg (6 lbs) sugar
  • 60 ml (2 fl. oz.) good Irish Whiskey
  • 1 teaspoon mixed spice (Please note, mixed spice is different from all-spice. Mixed spice, sometimes also called pudding spice is a British spice similar to pumpkin pie spice, containing cinnamon, nutmeg and allspice. I have a link for it below, or here is a recipe for it.)

Directions:

Place a saucer into the refrigerator to chill.

Wash the grapefruit, oranges and lemons. Remove any blemishes from the skin and cut them into quarters. Place in the food processor and process on high speed until the peel is reduced to 6-mm (1/4″) pieces. If you like a bigger peel in your marmalade, don’t process it for so long, and if you like very little peel, process it for longer.

Put the processed citrus in a preserving pot with the water, stir well and cook on a high heat, stirring occasionally, until the peel is cooked and smooshes to wee pieces between your fingers. This usually takes an hour.

Add the sugar, stir well and cook over a high heat, stirring occasionally, until the marmalade reaches setting point, with a marmalade this usually takes 20 -40 minutes.

Spoon a little of the boiling preserve onto the cold saucer. Let it cool and then push it with your finger. If it has reached setting point, the top of the blob of marmalade will wrinkle. Marmalades should have wrinkles at least 2 -3 mm hight.

Remove from heat. Skim off any seeds and sugar foam.

Add 60 ml (2 fl oz) of good Irish Whiskey and 1 teaspoon of ground mixed spice.

Pour into warm sterilized jars to within 6 mm (1/4″) of the top. Wipe any drips off the rims of the jars to make sure there is a good seal between the jar and lid. A dampened paper towel works well for this. Place the lids on and seal.

For the Irish Whiskey Marmalade Tarts:

*These tarts are baked in a bun tin rather than a muffin tin. Bun tins are similar to muffin tins but are much more shallow. If you don’t have bun tin, (there is an amazon prime link for one below – you could have it tomorrow :)) you could try filling a muffin tin half way, though I haven’t tried that and can’t speak to the results.

Ingredients:

For the shortcrust pastry:

  • 110 grams (4 oz.) butter (chopped)
  • 225 grams (8 oz.) plain flour
  • 1/2 teaspoon salt
  • 6 Tablespoons cold water

For the batter:

  • 75 grams (2 1/2 oz) all purpose flour
  • 1/4 teaspoon baking powder
  • 60 grams (2 oz) butter (chopped)
  • 60 grams ( 2 oz.) sugar
  • 1 large egg – beaten
  • 1 Tablespoon Irish Whiskey Marmalade

Directions:

Rub the butter into the flour until it resembles fine breadcrumbs and then mix in the salt. Add the cold water, one tablespoon at a time, mixing after each addition until the pastry holds together. You may not need to use it all. Knead it a few times until it is smooth and then cover it and put it in the fridge to rest for at least 30 minutes.

Preheat the oven to 200°C (400°F/Gas 6).

Roll out the pastry on a floured surface until it is about 3 mm ( 1/8″) thick. Cut out circles slightly bigger that the size of the bun hole and put them into the tin.

Mix the flour, baking powder, butter, sugar and egg together until smooth. I do this in my food processor.

Fold in the Irish Whiskey Marmalade.

Put 1 teaspoon of the batter into each pastry case.

Bake the tarts for 18 – 20 minutes until golden brown.

Remove the bun tin from the oven. Let the tarts cool in the tin for a few minutes and then carefully take them out and place them on a wire rack to finish cooling.

Enjoy!

Irish Whiskey Marmalade Tarts bought to you by: Runcible Eats (www.leaandjay.com)

Links for helpful kitchen tools & ingredients for Irish Whiskey Marmalade Tarts:

Fruit on the Table: Seasonal Recipes from the Green Apron Kitchen

OXO Good Grips Stainless Steel Food Scale

Cuisinart Pro-Classic Food Processor

Kilner Stainless Steel Jam Pan

Ball Mason 4 oz quilted jelly jars

Canning Magnetic Lid Wand

Norpro 600 Jar Lifter

Ball Canning Funnel

Nonstick Twelve Hole Shallow Bun Tin

Mixed Spice


Meyer Lemon Vanilla Bean Champagne Preserves

June 18, 2013

IMG_3438

I don’t know what has gotten into me recently. I think it is just pure laziness. I haven’t posted for quite some time and don’t really have any good reason as to why I haven’t. I wish I could say it was because I had been whisked off to some exotic locale, or maybe that I had won an immense lottery jackpot and was busy out spending it all. But no. Nothing like that. Just lazy I think. It’s not like I haven’t been in the kitchen. Oh, believe me I have and I actually managed to get a picture or two. I just haven’t gotten around to writing any of it up. But I woke up this morning and thought perhaps I might want to get with it again, so I thought I’d start with this lovely Meyer Lemon Vanilla Bean Champagne Preserves recipe.

IMG_3513

Meyer Lemons aren’t available for long in this neck of the woods, so when I spied them in the store a couple of weeks ago I snapped them right up! Meyer Lemons, which originated in China, are a cross between a regular lemon and a Mandarin Orange. This results in a somewhat sweeter, really vibrant tasting lemon without the acidic aspect. They are a gorgeous golden-yellow colour, kind of like egg yolks and have a much thinner skin than regular lemons. I love them and have made quite a few yummy treats with them in the past during their window of availability, like Meyer Lemon Curd and Meyer Lemon Creme Mini Tarts. Now I’m sure you can make these preserves with regular lemons if Meyer Lemons aren’t around, but if you can get them, give them a try.

IMG_3456

These Meyer Lemon Vanilla Bean Champagne Preserves came out wonderfully! I don’t know how they wouldn’t have considering all of the delicious ingredients that went into them. I’ve told you how delicious Meyer Lemons are and hello?….Champagne?! We love LOVE Champagne in this house! And just think, this recipe only calls for one little old cup. Sooo…you’ll most likely have to finish off the rest of the bottle since Champagne is so difficult to store and you wouldn’t want it to go to waste. But back to the preserves… beautifully golden hued and flecked throughout with vanilla, we’ve been gobbling them up at an astonishing rate! Mostly spread on toast, but last night my husband warmed it up just a bit and put some over vanilla ice cream (YUM!) which got me to thinking about what other sorts of interesting things you could enhance by adding a bit of those preserves. Then I remembered a bar we went to in New York city that serves Jammy Cocktails. That’s right, you get your choice of vodka or gin on the rocks and then they give you a big spoon full of jam to stir into that drink. How refreshing! Now that the humid Virginia summer has kicked into gear, I think I feel a Meyer Lemon Vanilla Bean Champagne Cocktail coming on right about now…

IMG_3540

Meyer Lemon Vanilla Bean Champagne Preserves

recipe slightly adapted from: Jelly Toast

Yield: 2-3 1/2 Pint (8 ounce) jars

Ingredients:

  • 1 1/4 lbs of Meyer lemons (about 8 small) scrubbed
  • 1 cup of champagne
  • 1/2 cup Meyer lemon juice (from about 4 lemons)
  • Granulated sugar (about 1 1/2 cups)
  • 1 Vanilla Bean

Directions:

Thinly slice Meyer lemons removing seeds and stems.

Place a small plate in the freezer to test the jam’s consistency later if desired.

Fill a large pot with tap water. Submerge three 1/2 pint jars and their lids, making sure they are completely covered by the water. Boil the water.

In a non-reactive pan, place lemon slices and cover with cold water. Bring to a simmer and cook for 10 minutes. Drain off water.Repeat this step one more time. Allow lemon slices to cool for several minutes.

Place lemon slices in a food processor and pulse several times to break up pieces. Leave the pieces as chunky or as fine as you desire.

Using a kitchen scale, weigh the lemon mixture. Return mixture to the large pot. Add the same amount of granulated sugar as you had lemon pieces (weigh the sugar to the exact same weight). Add sugar to the pot with the lemons.

Add 1/2 cup of lemon juice, and 1 cup of champagne and the seeds from one vanilla bean to the pot and bring to boil.

Allow to boil over medium/high heat (taking care that the heat is not too high or it will caramelized your preserves) until the preserves reach the gel point (220 degrees on a candy thermometer). This will take about 10-15 minutes. Watch the preserves carefully.

Gel point can also be tested by placing a small amount if the finished preserves on a frozen plate. (My preferred method.) If the preserves thicken and wrinkle when you run your finger through them on the frozen plate, it is done. If it remains runny, continue to cook for several more minutes.

When the desired consistency is reached, ladle the jam into jars. If your plan is to scarf down all of these preserves immediately, just put the lids on and place the jars in the refrigerator. If you would like to save one or both for later, screw rims onto jam jars. Using tongs, pick up the full jam jars and place them back into the boiling water for 10 minutes.

After 10 minutes, remove the jars and place them on the towel. As they cool, you should hear a ping type noise which tells you the jam jars are sealed. When you push down in the center of the top of the jar, there should be no click noise. Make sure the lids are sealed tightly.

If you are using Weck jars with a glass lid, once the jar has been filled you place the rubber ring and glass top on the jar and secure it with the metal clips. Process the jar in the hot water bath as described above. Let jar cool completely and then remove the metal clips. If a proper seal has been established you should be able to lift the jar by its lid and the lid should remain firmly in place. If the lid comes off, don’t despair. You’ll just need to store that jar in the fridge and eat it up much sooner than you thought you would be.
The preserves can be stored for up to one year.

Serve on toast, scones, English Muffins, over ice cream, stirred into yogurt or in a refreshing jammy cocktail!

Enjoy!


Chocolate & Raspberry Buttermilk Doughnuts

March 1, 2013

IMG_0246

It’s here! It’s here! Day #1 of my St. Patrick’s Day countdown of Irish-y recipes. And ya’ll, I’m starting off with a great one! Who doesn’t swoon at the thought of Buttermilk Doughnuts? And these particular Buttermilk Doughnuts are filled with a Chocolate & Raspberry Jam that will bring tears to your eyes. Now I’m sure some of you folks out there in internet land are saying “Uh…How are Chocolate Raspberry Doughnuts particularly Irish?” Well now, keep your britches on for a just a minute and I will make the Irish connection clear.

IMG_0180

The food scene in Ireland today is really changing rapidly. For such a long time when one spoke of Irish cuisine, bland boiled meat and potato was the unfortunate stereotype. But now a days I think most folks are aware that there is a real food renaissance going on in Ireland. The traditional Irish dishes, which were always rustic and filling but were for quite some time ignored, are being revived and served in the most hip restaurants to be found. You see, that wonderful mild climate that gives the country such gorgeous green vistas also produces an abundance of world-class fresh ingredients from wonderful grass-fed beef and dairy cows to gorgeous fresh fruit and vegetables. There is an emphasis on seasonal, locally sourced, quality food. And this new-found emphasis on fresh and local has created a resurgence in artisan producers. In recent years there has been a huge increase in the number of farmers markets in the country. Now farmers markets are amazing because you often get to meet the actual people who grow and craft the delicious food you are purchasing. (Lets take another look at those doughnuts…)

IMG_0269

Last October, Jay and I were lucky enough to have the opportunity to travel over to Ireland to visit friends and family. Much to our delight, The 6th Annual Dingle Peninsula Food Festival was taking place while we were there. Now, if you are planning a trip to Ireland, let me just say, the Dingle Peninsula is a must see for your trip. National Geographic has declared it “the most beautiful place on earth” and it is ranked as one of Trip Advisors “Top 100 destinations in the world”.

IMG_0120

So, if you can manage to plan it so that you are there during the Food Festival, it will just be icing on the cake. The little town of Dingle really turns out for the festival! They have a “Taste Trail” which encompasses over 60 locations from pubs to galleries to shops. Walking that food trail was incredibly fun and tasty! The way it works is that you buy a book of taste tickets and then set off on the trail. Each location has a sample of featured local cuisine. We had kangaroo skewers (betcha didn’t know there were kangaroos in Ireland huh?), Spinach and Gruyère crepes and charming butterfly cakes, a pint or two of micro brew, plus many other tasty delicacies. We could barely waddle back home! But in addition to the food trail frenzy,  there are cookery demonstrations, food workshops, live music, the Farmers Forum, farmer’s/food markets and the Annual Blas Na hÉireann (Taste of Ireland): National Irish Food Awards. Blas Na hÉireann is the biggest competition of its type in Ireland. The prestigious awards, given as gold, silver and bronze in over 60 categories, are considered to be the ultimate benchmark of quality Irish produce and its passionate producers.. That’s where the Chocolate & Raspberry Preserves that I used to fill my lovely Buttermilk doughnuts come in. (Ahhh…it’s getting clearer…) My friend Theresa and her family own The Green Apron,  a small artisan preserve company located Derryclough, Ballingarry, (overlooking Knockfierna – the famous fairy hill) in County Limerick, Ireland. She makes those stunning preserves, which won a silver award in the Blas Na hÉireann Jams, Marmalades and Conserves category! That in itself was fantastic, but she didn’t stop there. Oh no. Theresa also won the Gold in that same category for her Apricot, Orange & Almond Conserve,

564847_4577305953342_1914496201_n

Theresa & her daughter Athene accepting the Gold and Silver Awards

and she won a Silver in the Dips & Seasonings category for her Italian Butter Mix and last but not least The Green Apron won Best in Farmer’s Market for Small Producers for their stand in the Limerick Milk Market.

IMG_9267

Four awards! Woohoo!!! Over that exciting weekend Theresa also taught a cookery class entitled “Preserving Your Harvest” and was able to man The Green Apron stall, with the help of family and friends. I tell you, she is unstoppable! I was lucky enough to bring a jar of the award-winning Chocolate & Raspberry Preserves, with a clear Irish pedigree, back home with me. Now, I must confess, I can’t tell you the recipe for it. No, no, no. Top secret and all. Well, I guess I could divulge it, but then would have to track you down and kill you all before Theresa was able to take me out. What I will say, is that if you are in Ireland, you simply must get ahold of a jar. You can find the Green Apron in the Limerick Milk Market every Saturday. They also do some other markets and fairs from time to time, so check their Facebook page for updates. Or you can email Theresa directly to discuss the possibilities of mail order. For all of you in other locales, if you’re in Ireland, try to catch her at the Milk Market, or you can find her at the next Dingle Peninsula Food Festival.

IMG_0596

Otherwise, you’ll just have to find your own favourite, scrumptious jam to fill your doughnuts with. Check out your local farmer’s markets and I’m sure you’ll find some wonderful artisan producers. Or get busy and make up a batch of your favourite fruit. A quality jam will make all the difference in your doughnuts. I can remember I wouldn’t go anywhere near a jam or jelly filled anything when I was younger. It was something about the texture and that fact that the jelly tasted sort of plastic and not like any particular fruit. If it was supposedly strawberry or raspberry, it often just tasted vaguely “pink”. There was never any real fruit flavour shining through, just sweet goo. That is not the case with my Chocolate & Raspberry Buttermilk Doughnuts. Not only is the cake portion of the doughnut moist and tender, but it is also bursting with vibrant raspberry preserves, with a rich chocolate undertones.

IMG_0199

For those of you who just can’t get enough chocolate, I dipped several of my doughnuts in a chocolate glaze. I also covered some with granulated sugar. Now you know how parents supposedly don’t favour one child over another, or at least would never admit to it? Well, I gotta say, whilst the sugar tossed doughnuts are lovely, but the chocolate glazed, Chocolate & Raspberry filled ones will make you go weak in the knees!

IMG_0254

These doughnuts are baked, not fried, sooo….I guess that means they’re good for you? Alright, it probably means they are less bad for you than their deep-fried cousins, which you will not miss in the least, especially not the calories and fat part, after you get a bite of these much trimmer little devils. There is no yeast involved, so you don’t have to worry with rise times. And the recipe is flexible, if you don’t have a doughnut pan, you can make these up as muffins and stuff them full of the jam of your choice as well.

IMG_0291

Easy and Delicious! Now that’s what I like to hear!

IMG_0083

Chocolate & Raspberry Buttermilk Doughnuts

yield: 8 doughnuts

Recipe adapted from: The Williams-Sonoma Baking Book

Ingredients:

For the doughnuts:

  • 7 Tablespoons (3 1/2 oz/105 grams) unsalted butter, at room temperature
  • 2/3 Cup (5 oz./155 grams) sugar
  • 1 large egg
  • 1 1/2 cups (7 1/2 oz./235 grams) all-purpose flour
  • 1 1/2 teaspoon baking powder
  • 1/2 teaspoon baking soda
  • 1/2 teaspoon salt
  • 1/2 teaspoon freshly grated nutmeg
  • 1/2 cup (4 fl. oz./125 ml) buttermilk
  • 1 1/2 teaspoon pure vanilla extract
  • Green Apron’s Chocolate & Raspberry Preserves (or your favourite preserve)

For the toppings:

Sugar coated:

  • 4 Tablespoons melted butter
  • 1/3 cup granulated sugar

Chocolate Glazed: 

  • 1/4 cup semisweet chocolate chips
  • 1 Tablespoon butter
  • 1 Tablespoon corn syrup
  • 1 teaspoon hot water

Directions:

Preheat the oven to 350° F (180°C). Grease Doughnut pan with butter or butter-flavoured nonstick cooking spray.

In stand mixer cream together the butter and sugar until light and fluffy. Add the egg, beating well to incorporate  until pale and smooth.

In another bowl, stir together the flour, baking powder, baking soda, salt and nutmeg. Add to the butter mixture in two additions, alternating with the butter milk and vanilla. Stir just until evenly moistened. the batter will be slightly lumpy.

Spoon batter into each doughnut cavity until it is 1/3 full. Place Green Apron’s Chocolate & Raspberry Preserve (our your favourite jam) in a pastry bag and pipe a line of the preserves in the center of each doughnut. Cover the preserves with doughnut batter until each cavity is approximately 2/3 full. Don’t overfill the individual doughnut cups or you’ll lose the doughnut shape during baking.

Bake the doughnuts for 10-12 minutes or until the top of the doughnut spring back when touched. Let them cool in the pan for 4-5 minutes before removing.

To add sugar-coating:

Place granulated sugar in ziplock bag. Dip the cooled doughnut in melted butter. Place doughnut in bag and gently turn until coated with sugar.

To Glaze with chocolate:

In medium bowl, microwave chocolate chips, butter and corn syrup on 50% power for 1 minute. Stir until completely melted. Add hot water and mix until the glaze is smooth. If glaze is too thick, add more water until it reaches desired consistency.

Dip doughnuts into chocolate and place on wire rack until glaze has hardened.

Enjoy!


Quick & Easy Meyer Lemon Curd

June 2, 2012

Meyer Lemon-palooza continues…As you all most likely know by now, after many months of searching, I finally came across some Meyer Lemons and bought a whole slew of them! I made Meyer Lemon Pudding Cakes and Meyer Lemon Cream Mini Tarts. Both were stunning if I say so myself. And I still had some gorgeous Meyer Lemons left. (told you it was a really big bag…) So I went ahead and made up a batch of good old Meyer Lemon Curd.

I found the recipe on Craving Chronicles and it really did live up to its name. It  was very quick and easy and delicious to boot! It made about 1 1/2 cups of a delightfully sweet yet tart spread. Veritable sunshine in a jar I tell you!

Delicious smeared on scones, added to your morning oatmeal or yogurt, or simply eaten by the spoonful! I must admit, when I made up this curd, I did have another dessert in mind that uses Lemon Curd as one of its ingredients. I mention that just as a teaser, because I’ll be posting about that fabulous creation next time. Check back soon! In the meantime, get your jars of Meyer Lemon Curd ready to go!

Quick & Easy Meyer Lemon Curd

recipe from: Craving Chronicles

yield: about 1 1/2 cups

Ingredients:

  • 1/2 cup granulated sugar
  • zest of 2 Meyer lemons
  • 1/2 cup Meyer lemon juice (about 3-4 large lemons)
  • 2 large eggs
  • 4 tablespoons unsalted butter, cut into tablespoon-sized pieces

Directions:

Add all ingredients except butter to a saucepan over Low heat. Whisk to combine. Add butter. Continue whisking gently but constantly, heating slowly, until curd thickens and reaches 160°F on an instant read thermometer. Remove from heat.

For the smoothest curd, pour through a fine mesh strainer. Transfer to a storage container. Cover and refrigerate overnight before use. Curd keeps up to 1 week in the fridge.

Enjoy!


Bourbon Bacon Jam

March 30, 2012

You heard me right….BACON JAM! Lord in Heaven above, Have Mercy! I’d seen various blogs about this mythic food. I heard there was a food truck somewhere on the other side of the country that was serving this stuff up on its burgers. I was seriously fantasizing about it, but I had yet to experience it firsthand and was dying to give it a whirl. I mean, really?!! Bacon. Jam. I finally decided that it was time to take action. The Lord helps those who help themselves, so I’ve heard. So I got busy with a recipe for this ambrosia that I found on Spoon Fork Bacon. (Fabulous blog, you should check it out!) With a name like that, I knew that they would know how to make a killer Bacon Jam. As an added bonus, their recipe made a Boozy Bacon Jam. Well I was very excited now. I hadn’t even dreamed that Bourbon would be on the all-star list of ingredients for this recipe. And be warned, quite a lot of ingredients go into this blessed concoction, but nevertheless it is still quite easy to prepare. There is of course, one pound of applewood smoked bacon, and bourbon – don’t forget the bourbon. (Knob Creek Kentucky Bourbon to be exact) Then there are the onions and the coffee, the ancho chili powder, smoky paprika, pure maple syrup, Sriracha Chili sauce, shallot, spices….Good Lands! And when you get all of these items combined just so, you let them sit a simmer for 1 1/2 hours, so that all that goodness can meld together. After one whirl in the good ole food processor, I swear the clouds parted and the light did shineth down. I had created it!  Bacon Jam! (insert maniacal laughter) I can tell you, I could hardly contain myself while it was bubbling away on the stove. But once it was finished and I got that first spicy, smoky, bacon-y taste I was doing a veritable bacon jig, which we really should have gotten film footage of, but I’ll just have to leave it up to your imagination. My husband started to laugh at me, but when a dollop of this magnificent creation landed square on his unsuspecting taste buds, his feet started to move on their own as well. Once you make your batch of this jam, you’ll know all the steps to the dance for sure! It’s instinctive. Involuntary. No instruction necessary. You’ll see….

What will I do with my Bourbon Bacon Jam now that I have it? Well, first of all I think I need to put it under guard, because the few folks that know it’s here are planning a heist to relieve me of my treasure. (By the way, a really big watch dog is in residence here…just saying in case you get any ideas…) So lets see, besides eating it right out of the jar…we’ve put it on our tender and tasty Cheddar Scallion Scones that I just posted about, we topped some deviled eggs with a dollop of that bacon-y goodness, we put it on burgers, we put it on egg breakfast biscuits. I tell you the possibilities are endless! Make up a batch for yourself and let your imagination run wild. You will not be disappointed!

Bourbon Bacon Jam

yield: Two 8 ounce jars

recipe from: Spoon Fork Bacon

Ingredients:

  • 1 lb applewood smoked bacon
  • 1 Tablespoon unsalted butter
  • 1 large onion, thinly sliced
  • 3 Tablespoons light brown sugar
  • 1 shallot, thinly sliced
  • 2 garlic cloves, thinly sliced
  • 2 teaspoons smoked paprika
  • 1 teaspoon ancho chile powder
  • ½ teaspoon ground mustard
  • ½ teaspoon ground ginger
  • ½ teaspoon ground cinnamon
  • ¾ cup sweet bourbon or brandy
  • 2/3 cup strong brewed coffee
  • 2 Tablespoons apple cider vinegar
  • 2 Tablespoons tarragon vinegar (I didn’t have this, so just used 4 Tablespoons apple cider vinegar)
  • 3 Tablespoons maple syrup
  • 1 ½ Tablespoons Sriracha
  • salt and pepper to taste

Directions:

Fry bacon on medium-high heat for 6 to 8 minutes. Remove with slotted spoon and set aside.

Drain all but 1 tablespoon bacon fat from the pot, add butter and melt.

Add onion, brown sugar and a pinch of salt and cook for 10 to 15 minutes.

Add shallot, garlic and spices and sauté for an additional 3 to 5 minutes. Season with pepper.

Return the bacon to the pot and stir until well combined.

Pour the bourbon/brandy into the bacon mixture and cook the liquid down for about 3 to 4 minutes.

Add the remaining ingredients, reduce the heat to medium-low and simmer for 1 ½ hours, stirring occasionally.

Remove the mixture from the heat and allow to cool for 15 to 20 minutes.

Skim off any fat/grease that has formed at the top and discard.

Pour the mixture into a food processor and process until desired consistency is achieved.

Serve warm or store in an airtight container, in the refrigerator, until ready to use. Will last for up to one month (as if any of that bacon jam will be left around for 1 month. Ha!)

Enjoy!