Salted and Malted Nutella Caramel Chocolate Chip Cookies

February 5, 2014

IMG_5120

Salted and Malted Nutella Caramel Chocolate Chip Cookies. I really don’t know if I need to elaborate on this one… I mean, I don’t know about you, but they had me at Salted & Malted. Nothing more need be said. But then those delicious pair of words are followed by Nutella. And it doesn’t stop there. Oh no. It goes on to read Caramel Chocolate Chip Cookie! Have Mercy!

IMG_5106

I was instantly confident that this would be the recipe that I would make for World Nutella Day. That’s right, today February 5th is World Nutella Day. This celebration of all things Nutella was started in 2007 by Sara at Ms. Adventures in Italy and Michelle at Bleeding Espresso as a day to celebrate, get creative with and most importantly, to EAT Nutella.

World_Nutella_Day_Final_m-300x207

I love Nutella. Although I missed adding a submission to Nutella Day last year. (Total brain freeze…I have no excuse) I have contributed a couple of truly tasty Nutella laden recipes in years past. There was my exquisite Nutella, Double Chocolate & Banana Tart

IMG_1065

and my delightful Nutella & Banana filled Peanut Butter Ebelskivers.

IMG_5014_2

I think these Salted & Malted Nutella Caramel Chocolate Chip Cookies are a great way to jump back into the game.

IMG_5100

Morgan over at Host the Toast came up with these gems back in December. What a masterpiece! They literally have it all, silky, decadent Nutella, creamy caramel, nostalgic malted goodness and rich chocolate chips all rolled up in a crunchy chewy salted cookie. (Yup…its got the salty/sweet thing covered as well!) They are an absolute breeze to make and as I’m sure you can imagine, are certainly quite easy to eat. (Ahem…probably a bit too easy judging from the fit of my britches…) I can’t get enough of these little devils! Get yourself addicted today!

IMG_5128

Salted and Malted Nutella Caramel Chocolate Chip Cookies

recipe from Host the Toast

yield: 27 Cookies

Ingredients:

  • 1 and ⅓ cups all-purpose flour
  • ¼ cup malted milk powder
  • ½ teaspoon baking soda
  • ½ teaspoon salt
  • ½ cup unsalted butter, room temperature
  • ¼ cup granulated sugar
  • ¾ cup plus 2 tablespoons packed dark brown sugar
  • ⅔ cup Nutella
  • 1 egg, room temperature
  • 1 teaspoon vanilla extract
  • ⅔ cup semisweet chocolate chips
  • ⅔ cup caramel bits (or baking caramels cut into tiny pieces)
  • Flaky Sea salt, for topping

Directions:

Preheat oven to 350° F. Line 2 baking sheets with parchment paper and set aside.

In a large bowl, whisk together the flour, malted milk powder, baking soda, and salt until well blended.

Cream together the butter and both sugars in a separate bowl until completely smooth.

Add the Nutella to the butter mixture and mix until fully combined. Add in the egg and vanilla and continue to mix. Then, slowly add in the flour mixture. Mix until it all is just incorporated, but don’t over-mix.

Stir in the chocolate chips and caramel bits until evenly distributed. I like to refrigerate cookie dough for an hour or so before baking. It helps to keep it from spreading too quickly in the oven resulting in a very thin cookie. However, this step is optional. Using a medium-sized cookie scoop ( holds about 2 tablespoons) scoop dough and drop onto the parchment paper-covered baking sheets, spacing them out about 2½ inches apart and away from the sides of the sheet. You may have to do multiple batches– don’t try to squeeze them all in.

Sprinkle dough with flaky sea salt.

Bake 10-13 minutes. Remove from the oven. They will still be very, very soft. Leave them on the cookie sheet on a wire rack for about 15 minutes, or until they are solid enough to eat.

Enjoy!


Italian Lentil Salad over Crusty Mozzarella Toasts

February 1, 2014

IMG_4020

This Italian Lentil Salad, spooned generously over toasted crusty bread topped with melted fresh mozzarella, may have kept me alive last week. I kid you not. This meal is so incredibly hearty and delicious, it kept me going on the night that our furnace gave up the ghost and the temperature outside plunged to a bone-chilling 8° F (-13° C). Yup…Oh and the wind chill made it feel like 1°F (-17° C). Well, it didn’t get that cold here inside, but I was really freaking out that it would get just cold enough that all the pipes in the house would burst. Just two days before hand we had been dealing with a frozen sewer pipe. Needless to say, tension was running high around here that night. Luckily we had a gas fireplace in the living room that we were able to huddle around and big servings of Italian Lentil Salad which helped to not only warm us but to also fortify our souls for what further, yet unknown calamities were certainly lurking right around the frigid corner. And I should also mention that we had a big bottle of wine (or two) that perhaps helped to sooth our cold shattered nerves!

IMG_4032

I am happy to report that not only did we survive the most recent arctic blast unscathed, but our pipes held out like champs! Normally a big fan of Winter, this Virginia winter has proven quite bizarre for me. We have endured multiple days of temperatures which were only able climb to a high of 20° F (-6° C), and you can imagine where they headed once the sun went down.  However, even thought the temperatures are lingering in the polar vicinity, we haven’t had much snow (which I actually like), just the glacial cold. I was visiting Iceland in December and believe it or not, I feel I need to return if only to warm up! So it seems good old Virginia has become a land of the extremes; sweltering, miserable humid and sweaty summers followed up by bitter, raw Siberian winters. Hmmm….

P1020801

Frozen Virginia Vista

That most famous of groundhogs, Punxsutawney Phil, is scheduled to make his yearly appearance on Sunday.

Unknown

The critter himself!

I never thought I’d say it, but I hope he does not see his shadow and Winter is over. I do declare that with some trepidation because even though it was cold, and I do mean somewhat glacial, without a furnace the other night, I was able to put on enough layers and pile on enough blankets that I was comfortable. If not for my extreme dread over burst pipes, all would have been well. However, it is often so hot here when it does deign to “warm up” that I can’t get comfortable, no matter how nekkid (that’s a word right?) I get.

IMG_4013

Thinking back to those steamy Virginia summers, that is when I originally found this recipe on Pinch of Yum ( I did modify it somewhat). You see, I had planted an incredibly over active cherry tomato plant and was scouring the intertubes (my word for worldwide web) for recipes in which I could use my bumper crop. I made this salad quite a few times back then. Mind you, since we were at the opposite end on thermometer from where we are now, I served it cold, as a side salad, or sometimes over a bed of lettuce or if I was on the go, rolled it into a wrap. No matter which way I served it, it was absolutely delicious and refreshing. So, there you have it. This gem of a recipe is very versatile temperature wise and it certainly must be good for you, chock full of lentils, bulgur wheat and veggies as it is. No meat in sight. It will not only delightfully satisfy your hunger, but will also even allow you to feel somewhat virtuous as you tuck into a big plate of it. You really should add this one to your recipe box. You never know, it might just save your life!

IMG_4015

Italian Lentil Salad

recipe adapted from: Pinch of Yum

yield: 8 – 10 servings

Ingredients:

  • 1 cup dry green (brown) lentils
  • ½ cup dry light bulgur
  • 1 medium red onion, diced
  • 3-4 cups fresh tomatoes, chopped
  • 6-8 cloves garlic, minced
  • 2 tablespoons olive oil
  • ¼ cup balsamic vinaigrette
  • 1/4 grated parmesan cheese
  • handful of fresh basil, chopped
  • salt and pepper to taste
  • fresh mozzarella, sliced
  • toasted slices of crusty bread

Instructions:

Cook the lentils and the bulgur according to directions, using vegetable/chicken broth instead of water. When cooked, combine and set aside.

Saute the onion in the olive oil until it softens a bit and then add the tomatoes and garlic to the pan. Saute over low heat for 15 minutes or until the tomatoes and garlic are soft and fragrant. Remove from heat. Add the lentils, bulgur, basil and parmesan to the pan and stir to combine.

Season with dressing and salt and pepper. Serve hot or cold.

If serving over toasted bread, toast bread slices. Place slices of fresh mozzarella on toasted bread slices and stick under broiler until cheese is melted. Top bread slices with heaping spoonfuls of warm lentil salad.

Enjoy!

P.S. Thanks to all you folks out there reading my blog! I have been at the food blogging thing for 3 years on February 1st and am so thankful anyone is actually paying attention! I hope I can continue to inspire you with my culinary adventures in the upcoming year.


Scotch Egg Pie

January 24, 2014

IMG_4856

So I can’t believe it, but apparently it’s the New Year! And quite a few days into it I must admit. Hmmm….I seem to have been a very neglectful blogger. In my defense, I have had quite a bit going on around here recently, you know, the usual Thanksgiving/ Christmas hysteria, but I also had several vacations, a family health scare and a small house fire…I will tell you all about those things a bit later, I promise. But enough excuses. Let me start anew by saying “Happy New Year” to all you folks out there on the “interwebs”. I would go on to tell you some nonsense about how I had made a resolution to blog faithfully every Tuesday and Thursday, but I think we all know that would be quite optimistic, bordering on delusional. Life just has a way of making a mess of those types of declarations, so I think I won’t bother. I’ll just get back into the swing of things with this great recipe for Scotch Egg Pie,  just in time for the upcoming Robert Burns Night celebrations on January 25th!

IMG_4889

Throughout the world, though especially in Scotland, folks will be celebrating with a Burns Night Supper to mark the occasion. Robert Burns was born in 1759 and is regarded as the National Poet of Scotland. I’m quite a Burns fan myself and will certainly be raising my glass to The Bard this weekend. I have given you some great Scottish recipes in the past in case you might be planning a Burn’s Night Supper of you own. Last year it was Cock-a-leekie soup

IMG_9242

which I served with delicious, crusty Struan. Struan, also known as Celtic Harvest Bread, is thought to have taken its name from a town in Western Scotland called Struanmoor, on the Isle of Skye. It was originally enjoyed once a year as a harvest bread, using whatever grains were available from the previous day’s harvest. This is my absolute favourite bread, so it is almost always available in my house. It toasts up particularly brilliantly.

IMG_7088 - Version 2

The year before it was Deviled Scotch Eggs.

IMG_0768

And I had also previously given you the traditional Scotch Egg recipe. If you don’t know what Scotch Eggs are, believe me it is time that you find out! Basically it is  a hard-boiled egg encased in sausage and then deep-fried. Good Lord Have Mercy!

IMG_5115

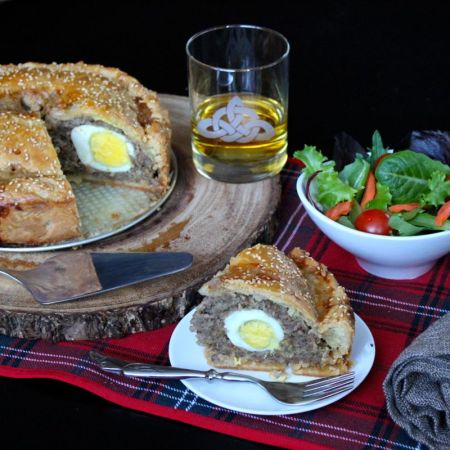
Now, the Scotch Egg Pie we’re about to discuss was not deep-fried, it was baked. But I just knew from the get-go that it was going to be amazing! I mean how could it not be with the list of ingredients it was sporting…spicy sausage, hard-boiled eggs all wrapped up in a buttery flaky pie crust?!! My husband could hardly contain himself when I teased him with a description of the culinary creation which would soon be arriving on his dinner plate! I think I’ve mentioned before that he absolutely loves any sort of meat pie, pasty, empanadas, etc. He also seems to really have an egg thing. He never tires of them, any and every way you fix them. Now this Scotch Egg Pie checked all of the boxes for him. He knew it would be awesome. And I am happy to say it did meet, if not exceed his expectations. Just delicious!

IMG_4832

I found this recipe on BBC Good Food. The original version called for Lincolnshire sausages. Lincolnshire sausages are a type of pork sausage that is associated with the English county of Lincolnshire. These sausages have more sage spice than the usual peppery or thyme flavours you might find in sausages which hale from other locales. Furthermore, they are coarsely ground rather than minced which gives them a much more chunky texture. Well, I couldn’t find any authentic Lincolnshire sausages here in good old Virginia, but believe you me, there was no scarcity of coarsely ground pork sausage around here, so I just made do. And while I was at it, I bought some really hot spicy sausage, because we definitely like a bit of heat! Red pepper flakes, habañero sauce, jalapeños, or Sriracha…bring it on! I did customize the sausage mixture a bit further as well with the addition of some Worcestershire sauce and parmesan cheese. Oh and I used my favourite short crust pastry recipe which creates the most buttery flaky pie crust imaginable. I’m telling you it is the pie crust of your dreams, is really easy to make and has vodka in it! (Always a welcome addition in my opinion). I suppose just grabbing a box of premade pie crust of the supermarket shelf is easier, but if you do have the time, I highly recommend you try this particular recipe. If you are anything like me, this will be your go-to pie crust recipe from that point on!

IMG_4865

Although I served my Scotch Egg Pie with a lovely green salad and a pint or two… for a casual, simple dinner, I’ve been told that Scotch Egg Pie is normally seen as more of a picnic food than sit down dinner entrée. Indeed I can see how it would be fantastic for a picnic in that it is easy to eat with your fingers, though perhaps a bit messy and tastes equally good at room temperature or piping hot from the oven. It would be great for breakfast, brunch or in a packed lunch as well. And I think it would be a well received addition to any Burns Night Supper. I hope I’ve managed to inspire you with these lovely Scottish dishes. If so, whip some of them up and raise a wee dram and drink a toast to Scotland’s Favourite Son this Saturday.

IMG_4837

Scotch Egg Pie

recipe adapted from: BBC Good Food

Ingredients:

  • 8 medium hard-boiled eggs
  • 2 lbs. sausage
  • 1 teaspoon freshly ground nutmeg
  • 1 Tablespoon thyme, leaves only
  • 2 Tablespoons Worcestershire sauce
  • 1/4 cup grated parmesan cheese
  • 100 grams panko
  • 1 batch of short crust pastry (recipe below) or 500 grams of store-bought pie pastry
  • flour, for dusting
  • 1 Tablespoon sesame seeds

Directions:

If you are planning to make your own short crust, remember that it will need to chill 1 hour in the fridge before you plan to roll it out into the pan. You can make the pastry the day before if you are a super-organized, type A planner or if you are pretty laid back and usually just wing-it, start production on this recipe at whatever time a bit earlier than usual would be for you. If you are using store-bought pastry, move on to the next step.

Preheat oven to 375°F. Butter an 8″ springform pan and line the bottom with parchment paper. Or, if you don’t have a springform, just use a regular 8″ round cake tin. Criss-cross two long strips of baking parchment in the tin to aid you when you are ready to lift out the pie.

Place 6 of the eggs in a large saucepan of cold water. Bring to a boil and then remove from heat. Let the eggs stand in pan for 5 minutes, then run cold water into the pan to cool eggs. Peel when cool enough to handle.

Place the sausage in a large mixing bowl. Add the nutmeg, thyme, 75 grams of the panko ( a heaping cup), 1 egg, Worcestershire sauce, parmesan, pepper, salt and mix well. Set aside.

Roll out half of the pastry on a lightly floured surface. Line the baking tin. Scatter the remaining Panko over the base of the pastry.

Pat about one-quarter of the sausage mixture into the bottom of the tin. Arrange the peeled eggs on top, spacing them evenly. Gently pack the remaining sausage mixture around and over the eggs.

Roll out the remaining pastry dough and cover the pie, crimping the edges. Cut a steam hole in the top of the pastry. Beat the remaining egg lightly. Glaze the top of the pastry dough with the egg wash and sprinkle with sesame seeds.

Place tin on a cookie sheet and bake for 1 hour or until the pork registers 160° F.

Remove pie from the oven and lift it from the tin, or remove the sides if using a springform pan. Place the pie back on the cookie sheet and return it to the oven for 10 minutes or so to brown the sides. Transfer to a wire rack to cool.

Enjoy!

Perfect Flaky Pie Crust

Originally adapted from: Inspired Taste

Ingredients:

(this recipe makes dough for two pie crusts)

  • 2 1/2 cups (360 grams) all-purpose flour
  • 1 teaspoon kosher salt
  • 1 cup (227 grams) very cold unsalted butter, cut into 1/2-inch cubes (2 sticks)
  • 6 tablespoons vodka (chilled)
  • 2 Tablespoons ice water

Directions:

This recipe will make enough dough for two pie crusts. You will need both for this Scotch Egg Pie.

Mix 6 tablespoons of vodka and 2 tablespoons of water. Put in fridge or freezer (don’t forget it) to chill.

Add 1 1/2 cups flour, salt to a food processor. Pulse 2 to 3 times until combined.

Scatter butter cubes over flour and process until a dough or paste begins to form, about 15 seconds. (There should be no uncoated flour).

Scrape bowl, redistribute the flour-butter mixture then add remaining 1 cup of flour. Pulse 4 to 5 times until flour is evenly distributed. (Dough should look broken up and a little crumbly).

Transfer to a medium bowl then sprinkle 6 tablespoons of ice water/vodka over mixture. Using a rubber spatula, press the dough into itself. The crumbs should begin to form larger clusters. If you pinch some of the dough and it holds together, it’s ready. If the dough falls apart, add 1 to 2 tablespoons of extra water/vodka and continue to press until dough comes together.

Remove dough from bowl and place in a mound on a clean surface. Work the dough just enough to form a ball. Cut ball in half then form each half into discs. Wrap each disc with plastic wrap and refrigerate at least 1 hour, and up to 2 days. You can also freeze it for up to 3 months (just thaw it overnight in the fridge before using).


Cookies & Cream Salted Caramel Popcorn Bars

October 31, 2013

IMG_4617

Happy Halloween! I LOVE Halloween. Our neighborhood, which is near “Sleepy Hollow” (I kid you not!) is all decked out in all of its spooky finery

IMG_1141

I’ve noticed quite a few new residents

IMG_1138

who seem to be getting up to all sorts of mischief

IMG_1140

and well some of them are just downright creepy!

IMG_1129

I am so sad to say that the husband and I have not attended a proper Halloween costume party since 2010! I am simply appalled!! Unfortunately that trend is continuing this year as we have no big plans at all. As I mentioned in my last blog, things around here are craaaaZy (that’s right…with a capital Z) right now. I had all sorts of plans for the Halloween goodies I was going to conjure up for you. I’ve made some really fun treats in the past. I think my all time favourite Halloween creation is the Soul Cake.

IMG_8703

It might just be the historian in me that makes me love it so much, because truth be told, unlike most sugar laden, tooth-achingly sweet candies found in abundance on Halloween, these little cake like cookies are only mildly sweet. There is not a speck of chocolate to be found in them, only a few currants top the cakes arranged in a cross pattern. What can I say, sometimes less is more. Here is a little bit from my Soul Cake blog post which talks about the origins of Halloween and the Soul Cake connection.

Our modern Halloween celebrations are derived from the Celtic holiday of Samhain. Samhain was Celtic New Year. It was a harvest festival which marked the dying of the sun-god and a turning to the colder, dormant half of the year. On this night, the Celts believed the veil between the worlds of the living and the dead was at its lowest point. The dead could more easily travel back over to our side, and if we weren’t careful, we could accidentally wander over in to their world and be trapped-a good reason to stay close to home and bonfires, no doubt! This belief likely gave rise to our Halloween legends of ghosts, ghouls and witches wandering about on this night in particular. As Christian beliefs took hold, Samhain celebrations became re-branded as All Soul’s Eve. By the eighth century beggars, rather than the spirits from the other world, would travel door to door on this night. In exchange for their prayers for the family’s departed, they were given a small cake, known as a Soul Cake.

IMG_8684

I also was quite fond of these Halloween Popcorn Balls I made back in 2011.

IMG_8443 - Version 2

The husband is a big fan of popcorn. He would be quite happy to eat it every day. And I think his love of popcorn has rubbed off on our pup. He actually recognizes that word now and can make it into our kitchen from anywhere in the house in less than 10 seconds when he hears the telltale rattle of the popcorn kernels hitting the metal pan.

IMG_8506

Alas, all I could manage to get done this year was this batch of Cookies & Cream Salted Caramel Popcorn Bars. Yup, there sure is popcorn in this treat. I figured if I could only get one of my intended treats done, I would pick one that I knew would make the husband very happy. And turns out this one was a real winner!

IMG_4618

Believe me, if you find yourself a little short on time today and haven’t managed to conjure up any fabulous holiday treats, this might be the recipe for you. But let me tell you about these little devils. The bottom layer is a cookie dough crust. I used chocolate chips and those Halloween white chocolate Candy Corn M&M’s that can be found this time of year. I am so thankful that they are only found around this time of year, because those things are similar to the Cadbury Mini Eggs for me…pure crack! I could literally eat them until I popped….or more likely until the top button popped off my britches! So as happy as I am to see them arrive in stores, I am somewhat relieved when they disappear again. But back to the recipe, if you aren’t as fond as I am of the Candy Corn M&M’s (I can’t imagine!) you can throw in a cup of whatever candy you like and customize it to fit your taste. The original recipe I had for these uses Reese’s peanut butter cups, which I think would be delicious as well. I am a big fan of the Reese Cup, but I was really trying to Halloween things up around here so the candy corn colours of the M&M’s won out. On top of that great cookie base you will find a thin cream layer, similar to what you find sandwiched in the middle of a Oreo cookie. The top layer consists of gooey salted caramel coated popcorn, which has been drizzled with chocolate and sprinkled with flaky sea salt. Good grief! They are amazing! I think I chose well.

IMG_4588

Although there are several steps involved in making these bars, they are all pretty quick and easy. Make sure you allow for cooling time for the bottom cookie layer as well as at least 1 hour or so for the bars to set before cutting them. If you want to make them look even more “Halloween-y” you could sprinkle some candy corn over the caramel popcorn layer or even some Candy Corn M&M’s that you have left over from the cookie base. I’m sure you know by now that I did not have any “left over” M&M’s by the time I was adding the salted caramel popcorn layer. Nope I promptly inhaled the rest of the bag shortly after it was opened. I had to keep my strength up in the kitchen, I had no choice. But you might be able to exercise some self-control and set a few aside. Although I really wish the husband and I were getting all dressed up tonight and heading out to a fancy party to celebrate Halloween, I guess there is always next year. I definitely feel somewhat less deprived finding myself in possession of these sinfully delicious, salty sweet bars. Or maybe it is them who have possessed me……Mwa-hah-hah! Happy Halloween!

IMG_4625

Cookies & Cream Salted Caramel Popcorn Bars

recipe slightly adapted from: Half Baked Harvest

yield: 18 -20 bars depending on how you slice them

Ingredients:

For the Cookie Layer

  • 2 1/2 cups all-purpose flour
  • 1 teaspoon baking soda
  • 1 teaspoon salt
  • 2 teaspoons water
  • 1 cup (2 sticks) unsalted butter, softened
  • 1/4 cup granulated sugar
  • 3/4 cup brown sugar
  • 2 teaspoons vanilla extract
  • 2 large eggs
  • 1 cup semi-sweet chocolate chips
  • 1 cup Halloween Candy Corn M&M’s (or your favourite)

For the Cream Layer

  • 1 stick (1/2 cup) butter, softened
  • 1 1/4 cups powdered sugar
  • 1 teaspoon vanilla extract
  • 1/4 teaspoon salt

For the Salted Caramel Popcorn

  • 1/2 cup brown sugar + 1/4 cup water
  • 1/4 cup butter, cut into cubes
  • 3/4 cup cream
  • 1 Tablespoon vanilla extract
  • 1/4 cup butterscotch chips
  • flaked sea salt
  • 5 cups popped popcorn
  • melted chocolate for drizzling

Directions:

Preheat the oven to 350° F. Grease a 9×13″ baking tin or line in with parchment paper.

Combine the flour, baking soda and salt in small bowl. Beat the butter, granulated sugar, brown sugar and vanilla in large mixer bowl until creamy, about 3-5 minutes. Add the eggs one at a time, beating well after each addition. Gradually beat in the flour mixture and the 2 teaspoons water. Fold in the chocolate chips and M&M’s (or candy of your choice.)

Spread the dough into the prepared pan. Bake 18 – 25 minutes, until just set in the center. Allow to cool completely before adding the cream layer. You can pop the pan into the freezer or fridge to accelerate the cooling process if you are pressed for time.

Once the cookie layer is cool, make the cream layer. In a stand mixer, beat the butter until smooth and creamy. Add the powdered sugar slowly. I usually do 1 heaping Tablespoon at a time. It will be less gritty if you add the sugar slowly. Add the vanilla and salt and beat until smooth. Spread the cream over the cookie layer.

Now for the caramel popcorn. Combine the brown sugar and water in a small saucepan over medium high heat. Bring the mixture to a boil. Once it begins to boil watch closely and whisk until the mixture starts to smell like caramel. This will take about 5-6 minutes. Add the butter cubes and slowly pour in the cream, whisking constantly. Continue to heat over medium-high until the mixture has thickened, about 5 -10 minutes more. rEmove from the heat and stir in the butterscotch chips, vanilla and a good pinch of salt. Stir until smooth. Place the popcorn in a large bowl and pour the caramel over it. Toss well and then spread the popcorn over the cream layer. Melt 1/4 cup chocolate chips and drizzle over the top. Sprinkle with a good amount of flaked sea salt. If you would like to add some additional candy decoration such as candy corn or the elusive “left-over” Candy Corn M&Ms, do so now. Let sit at least 1 hour before cutting. You can place them in the ridge to help them set faster. Cut into bars.

Enjoy!


Five Minute Brioche Rolls

August 13, 2013

IMG_3716

Well, it’s August now, which must mean Summer is going to be winding down soon (please Jesus!). Though I bet there are a fair share of you who are still getting some visitors turning up on their door. It doesn’t really happen too terribly often to us here in swampy, mosquito infested Virginia. But I bet those of you with more desirable locales are enjoying the company of some visiting friends and family. And if folks don’t appear this summer, the holidays aren’t too far around the corner. This recipe for Five Minute Brioche rolls is a godsend when you have folks staying with you for a few days. They will think you truly are some sort of domestic goddess as you appear from the kitchen daily, with not even one hair out-of-place, bearing a different type of freshly baked, delicious roll. Say… Pain au Chocolat rolls for breakfast, a cinnamon sugar bread loaf for afternoon tea and then savoury little pesto rolls for dinner. Now I suppose you could muss up the hair a bit and artfully dust yourself with flour if you wanted to go down the more dramatic path. But it would be all for show, because this recipe is sooo easy and you will be able to make all three of these breads, or rolls with whatever flavour combinations you fancy, by simply spending five minutes to mix the dough up at the onset of your friends stay.

IMG_3740

That is the beauty of this bread! You just mix up the dough, which really does take only about 5 minutes. Let it rise for a couple of hours and then pop it into the fridge for at least two hours. It will keep in the fridge for up to five days. When you are ready to bake a batch of something delicious, you simply scoop out 1/3 of the dough, roll it out in a rectangle, add whatever type of add-ins you prefer (That’s right! This recipe is totally customizable.), roll it up like you would a cinnamon roll and then slice it into 12 portions which you bake in a muffin tin, or bread loaf pan if you wish. Ta Da! It is that easy. I made Pesto Swirl Muffins one day,

IMG_3743

followed by Pain au Chocolate Muffins the next,

IMG_3734

and then did a Cinnamon Sugar Swirl loaf on the third.

IMG_3729

I first saw this brilliant recipe on The Café Sucré Farina‘s blog. (Fantastic site – you must take a peek!) Apparently there is actually a book (and website) called Artisan Bread in Five Minutes which has recipes for all different types of bread which can be made using this technique. Fascinating huh? I used to be very intimidated by yeast breads. But luckily I got over that, which is a good thing because yeast breads are just so delicious. And this Five Minute Technique shows you how easy making drool-worthy homemade bread can be. I was tempted to mix up another batch at the start of this week, but in the not too distant future I will be heading out on a beach vacation and eating batch upon batch of rich, buttery Brioche is not a good idea when one needs to be sporting a bikini. For those of you who know me well, I’m sure you’ve read that sentence over several times now and are concerned with how far the mercury has plummeted in Hell. Believe me, I agree it is a bit odd. I will have to let you know if I actually spontaneously combust at the moment my pale, pasty foot hits the sand. Wish me luck and effective sun screen coverage while eating a few of these Brioche rolls.

IMG_3725

Five Minute Brioche Rolls

recipe adapted from: The Café Sucré Farina

yield: 12 Muffins per each 1/3 of dough

Ingredients:

For the Brioche:

  • 1 ½ cups lukewarm water
  • 1 tablespoon granulated yeast
  • 1 tablespoon kosher salt
  • 8 large eggs, lightly beaten
  • ½ cup honey
  • 1 ½ cups (3 sticks) unsalted butter, melted
  • 7 ½ cups unbleached all-purpose flour

Ingredients for the Pesto Swirled Rolls:

  • ⅓ of the brioche dough
  • ¼ cup pesto, purchased or homemade
  • 1 large egg, mixed with 1 tablespoon of water for egg wash

Ingredients for the Pain Au Chocolat Rolls:

  • 1/3 of the brioche dough
  • 1 cup roughly chopped chocolate
  • 1 large egg, mixed with 1 tablespoon of water for egg wash

Ingredients for the Cinnamon Swirl Loaf:

  • 1/3 of the brioche dough
  • 1 1/2 tablespoons cinnamon
  • 1/2 cup granulated sugar
  • 3 tablespoons melted butter

Directions:

Mix the yeast, salt, eggs, honey and melted butter with the water in a 5-quart bowl, or lidded (not airtight) food container. I used this dough rising bucket that I purchased from King Arthur Flour and it works perfectly! Mix in the flour, using a spoon until all of the flour is incorporated.Cover (not airtight), and allow to sit at room temperature for about two hours. Refrigerate for a least two hours before proceeding with recipe.
Instructions for the Pesto Rolls:
Generously butter a 12 cup muffin pan.Scoop up approximately ⅓ of dough and place on a well-floured work surface. Turn dough several times till coated with flour on all sides. Roll dough into a 10×18 inch rectangle. Spread evenly with pesto to within 1/2-inch of edges.Beginning on one long side, roll the dough into a log and pinch edge to seal. Turn dough so that seam is faced down.Cut log into 12 portions, approximately 1-½ inches each. Place in prepared muffin cups with a swirled sides up and down. Cover with a clean kitchen towel and allow to rise for 40-60 minutes or until doubled in size. When almost doubled, preheat oven to 350˚F.Brush rolls with egg wash and place in oven. Bake for 20-25 minutes or until golden brown. Check rolls after 15 minutes. If they’re getting too brown, cover with foil and bake for 5 more minutes to ensure that center will not be doughy.Remove from oven and allow to cool for 1-2 minutes, then carefully transfer to cooling rack. When completely cool. transfer to an airtight container. May be frozen. Thaw and re-warm in a 325˚F oven for 5-8 minutes right before serving.Instructions for the Pain Au Chocolat Rolls:Follow the above instructions, but replace pesto with 1 cup of roughly chopped chocolate. I used dark chocolate and was quite pleased, but use whatever type you prefer.Instructions for the Cinnamon Swirl Brioche Loaf:

Generously butter a 5X9″ bread pan.

Whisk cinnamon into granulated sugar. Set aside.

Melt butter.

Scoop up approximately ⅓ of dough and place on a well-floured work surface. Turn dough several times till coated with flour on all sides. Roll dough into a 5X8″ rectangle.

Brush the surface of the dough lightly with melted butter. Sprinkle the cinnamon sugar over the buttered dough, leaving a 1/4″ border.

Beginning with the 5″ side of the dough, roll up the entire length of dough and pinch seam closed. Gently rock the roll back and forth to even it out.

Place roll of dough in greased bread pan, seam side down.

Beginning on one long side, roll the dough into a log and pinch edge to seal. Turn dough so that seam is faced down.

Cover with a clean kitchen towel and allow to rise for 40-60 minutes or until doubled in size. When almost doubled, preheat oven to 350˚F.

Gently brush top of loaf with melted butter and sprinkle with remaining cinnamon sugar mix. Bake for 30 -35 minutes or until golden brown. If it is getting too brown, cover with foil.

Remove from oven and allow to cool for 1-2 minutes, then carefully transfer to cooling rack.

Enjoy!


M&M Cookie Bars

May 7, 2013

IMG_2944

Want a tasty, crowd pleasing treat that doesn’t take much time or effort to make? Look no further, you’ve found it here with these M&M Cookie Bars. These wonderfully thick and chewy bars are simply delicious, buttery and chocolatey and every single bite is just bursting with M&M’s. And as I’ve mentioned, they are so easy to make I could almost do it in my sleep. (And perhaps I have…though that is an entirely different story) But really, in 45 minutes these little devils are done and dusted with the dishes washed up and everything!

IMG_2971

The great thing about using M&M’s in these bars, besides the fact that folks just plain love them, is that it makes the dessert very versatile. M&M’s come in so many varieties these days. You can find bags of them with colours customized for almost every holiday, they come in white chocolate, dark chocolate, peanut butter, pretzel filled, etc. etc. By changing which type of M&M you use, you’ll seem to have come up with a brand spanking new dessert every time. Minimal effort, maximum results. Gotta love that. Bake yourself the first of many batches today!

IMG_2926

M&M Cookie Bars

recipe from: What Megan’s Making

yield: 16 squares

Ingredients:

  • 2 1/8 cups flour
  • 1/2 tsp salt
  • 1/2 tsp baking soda
  • 12 Tbsp butter (1 1/2 sticks), melted and cooled slightly
  • 1 cup brown sugar
  • 1/2 cup white sugar
  • 1 large egg
  • 1 large egg yolk
  • 2 tsps vanilla extract
  • 1 12oz bag M&M’s, divided ( I used mini M&M’s but regular sized will work fine as well)

Directions:

Preheat the oven to 325° F. Adjust the oven rack to lower-middle position. Grease a 9×9″ pan and set aside.

In a medium-sized bowl, whisk together the flour, salt, and baking soda and set aside.

In a large bowl, whisk the melted butter and sugars until combined. Add the egg, egg yolk, and vanilla and mix well. Using a rubber spatula, fold the dry ingredients into the egg mixture until just combined; do not overmix. Fold in 1 cup of M&M’s and turn the batter into the prepared pan, smoothing the top with the spatula. Sprinkle remaining M&M’s on top and press in slightly.

Bake 25-30 minutes, until the top of the bars is light golden brown, slightly firm to the touch, and edges start pulling away from sides of pan. Cool completely before cutting.

Enjoy!


BBQ Pulled Pork Taquitos

May 3, 2013

IMG_2715

Here it is, May 3rd and Cinco de Mayo is nearly upon us! But there is still time to make these outstanding BBQ Pulled Pork Taquitos before the big day and I assure you, you will be glad that you did! If you’ll recall, just a few weeks ago I broke out my slow cooker and made some mouth-watering pork carnitas which I used for Carnitas Tacos. Quite unbelievably,  I actually had a bit of that pork leftover and that is what went into these Taquitos.

IMG_2674

Now don’t get me wrong, I loved those tacos, but I can see firing up that crock pot again just to make these little devils. Not only are they absolutely dee-lish but they are also easy to prepare. No frying, these gems are baked. And where a lot of recipes I perused called for cream cheese, these little fellows are made with ranch dressing and BBQ sauce. Now you can pick whatever BBQ sauce happens to be your favourite. As you know, if you’ve been paying any mind to us around here, we like it pretty spicy, so I went with a Habañero Hot. But you can customize this recipe to your taste and do whatsoever you please, as far as the sauce goes anyway…sweet, mustardy, vinegary…you name it! I will say though if you are going to follow my lead, you might want to have a bunch of beer iced down and ready to go. (Actually, now that I think about it,  you should do that regardless of the sauce you pick 🙂

IMG_2687

One thing you should keep in mind is that it does take a while for the slow cooker to work its magic on that pork shoulder, so plan ahead. But once that pork is pulled and ready to go, these Taquitos assemble quickly and easily. You can make up a big tray of them earlier in the day and then just pop them into the oven 30 minutes or so before party guests arrive. Not that you need to have a party to serve these. My husband is already making plans to have the next batch I make all to his self! In fact, I haven’t tried this, but I think you could substitute in some chicken (perhaps rotisserie chicken if you are pressed for time) for the pork and these would still taste superb. So there you have it. I’ve given you a few great Cinco de Mayo recipes now, Carnitas Tacos, Salsa, Guacamole and BBQ Pulled Pork Taquitos. With food mostly covered, you should be well on your way to planning a rocking celebration in just a couple of days. Don’t forget the drinks…oh, and a hot Mariachi Band. Let me know how it goes!

IMG_2692

BBQ Pulled Pork Taquitos

recipe slightly adapted from: Tracey’s Culinary Adventures

Yield: 10-12 Taquitos

Ingredients:

  • 1/4 – 1/3 cup ranch dressing
  • 1/3 cup barbecue sauce  (I used Sticky Fingers Smokehouse’s Habañero Hot sauce)
  • 1/2 teaspoon paprika
  • 1/2 teaspoon chile powder
  • 1/2 teaspoon garlic powder
  • 1/2 teaspoon mustard powder
  • pinch of red pepper flakes
  • dash of hot sauce
  • 1/2 teaspoon packed brown sugar (light or dark)
  • 1/4 teaspoon kosher salt
  • 1/4 cup diced red onion
  • 3 scallions, thinly sliced
  • 1/4 cup minced fresh cilantro
  • 2 cups shredded pulled pork (I used left-overs from the pork I made for Carnitas Tacos)
  • 1 cup shredded  cheese (I used Sargento’s Four Cheese Mexican Blend)
  • 10-12 (6-inch) corn or flour tortillas
  • ranch dressing and/or barbecue sauce, for serving

Directions:

Preheat oven to 425° F. Line a rimmed baking sheet with aluminum foil and spray with nonstick cooking spray.

In a large bowl, stir together 1/4 cup of the ranch dressing, the barbecue sauce, paprika, chile powder, garlic powder, mustard powder, brown sugar, salt, red onion, scallions and cilantro. (If the mixture seems too dry, add the remaining ranch dressing.) Add the pork and cheese and stir until evenly distributed. Season the mixture to taste with salt and pepper.

Place 2 tortillas at a time on a microwave safe plate and cover with a damp paper towel. Microwave for 25 seconds, or until the tortillas are soft and pliable. Spoon 2-3 tablespoons of the filling onto the lower third of each tortilla, and roll tightly. Place seam side-down on the prepared baking sheet. Repeat with the remaining tortillas and filling.

Spray the tops of the taquitos with cooking spray and sprinkle with kosher salt. Bake for 15-20 minutes, or until the tortillas are crisp and golden. Serve with salsa and/or barbecue sauce.

Enjoy!


Salsa

April 23, 2013

IMG_2657

Cinco de Mayo isn’t far off and I just shared a great recipe with you for Carnitas Tacos, which I’m sure would be warmly welcomed at any Cinco de Mayo celebration. One of the fixings you will definitely need to have on hand when you make up a bunch of those afore-mentioned Tacos is a spicy fresh salsa. So I thought I’d go ahead and share my favourite salsa recipe with you. Salsa is easy to make, especially if you have a food processor. But even if you don’t, it is still pretty straightforward, just requiring a bit of chopping. And it tastes fantastic. Wonderfully fresh! So different from that stuff you find on supermarket shelves you’ll be wondering what in the world it was that you were eating out of those jars for all those years. Salsa which simply means “sauce” in Spanish has been around for a long time. In the mid 1500’s, Spanish Franciscan missionaries mentioned it in their writings as a dish the Aztecs enjoyed. And it is still being enjoyed today all over the world. As it turns out Americans have been eating a whole lot of Salsa. In 1991 it overtook ketchup as the top-selling condiment here! This homemade version goes along great with any mexican dish or simply on its own with a big old basket of tortilla chips. Make up a batch for any Cinco de Mayo celebration and you will be the talk of the town. But remember, it takes a little while for all of the lovely flavours to come together, so it is best if you can make this salsa at least 12 hours before you want to serve it. I usually make it the day before. So what are you waiting for? Get chopping!

IMG_2642

Salsa

recipe adapted from: Alton Brown

Ingredients:

  • 6 Roma tomatoes, chopped
  • 4 garlic cloves, minced
  • 2 seeded and minced jalapeños
  • 1 red bell pepper, fine dice
  • 1/2 red onion, fine chopped
  • 1 tablespoon olive oil
  • 1 lime, juiced
  • 1 cup fresh cilantro, chopped (We love cilantro, but if you don’t, you may want to reduce this a bit)
  • Chili powder, salt, and pepper, to taste
  • 5 Fresh scallions, chopped

Directions:

Get a large bowl out and set aside. I use my food processor to chop the tomatoes, red pepper, garlic and onion. I process each vegetable individually (with the exception of the garlic and onion which go in together) so that I can get them to the texture I prefer. As you finish chopping each vegetable, add it to the large bowl and then add in the olive oil, lime juice, cilantro, scallions and spices. Stir to combine. Place in refrigerator for up to 12 hours for optimum flavour infusion.

Serve with tortilla chips.


Carnitas Tacos

April 19, 2013

IMG_2609

I gotta tell ya’ll, we LOVE any sort of Mexican/Tex-Mex food around here. I’m always more than happy to try out any such recipe. And on Friday night, one of the bands my husband plays in usually arrives here to rehearse. (yup…we have a rehearsal space/recording studio in our basement.) Which is great because it gives me a captive audience to try out new recipes on. And they went absolutely wild for these Carnitas Tacos! What really made these tacos stand out from the run of the mill ground beef tacos was the delicious, spicy, melt-in-your-mouth-tender yet crispy at the edges pork. And the truly wonderful thing about these carnitas is that I was able to make the dish with very little fuss. No really, I kid you not and I’m not even exaggerating the least little bit! You see they are crock pot carnitas. I don’t know about you, but I seem to have some strange ideas about how one gets pulled pork. Perhaps it is a bit of the southerner in me, but I instantly think of a whole pig over a spit and some poor sweltering soul that is left to turn the crank on the spit for the days it takes it to cook. Of course, I fear that I’m going to be that poor soul, so I tend to shy away from any pulled pork recipe. But do you know what I’ve come to realize? You don’t need to man a spit. In fact, you can make some heavenly pulled pork in a crock pot. Go figure! So, this is what I did. I got up the day before folks were going to arrive and put a big old pork shoulder into my crock pot with all the appropriate spices, some lime juice, orange juice and beer and then just turned it on and let it do its thing for 8 hours. When it was all done, I removed the meat, shredded it and popped it into the fridge. The next evening, I got all my taco fixings ready to go, you know the grated cheese, shredded lettuce, salsa, guacamole, diced onions and tomatoes, fresh chopped cilantro, sour cream and tortillas both soft and crispy. Then, shortly before I was going to serve dinner, I put the shredded pork in the broiler to warm it up and get it a little crispy around the edges.

IMG_2585

It was really easy and incredibly tasty! And the other amazing thing is that there were left-overs! On band rehearsal evenings I’m usually feeding six hungry musicians, so more often than not the only thing I bring back into the kitchen are dirty dishes. However, this time I knew I’d be able to get at least one more meal from these carnitas. Hmmm…there are so many possibilities, we could do more tacos, or a tamale pie or pulled pork sandwiches. You’ll have to check back to see what I actually came up with, but I’ll tell you it was just as good as these stop-you-in-your-tracks Carnitas Tacos and that is saying something! But don’t let folks in on the secret, let them imagine you out there toiling endlessly over that spit!

IMG_2635

Carnitas Tacos

recipe from: Pinch of Yum

Yield: 10-12 servings

Ingredients:

  • 4-5 lbs. pork shoulder
  • 5 cloves garlic
  • 1 tablespoon salt
  • 1 teaspoon cumin
  • 1 teaspoon chili powder
  • 1 teaspoon black pepper
  • 1 teaspoon oregano
  • ¼ teaspoon cinnamon
  • ½ teaspoon cayenne pepper
  • 1 tablespoon chipotle hot sauce
  • juice of 2 limes
  • ½ cup orange juice
  • 12 ounces beer
  • ½ cup salsa

Taco Fixings: whatever your favourites are, but here are some suggestions

  • tortillas, soft or crispy – your choice
  • lettuce, shredded
  • tomatoes, diced
  • guacamole or sliced avocados
  • onion, diced
  • cilantro, freshly chopped
  • sour cream
  • shredded cheese
  • salsa
  • hot sauce

Directions:

Place the pork shoulder in the slow cooker, fat side up. Roughly chop the garlic and place in the slow cooker (I actually kind of rubbed it onto the meat to get as much garlic flavor as possible, but you could just toss it in, too).

Sprinkle the meat with salt, cumin, chili powder, black pepper, oregano, cinnamon, and cayenne. Rub seasonings onto the pork.

Add lime juice, orange juice, beer, and salsa. Cover and cook on low for 8 hours.

Remove pork from the slow cooker. Shred meat with two forks. Reserve the sauce separately. The meat should fall apart easily. At this point, you can either place the meat in the refrigerator if you are serving at a later date. Or if you are ready to serve it right then and there, preheat the broiler. Line a baking sheet with aluminum foil. Place the shredded meat on the cooking sheet and pour a few spoonfuls of sauce over the top. Broil for 5-10 minutes or until you get browned edges on the pork.Serve on tortillas with fresh cilantro, avocado, and all the fixins!

Enjoy!


Bourbon Apple Cinnamon Hot Cross Bun Bread Pudding

April 16, 2013

IMG_2899

Since I just shared that wonderfully spicy Chicken & Andouille Jambalaya recipe with you, I thought you might like something with a bit of a Creole flavour to serve for dessert. New Orleans Bourbon Bread Pudding is just such a dessert. Usually this bread pudding would be made with a French baguette or other egg rich bread like brioche or challah.But I had just made a huge batch of Apple & Cinnamon Hot Cross Buns on Good Friday. Those Buns were deeee-lish!

IMG_2457

The best Hot Cross Buns I have made to date. However, there were quite of few of those gems sitting around here. Even after the husband and I had eaten our fill, and I’d set one aside for its good luck/medicinal value, we still had quite a few and they were rapidly heading towards a very stale state. Perfect for Bread Pudding! Apple & Cinnamon Hot Cross Bun Bread Pudding!

IMG_2880

Oh and don’t forget that I’m putting some Bourbon in the mix as well. That is always a good thing! I had made Dorie Greenspan’s Bourbon Bread Pudding before and knew it was a winner, so I just made her Bourbon Bread pudding using my Apple & Cinnamon Hot Cross Buns for the bread. I decided to make up a bit of Bourbon Syrup to drizzle over the pudding as well. Oh yeah…and we might have added a little scoop of ice cream on the side. Let me tell you, this bread pudding is just da bomb! I hope you won’t wait until next Easter to make it!

IMG_2916

Bourbon Apple Cinnamon Hot Cross Bun Bread Pudding

Recipe slightly adapted from: Dorie Greenspan’s Baking From My Home to Yours

Yield: 8 servings

Ingredients:

  • 8 ounces left over Apple & Cinnamon Hot Cross Buns
  • 1 1/2 cups whole milk
  • 1 1/2 cups heavy cream
  • 4 large eggs
  • 2 large egg yolks
  • 1/2 cup sugar
  • 1/2 teaspoon ground cinnamon
  • pinch of freshly grated nutmeg
  • 1 1/2 teaspoons pure vanilla extract
  • Demerara sugar to sprinkle over top

For the Bourbon syrup:

  • 1/3 cup water
  • 1/4 cup sugar
  • 1/4 cup Bourbon ( I like Knob Creek)

Directions:

Butter a 9×5 inch loaf pan ( Pyrex or ceramic will work well. I had so many Buns left over to use, I doubled the recipe and made mine in a 9×13″ pan). Line a roasting pan big enough to hold the loaf pan with a double thickness of paper towels. Fill a teakettle with water and put it on to boil; when the water boils, turn off the heat.

Cut the buns into 1″ cubes and remove the cross from the top of the bun as it tends to have a tough texture. If the bread is stale, put it into the loaf pan. If it is not stale, spread it out on a baking sheet lined with parchments and bake it in a 350° F oven to “stale” it for 10 minutes. Once finished, place the bread in the loaf pan and set the loaf pan in the middle of the roasting pan.

Bring milk and cream just to a boil.

Meanwhile, whisk the eggs, yolks, sugar, cinnamon and nutmeg together in a bowl. Still whisking slowly drizzle in about one-quarter of the hot milk mixture-this will temper, or warm the eggs so they don’t curdle. Whisking all the while, slowly pour in the remaining milk. Add the bourbon and vanilla and whisk gently to blend. Rap the bowl against the counter to pop any bubbles that might have formed, then pour the custard over the bread and press the bread gently with the back of a spoon to help cover it with liquid. Cover the pan lightly with wax paper and leave it on the counter, giving the bread the back-of-the-spoon treatment now and then, for 1 hour.

Center a rack in an oven preheated to 350°F.

Discard the wax paper. Sprinkle Demerara sugar over the top of the pudding. Cover the loaf pan snugly with a piece of aluminum foil. Poke about 5 holes in the foil. Slide the roasting pan/loaf pan into the oven and very carefully pour enough hot water into the roasting pan to come halfway up the sides of the loaf pan. Bake the pudding for 30 minutes, then remove the foil and bake for 15 minutes more, or until the pudding is puffed and golden and a knife inserted deep into the center comes out clean. Transfer the baking pan to a rack and cool the pudding until it is just warm, or reaches room temperature.

While pudding is baking make the Bourbon Syrup. Stir the water and sugar together in a medium saucepan over medium heat until the sugar melts, then bring to a boil for about 3 minutes. Remove the pan from the heat and stir in the Bourbon. Pour the syrup into a heatproof bowl and let cool.

Once you a ready to serve the pudding, sprinkle powdered sugar over the top and serve with a Bourbon syrup drizzle. Or you could go even one step further and serve it along with a scoop of ice cream.

Enjoy!